
Instructions
Page 7
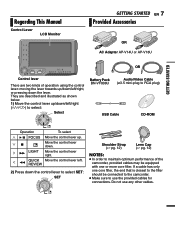
...one or more core filter. Do not use the provided cables for connections. They are two kinds of the camcorder, provided cables may be connected to the camcorder. ● Make sure to maintain optimum performance of operation using the control lever: moving the lever towards up . 47... Move the control lever down. 2 ¡ LIGHT Move the control lever right. 1 1 QUICK REVIEW Move the control lever left /right, or ...
...one or more core filter. Do not use the provided cables for connections. They are two kinds of the camcorder, provided cables may be connected to the camcorder. ● Make sure to maintain optimum performance of operation using the control lever: moving the lever towards up . 47... Move the control lever down. 2 ¡ LIGHT Move the control lever right. 1 1 QUICK REVIEW Move the control lever left /right, or ...

Instructions
Page 9
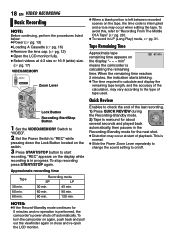
OFF: To switch off the camcorder. PLAY: ● To play back a tape. The logo is used for shooting is built-in here.) îStereo Microphone ïStud Hole (੬ pg. 15) &#... VIDEO: To record on a tape or play back a recording on the tape or in the memory card. Controls 11 : Left/Rewind (1) (੬ pg. 21)/ Quick Review [QUICK REVIEW] (੬ pg. 18) 2 : Right/Fast-Forward (¡) (੬ pg. 21)/ LED Light [LIGHT] (੬ pg. 34) 3 : Up/Play/Pause (6) (੬ pg. 21)/ Manual Focus...
OFF: To switch off the camcorder. PLAY: ● To play back a tape. The logo is used for shooting is built-in here.) îStereo Microphone ïStud Hole (੬ pg. 15) &#... VIDEO: To record on a tape or play back a recording on the tape or in the memory card. Controls 11 : Left/Rewind (1) (੬ pg. 21)/ Quick Review [QUICK REVIEW] (੬ pg. 18) 2 : Right/Fast-Forward (¡) (੬ pg. 21)/ LED Light [LIGHT] (੬ pg. 34) 3 : Up/Play/Pause (6) (੬ pg. 21)/ Manual Focus...
Instructions
Page 18
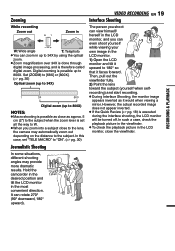
...Button 1 Set the VIDEO/MEMORY Switch to "VIDEO". 2 Set the Power Switch to check the end of the last recording. 1) Press QUICK REVIEW during the Recording-Standby mode. 2) Tape is interrupted and errors may occur when editing the tape. Approximate recording time Enables to "REC" while ... 60 min. 90 min. 80 min. 120 min. Tape Remaining Time Approximate tape remaining time appears on the display while recording is performed, the camcorder's power shuts off . To avoid this, refer to the type of playback. NOTES: ● If the Record-Standby mode continues for the next...
...Button 1 Set the VIDEO/MEMORY Switch to "VIDEO". 2 Set the Power Switch to check the end of the last recording. 1) Press QUICK REVIEW during the Recording-Standby mode. 2) Tape is interrupted and errors may occur when editing the tape. Approximate recording time Enables to "REC" while ... 60 min. 90 min. 80 min. 120 min. Tape Remaining Time Approximate tape remaining time appears on the display while recording is performed, the camcorder's power shuts off . To avoid this, refer to the type of playback. NOTES: ● If the Record-Standby mode continues for the next...
Instructions
Page 19
However, the actual recorded image does not appear inverted. ● If the Quick Review (੬ pg. 18) is possible up to 800X. In such a case, check the playback picture in the viewfinder. ● To check the playback ... the subject (yourself when selfrecording) and start recording. ● During Interface Shooting, the monitor image appears inverted as approx. 5 cm (2") to the subject. Hold the camcorder in the desired position and tilt the LCD monitor in up to 180° so that it would when viewing a mirror. In this case, set...
However, the actual recorded image does not appear inverted. ● If the Quick Review (੬ pg. 18) is possible up to 800X. In such a case, check the playback picture in the viewfinder. ● To check the playback ... the subject (yourself when selfrecording) and start recording. ● During Interface Shooting, the monitor image appears inverted as approx. 5 cm (2") to the subject. Hold the camcorder in the desired position and tilt the LCD monitor in up to 180° so that it would when viewing a mirror. In this case, set...


