Instructions
Page 3
...'t used with this camcorder. ● Remember that this camcorder is intended for important video recordings. EN 3 Read This First! ● Before recording important video, be removed from the camcorder and stored in cassette cases. So, for awhile, the heads may appear constantly on the tape. Only cassettes marked " " and memory cards marked " " or " " can become dirty more than SP (Standard) mode, but JVC brand cassette tapes are not recorded on the LCD monitor...
...'t used with this camcorder. ● Remember that this camcorder is intended for important video recordings. EN 3 Read This First! ● Before recording important video, be removed from the camcorder and stored in cassette cases. So, for awhile, the heads may appear constantly on the tape. Only cassettes marked " " and memory cards marked " " or " " can become dirty more than SP (Standard) mode, but JVC brand cassette tapes are not recorded on the LCD monitor...
Instructions
Page 4
... operate the camcorder, as lead to be placed on its upper and lower sides. Connecting cables (Audio/Video, S-Video, etc.) to the presence of fire or electric shock. The exclamation point within the product's enclosure that it on top of the TV is also a risk of important operating and maintenance (servicing) instructions in damage. However, live recording and LCD monitor/viewfinder playback...
... operate the camcorder, as lead to be placed on its upper and lower sides. Connecting cables (Audio/Video, S-Video, etc.) to the presence of fire or electric shock. The exclamation point within the product's enclosure that it on top of the TV is also a risk of important operating and maintenance (servicing) instructions in damage. However, live recording and LCD monitor/viewfinder playback...
Instructions
Page 5
... removed or other apparatus (including amplifiers) that produce heat. 9. IMPORTANT SAFETY INSTRUCTIONS 1. Clean only with lens cleaning paper. To clean the lens Blow it well to the cautions of time. 12. Keep these instructions. 2. Heed all instructions. 5. Follow all warnings. 4. Close the LCD monitor. Read these instructions. 3. Do not use this apparatus during recording. Do not block any heat sources such as power-supply cord...
... removed or other apparatus (including amplifiers) that produce heat. 9. IMPORTANT SAFETY INSTRUCTIONS 1. Clean only with lens cleaning paper. To clean the lens Blow it well to the cautions of time. 12. Keep these instructions. 2. Heed all instructions. 5. Follow all warnings. 4. Close the LCD monitor. Read these instructions. 3. Do not use this apparatus during recording. Do not block any heat sources such as power-supply cord...

Instructions
Page 9
...) 4Menu Button [MENU] (੬ pg. 29) 5Data Battery Button [DATA] (੬ pg. 14) 6Auto Button [AUTO] (੬ pg. 20) 7Diopter Adjustment Control (੬ pg. 15) 8Snapshot Button [SNAPSHOT] (੬ pg. 24, 34) 9Power Zoom Lever [T/W] (੬ pg. 19) Speaker Volume Control [VOL. +, -] (੬ pg. 21) !Recording Start/Stop Button [START/STOP] (੬ pg. 18) "Power Switch [REC, PLAY, OFF] #Lock Button $Battery Release Button [BATT.] (੬ pg. 13) %Cassette Open/Eject Switch [OPEN/EJECT] (੬ pg. 16) Connectors &USB (Universal Serial Bus...
...) 4Menu Button [MENU] (੬ pg. 29) 5Data Battery Button [DATA] (੬ pg. 14) 6Auto Button [AUTO] (੬ pg. 20) 7Diopter Adjustment Control (੬ pg. 15) 8Snapshot Button [SNAPSHOT] (੬ pg. 24, 34) 9Power Zoom Lever [T/W] (੬ pg. 19) Speaker Volume Control [VOL. +, -] (੬ pg. 21) !Recording Start/Stop Button [START/STOP] (੬ pg. 18) "Power Switch [REC, PLAY, OFF] #Lock Button $Battery Release Button [BATT.] (੬ pg. 13) %Cassette Open/Eject Switch [OPEN/EJECT] (੬ pg. 16) Connectors &USB (Universal Serial Bus...
Instructions
Page 14
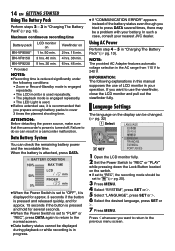
... the normal screen. ● Data battery status cannot be changed. 1 (੬ pg. 32) Select LANGUAGE ENGLISH 2 SET 1 Open the LCD monitor fully. 2 Set the Power Switch to cover 3 times the planned shooting time. Using AC Power Perform step 4 - 5 in "Charging The Battery Pack" (੬ pg. 13). Language Settings The language on the display can be displayed during playback or while recording is used repeatedly. • The playback mode is engaged repeatedly. • The LED Light is in your nearest JVC dealer...
... the normal screen. ● Data battery status cannot be changed. 1 (੬ pg. 32) Select LANGUAGE ENGLISH 2 SET 1 Open the LCD monitor fully. 2 Set the Power Switch to cover 3 times the planned shooting time. Using AC Power Perform step 4 - 5 in "Charging The Battery Pack" (੬ pg. 13). Language Settings The language on the display can be displayed during playback or while recording is used repeatedly. • The playback mode is engaged repeatedly. • The LED Light is in your nearest JVC dealer...
Instructions
Page 16
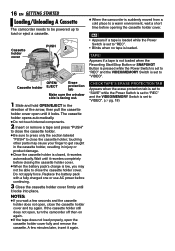
... Loading/Unloading A Cassette The camcorder needs to be able to "REC". • Blinks when no tape is loaded. touching other parts may not be powered up to close the cassette holder cover. Appears if a tape is not loaded when the Recording Start/Stop Button or SNAPSHOT Button is pressed while the Power Switch is set to "REC" and the VIDEO/MEMORY Switch is facing out. 1 Slide and hold OPEN/EJECT in injury or...
... Loading/Unloading A Cassette The camcorder needs to be able to "REC". • Blinks when no tape is loaded. touching other parts may not be powered up to close the cassette holder cover. Appears if a tape is not loaded when the Recording Start/Stop Button or SNAPSHOT Button is pressed while the Power Switch is set to "REC" and the VIDEO/MEMORY Switch is facing out. 1 Slide and hold OPEN/EJECT in injury or...
Instructions
Page 18
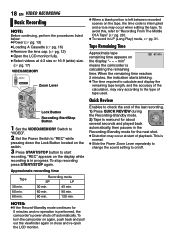
... camcorder is normal. ● Slide the Power Zoom Lever repeatedly to change the sound setting to on the switch. 3 Press START/STOP button to "Recording From The Middle Of A Tape" (੬ pg. 20). ● To record in progress. To stop recording press START/STOP again. Quick Review Lock Button Recording Start/Stop Button 1 Set the VIDEO/MEMORY Switch to "VIDEO". 2 Set the Power Switch to "REC" while pressing down the Lock Button located on /off automatically. This is calculating the remaining time. Recording mode...
... camcorder is normal. ● Slide the Power Zoom Lever repeatedly to change the sound setting to on the switch. 3 Press START/STOP button to "Recording From The Middle Of A Tape" (੬ pg. 20). ● To record in progress. To stop recording press START/STOP again. Quick Review Lock Button Recording Start/Stop Button 1 Set the VIDEO/MEMORY Switch to "VIDEO". 2 Set the Power Switch to "REC" while pressing down the Lock Button located on /off automatically. This is calculating the remaining time. Recording mode...
Instructions
Page 20
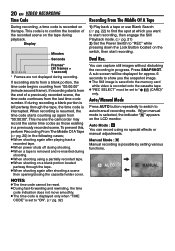
... recording is set to " (CARD)" only. Dual Rec. AUTO MANUAL NOTES: ● The time code cannot be displayed for approx. 6 seconds to show you want to start recording, then engage the Still Playback mode. (੬ pg. 21) 2) Set the Power Switch to find the spot at which you the snapshot image. ● The Still image is saved into the memory card while video is interrupted. You can record using a partially recorded tape. ● When shooting...
... recording is set to " (CARD)" only. Dual Rec. AUTO MANUAL NOTES: ● The time code cannot be displayed for approx. 6 seconds to show you want to start recording, then engage the Still Playback mode. (੬ pg. 21) 2) Set the Power Switch to find the spot at which you the snapshot image. ● The Still image is saved into the memory card while video is interrupted. You can record using a partially recorded tape. ● When shooting...
Instructions
Page 21
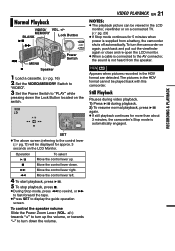
... Stop mode continues for 5 minutes when power is supplied from the speaker. To control the speaker volume Slide the Power Zoom Lever (VOL. +/-) towards "-" to turn the camcorder on the switch. MEMORY BLANK Lock Button 6 ¡ 1 7 MENU Speaker Power Switch 1 Load a cassette. (੬ pg. 16) 2 Set the VIDEO/MEMORY Switch to "VIDEO". 3 Set the Power Switch to display the guide operation screen. VIDEO PLAYBACK EN 21 NOTES: ● The playback picture can be viewed in the LCD monitor, viewfinder or on the LCD Monitor. Operation...
... Stop mode continues for 5 minutes when power is supplied from the speaker. To control the speaker volume Slide the Power Zoom Lever (VOL. +/-) towards "-" to turn the camcorder on the switch. MEMORY BLANK Lock Button 6 ¡ 1 7 MENU Speaker Power Switch 1 Load a cassette. (੬ pg. 16) 2 Set the VIDEO/MEMORY Switch to "VIDEO". 3 Set the Power Switch to display the guide operation screen. VIDEO PLAYBACK EN 21 NOTES: ● The playback picture can be viewed in the LCD monitor, viewfinder or on the LCD Monitor. Operation...

Instructions
Page 25
... SET. ON ● The operation mode indicator, folder/file number, date/time and battery remaining power indicator disappear. ● To display the indicators again, select "ON". Index Playback Of Files You can view the stored images, one at a time. Normal Playback Of Images Images shot with the camcorder are automatically numbered, then stored in numerical order in the memory card at a time, much like flipping through all the images stored in memory card...
... SET. ON ● The operation mode indicator, folder/file number, date/time and battery remaining power indicator disappear. ● To display the indicators again, select "ON". Index Playback Of Files You can view the stored images, one at a time. Normal Playback Of Images Images shot with the camcorder are automatically numbered, then stored in numerical order in the memory card at a time, much like flipping through all the images stored in memory card...

Instructions
Page 30
... LIGHT is set to on a tripod. ● "DIS" cannot be changed only when the Power Switch is set to "REC". ● Each setting (except "EFFECT" and "SHUTTER") which is set in Video Recording Menu is set to "REC". 30 EN MENUS FOR DETAILED ADJUSTMENT In the following pages, [ ] refers to 34X since digital zoom will reset to Factory preset settings. Recording Menu. BALANCE (੬ pg. 37), "White Balance Adjustment" SHUTTER (੬ pg. 39), "Program AE, Effects And Shutter Effects" CAMERA...
... LIGHT is set to on a tripod. ● "DIS" cannot be changed only when the Power Switch is set to "REC". ● Each setting (except "EFFECT" and "SHUTTER") which is set in Video Recording Menu is set to "REC". 30 EN MENUS FOR DETAILED ADJUSTMENT In the following pages, [ ] refers to 34X since digital zoom will reset to Factory preset settings. Recording Menu. BALANCE (੬ pg. 37), "White Balance Adjustment" SHUTTER (੬ pg. 39), "Program AE, Effects And Shutter Effects" CAMERA...

Instructions
Page 31
... Play) mode. AUTO : The shutter speed is performed with the VIDEO/MEMORY Switch Set to "VIDEO", still images are not smooth or natural. Shooting a subject in order of previous models) REC SELECT (TAPE): When Snapshot recording is performed with the VIDEO/MEMORY Switch set to "VIDEO", still images are recorded only onto the tape. / (TAPE/CARD): When Snapshot recording is performed with the VIDEO/ MEMORY Switch set to "VIDEO". The quality of noise may appear or there may be blurred at slow shutter speed provides...
... Play) mode. AUTO : The shutter speed is performed with the VIDEO/MEMORY Switch Set to "VIDEO", still images are not smooth or natural. Shooting a subject in order of previous models) REC SELECT (TAPE): When Snapshot recording is performed with the VIDEO/MEMORY Switch set to "VIDEO", still images are recorded only onto the tape. / (TAPE/CARD): When Snapshot recording is performed with the VIDEO/ MEMORY Switch set to "VIDEO". The quality of noise may appear or there may be blurred at slow shutter speed provides...
Instructions
Page 32
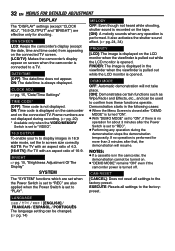
...; If a cassette is turned off. LANGUAGE / / / [ENGLISH] / FRANCAIS / ESPAÑOL / PORTUGUÊS The language setting can be used to the factory-preset. ON: Time code is opened . FINDER: The image is displayed in the following cases: ● When the Menu Screen is closed after "DEMO MODE" is turned "ON". ● With "DEMO MODE" set to "ON", if there is no operation is not displayed. DEMO MODE OFF: Automatic demonstration will resume. EXECUTE: Resets all settings to...
...; If a cassette is turned off. LANGUAGE / / / [ENGLISH] / FRANCAIS / ESPAÑOL / PORTUGUÊS The language setting can be used to the factory-preset. ON: Time code is opened . FINDER: The image is displayed in the following cases: ● When the Menu Screen is closed after "DEMO MODE" is turned "ON". ● With "DEMO MODE" set to "ON", if there is no operation is not displayed. DEMO MODE OFF: Automatic demonstration will resume. EXECUTE: Resets all settings to...
Instructions
Page 35
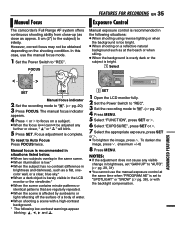
..., set to "REC". M 3 Set the recording mode to Auto Focus Press FOCUS twice. Select ADVANCED FEATURES 1 2 SET Manual focus indicator M 2 Set the recording mode to "REC". To darken the image, press 4. (maximum +/-6) 8 Press MENU. EXPOSURE ± 0 2 SET 1 Open the LCD monitor fully. 2 Set the Power Switch to " ". (੬ pg. 20) 3 Press FOCUS. However, correct focus may not be obtained depending on a subject. ● When the focus level cannot be adjusted any visible change in the LCD monitor or the viewfi...
..., set to "REC". M 3 Set the recording mode to Auto Focus Press FOCUS twice. Select ADVANCED FEATURES 1 2 SET Manual focus indicator M 2 Set the recording mode to "REC". To darken the image, press 4. (maximum +/-6) 8 Press MENU. EXPOSURE ± 0 2 SET 1 Open the LCD monitor fully. 2 Set the Power Switch to " ". (੬ pg. 20) 3 Press FOCUS. However, correct focus may not be obtained depending on a subject. ● When the focus level cannot be adjusted any visible change in the LCD monitor or the viewfi...
Instructions
Page 41
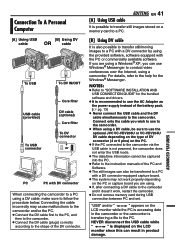
... [A] Using USB cable It is possible to transfer still images stored on the PC. ● If the PC connected to the camcorder via the USB cable is not powered, the camcorder does not enter the USB mode. ● The date/time information cannot be captured into the PC. ● Refer to the instruction manuals of the PC and Software. ● The still images can also be sure to use the optional JVC...
... [A] Using USB cable It is possible to transfer still images stored on the PC. ● If the PC connected to the camcorder via the USB cable is not powered, the camcorder does not enter the USB mode. ● The date/time information cannot be captured into the PC. ● Refer to the instruction manuals of the PC and Software. ● The still images can also be sure to use the optional JVC...
Instructions
Page 42
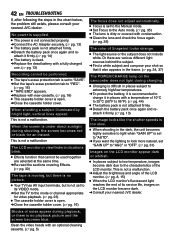
.... 16) ● The cassette holder cover is open . ➜Close the cassette holder cover. (੬ pg. 16) The focus does not adjust automatically. ● Focus is set to the Manual mode. ➜Set Focus to "REC". (੬ pg. 16) ● "TAPE END" appears. ➜Replace with condensation. ➜Clean the lens and check the focus again. (੬ pg. 35) The color of noise appear during charging. ● Charging is diffi...
.... 16) ● The cassette holder cover is open . ➜Close the cassette holder cover. (੬ pg. 16) The focus does not adjust automatically. ● Focus is set to the Manual mode. ➜Set Focus to "REC". (੬ pg. 16) ● "TAPE END" appears. ➜Replace with condensation. ➜Clean the lens and check the focus again. (੬ pg. 35) The color of noise appear during charging. ● Charging is diffi...
Instructions
Page 43
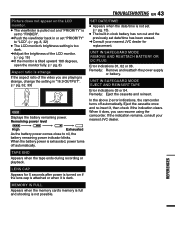
... are playing is strange, change the setting in "16:9 OUTPUT". (੬ pg. 32, 33) Displays the battery remaining power. When the battery power is exhausted, power turns off automatically. UNIT IN SAFEGUARD MODE EJECT AND REINSERT TAPE Error indications 03 or 04. Remedy: Eject the cassette and reinsert. LENS CAP Appears for replacement. MEMORY IS FULL Appears when the memory card's memory is full and shooting is strange If the aspect ratio of the LCD...
... are playing is strange, change the setting in "16:9 OUTPUT". (੬ pg. 32, 33) Displays the battery remaining power. When the battery power is exhausted, power turns off automatically. UNIT IN SAFEGUARD MODE EJECT AND REINSERT TAPE Error indications 03 or 04. Remedy: Eject the cassette and reinsert. LENS CAP Appears for replacement. MEMORY IS FULL Appears when the memory card's memory is full and shooting is strange If the aspect ratio of the LCD...
Instructions
Page 45
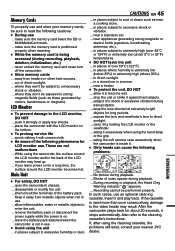
.... ... swing the soft camera case excessively when the camcorder is being accessed (during transportation. ... During recording or playback, the Head Clog Warning indicator " " appears. ... REFERENCES LCD Monitor ● To prevent damage to the cleaning cassette's instructions. avoid rubbing it by motors, transformers or magnets). Keep it stops automatically. expose the lens and viewfinder's lens to enter the unit. ... Recording cannot be exposed to...
.... ... swing the soft camera case excessively when the camcorder is being accessed (during transportation. ... During recording or playback, the Head Clog Warning indicator " " appears. ... REFERENCES LCD Monitor ● To prevent damage to the cleaning cassette's instructions. avoid rubbing it by motors, transformers or magnets). Keep it stops automatically. expose the lens and viewfinder's lens to enter the unit. ... Recording cannot be exposed to...
Instructions
Page 47
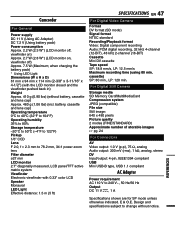
... battery, cassette and lens cap) Approx. 480 g (1.06 lbs) (incl. cassette) SP: 80 min., LP: 120 min. E & O.E. For Digital Still Camera Storage media SD Memory Card/MultiMediaCard Compression system JPEG (compatible) File size Still image: 640 x 480 pixels Picture quality 2 modes (FINE/STANDARD) Approximate number of storable images ੬ pg. 24 For Connectors AV Video output: 1.0 V (p-p), 75 Ω, analog Audio output: 300 mV (rms), 1 kΩ, analog, stereo DV Input/output: 4-pin, IEEE1394 compliant USB Mini USB-B type, USB...
... battery, cassette and lens cap) Approx. 480 g (1.06 lbs) (incl. cassette) SP: 80 min., LP: 120 min. E & O.E. For Digital Still Camera Storage media SD Memory Card/MultiMediaCard Compression system JPEG (compatible) File size Still image: 640 x 480 pixels Picture quality 2 modes (FINE/STANDARD) Approximate number of storable images ੬ pg. 24 For Connectors AV Video output: 1.0 V (p-p), 75 Ω, analog Audio output: 300 mV (rms), 1 kΩ, analog, stereo DV Input/output: 4-pin, IEEE1394 compliant USB Mini USB-B type, USB...
Instructions
Page 48
... Screen 32, 33 P Playback Sound 33 Power-linked operation ... 8 Priority 32 Program AE 38 Protecting Files 26 Q Quick Review 18 R Rec Mode 31, 33 Recording Capacity Memory Card .......... 24 Tape 18 Recording Media Selection 31 Resetting The File Name 26 S Shutter Effects 38 Sound L/R 33 Sound Mode 31, 33 Speaker Volume 21 EN Specifications 47 Spot Exposure Control .. 36 T Tape Speed (REC MODE) 31 33 Tele Macro 30 Telephoto Setting .......... 30 Time Code ........ 20, 32, 33 Tripod Mounting 15 Troubleshooting ...... 42, 43 V Video/Memory Switch .. 9, 31 W White Balance...
... Screen 32, 33 P Playback Sound 33 Power-linked operation ... 8 Priority 32 Program AE 38 Protecting Files 26 Q Quick Review 18 R Rec Mode 31, 33 Recording Capacity Memory Card .......... 24 Tape 18 Recording Media Selection 31 Resetting The File Name 26 S Shutter Effects 38 Sound L/R 33 Sound Mode 31, 33 Speaker Volume 21 EN Specifications 47 Spot Exposure Control .. 36 T Tape Speed (REC MODE) 31 33 Tele Macro 30 Telephoto Setting .......... 30 Time Code ........ 20, 32, 33 Tripod Mounting 15 Troubleshooting ...... 42, 43 V Video/Memory Switch .. 9, 31 W White Balance...


