
Instruction Manual
Page 5
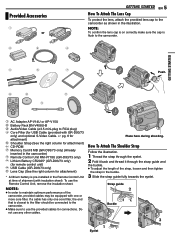
Provided Accessories or GETTING STARTED EN 5 How To Attach The Lens Cap To protect the lens, attach the provided lens cap to the camcorder as shown in the buckle. 3 Slide the strap guide fully towards the eyelet. To use any other cables. NOTES: ● In order to ...right column for attachment) f CD-ROM g Memory Card 8 MB (GR-D93/73 only) (Already inserted in the camcorder) h Remote Control Unit RM-V718U (GR-D93/73 only) i Lithium Battery CR2025* (GR-D93/73 only) (for remote control unit) j USB Cable (GR-D93/73 only) k Lens Cap (See the right column for connections. How To Attach The...
Provided Accessories or GETTING STARTED EN 5 How To Attach The Lens Cap To protect the lens, attach the provided lens cap to the camcorder as shown in the buckle. 3 Slide the strap guide fully towards the eyelet. To use any other cables. NOTES: ● In order to ...right column for attachment) f CD-ROM g Memory Card 8 MB (GR-D93/73 only) (Already inserted in the camcorder) h Remote Control Unit RM-V718U (GR-D93/73 only) i Lithium Battery CR2025* (GR-D93/73 only) (for remote control unit) j USB Cable (GR-D93/73 only) k Lens Cap (See the right column for connections. How To Attach The...
Instruction Manual
Page 11
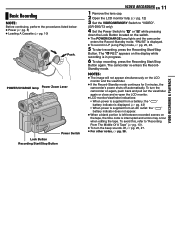
The camcorder re-enters the RecordStandby mode. To turn the beep sounds off automatically. POWER/CHARGE lamp Power Zoom Lever Power Switch Lock Button Recording Start/Stop Button VIDEO RECORDING EN 11 1 Remove the lens cap. 2 Open the LCD monitor fully. (੬ pg. 12) 3 Set the VIDEO/MEMORY Switch to "VIDEO". (GR-D93.../73 only) 4 Set the Power Switch to "Recording From The Middle Of A Tape" (੬ pg. 13). ● To turn the camcorder on again, push back and...
The camcorder re-enters the RecordStandby mode. To turn the beep sounds off automatically. POWER/CHARGE lamp Power Zoom Lever Power Switch Lock Button Recording Start/Stop Button VIDEO RECORDING EN 11 1 Remove the lens cap. 2 Open the LCD monitor fully. (੬ pg. 12) 3 Set the VIDEO/MEMORY Switch to "VIDEO". (GR-D93.../73 only) 4 Set the Power Switch to "Recording From The Middle Of A Tape" (੬ pg. 13). ● To turn the camcorder on again, push back and...
Instruction Manual
Page 18
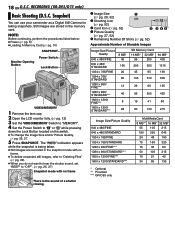
...can use your camcorder as a Digital Still Camera for taking snapshots. NOTE: Before continuing, perform the procedures listed below: ● Power (੬ pg. 6) ● Loading A Memory Card (੬ pg. 10) SNAPSHOT Monitor Opening Button Power Switch Lock Button VIDEO/MEMORY 1 Remove the lens cap. 2 Open ...the Lock Button located on the switch. ● To change the Image Size and/or Picture Quality, ੬ pg. 25, 27. 5 Press SNAPSHOT. RECORDING (GR-D93/D73 only) Basic Shooting (D.S.C. A Image Size (੬ pg. 28, 52) B Shooting Icon (੬ pg. 52) C Card Icon (੬ pg...
...can use your camcorder as a Digital Still Camera for taking snapshots. NOTE: Before continuing, perform the procedures listed below: ● Power (੬ pg. 6) ● Loading A Memory Card (੬ pg. 10) SNAPSHOT Monitor Opening Button Power Switch Lock Button VIDEO/MEMORY 1 Remove the lens cap. 2 Open ...the Lock Button located on the switch. ● To change the Image Size and/or Picture Quality, ੬ pg. 25, 27. 5 Press SNAPSHOT. RECORDING (GR-D93/D73 only) Basic Shooting (D.S.C. A Image Size (੬ pg. 28, 52) B Shooting Icon (੬ pg. 52) C Card Icon (੬ pg...

Instruction Manual
Page 43
Warning Indications Displays the battery remaining power. TROUBLESHOOTING EN 43 A. DUB ERROR! Remaining power level High Exhausted As the battery power comes close to nil, the battery indicator blinks. When the battery power is exhausted, power turns off automatically.
Warning Indications Displays the battery remaining power. TROUBLESHOOTING EN 43 A. DUB ERROR! Remaining power level High Exhausted As the battery power comes close to nil, the battery indicator blinks. When the battery power is exhausted, power turns off automatically.


