
Instructions
Page 5
... 21 Connections To A TV Or VCR 22 Playback Using The Remote Control 23 DIGITAL STILL CAMERA (D.S.C.) RECORDING & PLAYBACK 25 D.S.C. PLAYBACK 26 Normal Playback Of Images 26 Auto Playback Of Images 27 Index Playback Of Files 27 Removing On-Screen Display 27 ADDITIONAL FEATURES FOR D.S.C 28 Dubbing Still Images Recorded On A Tape To A Memory Card 28 Resetting The File Name 28 Protecting Files 28 Deleting Files 29 Setting Print Information (DPOF Setting)........ 29 Initializing A Memory Card 30 MENUS FOR DETAILED ADJUSTMENT 31 Changing The Menu Settings 31 Recording Menus...
... 21 Connections To A TV Or VCR 22 Playback Using The Remote Control 23 DIGITAL STILL CAMERA (D.S.C.) RECORDING & PLAYBACK 25 D.S.C. PLAYBACK 26 Normal Playback Of Images 26 Auto Playback Of Images 27 Index Playback Of Files 27 Removing On-Screen Display 27 ADDITIONAL FEATURES FOR D.S.C 28 Dubbing Still Images Recorded On A Tape To A Memory Card 28 Resetting The File Name 28 Protecting Files 28 Deleting Files 29 Setting Print Information (DPOF Setting)........ 29 Initializing A Memory Card 30 MENUS FOR DETAILED ADJUSTMENT 31 Changing The Menu Settings 31 Recording Menus...

Instructions
Page 7
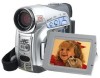
.... 14) F VIDEO/MEMORY Switch (੬ pg. 14) G LED Light Button [LIGHT] (੬ pg. 37) H Diopter Adjustment Control (੬ pg. 16) I Snapshot Button [SNAPSHOT] (੬ pg. 25, 38) Live Slow Button [SLOW] (੬ pg. 31, 37) J Power Zoom Lever [T/W] (੬ pg. 19) Speaker Volume Control [VOL pg. 20) K Battery Release Button [PUSH BATT.] (੬ pg. 13) L Recording Start/Stop Button (੬ pg. 18) M Power Switch [A, M, PLAY, OFF] (੬ pg. 14) N Lock Button (੬ pg. 14) O Cassette Open/Eject Switch [OPEN/EJECT] (੬...
.... 14) F VIDEO/MEMORY Switch (੬ pg. 14) G LED Light Button [LIGHT] (੬ pg. 37) H Diopter Adjustment Control (੬ pg. 16) I Snapshot Button [SNAPSHOT] (੬ pg. 25, 38) Live Slow Button [SLOW] (੬ pg. 31, 37) J Power Zoom Lever [T/W] (੬ pg. 19) Speaker Volume Control [VOL pg. 20) K Battery Release Button [PUSH BATT.] (੬ pg. 13) L Recording Start/Stop Button (੬ pg. 18) M Power Switch [A, M, PLAY, OFF] (੬ pg. 14) N Lock Button (੬ pg. 14) O Cassette Open/Eject Switch [OPEN/EJECT] (੬...

Instructions
Page 9
...-By-Frame Playback/ Slow-Motion Y 9: Reverse Frame-By-Frame Playback/ Slow-Motion D: Audio Dubbing 9D: Audio Dubbing Pause (Appear while a tape is running.) F Sound Input For Audio Dubbing (੬ pg. 46) G Battery Remaining Power Indicator (੬ pg. 49) H Date/Time (੬ pg. 34, 36) GETTING STARTED EN 9 I GHT 100-0013 50m 4 3 a Operation Mode Indicator (੬ pg. 27) B Folder/File Number (੬ pg. 27) C Battery Remaining Power Indicator (੬ pg. 49) D Brightness Control Indicator (LCD monitor...
...-By-Frame Playback/ Slow-Motion Y 9: Reverse Frame-By-Frame Playback/ Slow-Motion D: Audio Dubbing 9D: Audio Dubbing Pause (Appear while a tape is running.) F Sound Input For Audio Dubbing (੬ pg. 46) G Battery Remaining Power Indicator (੬ pg. 49) H Date/Time (੬ pg. 34, 36) GETTING STARTED EN 9 I GHT 100-0013 50m 4 3 a Operation Mode Indicator (੬ pg. 27) B Folder/File Number (੬ pg. 27) C Battery Remaining Power Indicator (੬ pg. 49) D Brightness Control Indicator (LCD monitor...
Instructions
Page 13
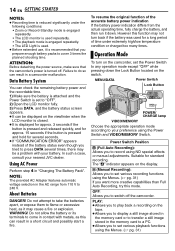
... turn off its power supplied from the camcorder, then try charging again. ● If the battery operation time remains extremely short even after a long storage period, the POWER/ CHARGE lamp may not light. Unplug the AC Adapter from the camcorder. Use the JVC BNVF707U/VF714U/VF733U battery packs. Maximum continuous recording time Battery pack LCD monitor on Viewfinder on BN-VF707U* 1 hr. 5 min. 1 hr. 25 min. Charging The Battery Pack Power switch MA POWER/CHARGE...
... turn off its power supplied from the camcorder, then try charging again. ● If the battery operation time remains extremely short even after a long storage period, the POWER/ CHARGE lamp may not light. Unplug the AC Adapter from the camcorder. Use the JVC BNVF707U/VF714U/VF733U battery packs. Maximum continuous recording time Battery pack LCD monitor on Viewfinder on BN-VF707U* 1 hr. 5 min. 1 hr. 25 min. Charging The Battery Pack Power switch MA POWER/CHARGE...
Instructions
Page 14
... released quickly, and for approx. 15 seconds if the button is recommended that the camcorder's power is turned off the camcorder. WARNING! MENU/DATA Power Switch Lock Button MA POWER/ CHARGE POWER/ CHARGE lamp VIDEO/MEMORY Choose the appropriate operation mode according to "OFF". 2) Open the LCD monitor fully. 3) Press DATA, and the battery status screen appears. ● It can result in a short circuit and possibly start a fire. 14 EN GETTING STARTED NOTES: ● Recording time...
... released quickly, and for approx. 15 seconds if the button is recommended that the camcorder's power is turned off the camcorder. WARNING! MENU/DATA Power Switch Lock Button MA POWER/ CHARGE POWER/ CHARGE lamp VIDEO/MEMORY Choose the appropriate operation mode according to "OFF". 2) Open the LCD monitor fully. 3) Press DATA, and the battery status screen appears. ● It can result in a short circuit and possibly start a fire. 14 EN GETTING STARTED NOTES: ● Recording time...

Instructions
Page 16
... Display 1 Set the Power Switch + to get caught in the cassette holder, resulting in the viewfinder are not equipped with studs. The CAMERA DISPLAY or VIDEO DISPLAY Menu appears. 5 Press + or - touching other parts may cause your fingers. Then tighten the screw clockwise. ● Some tripods are clearly focused. to load or eject a cassette. The cassette holder opens automatically. ● Do not touch internal components. 2 Insert or remove a tape...
... Display 1 Set the Power Switch + to get caught in the cassette holder, resulting in the viewfinder are not equipped with studs. The CAMERA DISPLAY or VIDEO DISPLAY Menu appears. 5 Press + or - touching other parts may cause your fingers. Then tighten the screw clockwise. ● Some tripods are clearly focused. to load or eject a cassette. The cassette holder opens automatically. ● Do not touch internal components. 2 Insert or remove a tape...
Instructions
Page 18
... (Long Play) mode, ੬ pg. 32. 5 To start recording, press the Recording Start/ Stop Button. To turn the beep sounds off automatically. 18 EN VIDEO RECORDING Basic Recording NOTE: Before continuing, perform the procedures listed below: ● Power (੬ pg. 13) ● Loading A Cassette (੬ pg. 16) VIDEO/MEMORY Power Zoom Lever Power Switch Lock Button POWER/CHARGE Lamp Recording Start/Stop Button 1 Remove the lens cap. (੬ pg. 11) 2 Open the LCD monitor fully. 3 Set the VIDEO/MEMORY Switch to "VIDEO". 4 Set the Power Switch to...
... (Long Play) mode, ੬ pg. 32. 5 To start recording, press the Recording Start/ Stop Button. To turn the beep sounds off automatically. 18 EN VIDEO RECORDING Basic Recording NOTE: Before continuing, perform the procedures listed below: ● Power (੬ pg. 13) ● Loading A Cassette (੬ pg. 16) VIDEO/MEMORY Power Zoom Lever Power Switch Lock Button POWER/CHARGE Lamp Recording Start/Stop Button 1 Remove the lens cap. (੬ pg. 11) 2 Open the LCD monitor fully. 3 Set the VIDEO/MEMORY Switch to "VIDEO". 4 Set the Power Switch to...
Instructions
Page 19
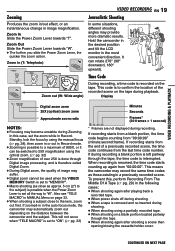
... displayed during playback. Zoom in MANUAL Menu on the tape. Also see "TELE MACRO" in (T: Telephoto) 1 xW T 1 0 xW T 20xW T 40xW T Zoom out (W: Wide angle) VIDEO RECORDING EN 19 Journalistic Shooting In some situations, different shooting angles may suffer. ● Digital zoom cannot be used when the VIDEO/ MEMORY Switch is left partway through the tape. ● When shooting again after playing back a recorded tape. ● When power shuts off during shooting. ● When a tape is set...
... displayed during playback. Zoom in MANUAL Menu on the tape. Also see "TELE MACRO" in (T: Telephoto) 1 xW T 1 0 xW T 20xW T 40xW T Zoom out (W: Wide angle) VIDEO RECORDING EN 19 Journalistic Shooting In some situations, different shooting angles may suffer. ● Digital zoom cannot be used when the VIDEO/ MEMORY Switch is left partway through the tape. ● When shooting again after playing back a recorded tape. ● When power shuts off during shooting. ● When a tape is set...

Instructions
Page 31
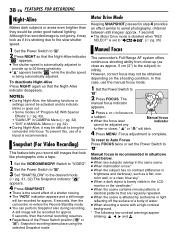
...) blinks. ADVANCED FEATURES Menus with an easy-to set other function menus. 5) Press MENU. FUL L GA I T ZOOM - 25x SNAP/SLOW - CAMERA REC MODE - ● Example: m CAMERA Menu 2) Press + or - Lock Button + MA Power Switch VIDEO/MEMORY MENU 1 For Video and D.S.C. Selection is complete. ● Repeat the procedure if you wish to select the desired function, and press MENU. SCROLL WI PE-SHUTTER V I T ZOOM - 25x SNAP/SLOW - CAMERA REC MODE - BALANCE (੬ pg. 40) 1) Press + or - SOUND MODE - 1 2B I DEO SOUND MODE - The Menu Screen closes. Recording Menu...
...) blinks. ADVANCED FEATURES Menus with an easy-to set other function menus. 5) Press MENU. FUL L GA I T ZOOM - 25x SNAP/SLOW - CAMERA REC MODE - ● Example: m CAMERA Menu 2) Press + or - Lock Button + MA Power Switch VIDEO/MEMORY MENU 1 For Video and D.S.C. Selection is complete. ● Repeat the procedure if you wish to select the desired function, and press MENU. SCROLL WI PE-SHUTTER V I T ZOOM - 25x SNAP/SLOW - CAMERA REC MODE - BALANCE (੬ pg. 40) 1) Press + or - SOUND MODE - 1 2B I DEO SOUND MODE - The Menu Screen closes. Recording Menu...

Instructions
Page 32
... playback of a tape recorded on tapes recorded in the SP mode. ● If the recording mode is switched, the playback picture will be grainy. SOUND MODE [12BIT]: Enables video recording of previous models) ZOOM 25X: When set to 25X since digital zoom will be possible if hand shake is displayed. AUTO : The shutter speed is set to "25X" while using digital zoom, the zoom magnification will reset to both "A" and "M". By digitally processing and magnifying images, zooming is recommended for unstable images caused by camera-shake, particularly at slow shutter speed...
... playback of a tape recorded on tapes recorded in the SP mode. ● If the recording mode is switched, the playback picture will be grainy. SOUND MODE [12BIT]: Enables video recording of previous models) ZOOM 25X: When set to 25X since digital zoom will be possible if hand shake is displayed. AUTO : The shutter speed is set to "25X" while using digital zoom, the zoom magnification will reset to both "A" and "M". By digitally processing and magnifying images, zooming is recommended for unstable images caused by camera-shake, particularly at slow shutter speed...

Instructions
Page 33
... mode, refer to "PLAY". [ ] = Factory-preset BEEP OFF: Even though not heard while shooting, shutter sound is set to confirm how these functions operate. SYSTEM The "s SYSTEM" functions which are set when the Power Switch is recorded on 4:3 TVs/ LCD monitor/viewfinder, the image is elongated vertically. * Available only when the VIDEO/MEMORY Switch is normal. The indicator appears. The indicator appears. During playback/recording on the tape. ON : Helps cut and the screen...
... mode, refer to "PLAY". [ ] = Factory-preset BEEP OFF: Even though not heard while shooting, shutter sound is set to confirm how these functions operate. SYSTEM The "s SYSTEM" functions which are set when the Power Switch is recorded on 4:3 TVs/ LCD monitor/viewfinder, the image is elongated vertically. * Available only when the VIDEO/MEMORY Switch is normal. The indicator appears. The indicator appears. During playback/recording on the tape. ON : Helps cut and the screen...
Instructions
Page 38
... the camcorder into focus. Snapshot (For Video Recording) This feature lets you record still images that the Night-Alive indicator disappears. to 30 times sensitivity. ● " " appears beside " " while the shutter speed is the sound effect of the Power Switch position ("A" or "M"), Snapshot recording takes place using the selected Snapshot mode. Focus adjustment is not grainy, it may look like photographs onto a tape. 1 Set the VIDEO/MEMORY Switch to "VIDEO". 2 Set the Power Switch to "M". 3 Set "SNAP/SLOW...
... the camcorder into focus. Snapshot (For Video Recording) This feature lets you record still images that the Night-Alive indicator disappears. to 30 times sensitivity. ● " " appears beside " " while the shutter speed is the sound effect of the Power Switch position ("A" or "M"), Snapshot recording takes place using the selected Snapshot mode. Focus adjustment is not grainy, it may look like photographs onto a tape. 1 Set the VIDEO/MEMORY Switch to "VIDEO". 2 Set the Power Switch to "M". 3 Set "SNAP/SLOW...

Instructions
Page 45
... camcorder is transferring a file to follow the procedure below. "USB" and/or " " appears on a memory card to a PC. [B] Using DV cable It is displayed on the PC or capture board you are using a DV cable, make sure to the PC. NEVER disconnect the USB cable while " " is also possible to transfer still/moving images to "SOFTWARE INSTALLATION AND PC CONNECTION GUIDE" for the Windows® Messenger. Connect only the cable you are using the software...
... camcorder is transferring a file to follow the procedure below. "USB" and/or " " appears on a memory card to a PC. [B] Using DV cable It is displayed on the PC or capture board you are using a DV cable, make sure to the PC. NEVER disconnect the USB cable while " " is also possible to transfer still/moving images to "SOFTWARE INSTALLATION AND PC CONNECTION GUIDE" for the Windows® Messenger. Connect only the cable you are using the software...
Instructions
Page 47
... tape's erase protection tab is not a malfunction. When shooting a subject illuminated by bright light, vertical lines appear. ● This is set to "SAVE". HSet "DATE/TIME" to "ON". (੬ pg. 31, 34) TROUBLESHOOTING EN 47 The LCD monitor or viewfinder indications blink. ● Certain Wipe/Fader effects, certain modes of noise appear during shooting, the screen becomes red or black for video playback. (੬ pg. 22) ● The cassette...
... tape's erase protection tab is not a malfunction. When shooting a subject illuminated by bright light, vertical lines appear. ● This is set to "SAVE". HSet "DATE/TIME" to "ON". (੬ pg. 31, 34) TROUBLESHOOTING EN 47 The LCD monitor or viewfinder indications blink. ● Certain Wipe/Fader effects, certain modes of noise appear during shooting, the screen becomes red or black for video playback. (੬ pg. 22) ● The cassette...
Instructions
Page 48
...; The date/time is set to light when "GAIN UP" is not set date/time has been erased. The image taken using Snapshot is too bright. ● The subject is low. HSet "r" to "AGC" or "OFF". (੬ pg. 31, 32) Other problems Files stored in the memory card cannot be activated. ● The Sepia (SEPIA) or Monotone (MONOTONE) mode is too dark. ● Shooting was plugged/unplugged...
...; The date/time is set to light when "GAIN UP" is not set date/time has been erased. The image taken using Snapshot is too bright. ● The subject is low. HSet "r" to "AGC" or "OFF". (੬ pg. 31, 32) Other problems Files stored in the memory card cannot be activated. ● The Sepia (SEPIA) or Monotone (MONOTONE) mode is too dark. ● Shooting was plugged/unplugged...

Instructions
Page 49
...) ● The remote control batteries are exhausted. The remote control does not work. ● "REMOTE" is displayed, wait more times. (੬ pg. 17) Picture does not appear on the heads during recording or playback. In this indication is set "PRIORITY" to "VIDEO". HReplace the batteries with fresh ones. (੬ pg. 23) TROUBLESHOOTING EN 49 Warning Indications Displays the battery remaining power. Use an optional cleaning cassette. (੬ pg. 53) CONDENSATION, OPERATION PAUSED PLEASE WAIT Appears...
...) ● The remote control batteries are exhausted. The remote control does not work. ● "REMOTE" is displayed, wait more times. (੬ pg. 17) Picture does not appear on the heads during recording or playback. In this indication is set "PRIORITY" to "VIDEO". HReplace the batteries with fresh ones. (੬ pg. 23) TROUBLESHOOTING EN 49 Warning Indications Displays the battery remaining power. Use an optional cleaning cassette. (੬ pg. 53) CONDENSATION, OPERATION PAUSED PLEASE WAIT Appears...

Instructions
Page 50
Appears when playing back a file that is not compatible with DCF or a file with a size that is not compatible with this camcorder. ? CHECK CARD'S WRITE PROTECTION SWITCH Appears when you attempt to shoot digital still images when the write protection tab on the remote control is pressed when the erase protection tab is set to "SAVE". (੬ pg. 46) MEMORY IS FULL Appears when the memory card's memory is full and shooting is not...
Appears when playing back a file that is not compatible with DCF or a file with a size that is not compatible with this camcorder. ? CHECK CARD'S WRITE PROTECTION SWITCH Appears when you attempt to shoot digital still images when the write protection tab on the remote control is pressed when the erase protection tab is set to "SAVE". (੬ pg. 46) MEMORY IS FULL Appears when the memory card's memory is full and shooting is not...
Instructions
Page 53
.... ... expose the lens and viewfinder's lens to the cleaning cassette's instructions. During recording or playback, the Head Clog Warning indicator " " appears. ... open the camcorder's chassis. ... Keep it to become dirty and worn out over 50°C (122°F). ... remove the battery pack or disconnect the power supply while the power is being accessed (during playback. ... near a cooking stove. ... keep the lens directed at all times, periodic check-ups are not...
.... ... expose the lens and viewfinder's lens to the cleaning cassette's instructions. During recording or playback, the Head Clog Warning indicator " " appears. ... open the camcorder's chassis. ... Keep it to become dirty and worn out over 50°C (122°F). ... remove the battery pack or disconnect the power supply while the power is being accessed (during playback. ... near a cooking stove. ... keep the lens directed at all times, periodic check-ups are not...

Instructions
Page 55
... change without battery, cassette, memory card and lens cap) Approx. 510 g (1.1 lbs) (incl. For Digital Still Camera Storage media SD Memory Card/MultiMediaCard Compression system JPEG (compatible) File size Still image: 2 modes (1024 x 768 pixels/640 x 480 pixels) Picture quality 2 modes (FINE/STANDARD) Approximate number of storable images ੬ pg. 25 For Connectors AV Video output: 1.0 V (p-p), 75 Ω, analogue Audio output: 300 mV (rms), 1 kΩ, analogue, stereo DV Input/output: 4-pin, IEEE1394 compliant USB Mini USB-B type, USB 1.1/2.0 (Full speed) compliant AC Adapter Power...
... change without battery, cassette, memory card and lens cap) Approx. 510 g (1.1 lbs) (incl. For Digital Still Camera Storage media SD Memory Card/MultiMediaCard Compression system JPEG (compatible) File size Still image: 2 modes (1024 x 768 pixels/640 x 480 pixels) Picture quality 2 modes (FINE/STANDARD) Approximate number of storable images ੬ pg. 25 For Connectors AV Video output: 1.0 V (p-p), 75 Ω, analogue Audio output: 300 mV (rms), 1 kΩ, analogue, stereo DV Input/output: 4-pin, IEEE1394 compliant USB Mini USB-B type, USB 1.1/2.0 (Full speed) compliant AC Adapter Power...

Instructions
Page 56
... A Cassette 16 Loading A Memory Card 17 M Manual Focus 38 Memory Card 17, 53 Motor Drive Mode 38 N EN Night-Alive 38 P Picture Quality 34 Playback Sound 35 Playback Special Effects 24 Power-Linked Operation 15 Program AE With Special Effects 42 Q Quick Review 20 R Recording Capacity Memory Card 25 Tape 18 Recording Media Selection 35 Remote Control 23 Resetting The File Name 28 S Slow-Motion Playback 24 Snapshot Mode 32 Sound Mode 32, 35 Speaker Volume 20 Specifications 55 Spot Exposure Control 40 T Tape Speed (REC MODE 32, 35 Telephoto Setting...
... A Cassette 16 Loading A Memory Card 17 M Manual Focus 38 Memory Card 17, 53 Motor Drive Mode 38 N EN Night-Alive 38 P Picture Quality 34 Playback Sound 35 Playback Special Effects 24 Power-Linked Operation 15 Program AE With Special Effects 42 Q Quick Review 20 R Recording Capacity Memory Card 25 Tape 18 Recording Media Selection 35 Remote Control 23 Resetting The File Name 28 S Slow-Motion Playback 24 Snapshot Mode 32 Sound Mode 32, 35 Speaker Volume 20 Specifications 55 Spot Exposure Control 40 T Tape Speed (REC MODE 32, 35 Telephoto Setting...


