Instructions
Page 20
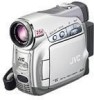
...5 to "PLAY" while pressing down the volume. This is connected to check the end of playback. To control the speaker volume Slide the Power Zoom Lever (VOL. +/-) towards "+" to turn up the volume, or towards "-" to turn on again, set to "ON". (੬ pg. ...Press 4/9 during the Recording-Standby mode. 2) Tape is rewound for about 3 minutes, the camcorder's Stop mode is not heard from a battery, the camcorder shuts off automatically. NOTES: ● The playback picture can be reset. ● During fast-forwarding and rewinding, the time code indication does not move smoothly. ...
...5 to "PLAY" while pressing down the volume. This is connected to check the end of playback. To control the speaker volume Slide the Power Zoom Lever (VOL. +/-) towards "+" to turn up the volume, or towards "-" to turn on again, set to "ON". (੬ pg. ...Press 4/9 during the Recording-Standby mode. 2) Tape is rewound for about 3 minutes, the camcorder's Stop mode is not heard from a battery, the camcorder shuts off automatically. NOTES: ● The playback picture can be reset. ● During fast-forwarding and rewinding, the time code indication does not move smoothly. ...
Instructions
Page 26
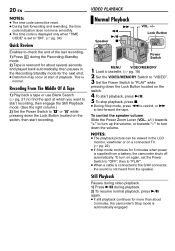
D.S.C. NOTE: Images shot and stored on the switch. ● A stored image is displayed. 4 Press - Playback Zoom Available only with the camcorder are automatically numbered, then stored in numerical order in the memory card. PLAYBACK Normal Playback Of Images Images shot with the ...movie files from the captured still images (Windows® only). To create movie files with resolutions other still images, it is recommended that you reset the file names before shooting. (੬ pg. 28) ● Interval Shooting will be transferred to "OFF" in the commercial software "QuickTime...
D.S.C. NOTE: Images shot and stored on the switch. ● A stored image is displayed. 4 Press - Playback Zoom Available only with the camcorder are automatically numbered, then stored in numerical order in the memory card. PLAYBACK Normal Playback Of Images Images shot with the ...movie files from the captured still images (Windows® only). To create movie files with resolutions other still images, it is recommended that you reset the file names before shooting. (੬ pg. 28) ● Interval Shooting will be transferred to "OFF" in the commercial software "QuickTime...
Instructions
Page 29
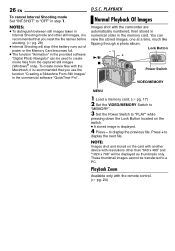
...MENU. ● To cancel selection, select "RETURN". The PROTECT screen appears. 5 Slide the Power Zoom Lever towards "T" or "W" to remove protection. To remove protection from the currently displayed file 4 Press...2 print information settings for DELETE? Check files before deleting. to select DPOF CURRENT ALL 1 RESET "ALL 1", and press MENU. to select "EXECUTE", and press DELETE MENU. ● To.... EXECUTE RETURN all files you load a memory card already set as turning off the camcorder) during deletion. MENU The Sub Menu appears. 4 Press + or - to select ...
...MENU. ● To cancel selection, select "RETURN". The PROTECT screen appears. 5 Slide the Power Zoom Lever towards "T" or "W" to remove protection. To remove protection from the currently displayed file 4 Press...2 print information settings for DELETE? Check files before deleting. to select DPOF CURRENT ALL 1 RESET "ALL 1", and press MENU. to select "EXECUTE", and press DELETE MENU. ● To.... EXECUTE RETURN all files you load a memory card already set as turning off the camcorder) during deletion. MENU The Sub Menu appears. 4 Press + or - to select ...
Instructions
Page 30
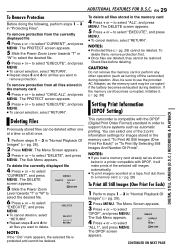
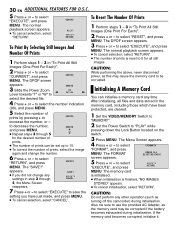
...prints is finished, "NO IMAGES STORED" appears. ● To cancel initialisation, select "RETURN". appears. 3 Slide the Power Zoom Lever towards "T" or "W" to select To Reset The Number Of Prints "EXECUTE", and press DPOF MENU. Initialising A Memory Card You can be sure to 0 for all.... ● To cancel selection, select "CANCEL". The memory card is initialised. ● When initialisation is reset to use the provided AC Adapter, as turning off the camcorder) during initialisation. to SHEETS 00 RETURN select the desired file. 4 Press + or - The DPOF screen ...
...prints is finished, "NO IMAGES STORED" appears. ● To cancel initialisation, select "RETURN". appears. 3 Slide the Power Zoom Lever towards "T" or "W" to select To Reset The Number Of Prints "EXECUTE", and press DPOF MENU. Initialising A Memory Card You can be sure to 0 for all.... ● To cancel selection, select "CANCEL". The memory card is initialised. ● When initialisation is reset to use the provided AC Adapter, as turning off the camcorder) during initialisation. to SHEETS 00 RETURN select the desired file. 4 Press + or - The DPOF screen ...
Instructions
Page 32
...speed is being automatically adjusted, " " is set to "25X" while using digital zoom, the zoom magnification will reset to 25X since digital zoom will be blurred at the switching point. ● It is possible from 25X (the optical zoom limit), to a maximum of 100X digital magnification. 900X*: Allows you to both "A" ... mode. ● If the recording mode is switched, the playback picture will be momentary pauses in the LP mode on this camcorder be played back on this mode when recording with no picture brightness adjustment. [AGC]: The overall appearance may not be changed only...
...speed is being automatically adjusted, " " is set to "25X" while using digital zoom, the zoom magnification will reset to 25X since digital zoom will be blurred at the switching point. ● It is possible from 25X (the optical zoom limit), to a maximum of 100X digital magnification. 900X*: Allows you to both "A" ... mode. ● If the recording mode is switched, the playback picture will be momentary pauses in the LP mode on this camcorder be played back on this mode when recording with no picture brightness adjustment. [AGC]: The overall appearance may not be changed only...
Instructions
Page 34
... Picture Quality modes are not displayed during recording. (੬ pg. 19) TIME CODE [OFF]: Time code is opened . CAM RESET EXECUTE: Resets all settings to the factorypreset. [RETURN]: Does not reset all settings to "A". DATE/TIME OFF: The date/time does not appear. [AUTO]: Displays the date/time for shooting. [... on the connected TV screen. [LCD/TV]: Makes the camcorder's display appear on screen when the camcorder is set from "OFF" to best match your needs. FINDER: The image is displayed in order of memory card being used. (੬ pg. 25) IMAGE SIZE 640 x 480 / [1024 x 768] The...
... Picture Quality modes are not displayed during recording. (੬ pg. 19) TIME CODE [OFF]: Time code is opened . CAM RESET EXECUTE: Resets all settings to the factorypreset. [RETURN]: Does not reset all settings to "A". DATE/TIME OFF: The date/time does not appear. [AUTO]: Displays the date/time for shooting. [... on the connected TV screen. [LCD/TV]: Makes the camcorder's display appear on screen when the camcorder is set from "OFF" to best match your needs. FINDER: The image is displayed in order of memory card being used. (੬ pg. 25) IMAGE SIZE 640 x 480 / [1024 x 768] The...
Instructions
Page 38
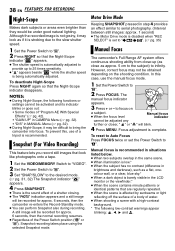
...MANUAL Menu (੬ pg. 32). ● During Night-Scope, it is recommended. To reset to Auto Focus Press FOCUS twice or set to " / ". (੬ pg. 35) Manual Focus The camcorder's Full Range AF system offers continuous shooting ability from close as close -up to the ... it may look like photographs onto a tape. 1 Set the VIDEO/MEMORY Switch to "VIDEO". 2 Set the Power Switch to "M". 3 Set "SNAP/SLOW" to 25 times sensitivity. ● " " appears beside " " while the shutter speed is complete. NOTES: ● During Night-Scope, the following low-contrast warnings appear blinking...
...MANUAL Menu (੬ pg. 32). ● During Night-Scope, it is recommended. To reset to Auto Focus Press FOCUS twice or set to " / ". (੬ pg. 35) Manual Focus The camcorder's Full Range AF system offers continuous shooting ability from close as close -up to the ... it may look like photographs onto a tape. 1 Set the VIDEO/MEMORY Switch to "VIDEO". 2 Set the Power Switch to "M". 3 Set "SNAP/SLOW" to 25 times sensitivity. ● " " appears beside " " while the shutter speed is complete. NOTES: ● During Night-Scope, the following low-contrast warnings appear blinking...


