Instruction Manual
Page 2
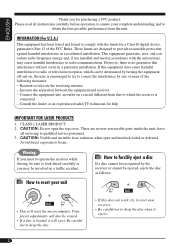
... disc when it will not occur in a residential installation. Connect the equipment into an outlet on , the user is loaded, it ejects. 2 CLASS 1 LASER PRODUCT 2. This equipment generates, uses, and can be determined by the receiver or cannot be recognized by turning the equipment off and on a circuit different from the unit. Reorient or relocate the receiving antenna. - Warning: If you need...
... disc when it will not occur in a residential installation. Connect the equipment into an outlet on , the user is loaded, it ejects. 2 CLASS 1 LASER PRODUCT 2. This equipment generates, uses, and can be determined by the receiver or cannot be recognized by turning the equipment off and on a circuit different from the unit. Reorient or relocate the receiving antenna. - Warning: If you need...
Instruction Manual
Page 3
... 8 Setting the clock 8 Radio operations 9 Listening to the radio 9 Storing stations in memory 10 Listening to a preset channel 26 Maintenance 27 More about this receiver ........ 28 Troubleshooting 30 Specifications 33 *For safety.... • Do not raise the volume level too much, as this manual 4 How to use the MODE button 4 Control panel - KD-AR360 and KD-G310 ......... 5 Parts identification 5 Remote controller - PSM ......... 20 Basic operations 20 Detaching the control panel.... 22 External component operations... 23 Playing an external component 23 SIRIUS® radio...
... 8 Setting the clock 8 Radio operations 9 Listening to the radio 9 Storing stations in memory 10 Listening to a preset channel 26 Maintenance 27 More about this receiver ........ 28 Troubleshooting 30 Specifications 33 *For safety.... • Do not raise the volume level too much, as this manual 4 How to use the MODE button 4 Control panel - KD-AR360 and KD-G310 ......... 5 Parts identification 5 Remote controller - PSM ......... 20 Basic operations 20 Detaching the control panel.... 22 External component operations... 23 Playing an external component 23 SIRIUS® radio...
Instruction Manual
Page 4
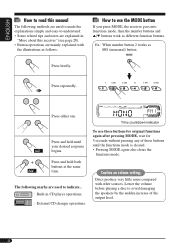
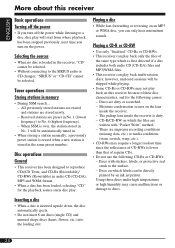
... begins. Lower the volume before playing a disc to indicate... : Built-in "More about this receiver" (see page 28). • Button operations are explained in CD player operations. : External CD changer operations. The following methods are used to avoid damaging the speakers by the sudden increase of these buttons for original functions again after pressing MODE, wait for 5 seconds without pressing any of the output level. 4 Ex.: When number button 2 works as different function buttons.
... begins. Lower the volume before playing a disc to indicate... : Built-in "More about this receiver" (see page 28). • Button operations are explained in CD player operations. : External CD changer operations. The following methods are used to avoid damaging the speakers by the sudden increase of these buttons for original functions again after pressing MODE, wait for 5 seconds without pressing any of the output level. 4 Ex.: When number button 2 works as different function buttons.
Instruction Manual
Page 5
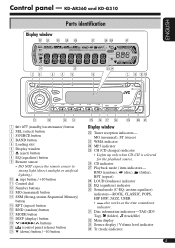
... / Sound mode (C-EQ: custom equalizer) indicators-ROCK, CLASSIC, POPS, HIP HOP, JAZZ, USER • also works as the time countdown indicator. h CD indicator j Playback mode / item indicators- z Disc information indicators-TAG (ID3 Tag), (folder), (track/file) x Main display c Source display / Volume level indicator v Tr (track) indicator 5 KD-AR360 and KD-G310 Display window Parts identification 1 (standby/on attenuator) button 2 SEL (select) button 3 SOURCE button 4 BAND button 5 Loading slot 6 Display window 7 0 (eject) button 8 EQ (equalizer) button 9 Remote sensor...
... / Sound mode (C-EQ: custom equalizer) indicators-ROCK, CLASSIC, POPS, HIP HOP, JAZZ, USER • also works as the time countdown indicator. h CD indicator j Playback mode / item indicators- z Disc information indicators-TAG (ID3 Tag), (folder), (track/file) x Main display c Source display / Volume level indicator v Tr (track) indicator 5 KD-AR360 and KD-G310 Display window Parts identification 1 (standby/on attenuator) button 2 SEL (select) button 3 SOURCE button 4 BAND button 5 Loading slot 6 Display window 7 0 (eject) button 8 EQ (equalizer) button 9 Remote sensor...
Instruction Manual
Page 6
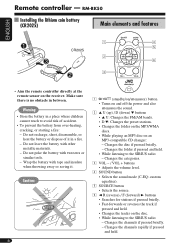
...) Main elements and features ENGLISH • Aim the remote controller directly at the remote sensor on an MP3-compatible CD changer: - Do not leave the battery with tweezers or similar tools. - Changes the categories. 3 VOL - / VOL + buttons • Adjusts the volume level. 4 SOUND button • Selects the sound mode (C-EQ: custom equalizer). 5 SOURCE button • Selects the source. 6 2 R (reverse) / F (forward) 3 buttons • Searches for stations if pressed briefly. • Fast-forwards or reverses the track...
...) Main elements and features ENGLISH • Aim the remote controller directly at the remote sensor on an MP3-compatible CD changer: - Do not leave the battery with tweezers or similar tools. - Changes the categories. 3 VOL - / VOL + buttons • Adjusts the volume level. 4 SOUND button • Selects the sound mode (C-EQ: custom equalizer). 5 SOURCE button • Selects the source. 6 2 R (reverse) / F (forward) 3 buttons • Searches for stations if pressed briefly. • Fast-forwards or reverses the track...
Instruction Manual
Page 7
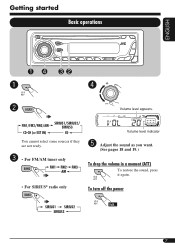
You cannot select some sources if they are not ready. ! • For FM/AM tuner only Volume level indicator @ Adjust the sound as you want. (See pages 18 and 19.) To drop the volume in a moment (ATT) To restore the sound, press it again. • For SIRIUS® radio only To turn off the power 7 Getting started Basic operations ENGLISH ~ Ÿ ⁄ Volume level appears.
You cannot select some sources if they are not ready. ! • For FM/AM tuner only Volume level indicator @ Adjust the sound as you want. (See pages 18 and 19.) To drop the volume in a moment (ATT) To restore the sound, press it again. • For SIRIUS® radio only To turn off the power 7 Getting started Basic operations ENGLISH ~ Ÿ ⁄ Volume level appears.
Instruction Manual
Page 8
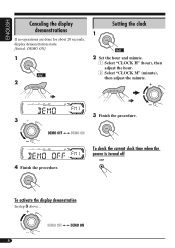
To check the current clock time when the power is turned off To activate the display demonstration In step 3 above... 8 ENGLISH Canceling the display demonstrations If no operations are done for about 20 seconds, display demonstration starts. [Initial: DEMO ON] 1 2 Setting the clock 1 2 Set the hour and minute. 1 Select "CLOCK H" (hour), then adjust the hour. 2 Select "CLOCK M" (minute), then adjust the minute. 3 4 Finish the procedure. 3 Finish the procedure.
To check the current clock time when the power is turned off To activate the display demonstration In step 3 above... 8 ENGLISH Canceling the display demonstrations If no operations are done for about 20 seconds, display demonstration starts. [Initial: DEMO ON] 1 2 Setting the clock 1 2 Set the hour and minute. 1 Select "CLOCK H" (hour), then adjust the hour. 2 Select "CLOCK M" (minute), then adjust the minute. 3 4 Finish the procedure. 3 Finish the procedure.
Instruction Manual
Page 10
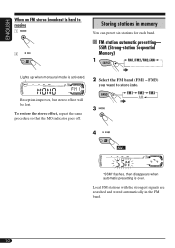
... and stored automatically in memory You can preset six stations for each band. SSM (Strong-station Sequential Memory) 1 Lights up when monaural mode is hard to store into. FM3) you want to receive 1 2 Storing stations in the FM band. 10 ENGLISH When an FM stereo broadcast is activated. 2 Select the FM band (FM1 - FM station automatic presetting- Reception improves, but stereo effect will be lost...
... and stored automatically in memory You can preset six stations for each band. SSM (Strong-station Sequential Memory) 1 Lights up when monaural mode is hard to store into. FM3) you want to receive 1 2 Storing stations in the FM band. 10 ENGLISH When an FM stereo broadcast is activated. 2 Select the FM band (FM1 - FM station automatic presetting- Reception improves, but stereo effect will be lost...
Instruction Manual
Page 13
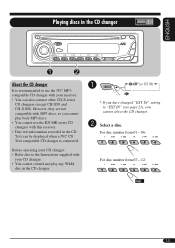
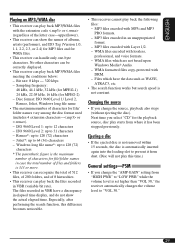
... play back MP3 discs. • You cannot use the JVC MP3compatible CD changer with MP3 discs, so you cannot select the CD changer. Ÿ Select a disc. However, they are not compatible with your CD changer. • You cannot control and play any WMA disc in the CD changer. ~ * If you have changed "EXT IN" setting to use the KD-MK series CD changers with this receiver. • Disc text information recorded in the CD changer About the CD changer It is connected. For disc number...
... play back MP3 discs. • You cannot use the JVC MP3compatible CD changer with MP3 discs, so you cannot select the CD changer. Ÿ Select a disc. However, they are not compatible with your CD changer. • You cannot control and play any WMA disc in the CD changer. ~ * If you have changed "EXT IN" setting to use the KD-MK series CD changers with this receiver. • Disc text information recorded in the CD changer About the CD changer It is connected. For disc number...

Instruction Manual
Page 18
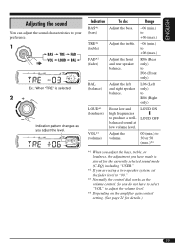
ENGLISH Sound adjustments Selecting preset sound modes (C-EQ: custom equalizer) You can select a preset sound mode suitable to the music genre. ~ Ex.: When "ROCK" is selected Indication pattern for each sound mode: Preset values Indication For: BAS*1 TRE*2 LOUD*3 USER (Flat sound) 00 00 OFF ROCK Rock or +03 +01 ON disco music CLASSIC Classical music +01 -02 OFF POPS Light music +04 +01 OFF HIP HOP Funk or rap +02 00 ON music JAZZ Jazz music +02 +03 OFF *1 BAS: Bass *2 TRE: Treble *3 LOUD: Loudness 18
ENGLISH Sound adjustments Selecting preset sound modes (C-EQ: custom equalizer) You can select a preset sound mode suitable to the music genre. ~ Ex.: When "ROCK" is selected Indication pattern for each sound mode: Preset values Indication For: BAS*1 TRE*2 LOUD*3 USER (Flat sound) 00 00 OFF ROCK Rock or +03 +01 ON disco music CLASSIC Classical music +01 -02 OFF POPS Light music +04 +01 OFF HIP HOP Funk or rap +02 00 ON music JAZZ Jazz music +02 +03 OFF *1 BAS: Bass *2 TRE: Treble *3 LOUD: Loudness 18
Instruction Manual
Page 19
... volume level. *4 Depending on the amplifier gain control setting. (See page 21 for the currently selected sound mode (C-EQ) including "USER." *2 If you do : Range BAS*1 (bass) Adjust the bass. -06 (min.) to +06 (max.) TRE*1 (treble) Adjust the treble. -06 (min.) to "00." *3 Normally the control dial works as you adjust the level. So you are using a two-speaker system, set the fader level to +06 (max.) FAD*2 (fader) Adjust the front and rear speaker balance...
... volume level. *4 Depending on the amplifier gain control setting. (See page 21 for the currently selected sound mode (C-EQ) including "USER." *2 If you do : Range BAS*1 (bass) Adjust the bass. -06 (min.) to +06 (max.) TRE*1 (treble) Adjust the treble. -06 (min.) to "00." *3 Normally the control dial works as you adjust the level. So you are using a two-speaker system, set the fader level to +06 (max.) FAD*2 (fader) Adjust the front and rear speaker balance...
Instruction Manual
Page 20
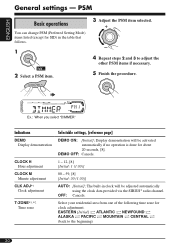
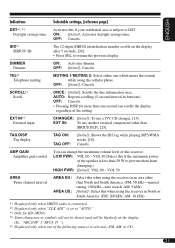
... no operation is done for about 20 seconds, [8]. Select your residential area from one of the following time zone for SID) in clock will be adjusted automatically using the clock data provided via the SIRIUS® radio channel. ENGLISH General settings - OFF: Cancels. DEMO OFF: Cancels. 1 - 12, [8] [Initial: 1 (1:00)] 00 - 59, [8] [Initial: 00 (1:00)] AUTO: [Initial]; Ex.: When you select "DIMMER" Indications DEMO Display demonstration CLOCK H Hour adjustment CLOCK M Minute adjustment...
... no operation is done for about 20 seconds, [8]. Select your residential area from one of the following time zone for SID) in clock will be adjusted automatically using the clock data provided via the SIRIUS® radio channel. ENGLISH General settings - OFF: Cancels. DEMO OFF: Cancels. 1 - 12, [8] [Initial: 1 (1:00)] 00 - 59, [8] [Initial: 00 (1:00)] AUTO: [Initial]; Ex.: When you select "DIMMER" Indications DEMO Display demonstration CLOCK H Hour adjustment CLOCK M Minute adjustment...
Instruction Manual
Page 21
...: Select this when using the cellular phone. AUTO: Repeats scrolling (5-second interval in between). VOL 00 - EXT IN: To use a JVC CD changer, [13]. OFF: [Initial]; AM: 10 kHz) *1 Displayed only when SIRIUS radio is connected. *2 Displayed only when "CLK ADJ" is set to prevent them from damaging.) HIGH PWR: [Initial]; Activates daylight savings time. SID*1 SIRIUS® ID The 12-digits SIRIUS identification number scrolls on the display. (Ex. DIMMER Dimmer...
...: Select this when using the cellular phone. AUTO: Repeats scrolling (5-second interval in between). VOL 00 - EXT IN: To use a JVC CD changer, [13]. OFF: [Initial]; AM: 10 kHz) *1 Displayed only when SIRIUS radio is connected. *2 Displayed only when "CLK ADJ" is set to prevent them from damaging.) HIGH PWR: [Initial]; Activates daylight savings time. SID*1 SIRIUS® ID The 12-digits SIRIUS identification number scrolls on the display. (Ex. DIMMER Dimmer...

Instruction Manual
Page 23
...; Adjust the sound as you want. (See pages 18 and 19.) • If "EXT IN" does not appear, see page 21). ~ ! External component operations Playing an external component ENGLISH You can connect the external component to the CD changer jack on the rear using the Line Input Adapter KS-U57 (not supplied). • For connection, see Installation/Connection Manual (separate volume). • Before operating the external component, select...
...; Adjust the sound as you want. (See pages 18 and 19.) • If "EXT IN" does not appear, see page 21). ~ ! External component operations Playing an external component ENGLISH You can connect the external component to the CD changer jack on the rear using the Line Input Adapter KS-U57 (not supplied). • For connection, see Installation/Connection Manual (separate volume). • Before operating the external component, select...
Instruction Manual
Page 24
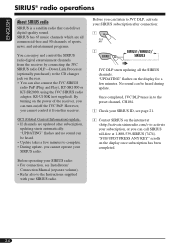
... minutes. No sound can deliver digital-quality sound. SIRIUS has 65 music channels which are updated after connection: 1 2 JVC DLP starts updating all commercial-free and 50 channels of the receiver, you can call SIRIUS toll-free at to the CD changer jack on the rear. • You can be heard during update. "UPDATING" flashes and no sound can also connect the JVC SIRIUS radio PnP (Plug and Play), KT-SR1000 or KT-SR2000, using the JVC SIRIUS radio adapter, KS-U100K...
... minutes. No sound can deliver digital-quality sound. SIRIUS has 65 music channels which are updated after connection: 1 2 JVC DLP starts updating all commercial-free and 50 channels of the receiver, you can call SIRIUS toll-free at to the CD changer jack on the rear. • You can be heard during update. "UPDATING" flashes and no sound can also connect the JVC SIRIUS radio PnP (Plug and Play), KT-SR1000 or KT-SR2000, using the JVC SIRIUS radio adapter, KS-U100K...
Instruction Manual
Page 28
... to the SIRIUS radio or CD changer, "SIRIUS" or "CD-CH" cannot be automatically tuned in. • When storing a station manually, a previously preset station is erased when a new station is over, the station stored in audio CD (CD-DA), MP3 and WMA format. • When a disc has been loaded, selecting "CD" for the following CD-Rs or CD-RWs: - Discs with "Packet Write" method. - Selecting the sources • When no disc is loaded in memory •...
... to the SIRIUS radio or CD changer, "SIRIUS" or "CD-CH" cannot be automatically tuned in. • When storing a station manually, a previously preset station is erased when a new station is over, the station stored in audio CD (CD-DA), MP3 and WMA format. • When a disc has been loaded, selecting "CD" for the following CD-Rs or CD-RWs: - Discs with "Packet Write" method. - Selecting the sources • When no disc is loaded in memory •...
Instruction Manual
Page 29
... "LOW PWR" while the volume level is not constant. The files recorded in an unappropriated format. - Disc format: ISO 9660 Level 1/ Level 2, Romeo, Joliet, Windows long file name • The maximum number of characters for MPEG-2) - Especially, after performing the search function, this time.) General settings-PSM • If you select "CD" for WMA files. • This receiver can handle only one...
... "LOW PWR" while the volume level is not constant. The files recorded in an unappropriated format. - Disc format: ISO 9660 Level 1/ Level 2, Romeo, Joliet, Windows long file name • The maximum number of characters for MPEG-2) - Especially, after performing the search function, this time.) General settings-PSM • If you select "CD" for WMA files. • This receiver can handle only one...
Instruction Manual
Page 30
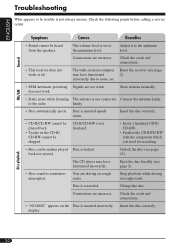
The volume level is not always serious. Connections are driving on rough roads. does not work at all. Unlock the disc (see page 2). • Disc sound is inserted incorrectly. Insert the disc correctly. Check the cords and connections. • This receiver does not work . The built-in microcomputer Reset the receiver (see page may have functioned 2). to the optimum level. Insert the disc correctly. • CD-R/CD-RW cannot be played back...
The volume level is not always serious. Connections are driving on rough roads. does not work at all. Unlock the disc (see page 2). • Disc sound is inserted incorrectly. Insert the disc correctly. Check the cords and connections. • This receiver does not work . The built-in microcomputer Reset the receiver (see page may have functioned 2). to the optimum level. Insert the disc correctly. • CD-R/CD-RW cannot be played back...
Instruction Manual
Page 32
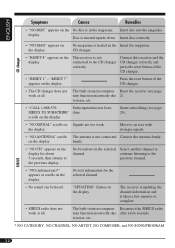
... to complete. • SIRIUS radio does not work at all . The built-in the magazine. display. Press the reset button of the CD changer. • "RESET 1" - on the selected Select another channel or channel. The built-in the Insert the magazine. ENGLISH Symptoms Causes Remedies • "NO DISC" appears on the No disc is not connected Connect the antenna firmly. Disc is loaded in microcomputer Reset the receiver (see page 24...
... to complete. • SIRIUS radio does not work at all . The built-in the magazine. display. Press the reset button of the CD changer. • "RESET 1" - on the selected Select another channel or channel. The built-in the Insert the magazine. ENGLISH Symptoms Causes Remedies • "NO DISC" appears on the No disc is not connected Connect the antenna firmly. Disc is loaded in microcomputer Reset the receiver (see page 24...
Instruction Manual
Page 33
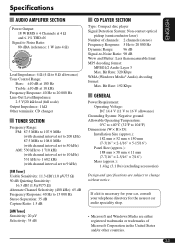
... Hz to 15 000 Hz Stereo Separation: 35 dB Capture Ratio: 1.5 dB [AM Tuner] Sensitivity: 20 µV Selectivity: 35 dB CD PLAYER SECTION Type: Compact disc player Signal Detection System: Non-contact optical pickup (semiconductor laser) Number of Microsoft Corporation in the United States and/or other countries. 33 Bit Rate: 192 Kbps GENERAL Power Requirement: Operating Voltage: DC 14.4 V (11 V to...
... Hz to 15 000 Hz Stereo Separation: 35 dB Capture Ratio: 1.5 dB [AM Tuner] Sensitivity: 20 µV Selectivity: 35 dB CD PLAYER SECTION Type: Compact disc player Signal Detection System: Non-contact optical pickup (semiconductor laser) Number of Microsoft Corporation in the United States and/or other countries. 33 Bit Rate: 192 Kbps GENERAL Power Requirement: Operating Voltage: DC 14.4 V (11 V to...


