Instructions
Page 3
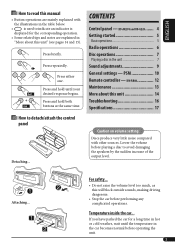
PSM 10 Remote controller - Attaching... Press and hold both buttons at the same time. KD-AR270 and KD-G220 ....... 4 Getting started 5 Basic operations 5 Radio operations 6 Disc operations 7 Playing a disc in the car becomes normal before operating the unit. 3 If you have parked the car for the corresponding operation. • ...
PSM 10 Remote controller - Attaching... Press and hold both buttons at the same time. KD-AR270 and KD-G220 ....... 4 Getting started 5 Basic operations 5 Radio operations 6 Disc operations 7 Playing a disc in the car becomes normal before operating the unit. 3 If you have parked the car for the corresponding operation. • ...
Instructions
Page 4
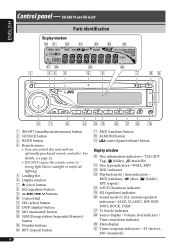
ST (stereo), MO (monaural) KD-AR270 and KD-G220 Parts identification Display window 1 (standby/on/attenuator) button 2 SOURCE button 3 BAND button 4 Remote sensor • You can control this unit with an optionally purchased remote controller. RND (random), (disc), (folder), RPT (repeat) f LOUD...level indicator / Time countdown indicator l Main display / Tuner reception indicators- For details, see page 12. • DO NOT expose the remote sensor to strong light (direct sunlight or artificial lighting). 5 Loading slot 6 Display window 7 0 (eject) button 8 EQ (equalizer) ...
ST (stereo), MO (monaural) KD-AR270 and KD-G220 Parts identification Display window 1 (standby/on/attenuator) button 2 SOURCE button 3 BAND button 4 Remote sensor • You can control this unit with an optionally purchased remote controller. RND (random), (disc), (folder), RPT (repeat) f LOUD...level indicator / Time countdown indicator l Main display / Tuner reception indicators- For details, see page 12. • DO NOT expose the remote sensor to strong light (direct sunlight or artificial lighting). 5 Loading slot 6 Display window 7 0 (eject) button 8 EQ (equalizer) ...


