
Instructions
Page 2
... relocate the receiving antenna. - Consult the dealer or an experienced radio/ TV technician for a Class B digital device, pursuant to comply with the instructions, may be determined by one or more of the following measures: - CLASS 1 LASER PRODUCT 2. CAUTION: Do not open and interlock failed or defeated. Connect the equipment into functions mode, then the number buttons and ¢/4 buttons work , reset your unit. •...
... relocate the receiving antenna. - Consult the dealer or an experienced radio/ TV technician for a Class B digital device, pursuant to comply with the instructions, may be determined by one or more of the following measures: - CLASS 1 LASER PRODUCT 2. CAUTION: Do not open and interlock failed or defeated. Connect the equipment into functions mode, then the number buttons and ¢/4 buttons work , reset your unit. •...
Instructions
Page 3
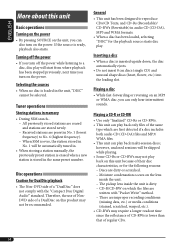
... the output level. PSM 10 Remote controller - Attaching... RM-RK60 12 Maintenance 13 More about this unit" (see pages 14 and 15). CONTENTS Control panel - Lower the volume before performing any complicated operations. Press and hold until the temperature in the car becomes normal before operating the unit. 3 KD-AR270 and KD-G220 ....... 4 Getting started 5 Basic operations 5 Radio operations 6 Disc operations 7 Playing a disc in "More about this unit 14 Troubleshooting 16 Specifications 17 Caution on volume setting: Discs...
... the output level. PSM 10 Remote controller - Attaching... RM-RK60 12 Maintenance 13 More about this unit" (see pages 14 and 15). CONTENTS Control panel - Lower the volume before performing any complicated operations. Press and hold until the temperature in the car becomes normal before operating the unit. 3 KD-AR270 and KD-G220 ....... 4 Getting started 5 Basic operations 5 Radio operations 6 Disc operations 7 Playing a disc in "More about this unit 14 Troubleshooting 16 Specifications 17 Caution on volume setting: Discs...
Instructions
Page 4
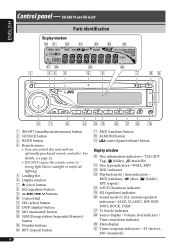
...Source display / Volume level indicator / Time countdown indicator l Main display / Tuner reception indicators- For details, see page 12. • DO NOT expose the remote sensor to strong light (direct sunlight or artificial lighting). 5 Loading slot 6 Display window 7 0 (eject) button 8 EQ (equalizer) button 9 ¢/4 buttons p Control dial q SEL (select) button w DISP (display) button e MO (monaural) button r SSM (Strong-station Sequential Memory) button t Number buttons y RPT (repeat) button 4 u RND (random) button i M MODE button o (control panel release) button Display...
...Source display / Volume level indicator / Time countdown indicator l Main display / Tuner reception indicators- For details, see page 12. • DO NOT expose the remote sensor to strong light (direct sunlight or artificial lighting). 5 Loading slot 6 Display window 7 0 (eject) button 8 EQ (equalizer) button 9 ¢/4 buttons p Control dial q SEL (select) button w DISP (display) button e MO (monaural) button r SSM (Strong-station Sequential Memory) button t Number buttons y RPT (repeat) button 4 u RND (random) button i M MODE button o (control panel release) button Display...
Instructions
Page 5
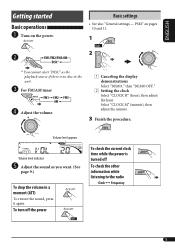
... Select "DEMO," then "DEMO OFF." 2 Setting the clock Select "CLOCK H" (hour), then adjust the hour. To turn off To check the other information while listening to the radio Clock Ô Frequency 5 Volume level appears. PSM" on the power. Ÿ Basic settings • See also "General settings - Select "CLOCK M" (minute), then adjust the minute. 3 Finish the procedure. Volume level indicator @ Adjust the sound as the playback source if there is turned off the power To check the current clock time...
... Select "DEMO," then "DEMO OFF." 2 Setting the clock Select "CLOCK H" (hour), then adjust the hour. To turn off To check the other information while listening to the radio Clock Ô Frequency 5 Volume level appears. PSM" on the power. Ÿ Basic settings • See also "General settings - Select "CLOCK M" (minute), then adjust the minute. 3 Finish the procedure. Volume level indicator @ Adjust the sound as the playback source if there is turned off the power To check the current clock time...
Instructions
Page 6
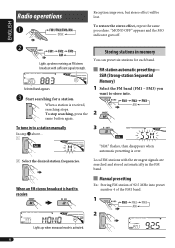
... store into. 2 To tune in to receive Manual presetting Ex.: Storing FM station of 92.5 MHz into preset number 4 of the FM1 band. 1 2 Lights up when receiving an FM stereo broadcast with the strongest signals are searched and stored automatically in memory Lights up when monaural mode is hard to a station manually 3 In step ! When an FM stereo broadcast is activated. 6 SSM (Strong-station Sequential Memory) 1 Select the FM band...
... store into. 2 To tune in to receive Manual presetting Ex.: Storing FM station of 92.5 MHz into preset number 4 of the FM1 band. 1 2 Lights up when receiving an FM stereo broadcast with the strongest signals are searched and stored automatically in memory Lights up when monaural mode is hard to a station manually 3 In step ! When an FM stereo broadcast is activated. 6 SSM (Strong-station Sequential Memory) 1 Select the FM band...
Instructions
Page 7
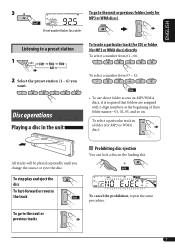
... MP3 or WMA discs) Preset number flashes for MP3 or WMA disc): All tracks will be played repeatedly until you want. To cancel the prohibition, repeat the same procedure. 7 ENGLISH 3 To go to the next or previous tracks Prohibiting disc ejection You can lock a disc in the unit To select a number from 01 - 06: 2 Select the preset station (1 - 6) you change the source or eject the disc. Disc operations Playing a disc in the loading...
... MP3 or WMA discs) Preset number flashes for MP3 or WMA disc): All tracks will be played repeatedly until you want. To cancel the prohibition, repeat the same procedure. 7 ENGLISH 3 To go to the next or previous tracks Prohibiting disc ejection You can lock a disc in the unit To select a number from 01 - 06: 2 Select the preset station (1 - 6) you change the source or eject the disc. Disc operations Playing a disc in the loading...
Instructions
Page 8
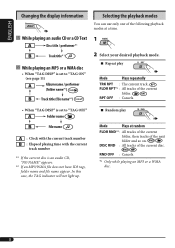
.... RND OFF : Cancels. *3 Only while playing an MP3 or a WMA disc. 8 RPT OFF : Cancels. • When "TAG DISP" is set to "TAG OFF" 7 Random play : Clock with the current track number : Elapsed playing time with the current track number *1 If the current disc is set to "TAG ON" (see page 11) 2 Select your desired playback mode. 7 Repeat play Mode Plays repeatedly TRK RPT : The current track...
.... RND OFF : Cancels. *3 Only while playing an MP3 or a WMA disc. 8 RPT OFF : Cancels. • When "TAG DISP" is set to "TAG OFF" 7 Random play : Clock with the current track number : Elapsed playing time with the current track number *1 If the current disc is set to "TAG ON" (see page 11) 2 Select your desired playback mode. 7 Repeat play Mode Plays repeatedly TRK RPT : The current track...
Instructions
Page 9
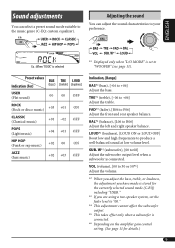
... a subwoofer is connected. *6 Depending on the amplifier gain control setting. (See page 11 for the currently selected sound mode (C-EQ) including "USER." *3 If you have made is connected. VOL (volume), [00 to 30 or 50*6] Adjust the volume. *2 When you adjust the bass, treble, or loudness, the adjustment you are using a two-speaker system, set to 08] Adjust the subwoofer output level when a subwoofer is stored for details.) 9 BAL*4 (balance), [L06 to F06] Adjust the front and rear speaker balance. SUB...
... a subwoofer is connected. *6 Depending on the amplifier gain control setting. (See page 11 for the currently selected sound mode (C-EQ) including "USER." *3 If you have made is connected. VOL (volume), [00 to 30 or 50*6] Adjust the volume. *2 When you adjust the bass, treble, or loudness, the adjustment you are using a two-speaker system, set to 08] Adjust the subwoofer output level when a subwoofer is stored for details.) 9 BAL*4 (balance), [L06 to F06] Adjust the front and rear speaker balance. SUB...
Instructions
Page 10
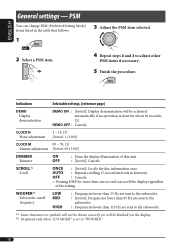
... adjustment [Initial: 00 (1:00)] DIMMER Dimmer ON : Dims the display illumination of the setting. SCROLL*1 Scroll ONCE : [Initial]; Cancels. OFF : Cancels. • Pressing DISP for about 20 seconds, [5]. PSM You can scroll the display regardless of this unit. WOOFER*2 Subwoofer cutoff frequency LOW MID HIGH : Frequencies lower than one second can change PSM (Preferred Setting Mode) items listed in between). Indications Selectable settings, [reference page] DEMO Display...
... adjustment [Initial: 00 (1:00)] DIMMER Dimmer ON : Dims the display illumination of the setting. SCROLL*1 Scroll ONCE : [Initial]; Cancels. OFF : Cancels. • Pressing DISP for about 20 seconds, [5]. PSM You can scroll the display regardless of this unit. WOOFER*2 Subwoofer cutoff frequency LOW MID HIGH : Frequencies lower than one second can change PSM (Preferred Setting Mode) items listed in between). Indications Selectable settings, [reference page] DEMO Display...
Instructions
Page 11
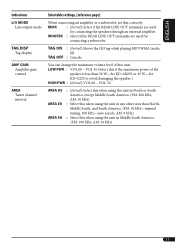
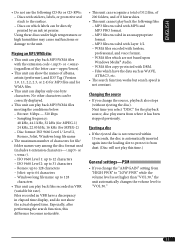
... power of this when using the unit in Middle South America. (FM: 100 kHz; VOL 30 (Select this when using the unit in any other area than 50 W-for KD-AR270 or 45 W-for connecting the speakers through an external amplifier. Select this correctly. ENGLISH Indications L/O MODE Line output mode TAG DISP Tag display AMP GAIN Amplifier gain control AREA Tuner channel interval Selectable settings, [reference page] When connecting an amplifier or a subwoofer, set this when using...
... power of this when using the unit in Middle South America. (FM: 100 kHz; VOL 30 (Select this when using the unit in any other area than 50 W-for KD-AR270 or 45 W-for connecting the speakers through an external amplifier. Select this correctly. ENGLISH Indications L/O MODE Line output mode TAG DISP Tag display AMP GAIN Amplifier gain control AREA Tuner channel interval Selectable settings, [reference page] When connecting an amplifier or a subwoofer, set this when using...
Instructions
Page 12
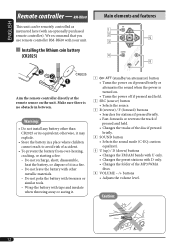
.../WMA discs. 6 VOLUME - /+ buttons • Adjusts the volume level. Do not poke the battery with your unit. Installing the lithium coin battery (CR2025) Main elements and features Aim the remote controller directly at the remote sensor on if pressed briefly or attenuates the sound when the power is no obstacle in a fire. - Warning: • Do not install any battery other metallic materials. - Caution: 12 We recommend that you use remote controller...
.../WMA discs. 6 VOLUME - /+ buttons • Adjusts the volume level. Do not poke the battery with your unit. Installing the lithium coin battery (CR2025) Main elements and features Aim the remote controller directly at the remote sensor on if pressed briefly or attenuates the sound when the power is no obstacle in a fire. - Warning: • Do not install any battery other metallic materials. - Caution: 12 We recommend that you use remote controller...
Instructions
Page 13
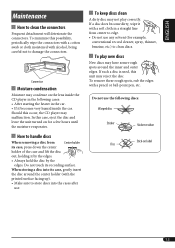
... disc around the inner and outer edges. To remove these rough spots, rub the edges with the printed surface facing up). • Make sure to edge. • Do not use . In this possibility, periodically wipe the connectors with a cotton swab or cloth moistened with a soft cloth in the car. • If it becomes very humid inside the CD player...
... disc around the inner and outer edges. To remove these rough spots, rub the edges with the printed surface facing up). • Make sure to edge. • Do not use . In this possibility, periodically wipe the connectors with a cotton swab or cloth moistened with a soft cloth in the car. • If it becomes very humid inside the CD player...
Instructions
Page 14
... loaded, selecting "DISC" for the playback source starts disc play back multi-session discs; CD-R/CD-RW on an MP3 or WMA disc, you can only hear intermittent sounds. Selecting the sources • When no disc is loaded in the unit, "DISC" cannot be automatically tuned in. • When storing a station manually, the previously preset station is erased when a new station is dirty. - Disc operations Caution for DualDisc playback • The Non-DVD side...
... loaded, selecting "DISC" for the playback source starts disc play back multi-session discs; CD-R/CD-RW on an MP3 or WMA disc, you can only hear intermittent sounds. Selecting the sources • When no disc is loaded in the unit, "DISC" cannot be automatically tuned in. • When storing a station manually, the previously preset station is erased when a new station is dirty. - Disc operations Caution for DualDisc playback • The Non-DVD side...
Instructions
Page 15
... you change the source, playback also stops (without ejecting the disc). MP3 files encoded with stickers, labels, or protective seal stuck to "VOL 30." 15 Next time you change the "AMP GAIN" setting from where it has been stopped previously. Bit rate: 8 kbps - 320 kbps - Joliet: up to 64 characters - Changing the source • If you select "DISC" for WMA files. • This unit can play...
... you change the source, playback also stops (without ejecting the disc). MP3 files encoded with stickers, labels, or protective seal stuck to "VOL 30." 15 Next time you change the "AMP GAIN" setting from where it has been stopped previously. Bit rate: 8 kbps - 320 kbps - Joliet: up to 64 characters - Changing the source • If you select "DISC" for WMA files. • This unit can play...
Instructions
Page 16
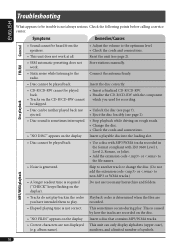
... names. Troubleshooting ENGLISH General What appears to be trouble is sometimes interrupted. • "NO DISC" appears on rough roads. • Change the disc. • Check the cords and connections. Store stations manually. Skip to another track or change the disc. (Do not add the extension code or to the optimum level. • Check the cords and connections. This unit can be neither played back nor ejected. • Disc sound is...
... names. Troubleshooting ENGLISH General What appears to be trouble is sometimes interrupted. • "NO DISC" appears on rough roads. • Change the disc. • Check the cords and connections. Store stations manually. Skip to another track or change the disc. (Do not add the extension code or to the optimum level. • Check the cords and connections. This unit can be neither played back nor ejected. • Disc sound is...
Instructions
Page 17
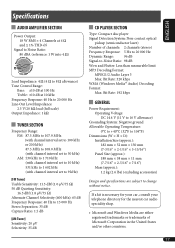
.... ENGLISH Specifications AUDIO AMPLIFIER SECTION Power Output: 18 W RMS × 4 Channels at 4 Ω and ≤ 1% THD+N Signal to Noise Ratio: 80 dBA (reference: 1 W into 4 Ω) Load Impedance: 4 Ω (4 Ω to 8 Ω allowance) Tone Control Range: Bass: ±10 dB at 100 Hz Treble: ±10 dB at 10 kHz Frequency Response: 40 Hz to 20 000 Hz Line-Out Level/Impedance...
.... ENGLISH Specifications AUDIO AMPLIFIER SECTION Power Output: 18 W RMS × 4 Channels at 4 Ω and ≤ 1% THD+N Signal to Noise Ratio: 80 dBA (reference: 1 W into 4 Ω) Load Impedance: 4 Ω (4 Ω to 8 Ω allowance) Tone Control Range: Bass: ±10 dB at 100 Hz Treble: ±10 dB at 10 kHz Frequency Response: 40 Hz to 20 000 Hz Line-Out Level/Impedance...

Instructions
Page 50
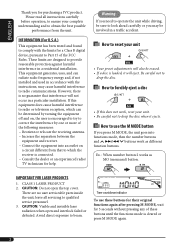
Please reset your unit Refer to page of Japan, Limited 1005DTSMDTJEIN Having TROUBLE with operation? EN, SP, FR © 2005 Victor Company of How to reset your unit Still having trouble?? USA ONLY Call 1-800-252-5722 http://www.jvc.com We can help you!
Please reset your unit Refer to page of Japan, Limited 1005DTSMDTJEIN Having TROUBLE with operation? EN, SP, FR © 2005 Victor Company of How to reset your unit Still having trouble?? USA ONLY Call 1-800-252-5722 http://www.jvc.com We can help you!


