

Instruction Manual
Page 3
... 7 Turning on the power 7 Canceling the display demonstration ........ 8 Setting the clock 9 RADIO OPERATIONS 10 Listening to the radio 10 Storing stations in memory 12 Tuning in to a preset station 13 CD OPERATIONS 14 Playing a CD 14 Locating a track or a particular portion on a CD 15 Selecting CD playback modes 15 Prohibiting CD ejection 16 SOUND ADJUSTMENTS 17 Selecting preset sound... unit. BEFORE USE *For safety.... *Temperature inside the car.... • Do not raise the volume level too much, as this will If you for purchasing a JVC product.
... 7 Turning on the power 7 Canceling the display demonstration ........ 8 Setting the clock 9 RADIO OPERATIONS 10 Listening to the radio 10 Storing stations in memory 12 Tuning in to a preset station 13 CD OPERATIONS 14 Playing a CD 14 Locating a track or a particular portion on a CD 15 Selecting CD playback modes 15 Prohibiting CD ejection 16 SOUND ADJUSTMENTS 17 Selecting preset sound... unit. BEFORE USE *For safety.... *Temperature inside the car.... • Do not raise the volume level too much, as this will If you for purchasing a JVC product.

Instruction Manual
Page 8
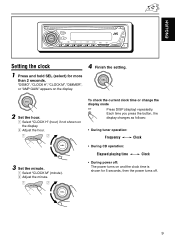
... 2 Select "DEMO" if not shown on the display. 4 Finish the setting. ENGLISH Canceling the display demonstration 3 Select "DEMO OFF." DEMO OFF To cancel the display demonstration, follow the procedure below: 1 Press and hold SEL (select) for the first time. "DEMO", "CLOCK H", "CLOCK M", "DIMMER", or "AMP GAIN" appears on the display. To activate the...
... 2 Select "DEMO" if not shown on the display. 4 Finish the setting. ENGLISH Canceling the display demonstration 3 Select "DEMO OFF." DEMO OFF To cancel the display demonstration, follow the procedure below: 1 Press and hold SEL (select) for the first time. "DEMO", "CLOCK H", "CLOCK M", "DIMMER", or "AMP GAIN" appears on the display. To activate the...
Instruction Manual
Page 9
..., the display changes as follows: • During tuner operation: Frequency Clock • During CD operation: Elapsed playing time Clock • During power off: The power turns on the display. 2 Adjust the hour. 1 2 3 Set the minute. 1 Select "CLOCK M" (minute). 2 Adjust the minute. 1 2 To check the current clock time or change the display mode Press DISP (display) repeatedly...
..., the display changes as follows: • During tuner operation: Frequency Clock • During CD operation: Elapsed playing time Clock • During power off: The power turns on the display. 2 Adjust the hour. 1 2 3 Set the minute. 1 Select "CLOCK M" (minute). 2 Adjust the minute. 1 2 To check the current clock time or change the display mode Press DISP (display) repeatedly...
Instruction Manual
Page 19
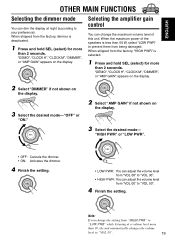
...DIMMER" if not shown on the display. 3 Select the desired mode-"OFF" or "ON." 2 Select "AMP GAIN" if not shown on the display. "DEMO", "CLOCK H", "CLOCK M", "DIMMER", or "AMP GAIN" appears on the display. 3 Select the desired mode- Selecting the amplifier gain control You can dim the display at a volume level... When shipped from being damaged. "HIGH PWR" or "LOW PWR". • OFF: Cancels the dimmer. • ON: Activates the dimmer. 4 Finish the setting. • LOW PWR: You can adjust the volume level from "VOL 00" to "VOL 30". • HIGH PWR: You can adjust the volume level from...
...DIMMER" if not shown on the display. 3 Select the desired mode-"OFF" or "ON." 2 Select "AMP GAIN" if not shown on the display. "DEMO", "CLOCK H", "CLOCK M", "DIMMER", or "AMP GAIN" appears on the display. 3 Select the desired mode- Selecting the amplifier gain control You can dim the display at a volume level... When shipped from being damaged. "HIGH PWR" or "LOW PWR". • OFF: Cancels the dimmer. • ON: Activates the dimmer. 4 Finish the setting. • LOW PWR: You can adjust the volume level from "VOL 00" to "VOL 30". • HIGH PWR: You can adjust the volume level from...


