
Instruction Manual
Page 2
...● Notes appear after most subsections. before use of the AC Power Adapter/Charger is on its bottom. You are not using the camcorder or AC Power Adapter/Charger under these as well. ● Basic and advanced features/operation are on the bottom and/or the back of... Adapter/ Charger for a long period of this digital video camera. refer to repair the malfunction yourself. ● To prevent shock, do not open the cabinet. Contact your JVC dealer. It is recommended that you disconnect the power cord from the camcorder or AC Power Adapter/ Charger, shut it down...
...● Notes appear after most subsections. before use of the AC Power Adapter/Charger is on its bottom. You are not using the camcorder or AC Power Adapter/Charger under these as well. ● Basic and advanced features/operation are on the bottom and/or the back of... Adapter/ Charger for a long period of this digital video camera. refer to repair the malfunction yourself. ● To prevent shock, do not open the cabinet. Contact your JVC dealer. It is recommended that you disconnect the power cord from the camcorder or AC Power Adapter/ Charger, shut it down...
Instruction Manual
Page 3
.... (An appropriate conversion adapter may be necessary to accommodate different designs of AC outlets in different countries.) When the equipment is allowed to the camcorder from an AC outlet, use this equipment, fire or electric shock may not be able to get out.) No naked flame sources, such as....) The apparatus shall not be followed strictly. Do not block the ventilation holes. (If the ventilation holes are possible anywhere. ● Use the JVC BN-V107U/V114U battery packs and, to recharge them or to supply power to enter this equipment in a bathroom or places with PAL-type colour...
.... (An appropriate conversion adapter may be necessary to accommodate different designs of AC outlets in different countries.) When the equipment is allowed to the camcorder from an AC outlet, use this equipment, fire or electric shock may not be able to get out.) No naked flame sources, such as....) The apparatus shall not be followed strictly. Do not block the ventilation holes. (If the ventilation holes are possible anywhere. ● Use the JVC BN-V107U/V114U battery packs and, to recharge them or to supply power to enter this equipment in a bathroom or places with PAL-type colour...

Instruction Manual
Page 4
...important scene... ... make sure you obtain permission beforehand.) The following notes concern possible physical damage to the camcorder and to the malfunctioning of the TV is intended for the digital video cassette, SD Memory Card and MultiMediaCard. CAUTION! make sure you record an event such as they...as tripping on unsteady or unlevel surfaces. It could tip over, causing serious damage to the camcorder's Info-Shoe. Ⅲ This camcorder is also a risk of injury. Attach only the optional JVC VL-V3U Video Light, VL-F3U Flash, MZ-V3U Stereo Zoom Microphone or MZ-V5U Stereo...
...important scene... ... make sure you obtain permission beforehand.) The following notes concern possible physical damage to the camcorder and to the malfunctioning of the TV is intended for the digital video cassette, SD Memory Card and MultiMediaCard. CAUTION! make sure you record an event such as they...as tripping on unsteady or unlevel surfaces. It could tip over, causing serious damage to the camcorder's Info-Shoe. Ⅲ This camcorder is also a risk of injury. Attach only the optional JVC VL-V3U Video Light, VL-F3U Flash, MZ-V3U Stereo Zoom Microphone or MZ-V5U Stereo...

Instruction Manual
Page 5
... cables may be equipped with one core filter, the end that is closest to the filter should be connected to the camcorder. ● Make sure to use any other cables. EN 5 Provided Accessories ● AC Power Adapter/Charger AA-V100EA, AA-V100A, AA-V100SH...) Battery x 2 (for remote control unit) ● USB Cable ● S/AV/Editing Cable ● Editing Extension Cable ● Memory Card 8 MB (Already inserted in the camcorder) ● Strap (੬ pg. 7 for attachment) ● Grip Belt (੬ pg. 6 for attachment) ● Audio Cable (for connections. If a cable has only ...
... cables may be equipped with one core filter, the end that is closest to the filter should be connected to the camcorder. ● Make sure to use any other cables. EN 5 Provided Accessories ● AC Power Adapter/Charger AA-V100EA, AA-V100A, AA-V100SH...) Battery x 2 (for remote control unit) ● USB Cable ● S/AV/Editing Cable ● Editing Extension Cable ● Memory Card 8 MB (Already inserted in the camcorder) ● Strap (੬ pg. 7 for attachment) ● Grip Belt (੬ pg. 6 for attachment) ● Audio Cable (for connections. If a cable has only ...

Instruction Manual
Page 6
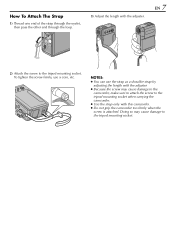
... Grip Belt 1) Remove the pad and separate the two straps. The core filter reduces interference. 3) Repeat the same procedure to attach the strap h to the camcorder. g h More than 2 cm 5) Attach the pad. 2) Thread one end of the strap g through the eyelet, then pass the other eyelet.
... Grip Belt 1) Remove the pad and separate the two straps. The core filter reduces interference. 3) Repeat the same procedure to attach the strap h to the camcorder. g h More than 2 cm 5) Attach the pad. 2) Thread one end of the strap g through the eyelet, then pass the other eyelet.
Instruction Manual
Page 7
... sure to attach the screw to the tripod mounting socket when carrying the camcorder. ● Use the strap only with this camcorder. ● Do not grip the camcorder too firmly when the screw is attached. NOTES: ● You can use a coin, etc. How To Attach The Strap 1) Thread one end of the strap...
... sure to attach the screw to the tripod mounting socket when carrying the camcorder. ● Use the strap only with this camcorder. ● Do not grip the camcorder too firmly when the screw is attached. NOTES: ● You can use a coin, etc. How To Attach The Strap 1) Thread one end of the strap...
Instruction Manual
Page 8
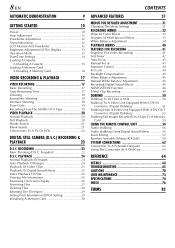
... Snapshot 23 D.S.C. PLAYBACK 24 Normal Playback Of Images 24 Auto Playback Of Images 24 Playback Of Video Clips 25 Playback Of Digital Sound Effects 25 Index Playback Of Files 26 Viewing File Information 26 Removing On-Screen Display 26 Protecting Files 27 Deleting Files ... USING THE REMOTE CONTROL UNIT 54 Audio Dubbing 56 Audio Dubbing Using Digital Sound Effects 56 Insert Editing 57 Random Assemble Editing [R.A.Edit 58 SYSTEM CONNECTIONS 62 Connection To A Personal Computer 62 Using The Camcorder As A WebCam 63 REFERENCE 64 DETAILS 64 TROUBLESHOOTING 65 CAUTIONS 70...
... Snapshot 23 D.S.C. PLAYBACK 24 Normal Playback Of Images 24 Auto Playback Of Images 24 Playback Of Video Clips 25 Playback Of Digital Sound Effects 25 Index Playback Of Files 26 Viewing File Information 26 Removing On-Screen Display 26 Protecting Files 27 Deleting Files ... USING THE REMOTE CONTROL UNIT 54 Audio Dubbing 56 Audio Dubbing Using Digital Sound Effects 56 Insert Editing 57 Random Assemble Editing [R.A.Edit 58 SYSTEM CONNECTIONS 62 Connection To A Personal Computer 62 Using The Camcorder As A WebCam 63 REFERENCE 64 DETAILS 64 TROUBLESHOOTING 65 CAUTIONS 70...

Instruction Manual
Page 9
...down the Lock Button located on the LCD monitor or viewfinder. Automatic Demonstration Automatic Demonstration takes place when "DEMO MODE" is in the camcorder. Ⅲ Performing any operation during the demonstration stops the demonstration temporarily. To cancel Automatic Demonstration 1 Set the Power Switch to "M" while...is no operation for more than 3 minute after that, the demonstration will resume. Ⅲ "DEMO MODE" remains "ON" even if the camcorder power is turned off. If no cassette is set to "A" or "M" and no operation is performed for about 3 minutes after the Power ...
...down the Lock Button located on the LCD monitor or viewfinder. Automatic Demonstration Automatic Demonstration takes place when "DEMO MODE" is in the camcorder. Ⅲ Performing any operation during the demonstration stops the demonstration temporarily. To cancel Automatic Demonstration 1 Set the Power Switch to "M" while...is no operation for more than 3 minute after that, the demonstration will resume. Ⅲ "DEMO MODE" remains "ON" even if the camcorder power is turned off. If no cassette is set to "A" or "M" and no operation is performed for about 3 minutes after the Power ...
Instruction Manual
Page 10
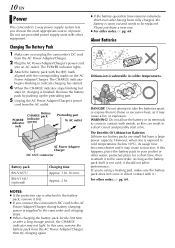
.... Please purchase a new one is exposed to cold temperatures (below 10°C), its terminals to come in contact with it may cease to the camcorder and charging stops. ● When charging the battery pack for a short time, then re-attach it may cause a fire or explosion. If ...then try charging again. NOTES: ● If the protective cap is attached to the battery pack, remove it first. ● If you connect the camcorder's DC cord to the AC Power Adapter/Charger during battery charging, power is supplied to function. Approx. 2 hr. ● If the battery operation...
.... Please purchase a new one is exposed to cold temperatures (below 10°C), its terminals to come in contact with it may cease to the camcorder and charging stops. ● When charging the battery pack for a short time, then re-attach it may cause a fire or explosion. If ...then try charging again. NOTES: ● If the protective cap is attached to the battery pack, remove it first. ● If you connect the camcorder's DC cord to the AC Power Adapter/Charger during battery charging, power is supplied to function. Approx. 2 hr. ● If the battery operation...
Instruction Manual
Page 11
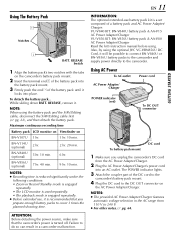
... supply power directly to cover 3 times the planned shooting time. Also, by using the optional JVC VC-VBN856U DC Cord, it is recommended that the camcorder's power is a set composed of a battery pack and AC Power Adapter/ Charger: VU-V840 KIT: BN-V840U battery pack & AA...the coupler part of the battery pack until it . NOTES: ● The provided AC Power Adapter/Charger features automatic voltage selection in a camcorder malfunction. Using The Battery Pack Notches BATT. Maximum continuous recording time Battery pack LCD monitor on Viewfinder on the AC Power Adapter/Charger. BN-...
... supply power directly to cover 3 times the planned shooting time. Also, by using the optional JVC VC-VBN856U DC Cord, it is recommended that the camcorder's power is a set composed of a battery pack and AC Power Adapter/ Charger: VU-V840 KIT: BN-V840U battery pack & AA...the coupler part of the battery pack until it . NOTES: ● The provided AC Power Adapter/Charger features automatic voltage selection in a camcorder malfunction. Using The Battery Pack Notches BATT. Maximum continuous recording time Battery pack LCD monitor on Viewfinder on the AC Power Adapter/Charger. BN-...
Instruction Manual
Page 12
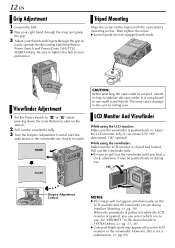
... while the LCD monitor is not advised to pull out the viewfinder until the indications in the viewfinder are not equipped with the camcorder's mounting socket. Then tighten the screw. ● Some tripods are clearly focused. Be sure to tighten the belt to stabilise the...Control until you can rotate 270º (90º downward, 180º upward). However, this is closed and locked. PAUSE CAUTION: When attaching the camcorder to a tripod, extend its legs to your thumb and fingers through the loop and grasp the grip. 3 Adjust your preference. This may be pushed back...
... while the LCD monitor is not advised to pull out the viewfinder until the indications in the viewfinder are not equipped with the camcorder's mounting socket. Then tighten the screw. ● Some tripods are clearly focused. Be sure to tighten the belt to stabilise the...Control until you can rotate 270º (90º downward, 180º upward). However, this is closed and locked. PAUSE CAUTION: When attaching the camcorder to a tripod, extend its legs to your thumb and fingers through the loop and grasp the grip. 3 Adjust your preference. This may be pushed back...
Instruction Manual
Page 13
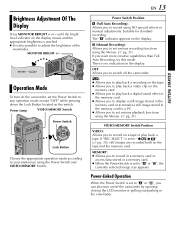
...) If you to set to adjust the brightness of the viewfinder. Suitable for standard recording. MEMORY: ● Allows you to switch off the camcorder by opening/ closing the LCD monitor or pulling out/pushing in the viewfinder. GETTING STARTED until the bright level indicator on the display moves and... the switch. There is set to any operation mode except "OFF" while pressing down the Lock Button located on a tape or play back a digital sound effect in the memory card. ● Allows you to display a still image stored in the memory card or to transfer a still image ...
...) If you to set to adjust the brightness of the viewfinder. Suitable for standard recording. MEMORY: ● Allows you to switch off the camcorder by opening/ closing the LCD monitor or pulling out/pushing in the viewfinder. GETTING STARTED until the bright level indicator on the display moves and... the switch. There is set to any operation mode except "OFF" while pressing down the Lock Button located on a tape or play back a digital sound effect in the memory card. ● Allows you to display a still image stored in the memory card or to transfer a still image ...
Instruction Manual
Page 14
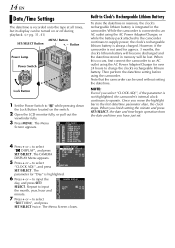
...the highlight bar to operate. The CAMERA DISPLAY Menu appears. The parameter for "Day" is always charged. However, if the camcorder is not highlighted, the camcorder's internal clock continues to the first date/time parameter (day), the clock stops. Button Power Lamp Power Switch Lock Button ...CLOCK ADJ . 20 . 12 . 03 17: 30 minute. 7 Press + or - CAMERA DISPLAY ON SCREEN - When this occurs, first connect the camcorder to charge the clock's rechargeable lithium battery. Repeat to select "n DISPLAY", and press SET/SELECT. NOTE: Even if you select "CLOCK ADJ.", if the...
...the highlight bar to operate. The CAMERA DISPLAY Menu appears. The parameter for "Day" is always charged. However, if the camcorder is not highlighted, the camcorder's internal clock continues to the first date/time parameter (day), the clock stops. Button Power Lamp Power Switch Lock Button ...CLOCK ADJ . 20 . 12 . 03 17: 30 minute. 7 Press + or - CAMERA DISPLAY ON SCREEN - When this occurs, first connect the camcorder to charge the clock's rechargeable lithium battery. Repeat to select "n DISPLAY", and press SET/SELECT. NOTE: Even if you select "CLOCK ADJ.", if the...
Instruction Manual
Page 15
... open . Slide the erase protection tab on this tape, slide the tab back to "REC" before loading it again. ● When the camcorder is closed with a fully charged one or use AC power before continuing. 3 Close the cassette holder cover firmly until it recedes completely before the... cassette holder recedes may cause damage to the camcorder. ● Even when the camcorder is closed , it recedes automatically. To record on the back of the tape in injury or product damage. ● Once ...
... open . Slide the erase protection tab on this tape, slide the tab back to "REC" before loading it again. ● When the camcorder is closed with a fully charged one or use AC power before continuing. 3 Close the cassette holder cover firmly until it recedes completely before the... cassette holder recedes may cause damage to the camcorder. ● Even when the camcorder is closed , it recedes automatically. To record on the back of the tape in injury or product damage. ● Once ...

Instruction Manual
Page 16
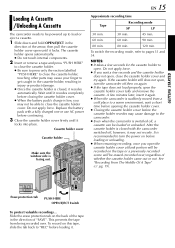
...or MultiMediaCards marked " ". ● Some brands of the label. 4 Close the card cover. Slide the write/erase protection tab on , as this camcorder. 16 EN Loading A Memory Card /Unloading A Memory Card The provided memory card is already inserted in the direction of "LOCK". Write/erase protection ...tab Card Cover Clipped edge Memory card Label 1 Make sure the camcorder's power is off. 2 Open the card cover. 3 To load a memory card, firmly insert it with this may cause the memory...
...or MultiMediaCards marked " ". ● Some brands of the label. 4 Close the card cover. Slide the write/erase protection tab on , as this camcorder. 16 EN Loading A Memory Card /Unloading A Memory Card The provided memory card is already inserted in the direction of "LOCK". Write/erase protection ...tab Card Cover Clipped edge Memory card Label 1 Make sure the camcorder's power is off. 2 Open the card cover. 3 To load a memory card, firmly insert it with this may cause the memory...

Instruction Manual
Page 17
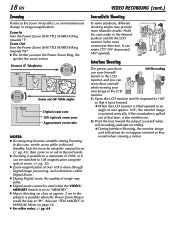
...scenes on the switch. 4 Open the LCD monitor fully, or pull out the viewfinder fully. ● The power lamp lights and the camcorder enters the Record-Standby mode. VIDEO RECORDING Basic Recording NOTE: Before continuing, perform the procedures listed below: ● Power (੬ pg. .... 6 To stop recording, press the Recording Start/Stop Button again. EN 17 NOTES: ● The image will not appear simultaneously on the display. m" means the camcorder is displayed. 5 To start recording, press the Recording Start/Stop Button. m 1 h 0 m (Now calculating) 0h 0m (Blinking) 0 h 5 9 m 0h ...
...scenes on the switch. 4 Open the LCD monitor fully, or pull out the viewfinder fully. ● The power lamp lights and the camcorder enters the Record-Standby mode. VIDEO RECORDING Basic Recording NOTE: Before continuing, perform the procedures listed below: ● Power (੬ pg. .... 6 To stop recording, press the Recording Start/Stop Button again. EN 17 NOTES: ● The image will not appear simultaneously on the display. m" means the camcorder is displayed. 5 To start recording, press the Recording Start/Stop Button. m 1 h 0 m (Now calculating) 0h 0m (Blinking) 0 h 5 9 m 0h ...
Instruction Manual
Page 18
Hold the camcorder in the desired position and tilt the LCD monitor in MANUAL Menu on ... magnification using the optical zoom. (੬ pg. 35) ● Zoom magnification of image may suffer. ● Digital zoom cannot be used when the VIDEO/ MEMORY Switch is inverted vertically. Zoom Out Turn the Power Zoom (SHUTTLE SEARCH...an instantaneous change in (T: Telephoto) 1 xW T 1 0 xW T 20xW T 40xW T 10x W T Zoom out (W: Wide angle) Digital zoom zone 10X (optical) zoom zone Approximate zoom ratio NOTES: ● Focusing may become unstable during Zooming. In this case, set to an...
Hold the camcorder in the desired position and tilt the LCD monitor in MANUAL Menu on ... magnification using the optical zoom. (੬ pg. 35) ● Zoom magnification of image may suffer. ● Digital zoom cannot be used when the VIDEO/ MEMORY Switch is inverted vertically. Zoom Out Turn the Power Zoom (SHUTTLE SEARCH...an instantaneous change in (T: Telephoto) 1 xW T 1 0 xW T 20xW T 40xW T 10x W T Zoom out (W: Wide angle) Digital zoom zone 10X (optical) zoom zone Approximate zoom ratio NOTES: ● Focusing may become unstable during Zooming. In this case, set to an...
Instruction Manual
Page 19
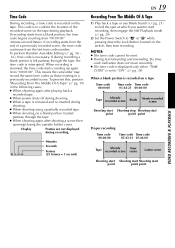
To prevent this, perform "Recording From The Middle Of A Tape" (੬ pg. 19) in a previously recorded scene. This means the camcorder may record the same time codes as those existing in the following cases; ● When shooting again after shooting a scene then opening/closing the cassette ...
To prevent this, perform "Recording From The Middle Of A Tape" (੬ pg. 19) in a previously recorded scene. This means the camcorder may record the same time codes as those existing in the following cases; ● When shooting again after shooting a scene then opening/closing the cassette ...

Instruction Manual
Page 20
...Lock Button located on the LCD monitor with it flipped over and pushed against the camcorder body. For details, ੬ pg. 72. ● If Stop mode continues for more than about 3 minutes, the camcorder's Stop mode is automatically engaged. ● When 4/9 is pressed, the image may... not pause immediately while the camcorder stabilises the still image. 20 EN Normal Playback VOL. +/- to fast-forward the tape. To...
...Lock Button located on the LCD monitor with it flipped over and pushed against the camcorder body. For details, ੬ pg. 72. ● If Stop mode continues for more than about 3 minutes, the camcorder's Stop mode is automatically engaged. ● When 4/9 is pressed, the image may... not pause immediately while the camcorder stabilises the still image. 20 EN Normal Playback VOL. +/- to fast-forward the tape. To...

Instruction Manual
Page 21
... search continues as long as you should start recording, make sure there is at the spot which is at a blank portion, the camcorder searches in either direction during Shuttle Search. OFF RETURN 6 Press + or - If the current position is no recorded scene after the...direction. ● Blank Search does not work if "HEAD CLEANING REQUIRED. ATTENTION: During Shuttle Search, parts of the tape is reached during Blank Search, the camcorder stops automatically. ● A blank portion which is not a malfunction. DEL . DEL BLANK SRCH EXECUTE S / AV I . Before you release the ...
... search continues as long as you should start recording, make sure there is at the spot which is at a blank portion, the camcorder searches in either direction during Shuttle Search. OFF RETURN 6 Press + or - If the current position is no recorded scene after the...direction. ● Blank Search does not work if "HEAD CLEANING REQUIRED. ATTENTION: During Shuttle Search, parts of the tape is reached during Blank Search, the camcorder stops automatically. ● A blank portion which is not a malfunction. DEL . DEL BLANK SRCH EXECUTE S / AV I . Before you release the ...


