Instruction Manual
Page 2
...(੬ pg. 76 - 81) and familiarise yourself with button locations, etc. Using This Instruction Manual ● All major sections are on pages 70 through 72 before use . SAFETY PRECAUTIONS WARNING: ...DO NOT EXPOSE THIS UNIT TO RAIN OR MOISTURE. Contact your JVC dealer. 2 EN Dear Customer, Thank you are not using the camcorder or AC Power Adapter/Charger under these as well. ●.... ● To prevent shock, do not open the cabinet. You are separated for purchasing this digital video camera. Be sure to read the safety information and precautions contained in the Table Of Contents ...
...(੬ pg. 76 - 81) and familiarise yourself with button locations, etc. Using This Instruction Manual ● All major sections are on pages 70 through 72 before use . SAFETY PRECAUTIONS WARNING: ...DO NOT EXPOSE THIS UNIT TO RAIN OR MOISTURE. Contact your JVC dealer. 2 EN Dear Customer, Thank you are not using the camcorder or AC Power Adapter/Charger under these as well. ●.... ● To prevent shock, do not open the cabinet. You are separated for purchasing this digital video camera. Be sure to read the safety information and precautions contained in the Table Of Contents ...
Instruction Manual
Page 8
...Snapshot (For Video Recording 41 Self-Timer 42 Auto Focus 43 Manual Focus 43 Exposure Control 44 Iris Lock 44 Backlight Compensation 45 White Balance Adjustment 45 Manual White Balance Adjustment 45 Recording Digital Sound Effects 46 NAVIGATION Function 46 E-Mail Clip Recording 48 ... THE REMOTE CONTROL UNIT 54 Audio Dubbing 56 Audio Dubbing Using Digital Sound Effects 56 Insert Editing 57 Random Assemble Editing [R.A.Edit 58 SYSTEM CONNECTIONS 62 Connection To A Personal Computer 62 Using The Camcorder As A WebCam 63 REFERENCE 64 DETAILS 64 TROUBLESHOOTING 65 CAUTIONS ...
...Snapshot (For Video Recording 41 Self-Timer 42 Auto Focus 43 Manual Focus 43 Exposure Control 44 Iris Lock 44 Backlight Compensation 45 White Balance Adjustment 45 Manual White Balance Adjustment 45 Recording Digital Sound Effects 46 NAVIGATION Function 46 E-Mail Clip Recording 48 ... THE REMOTE CONTROL UNIT 54 Audio Dubbing 56 Audio Dubbing Using Digital Sound Effects 56 Insert Editing 57 Random Assemble Editing [R.A.Edit 58 SYSTEM CONNECTIONS 62 Connection To A Personal Computer 62 Using The Camcorder As A WebCam 63 REFERENCE 64 DETAILS 64 TROUBLESHOOTING 65 CAUTIONS ...
Instruction Manual
Page 11
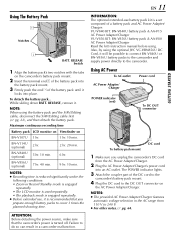
...: BN-V856U battery pack & AA-V80 AC Power Adapter/Charger Read the kit's instruction manual before using. NOTES: ● Recording time is reduced significantly under the following conditions: .../Editing cable first (੬ pg. 22), and then detach the battery pack. NOTE: When using the optional JVC VC-VBN856U DC Cord, it . BN-V840U (optional) 5 hr. 10 min. 6 hr. BN-V856U... 9 hr. 10 min. ATTENTION: Before detaching the power source, make sure that the camcorder's power is recommended that you unplug the camcorder's DC cord from 110 V to 240 V. ● For other notes, ੬ pg...
...: BN-V856U battery pack & AA-V80 AC Power Adapter/Charger Read the kit's instruction manual before using. NOTES: ● Recording time is reduced significantly under the following conditions: .../Editing cable first (੬ pg. 22), and then detach the battery pack. NOTE: When using the optional JVC VC-VBN856U DC Cord, it . BN-V840U (optional) 5 hr. 10 min. 6 hr. BN-V856U... 9 hr. 10 min. ATTENTION: Before detaching the power source, make sure that the camcorder's power is recommended that you unplug the camcorder's DC cord from 110 V to 240 V. ● For other notes, ੬ pg...
Instruction Manual
Page 13
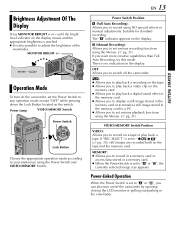
...9679; Allows you to play back a video clip on the memory card. ● Allows you to play back a digital sound effect in the memory card. ● Allows you can also turn on the camcorder, set to "A" or "M", the currently selected image size appears. OFF: Allows you to switch off the... ● It is set various playback functions using the Menus. (੬ pg. 31) If you to your preference using NO special effects or manual adjustments. EN 13 Power Switch Position A (Full Auto Recording): Allows you want more creative capabilities than Full Auto Recording, try this mode. Power Lamp...
...9679; Allows you to play back a video clip on the memory card. ● Allows you to play back a digital sound effect in the memory card. ● Allows you can also turn on the camcorder, set to "A" or "M", the currently selected image size appears. OFF: Allows you to switch off the... ● It is set various playback functions using the Menus. (੬ pg. 31) If you to your preference using NO special effects or manual adjustments. EN 13 Power Switch Position A (Full Auto Recording): Allows you want more creative capabilities than Full Auto Recording, try this mode. Power Lamp...
Instruction Manual
Page 18
... Produces the zoom in/out effect, or an instantaneous change in (T: Telephoto) 1 xW T 1 0 xW T 20xW T 40xW T 10x W T Zoom out (W: Wide angle) Digital zoom zone 10X (optical) zoom zone Approximate zoom ratio NOTES: ● Focusing may become unstable during Zooming. In this case, set the zoom while in...image may suffer. ● Digital zoom cannot be used when the VIDEO/ MEMORY Switch is set all the way to the subject) is possible when the Power Zoom Ring is inverted vertically. Hold the camcorder in the desired position and tilt the LCD monitor in MANUAL Menu on . 2) Point ...
... Produces the zoom in/out effect, or an instantaneous change in (T: Telephoto) 1 xW T 1 0 xW T 20xW T 40xW T 10x W T Zoom out (W: Wide angle) Digital zoom zone 10X (optical) zoom zone Approximate zoom ratio NOTES: ● Focusing may become unstable during Zooming. In this case, set the zoom while in...image may suffer. ● Digital zoom cannot be used when the VIDEO/ MEMORY Switch is set all the way to the subject) is possible when the Power Zoom Ring is inverted vertically. Hold the camcorder in the desired position and tilt the LCD monitor in MANUAL Menu on . 2) Point ...
Instruction Manual
Page 22
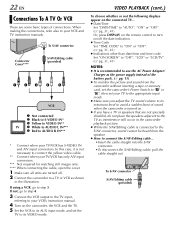
...22 EN Connections To A TV Or VCR These are not specially shielded, do not place the speakers adjacent to the TV as shown in the camcorder playback picture. ● While the S/AV/Editing cable is turned on. ● If you adjust the TV sound volume to its VIDEO mode.... (੬ pg. 11) ● To monitor the picture and sound from the camcorder without inserting a tape or memory card, set the camcorder's Power Switch to "A" or "M", then set your VCR's instruction manual. 4 Turn on /off . 2 Connect the camcorder to your TV/VCR has S-VIDEO IN and A/V input connectors. When making the ...
...22 EN Connections To A TV Or VCR These are not specially shielded, do not place the speakers adjacent to the TV as shown in the camcorder playback picture. ● While the S/AV/Editing cable is turned on. ● If you adjust the TV sound volume to its VIDEO mode.... (੬ pg. 11) ● To monitor the picture and sound from the camcorder without inserting a tape or memory card, set the camcorder's Power Switch to "A" or "M", then set your VCR's instruction manual. 4 Turn on /off . 2 Connect the camcorder to your TV/VCR has S-VIDEO IN and A/V input connectors. When making the ...
Instruction Manual
Page 31
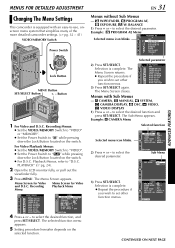
... select the desired function and press SET/SELECT. RETURN CAMERA REC MODE - MANUAL RETURN CONTINUED ON NEXT PAGE Playback Menus, refer to -use, onscreen menu system that simplifies many of the more detailed camcorder settings. (੬ pg. 32 - 41) VIDEO/MEMORY Switch Power Switch ... BALANCE 1) Press + or - Button 1 For Video and D.S.C. SCROLL WI PE-SHUTTER V I ON- MENUS FOR DETAILED ADJUSTMENT EN 31 Changing The Menu Settings This camcorder is complete. OF F N I . OFF NAV I GHTALIVE SHU T T ER SHU T T ER S POR T S SNOW SPOTL IGHT TWILIGHT ADVANCED FEATURES Lock ...
... select the desired function and press SET/SELECT. RETURN CAMERA REC MODE - MANUAL RETURN CONTINUED ON NEXT PAGE Playback Menus, refer to -use, onscreen menu system that simplifies many of the more detailed camcorder settings. (੬ pg. 32 - 41) VIDEO/MEMORY Switch Power Switch ... BALANCE 1) Press + or - Button 1 For Video and D.S.C. SCROLL WI PE-SHUTTER V I ON- MENUS FOR DETAILED ADJUSTMENT EN 31 Changing The Menu Settings This camcorder is complete. OF F N I . OFF NAV I GHTALIVE SHU T T ER SHU T T ER S POR T S SNOW SPOTL IGHT TWILIGHT ADVANCED FEATURES Lock ...
Instruction Manual
Page 33
...monitor fully, or pull out the viewfinder fully. 3 Set "r" to bring the camcorder into focus. NIGHTSCOPE Night-Scope (NIGHTSCOPE) Makes dark subjects or areas even brighter than 10 m, adjust the focus manually. When Twilight is reduced. The flash does not fire in extremely bright surroundings such...The faster the shutter speed, the darker the picture becomes. Use the shutter function under a fluorescent light or mercuryvapour lamp is chosen, the camcorder automatically adjusts the focus from the top and bottom toward the top and bottom, or wipe out from approx. 10 m to " ",...
...monitor fully, or pull out the viewfinder fully. 3 Set "r" to bring the camcorder into focus. NIGHTSCOPE Night-Scope (NIGHTSCOPE) Makes dark subjects or areas even brighter than 10 m, adjust the focus manually. When Twilight is reduced. The flash does not fire in extremely bright surroundings such...The faster the shutter speed, the darker the picture becomes. Use the shutter function under a fluorescent light or mercuryvapour lamp is chosen, the camcorder automatically adjusts the focus from the top and bottom toward the top and bottom, or wipe out from approx. 10 m to " ",...

Instruction Manual
Page 34
...that tapes recorded in the LP mode on this camcorder be momentary pauses in B/W. MANUAL: Makes the exposure control indicator appear. White Balance Adjustment W. AUTO: White balance is used. MWB: Adjust the white balance manually when shooting under various types of stereo sound on ...the other half. * Available only when the VIDEO/MEMORY Switch is recommended for a classic look. Combine this camcorder. ● During playback of a tape recorded on...
...that tapes recorded in the LP mode on this camcorder be momentary pauses in B/W. MANUAL: Makes the exposure control indicator appear. White Balance Adjustment W. AUTO: White balance is used. MWB: Adjust the white balance manually when shooting under various types of stereo sound on ...the other half. * Available only when the VIDEO/MEMORY Switch is recommended for a classic look. Combine this camcorder. ● During playback of a tape recorded on...
Instruction Manual
Page 35
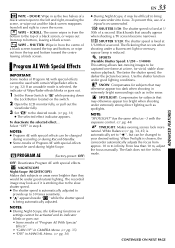
MANUAL: Enables thumbnail images to "Snapshot (For Video Recording)" (੬ pg. 41). By digitally processing and magnifying images, zooming is the sound effect of memory. Snapshot mode for video recording For details on the procedure, refer to be grainy, ... / 60SEC: The captured image is stored in the AGC mode, but the image is recommended. AGC: The overall appearance may be made manually. (੬ pg. 47) ADVANCED FEATURES FULL NEGA PIN-UP FRAME By digitally processing and magnifying images, zooming is possible from 10X (the optical zoom limit), to a maximum of 40X...
MANUAL: Enables thumbnail images to "Snapshot (For Video Recording)" (੬ pg. 41). By digitally processing and magnifying images, zooming is the sound effect of memory. Snapshot mode for video recording For details on the procedure, refer to be grainy, ... / 60SEC: The captured image is stored in the AGC mode, but the image is recommended. AGC: The overall appearance may be made manually. (੬ pg. 47) ADVANCED FEATURES FULL NEGA PIN-UP FRAME By digitally processing and magnifying images, zooming is possible from 10X (the optical zoom limit), to a maximum of 40X...
Instruction Manual
Page 36
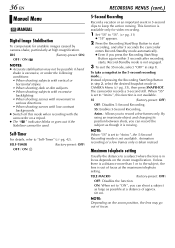
36 EN Manual Menu MANUAL Digital Image Stabilisation To compensate for video recording. 1 Set "5S" to "5S". (੬ pg. 31) ● "5S" appears. 2 Press the Recording Start/Stop Button to start recording, and after 5 seconds the camcorder enters Record-Standby mode automatically. ● Even if you... only. TELE MACRO (Factory-preset: OFF) OFF: Disables the function. ON: When set to "Anim.", this mode when recording with the camcorder on the zoom magnification. SELF-TIMER (Factory-preset: OFF) OFF / ON RECORDING MENUS (cont.) 5-Second Recording Record a vacation or an ...
36 EN Manual Menu MANUAL Digital Image Stabilisation To compensate for video recording. 1 Set "5S" to "5S". (੬ pg. 31) ● "5S" appears. 2 Press the Recording Start/Stop Button to start recording, and after 5 seconds the camcorder enters Record-Standby mode automatically. ● Even if you... only. TELE MACRO (Factory-preset: OFF) OFF: Disables the function. ON: When set to "Anim.", this mode when recording with the camcorder on the zoom magnification. SELF-TIMER (Factory-preset: OFF) OFF / ON RECORDING MENUS (cont.) 5-Second Recording Record a vacation or an ...
Instruction Manual
Page 37
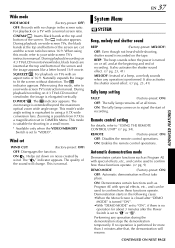
... (੬ pg. 54). This mode is suitable for more than 3 minutes after the Power Switch is set to your wide-screen TV's instruction manual. The " " indicator appears. CONTINUED ON NEXT PAGE ADVANCED FEATURES This mode's wide angle setting is turned "ON". •With "DEMO MODE..." set to your wide-screen TV's instruction manual. CINEMA* : Inserts black bands at the beginning and end of a beep, a melody sounds when any operation during the demonstration stops the ...
... (੬ pg. 54). This mode is suitable for more than 3 minutes after the Power Switch is set to your wide-screen TV's instruction manual. The " " indicator appears. CONTINUED ON NEXT PAGE ADVANCED FEATURES This mode's wide angle setting is turned "ON". •With "DEMO MODE..." set to your wide-screen TV's instruction manual. CINEMA* : Inserts black bands at the beginning and end of a beep, a melody sounds when any operation during the demonstration stops the ...
Instruction Manual
Page 42
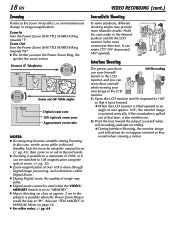
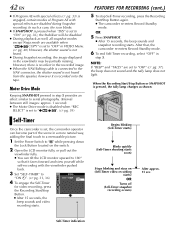
...set to pg. 39) FEATURES FOR RECORDING (cont.) 5 To stop Self-Timer recording, press the Recording Start/Stop Button again. ● The camcorder re-enters Record-Standby mode. Motor Drive Mode Keeping SNAPSHOT pressed in step 5 provides an effect similar to serial photography. (Interval between still images... approx. 1 second) ● The Motor Drive mode is disabled when "REC SELECT" is set , the camcorder operator can become part of Program AE with the viewfinder pushed back. 3 Set "SELF-TIMER" to MANUAL "ON ". (੬ pg. 31, 36) 4 To engage the Self-Timer SEL F - When the ...
...set to pg. 39) FEATURES FOR RECORDING (cont.) 5 To stop Self-Timer recording, press the Recording Start/Stop Button again. ● The camcorder re-enters Record-Standby mode. Motor Drive Mode Keeping SNAPSHOT pressed in step 5 provides an effect similar to serial photography. (Interval between still images... approx. 1 second) ● The Motor Drive mode is disabled when "REC SELECT" is set , the camcorder operator can become part of Program AE with the viewfinder pushed back. 3 Set "SELF-TIMER" to MANUAL "ON ". (੬ pg. 31, 36) 4 To engage the Self-Timer SEL F - When the ...

Instruction Manual
Page 43
... pressing down the Lock Button located on a further subject, press +. ADVANCED FEATURES The " " indicator appears and blinks. EN 43 Auto Focus The camcorder's Full Range AF system offers continuous shooting ability from close-up because the depth-of water. ● When shooting a scene with a high-contrast ...lens, zoom out first. (੬ pg. 18) If zoomed-in in the auto focus mode, the camcorder may not be obtainable in the situations listed below (in these cases perform "Manual Focus"): ● When two subjects overlap in the same scene. ● When illumination is low.* &#...
... pressing down the Lock Button located on a further subject, press +. ADVANCED FEATURES The " " indicator appears and blinks. EN 43 Auto Focus The camcorder's Full Range AF system offers continuous shooting ability from close-up because the depth-of water. ● When shooting a scene with a high-contrast ...lens, zoom out first. (੬ pg. 18) If zoomed-in in the auto focus mode, the camcorder may not be obtainable in the situations listed below (in these cases perform "Manual Focus"): ● When two subjects overlap in the same scene. ● When illumination is low.* &#...
Instruction Manual
Page 44
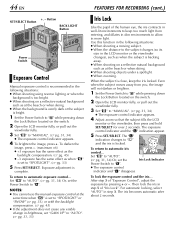
...Set "p" to automatic exposure control... When the subject is complete. Set "p" to "AUTO". (੬ pg. 31, 34) Or, set the Power Switch to "MANUAL". (੬ pg. 31, 34) ● The exposure control indicator appears. 4 To brighten the image, press +. After step 3 of "Iris Lock". For... a moving subject. ● When the distance to "SPOTLIGHT". (੬ pg. 33) 5 Press SET/SELECT. NOTES: ● You cannot use the manual exposure control at the beach or when skiing. ● When shooting objects under a spotlight. ● When zooming. The exposure control indicator and the " ...
...Set "p" to automatic exposure control... When the subject is complete. Set "p" to "AUTO". (੬ pg. 31, 34) Or, set the Power Switch to "MANUAL". (੬ pg. 31, 34) ● The exposure control indicator appears. 4 To brighten the image, press +. After step 3 of "Iris Lock". For... a moving subject. ● When the distance to "SPOTLIGHT". (੬ pg. 33) 5 Press SET/SELECT. NOTES: ● You cannot use the manual exposure control at the beach or when skiing. ● When shooting objects under a spotlight. ● When zooming. The exposure control indicator and the " ...

Instruction Manual
Page 45
... is retained even if the power is displayed. NOTE: White balance cannot be shot under various lighting. In such a case, adjust focus manually. (੬ pg. 43) ● A subject can be used . ● For the setting, refer to "A". EN 45 Backlight Compensation...subject is different depending on a cloudy day. HALOGEN: A video light or similar type of lighting. Press BACK LIGHT. However, more advanced camcorder operators control this function for a more professional colour/tint reproduction. (Factory-preset: AUTO) AUTO: White balance is used when "r" is correct...
... is retained even if the power is displayed. NOTE: White balance cannot be shot under various lighting. In such a case, adjust focus manually. (੬ pg. 43) ● A subject can be used . ● For the setting, refer to "A". EN 45 Backlight Compensation...subject is different depending on a cloudy day. HALOGEN: A video light or similar type of lighting. Press BACK LIGHT. However, more advanced camcorder operators control this function for a more professional colour/tint reproduction. (Factory-preset: AUTO) AUTO: White balance is used when "r" is correct...
Instruction Manual
Page 46
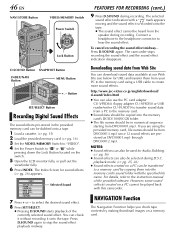
...Button +, - To cancel recording the sound effect midway... The camcorder stops recording the sound effect and the sound effect indication disappears... are prestored as DVC00001.mp3 through DVC00012.mp3. http://www.jvc-victor.co.jp/english/download/ d-sound/index.html ●...down the Lock Button located on a memory card. to the instruction manual of the currently selected sound effect. Downloading sound data from Web Site...stop the sound effect playback midway. Button SET/SELECT Button Recording Digital Sound Effects The sound effects pre-stored in numerical sequence starting...
...Button +, - To cancel recording the sound effect midway... The camcorder stops recording the sound effect and the sound effect indication disappears... are prestored as DVC00001.mp3 through DVC00012.mp3. http://www.jvc-victor.co.jp/english/download/ d-sound/index.html ●...down the Lock Button located on a memory card. to the instruction manual of the currently selected sound effect. Downloading sound data from Web Site...stop the sound effect playback midway. Button SET/SELECT Button Recording Digital Sound Effects The sound effects pre-stored in numerical sequence starting...

Instruction Manual
Page 47
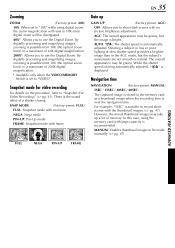
...Ring to the right (5) to select the desired image, and press SET/SELECT. ● The "NAVIGATION SEARCH" indication appears blinking and the camcorder starts searching the tape for the relevant point of the point where the loaded memory card is recognised is captured. 7 Press the Recording Start/..., 35) 3) After the recording, press NAVI STORE. • The " " indicator appears briefly and the captured image is being stored in MANUAL Menu, the NAVIGATION function will not work properly. The VIDEO Menu appears. Displayed while the captured image is stored in the memory card as a...
...Ring to the right (5) to select the desired image, and press SET/SELECT. ● The "NAVIGATION SEARCH" indication appears blinking and the camcorder starts searching the tape for the relevant point of the point where the loaded memory card is recognised is captured. 7 Press the Recording Start/..., 35) 3) After the recording, press NAVI STORE. • The " " indicator appears briefly and the captured image is being stored in MANUAL Menu, the NAVIGATION function will not work properly. The VIDEO Menu appears. Displayed while the captured image is stored in the memory card as a...
Instruction Manual
Page 50
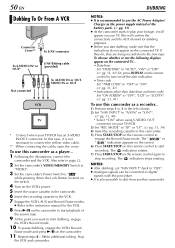
... set "S/AV INPUT" back to "OFF". ● Analogue signals can be converted to digital signals with this camcorder. 5) Press START/STOP on the remote control to play your TV. Pause mode and press 4/9 on the camcorder. 11 Repeat steps 8 - 10 for dubbing purposes. ● Before you want to ... 34) 4) Insert the recording cassette in the VCR. 7 Engage the VCR's AUX and Record-Pause modes. ● Refer to the instruction manual for the VCR. 8 Press 4/9 on the camcorder to start dubbing, engage the VCR's Record mode. 10 To pause dubbing, engage the VCR's Record- The " A/V.IN " or " S....
... set "S/AV INPUT" back to "OFF". ● Analogue signals can be converted to digital signals with this camcorder. 5) Press START/STOP on the remote control to play your TV. Pause mode and press 4/9 on the camcorder. 11 Repeat steps 8 - 10 for dubbing purposes. ● Before you want to ... 34) 4) Insert the recording cassette in the VCR. 7 Engage the VCR's AUX and Record-Pause modes. ● Refer to the instruction manual for the VCR. 8 Press 4/9 on the camcorder to start dubbing, engage the VCR's Record mode. 10 To pause dubbing, engage the VCR's Record- The " A/V.IN " or " S....
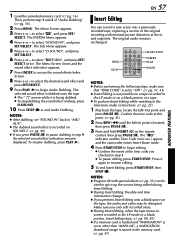
Instruction Manual
Page 57
... replacing a section of "Audio Dubbing" (੬ pg. 56). 2 Press MENU. The "9I" indicator and the Time Code (min.:sec.) appear and the camcorder enters Insert-Pause mode. 4 Press START/STOP to pause dubbing in step 9 the selected sound effect indication remains displayed. to select "BRETURN", and press SET... a blank portion, Insert Edting stops. (੬ pg. 80, 81) ● If a memory card is loaded and "NAVIGATION" is set to other than "MANUAL", a NAVIGATION thumbnail image is dubbed onto the tape. ● The " " moves while it again to select "s", and press SET/ SELECT. Make sure you ...
... replacing a section of "Audio Dubbing" (੬ pg. 56). 2 Press MENU. The "9I" indicator and the Time Code (min.:sec.) appear and the camcorder enters Insert-Pause mode. 4 Press START/STOP to pause dubbing in step 9 the selected sound effect indication remains displayed. to select "BRETURN", and press SET... a blank portion, Insert Edting stops. (੬ pg. 80, 81) ● If a memory card is loaded and "NAVIGATION" is set to other than "MANUAL", a NAVIGATION thumbnail image is dubbed onto the tape. ● The " " moves while it again to select "s", and press SET/ SELECT. Make sure you ...


