Instruction Manual
Page 1
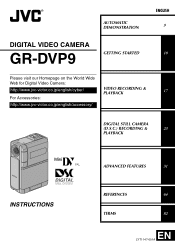
AUTOMATIC DEMONSTRATION ENGLISH 9 DIGITAL VIDEO CAMERA GR-DVP9 GETTING STARTED 10 Please visit our Homepage on the World Wide Web for Digital Video Camera: http://www.jvc-victor.co.jp/english/cyber/ VIDEO RECORDING & PLAYBACK 17 For Accessories: http://www.jvc-victor.co.jp/english/accessory/ DIGITAL STILL CAMERA (D.S.C.) RECORDING & 23 PLAYBACK INSTRUCTIONS ADVANCED FEATURES 31 REFERENCES 64 TERMS 82 EN LYT1147-001A
AUTOMATIC DEMONSTRATION ENGLISH 9 DIGITAL VIDEO CAMERA GR-DVP9 GETTING STARTED 10 Please visit our Homepage on the World Wide Web for Digital Video Camera: http://www.jvc-victor.co.jp/english/cyber/ VIDEO RECORDING & PLAYBACK 17 For Accessories: http://www.jvc-victor.co.jp/english/accessory/ DIGITAL STILL CAMERA (D.S.C.) RECORDING & 23 PLAYBACK INSTRUCTIONS ADVANCED FEATURES 31 REFERENCES 64 TERMS 82 EN LYT1147-001A
Instruction Manual
Page 24
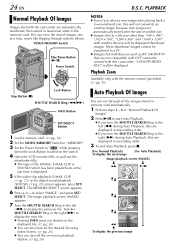
...time is displayed. 5 If the video clip playback (E-MAIL CLIP, ੬ pg. 25) or the digital sound playback (SOUND, ੬ pg. 25) screen appears, press SET/ SELECT. These thumbnail images ...cannot be transferred to a PC. ● Images shot with devices (such as JVC GR-DVX70) that are displayed in descending order. ● If you turn off the on the switch. ... SELECT. PLAYBACK Normal Playback Of Images Images shot with this will be viewed with the camcorder are displayed in the memory card. will not overwrite an existing image, because new images ...
...time is displayed. 5 If the video clip playback (E-MAIL CLIP, ੬ pg. 25) or the digital sound playback (SOUND, ੬ pg. 25) screen appears, press SET/ SELECT. These thumbnail images ...cannot be transferred to a PC. ● Images shot with devices (such as JVC GR-DVX70) that are displayed in descending order. ● If you turn off the on the switch. ... SELECT. PLAYBACK Normal Playback Of Images Images shot with this will be viewed with the camcorder are displayed in the memory card. will not overwrite an existing image, because new images ...

Instruction Manual
Page 84
AA/AG/AH/AC COPYRIGHT© 2003 VICTOR COMPANY OF JAPAN, LTD. EN GR-DVP9 ®Registered Trademark owned by VICTOR COMPANY OF JAPAN, LTD. Printed in Japan 0303-FO-ID-VP
AA/AG/AH/AC COPYRIGHT© 2003 VICTOR COMPANY OF JAPAN, LTD. EN GR-DVP9 ®Registered Trademark owned by VICTOR COMPANY OF JAPAN, LTD. Printed in Japan 0303-FO-ID-VP
Instruction Manual
Page 92
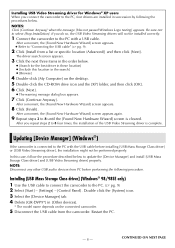
...PC before installing [USB Mass Storage Class driver] or [USB Video Streaming driver], the installation might not be installed correctly. 1 Connect the camcorder to 8 until the [Found New Hardware Wizard] screen is complete. The driver search screen appears. 3 Click the next three items in the... properly. In this location in the search] ● [Browse] 4 Double-click [My Computer] on the connected camcorder. 5 Disconnect the USB cable from the camcorder. Double click the [System] icon. 3 Select the [Device Manager] tab. 4 Delete [GR-DVP9*] in succession by following procedure.
...PC before installing [USB Mass Storage Class driver] or [USB Video Streaming driver], the installation might not be installed correctly. 1 Connect the camcorder to 8 until the [Found New Hardware Wizard] screen is complete. The driver search screen appears. 3 Click the next three items in the... properly. In this location in the search] ● [Browse] 4 Double-click [My Computer] on the connected camcorder. 5 Disconnect the USB cable from the camcorder. Double click the [System] icon. 3 Select the [Device Manager] tab. 4 Delete [GR-DVP9*] in succession by following procedure.
Instruction Manual
Page 93
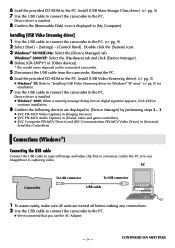
... name depends on digital signature appears, click [OK] to continue installation. 8 Confirm the following devices are turned off before making any connections. 2 Use the USB cable to connect the camcorder to the PC... 7 Use the USB cable to connect the camcorder to the PC. Windows® 2000/XP: Select the [Hardware] tab and click [Device Manager]. 4 Delete [GR-DVP9*] in the PC. Install [USB Video Streaming...; [JVC PIX-MCV Video Capture] in [Imaging Devices] ● [JVC PIX-MCV Audio Capture] in [Sound, video and game controllers] ● [JVC Composite PIX-MCV Device] and [JVC Communication...
... name depends on digital signature appears, click [OK] to continue installation. 8 Confirm the following devices are turned off before making any connections. 2 Use the USB cable to connect the camcorder to the PC... 7 Use the USB cable to connect the camcorder to the PC. Windows® 2000/XP: Select the [Hardware] tab and click [Device Manager]. 4 Delete [GR-DVP9*] in the PC. Install [USB Video Streaming...; [JVC PIX-MCV Video Capture] in [Imaging Devices] ● [JVC PIX-MCV Audio Capture] in [Sound, video and game controllers] ● [JVC Composite PIX-MCV Device] and [JVC Communication...


