Instruction Manual
Page 11
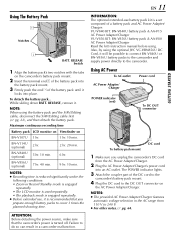
... to connect BN-V840U or BN-V856U battery packs to the camcorder and supply power directly to cover 3 times the planned shooting time. NOTES: ● Recording time is reduced significantly under the following conditions: • Zoom or Record-Standby mode is engaged repeatedly. • The LCD monitor is used repeatedly. • The playback mode is turned off. NOTES: ● The provided AC Power Adapter/Charger features automatic voltage selection in a camcorder malfunction...
... to connect BN-V840U or BN-V856U battery packs to the camcorder and supply power directly to cover 3 times the planned shooting time. NOTES: ● Recording time is reduced significantly under the following conditions: • Zoom or Record-Standby mode is engaged repeatedly. • The LCD monitor is used repeatedly. • The playback mode is turned off. NOTES: ● The provided AC Power Adapter/Charger features automatic voltage selection in a camcorder malfunction...
Instruction Manual
Page 14
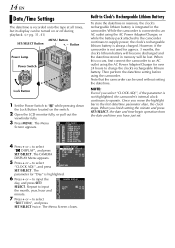
... 5 Press + or - The Menu Screen closes. While the camcorder is connected to an AC outlet using the AC Power Adapter/Charger, or while the battery pack attached to the camcorder continues to select "n DISPLAY", and press SET/SELECT. Then perform the date/time setting before using the AC Power Adapter/Charger for over 24 hours to select RETURN "BRETURN", and press SET/SELECT twice. Button Power Lamp Power Switch Lock Button 1 Set the Power Switch to select "CLOCK...
... 5 Press + or - The Menu Screen closes. While the camcorder is connected to an AC outlet using the AC Power Adapter/Charger, or while the battery pack attached to the camcorder continues to select "n DISPLAY", and press SET/SELECT. Then perform the date/time setting before using the AC Power Adapter/Charger for over 24 hours to select RETURN "BRETURN", and press SET/SELECT twice. Button Power Lamp Power Switch Lock Button 1 Set the Power Switch to select "CLOCK...
Instruction Manual
Page 28
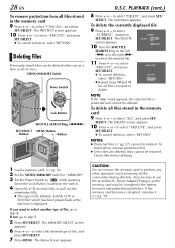
... deleted. VIDEO/MEMORY Switch Power Switch Lock Button SHUTTLE SEARCH Ring (3/5) SET/SELECT MENU Button Button +, - to use the provided AC Power Adapter/Charger, as turning off the camcorder) during deletion. to "P" while pressing down the Lock Button located on the switch. 4 Open the LCD monitor fully, or pull out the viewfinder fully. ● The type of file (IMAGE, E-MAIL CLIP or SOUND) which has been played back at once. Check files before deleting. 1 Load a memory card. (੬ pg. 16) 2 Set the VIDEO/MEMORY Switch to "MEMORY". 3 Set...
... deleted. VIDEO/MEMORY Switch Power Switch Lock Button SHUTTLE SEARCH Ring (3/5) SET/SELECT MENU Button Button +, - to use the provided AC Power Adapter/Charger, as turning off the camcorder) during deletion. to "P" while pressing down the Lock Button located on the switch. 4 Open the LCD monitor fully, or pull out the viewfinder fully. ● The type of file (IMAGE, E-MAIL CLIP or SOUND) which has been played back at once. Check files before deleting. 1 Load a memory card. (੬ pg. 16) 2 Set the VIDEO/MEMORY Switch to "MEMORY". 3 Set...
Instruction Manual
Page 29
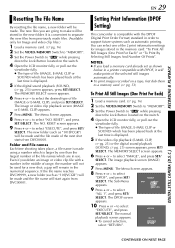
... you delete an image or video clip file with a number in a printer compatible with the DPOF (Digital Print Order Format) standard in the new folder. The Sub Menu appears. 9 Press + or - The DPOF screen appears. 10 Press + or - ALL1? ● To cancel selection, select "RETURN". It is displayed. 5 If the digital sound playback (SOUND, (੬ pg. 25)) screen appears, press SET/SELECT. The NO. RECORDING & PLAYBACK EN 29 Resetting The File...
... you delete an image or video clip file with a number in a printer compatible with the DPOF (Digital Print Order Format) standard in the new folder. The Sub Menu appears. 9 Press + or - The DPOF screen appears. 10 Press + or - ALL1? ● To cancel selection, select "RETURN". It is displayed. 5 If the digital sound playback (SOUND, (੬ pg. 25)) screen appears, press SET/SELECT. The NO. RECORDING & PLAYBACK EN 29 Resetting The File...
Instruction Manual
Page 30
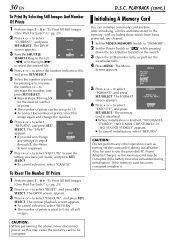
... it. SAVE? ● If you have been protected, are cleared. 1 Set the VIDEO/MEMORY Switch to "MEMORY". 2 Set the Power Switch to decrease the number, and SHEETS press SET/SELECT. 05 ● Repeat steps 3 through 5, the Menu Screen reappears. 7 Press + or - After initialising, all still images. Also, be sure to use the provided AC Power Adapter/Charger, as the memory card may cause the memory card to 0 for all files and data stored in...
... it. SAVE? ● If you have been protected, are cleared. 1 Set the VIDEO/MEMORY Switch to "MEMORY". 2 Set the Power Switch to decrease the number, and SHEETS press SET/SELECT. 05 ● Repeat steps 3 through 5, the Menu Screen reappears. 7 Press + or - After initialising, all still images. Also, be sure to use the provided AC Power Adapter/Charger, as the memory card may cause the memory card to 0 for all files and data stored in...
Instruction Manual
Page 50
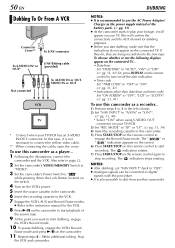
...) * Select "S.IN" when using S-VIDEO OUT connector on your TV/VCR. 3) Set "REC MODE" to "SP" or "LP". (੬ pg. 31, 34) 4) Insert the recording cassette in the VCR. 7 Engage the VCR's AUX and Record-Pause modes. ● Refer to the instruction manual for the VCR. 8 Press 4/9 on your TV/VCR has an S-VIDEO IN/OUT connector. Also refer to page 22. 2 Set the camcorder's VIDEO/MEMORY Switch to "VIDEO". 3 Set the camcorder's Power Switch to "P" while pressing...
...) * Select "S.IN" when using S-VIDEO OUT connector on your TV/VCR. 3) Set "REC MODE" to "SP" or "LP". (੬ pg. 31, 34) 4) Insert the recording cassette in the VCR. 7 Engage the VCR's AUX and Record-Pause modes. ● Refer to the instruction manual for the VCR. 8 Press 4/9 on your TV/VCR has an S-VIDEO IN/OUT connector. Also refer to page 22. 2 Set the camcorder's VIDEO/MEMORY Switch to "VIDEO". 3 Set the camcorder's Power Switch to "P" while pressing...
Instruction Manual
Page 63
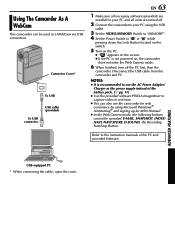
... necessary software (provided) are installed in real time. ● You can be operated: E-MAIL, SNAPSHOT, INDEX/ NAVI, NAVI STORE, D.SOUND, the Recording Start/Stop Button. Refer to the instruction manuals of the battery pack. (੬ pg. 11) ● Use the provided software PIXELA ImageMixer to your PC using Microsoft Windows® NetMeeting® and signing up for web conference by using the USB cable. 3 Set the VIDEO/MEMORY Switch to "MEMORY". 4 Set the Power Switch to...
... necessary software (provided) are installed in real time. ● You can be operated: E-MAIL, SNAPSHOT, INDEX/ NAVI, NAVI STORE, D.SOUND, the Recording Start/Stop Button. Refer to the instruction manuals of the battery pack. (੬ pg. 11) ● Use the provided software PIXELA ImageMixer to your PC using Microsoft Windows® NetMeeting® and signing up for web conference by using the USB cable. 3 Set the VIDEO/MEMORY Switch to "MEMORY". 4 Set the Power Switch to...
Instruction Manual
Page 65
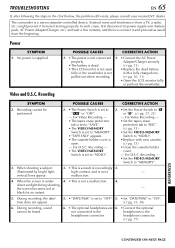
... CORRECTIVE ACTION 2. Switch to "SAVE". Recording - • Set the VIDEO/MEMORY Switch to "ON". (੬ pg. 31, 38) 6. When the screen is under 4. • This is not connected 1. • Connect the AC Power properly. During recording, the date/ time does not appear. 5. • "DATE/TIME" is • Replace with a fully charged one. or "M". (੬ pg. 17, 23) - When shooting a subject 3. • This is not with new cassette. TROUBLESHOOTING EN 65 If...
... CORRECTIVE ACTION 2. Switch to "SAVE". Recording - • Set the VIDEO/MEMORY Switch to "ON". (੬ pg. 31, 38) 6. When the screen is under 4. • This is not connected 1. • Connect the AC Power properly. During recording, the date/ time does not appear. 5. • "DATE/TIME" is • Replace with a fully charged one. or "M". (੬ pg. 17, 23) - When shooting a subject 3. • This is not with new cassette. TROUBLESHOOTING EN 65 If...
Instruction Manual
Page 74
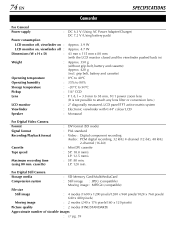
...EN SPECIFICATIONS Camcorder For General Power supply : Power consumption LCD monitor off, viewfinder on : LCD monitor on, viewfinder off : Dimensions (W x H x D) : Weight : Operating temperature : Operating humidity : Storage temperature : Pickup : Lens : LCD monitor : Viewfinder : Speaker : DC 6.3 V (Using AC Power Adapter/Charger) DC 7.2 V (Using battery pack) Approx. 3.9 W Approx. 4.7 W 43 mm x 115 mm x 80 mm (with 0.44" colour LCD Monaural For Digital Video Camera Format Signal format Recording/Playback format Cassette Tape speed Maximum recording time (using...
...EN SPECIFICATIONS Camcorder For General Power supply : Power consumption LCD monitor off, viewfinder on : LCD monitor on, viewfinder off : Dimensions (W x H x D) : Weight : Operating temperature : Operating humidity : Storage temperature : Pickup : Lens : LCD monitor : Viewfinder : Speaker : DC 6.3 V (Using AC Power Adapter/Charger) DC 7.2 V (Using battery pack) Approx. 3.9 W Approx. 4.7 W 43 mm x 115 mm x 80 mm (with 0.44" colour LCD Monaural For Digital Video Camera Format Signal format Recording/Playback format Cassette Tape speed Maximum recording time (using...
Instruction Manual
Page 77
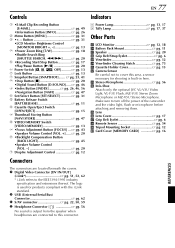
..., 62 * i.Link refers to turn off the power of the camcorder and the video light, flash or microphone before attaching and removing them. Controls a •E-Mail Clip Recording Button [E-MAIL pg. 49 •Information Button [INFO pg. 26 b Menu Button [MENU pg. 31 c •+, - T USB (Universal Serial Bus) Connector pg. 62 U S/AV connector pg. 22, 50, 59 V Headphone Connector pg. 56 No sound is output from the speaker when...
..., 62 * i.Link refers to turn off the power of the camcorder and the video light, flash or microphone before attaching and removing them. Controls a •E-Mail Clip Recording Button [E-MAIL pg. 49 •Information Button [INFO pg. 26 b Menu Button [MENU pg. 31 c •+, - T USB (Universal Serial Bus) Connector pg. 62 U S/AV connector pg. 22, 50, 59 V Headphone Connector pg. 56 No sound is output from the speaker when...
Instruction Manual
Page 81
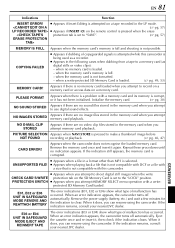
EN 81 Indications Function INSERT ERROR! ● Appears if Insert Editing is attempted on a tape recorded in the LP mode. ● Appears if INSERT (I) on the remote control is pressed when the erase
EN 81 Indications Function INSERT ERROR! ● Appears if Insert Editing is attempted on a tape recorded in the LP mode. ● Appears if INSERT (I) on the remote control is pressed when the erase

Instruction Manual
Page 83
... Recording media selection (REC SELECT 39 Recording Mode (REC MODE 34, 40 Recording Time Memory Card 49 Tape 15 Record-Standby 17 Remaining Power Level 80 Remote Control 54 Remote control setting (REMOTE 37 Resetting Menu Settings (CAM RESET 38 Resetting The File Name 29 Rewind The Tape 20 S SD Memory Card 16, 71 Self-Timer (SELF-TIMER 36, 42 Set Remote/VCR Code 58 Shuttle Search 21 Slow-Motion Playback 55 Snapshot 23, 41 Snapshot Mode (SNAP MODE 35 Sound input (SOUND IN 38 Sound Mode (SOUND MODE 34, 40 Speaker Volume 20 Specifications 74, 75 Still Playback 20 S-Video...
... Recording media selection (REC SELECT 39 Recording Mode (REC MODE 34, 40 Recording Time Memory Card 49 Tape 15 Record-Standby 17 Remaining Power Level 80 Remote Control 54 Remote control setting (REMOTE 37 Resetting Menu Settings (CAM RESET 38 Resetting The File Name 29 Rewind The Tape 20 S SD Memory Card 16, 71 Self-Timer (SELF-TIMER 36, 42 Set Remote/VCR Code 58 Shuttle Search 21 Slow-Motion Playback 55 Snapshot 23, 41 Snapshot Mode (SNAP MODE 35 Sound input (SOUND IN 38 Sound Mode (SOUND MODE 34, 40 Speaker Volume 20 Specifications 74, 75 Still Playback 20 S-Video...
Instruction Manual
Page 89
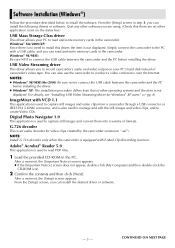
... connect the USB cable between the camcorder and the PC before installing the driver. ● Windows® XP: The installation procedure differs from a camcorder through a USB connector or IEEE1394 (i.LINK) connector, and is not displayed. CONTINUED ON NEXT PAGE USB Video Streaming driver This driver allows you can also use the camcorder to record camcorder's audio and video output on the status bar.) USB Mass Storage Class driver This driver allows your PC's hard disk instead of formats...
... connect the USB cable between the camcorder and the PC before installing the driver. ● Windows® XP: The installation procedure differs from a camcorder through a USB connector or IEEE1394 (i.LINK) connector, and is not displayed. CONTINUED ON NEXT PAGE USB Video Streaming driver This driver allows you can also use the camcorder to record camcorder's audio and video output on the status bar.) USB Mass Storage Class driver This driver allows your PC's hard disk instead of formats...
Instruction Manual
Page 96
... message [ACCESSING FILES] is connected to "OFF". The software that is needed in the status bar. If the video clip plays but without the audio, install the G.726 decoder from the Microsoft web site at: http://www.microsoft.com/ If you have opened with E-Mail Clip Recording function) Use the Windows Media™ Player (version 6.4 or later). The camcorder turns off the camcorder. The [Unplug or Eject Hardware] or [Safely Remove...
... message [ACCESSING FILES] is connected to "OFF". The software that is needed in the status bar. If the video clip plays but without the audio, install the G.726 decoder from the Microsoft web site at: http://www.microsoft.com/ If you have opened with E-Mail Clip Recording function) Use the Windows Media™ Player (version 6.4 or later). The camcorder turns off the camcorder. The [Unplug or Eject Hardware] or [Safely Remove...
Instruction Manual
Page 100
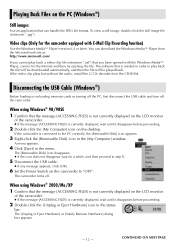
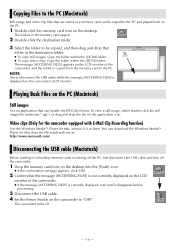
... the camcorder to "OFF". Playing Back Files on the camcorder's LCD monitor. Video clips (Only for the camcorder equipped with E-Mail Clip Recording function) Use the Windows Media™ Player for Mac from the memory card to the PC. NOTE: Never disconnect the USB cable while the message [ACCESSING FILES] is displayed on the PC (Macintosh) Still images Use an application that can handle the JPEG file format. To view a still image, either double-click the still image file...
... the camcorder to "OFF". Playing Back Files on the camcorder's LCD monitor. Video clips (Only for the camcorder equipped with E-Mail Clip Recording function) Use the Windows Media™ Player for Mac from the memory card to the PC. NOTE: Never disconnect the USB cable while the message [ACCESSING FILES] is displayed on the PC (Macintosh) Still images Use an application that can handle the JPEG file format. To view a still image, either double-click the still image file...

Instruction Manual
Page 133
... this case, click the Digital video camera input (1394) button in the information display panel. 2 Click the Play button. NOTE: If the MPEG1 files cannot be loaded from a tape via an optional DV cable, noise may appear depending on the camcorder to capture video. The camcorder turns off. Windows Media™ Player can use the USB cable. The amount of a USB cable to "OFF". In this case, use a DV cable instead of available storage space...
... this case, click the Digital video camera input (1394) button in the information display panel. 2 Click the Play button. NOTE: If the MPEG1 files cannot be loaded from a tape via an optional DV cable, noise may appear depending on the camcorder to capture video. The camcorder turns off. Windows Media™ Player can use the USB cable. The amount of a USB cable to "OFF". In this case, use a DV cable instead of available storage space...
Instruction Manual
Page 140
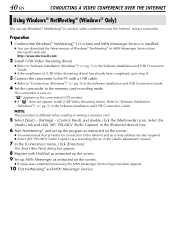
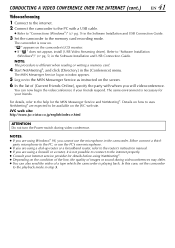
... [JVC PIX-MCV Audio Capture] as instructed on the screen. ● If setup was completed previously, the MSN Messenger Service logon window appears. 10 Exit NetMeeting® and MSN Messenger Service. Preparation 1 Confirm that provides for connection to the memory card recording mode. NOTE: The procedure is now on the camcorder's LCD monitor. ● If " " does not appear, install [USB Video Streaming driver]. Refer to conduct video conferences over the Internet, using a camcorder...
... [JVC PIX-MCV Audio Capture] as instructed on the screen. ● If setup was completed previously, the MSN Messenger Service logon window appears. 10 Exit NetMeeting® and MSN Messenger Service. Preparation 1 Confirm that provides for connection to the memory card recording mode. NOTE: The procedure is now on the camcorder's LCD monitor. ● If " " does not appear, install [USB Video Streaming driver]. Refer to conduct video conferences over the Internet, using a camcorder...
Instruction Manual
Page 141
... the router's instruction manual. ● If you cannot use the PC's own microphone. ● If you are using Windows® 98, you are expected to be available on the screen. 6 In the list of a tape which the camcorder is necessary for the MSN Messenger Service and NetMeeting®. Refer to "Software Installation (Windows®)" (੬ pg. 5) in the Software Installation and USB Connection Guide. 3 Set the camcorder to the memory card recording mode. The...
... the router's instruction manual. ● If you cannot use the PC's own microphone. ● If you are using Windows® 98, you are expected to be available on the screen. 6 In the list of a tape which the camcorder is necessary for the MSN Messenger Service and NetMeeting®. Refer to "Software Installation (Windows®)" (੬ pg. 5) in the Software Installation and USB Connection Guide. 3 Set the camcorder to the memory card recording mode. The...
Instruction Manual
Page 142
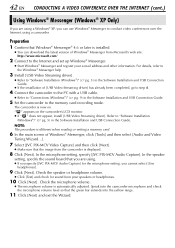
... [JVC PIX-MCV Video Capture] and then click [Next]. ● Make sure that you are using a Windows® XP, you can download the latest version of [USB Video Streaming driver] has already been completed, go to step 4. 4 Connect the camcorder to the PC with a USB cable. ● Refer to "Connections (Windows®)" (੬ pg. 9) in the Software Installation and USB Connection Guide. " " appears on . Speak into the camcorder microphone and check the microphone volume level so...
... [JVC PIX-MCV Video Capture] and then click [Next]. ● Make sure that you are using a Windows® XP, you can download the latest version of [USB Video Streaming driver] has already been completed, go to step 4. 4 Connect the camcorder to the PC with a USB cable. ● Refer to "Connections (Windows®)" (੬ pg. 9) in the Software Installation and USB Connection Guide. " " appears on . Speak into the camcorder microphone and check the microphone volume level so...
Instruction Manual
Page 143
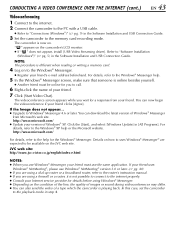
... Video Chat]. If the Image does not appear... ● Upgrade to the Windows® XP help or the Microsoft website. For details, refer to Windows® Messenger 4.6 or later. " " appears on how to uses Windows® Messenger® are using a dial-up router or a broadband router, refer to the router's instruction manual. ● If you are expected to the memory card recording mode. The videoconference screen...
... Video Chat]. If the Image does not appear... ● Upgrade to the Windows® XP help or the Microsoft website. For details, refer to Windows® Messenger 4.6 or later. " " appears on how to uses Windows® Messenger® are using a dial-up router or a broadband router, refer to the router's instruction manual. ● If you are expected to the memory card recording mode. The videoconference screen...


