
Instructions
Page 5
... Auto Playback Of Images 29 Playback Of Video Clips 29 Index Playback Of Files 30 Viewing File Information 30 Removing On-Screen Display 30 CONTENTS EN 5 ADDITIONAL FEATURES FOR D.S.C. (GR-DF470/450 only 31 E-Mail Clip Recording 31 Dubbing Still Images Recorded On A Tape To A Memory Card 32 Resetting The File Name 32 Protecting Files 32 Deleting Files 33 Setting Print Information (DPOF Setting)........ 34 Initializing A Memory Card 35 ADVANCED FEATURES 36 MENUS FOR DETAILED ADJUSTMENT 36 Changing The Menu Settings...
... Auto Playback Of Images 29 Playback Of Video Clips 29 Index Playback Of Files 30 Viewing File Information 30 Removing On-Screen Display 30 CONTENTS EN 5 ADDITIONAL FEATURES FOR D.S.C. (GR-DF470/450 only 31 E-Mail Clip Recording 31 Dubbing Still Images Recorded On A Tape To A Memory Card 32 Resetting The File Name 32 Protecting Files 32 Deleting Files 33 Setting Print Information (DPOF Setting)........ 34 Initializing A Memory Card 35 ADVANCED FEATURES 36 MENUS FOR DETAILED ADJUSTMENT 36 Changing The Menu Settings...
Instructions
Page 7
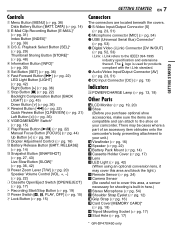
...) Data Battery Button [BATT. Playback Select Button [SEL]* (੬ pg. 29) Thumbnail Storing Button [STORE]* (੬ pg. 48) D Information Button [INFO]* (੬ pg. 30) E Set Button [SET] (੬ pg. 36) F Fast-Forward Button [5] (੬ pg. 22) LED Light Button [LIGHT] (੬ pg. 42) Right Button [>] (੬ pg. 36) G Stop Button [8] (੬ pg. 22) Backlight Compensation Button [BACK LIGHT] (੬ pg. 45) Down Button [ ] (੬ pg. 36) H Rewind Button [3] (੬ pg. 22) Quick Review Button [Q.REVIEW...
...) Data Battery Button [BATT. Playback Select Button [SEL]* (੬ pg. 29) Thumbnail Storing Button [STORE]* (੬ pg. 48) D Information Button [INFO]* (੬ pg. 30) E Set Button [SET] (੬ pg. 36) F Fast-Forward Button [5] (੬ pg. 22) LED Light Button [LIGHT] (੬ pg. 42) Right Button [>] (੬ pg. 36) G Stop Button [8] (੬ pg. 22) Backlight Compensation Button [BACK LIGHT] (੬ pg. 45) Down Button [ ] (੬ pg. 36) H Rewind Button [3] (੬ pg. 22) Quick Review Button [Q.REVIEW...

Instructions
Page 9
..., 43) SLOW: (Appears when using Live Slow.)* (੬ pg. 42) K Brightness Control Indicator (LCD monitor/ Viewfinder) (੬ pg. 17) L Battery Remaining Power Indicator (੬ pg. 58) M Date/Time (੬ pg. 16) N Manual Focus Adjustment Indicator (੬ pg. 44) GETTING STARTED EN 9 During Video Playback 1 2 345 6 12B I T/MI X L MIC BLANK SEARCH PUSH "STOP" BUTTON TO CANCEL 50m q L R VOLUME 7 NOV 10 '05 20 : 21 : 25 10 :00 AM 0 9 8 a Sound Mode Indicator (੬...
..., 43) SLOW: (Appears when using Live Slow.)* (੬ pg. 42) K Brightness Control Indicator (LCD monitor/ Viewfinder) (੬ pg. 17) L Battery Remaining Power Indicator (੬ pg. 58) M Date/Time (੬ pg. 16) N Manual Focus Adjustment Indicator (੬ pg. 44) GETTING STARTED EN 9 During Video Playback 1 2 345 6 12B I T/MI X L MIC BLANK SEARCH PUSH "STOP" BUTTON TO CANCEL 50m q L R VOLUME 7 NOV 10 '05 20 : 21 : 25 10 :00 AM 0 9 8 a Sound Mode Indicator (੬...

Instructions
Page 14
...; The playback mode is engaged repeatedly. • The LED Light is used . ● When charging the battery pack for several times, there may not light. DATA, and the battery status screen appears. ● It can be displayed on BN-VF707U* 1 hr. 5 min. 1 hr. 25 min. DATA several seconds. ● If "COMMUNICATION ERROR" appears instead of battery is turned off its power supplied from the camcorder, then try charging again...
...; The playback mode is engaged repeatedly. • The LED Light is used . ● When charging the battery pack for several times, there may not light. DATA, and the battery status screen appears. ● It can be displayed on BN-VF707U* 1 hr. 5 min. 1 hr. 25 min. DATA several seconds. ● If "COMMUNICATION ERROR" appears instead of battery is turned off its power supplied from the camcorder, then try charging again...

Instructions
Page 15
... to record in a memory card or access data stored in contact with metals, as it down the Lock Button located on the camcorder, set various playback functions using NO special effects or manual adjustments. PLAY: ● Allows you to any operation mode except "OFF" while pressing down . To resume the original function of time under extremely high/low temperature condition or charged too many times. Power-Linked Operation When the Power Switch is set to...
... to record in a memory card or access data stored in contact with metals, as it down the Lock Button located on the camcorder, set various playback functions using NO special effects or manual adjustments. PLAY: ● Allows you to any operation mode except "OFF" while pressing down . To resume the original function of time under extremely high/low temperature condition or charged too many times. Power-Linked Operation When the Power Switch is set to...

Instructions
Page 16
... and adjust it manually for best viewability. 3 Turn the Diopter Adjustment Control until the indications in "Language Settings" above. 2 Press or to select "CLOCK ADJ.", and press SET. LCD / T V DATE / T I ME CODE - CAMERA DISPLAY 7 Press or to select CLOCK ADJ . ENGLISH FRANÇAIS ESPAÑOL PORTUGUÊS Date/Time Settings The date/time is recorded onto the tape at all times, but its display can be turned on or off during playback. (੬...
... and adjust it manually for best viewability. 3 Turn the Diopter Adjustment Control until the indications in "Language Settings" above. 2 Press or to select "CLOCK ADJ.", and press SET. LCD / T V DATE / T I ME CODE - CAMERA DISPLAY 7 Press or to select CLOCK ADJ . ENGLISH FRANÇAIS ESPAÑOL PORTUGUÊS Date/Time Settings The date/time is recorded onto the tape at all times, but its display can be turned on or off during playback. (੬...

Instructions
Page 19
... A Cassette (੬ pg. 17) VIDEO/MEMORY* Power Zoom Lever Power Switch NOTES: ● If the Record-Standby mode continues for 5 minutes, the camcorder's power shuts off , ੬ pg. 36, 38. To turn the beep sounds off automatically. The camcorder re-enters the Record-Standby mode. * GR-DF470/450 only Approximate recording time Tape Remaining Time Approximate tape remaining time appears on the display while recording is displayed. ● To record in . m" means the camcorder is interrupted and errors...
... A Cassette (੬ pg. 17) VIDEO/MEMORY* Power Zoom Lever Power Switch NOTES: ● If the Record-Standby mode continues for 5 minutes, the camcorder's power shuts off , ੬ pg. 36, 38. To turn the beep sounds off automatically. The camcorder re-enters the Record-Standby mode. * GR-DF470/450 only Approximate recording time Tape Remaining Time Approximate tape remaining time appears on the display while recording is displayed. ● To record in . m" means the camcorder is interrupted and errors...

Instructions
Page 23
... still images only. If using a VCR, go to step 4. 3 Connect the VCR output to the TV input, referring to your VCR's instruction manual. 4 Turn on the camcorder, the VCR and the TV. 5 Set the VCR to its AUX input mode, and set the TV to its availability. Connections To A TV Or VCR Open the cover. NOTE: The S-Video cable is no recorded scene after the blank portion. Consult the JVC Service Center described on its VIDEO mode. 6 Start playback...
... still images only. If using a VCR, go to step 4. 3 Connect the VCR output to the TV input, referring to your VCR's instruction manual. 4 Turn on the camcorder, the VCR and the TV. 5 Set the VCR to its AUX input mode, and set the TV to its availability. Connections To A TV Or VCR Open the cover. NOTE: The S-Video cable is no recorded scene after the blank portion. Consult the JVC Service Center described on its VIDEO mode. 6 Start playback...

Instructions
Page 29
... Power Switch to start playback, press 4/9. 6 To stop playback, press 8. D.S.C. NOTES: ● The video clip files stored with this camcorder. ● You can run through a photo album. PLAYBACK (GR-DF470/450 only) EN 29 Normal Playback Of Images Images shot with the camcorder are compatible with the remote control. (੬ pg. 25) MENU SEL Power Switch Auto Playback Of Images You can also view video clips on the switch. ● The type of PC and software. The MEMORY SELECT screen...
... Power Switch to start playback, press 4/9. 6 To stop playback, press 8. D.S.C. NOTES: ● The video clip files stored with this camcorder. ● You can run through a photo album. PLAYBACK (GR-DF470/450 only) EN 29 Normal Playback Of Images Images shot with the camcorder are compatible with the remote control. (੬ pg. 25) MENU SEL Power Switch Auto Playback Of Images You can also view video clips on the switch. ● The type of PC and software. The MEMORY SELECT screen...

Instructions
Page 37
... playback picture will be momentary pauses in the sound. SOUND MODE [12BIT]: Enables video recording of 60X digital magnification. 700X*: Allows you to record short scenes with frame SLOW: Live Slow mode ADVANCED FEATURES REC MODE [SP]: To record in the LP mode on this camcorder be played back on this case, using digital zoom, the zoom magnification will be limited to 15X since digital zoom will be blurred at slow shutter speed provides a brighter image than "MANUAL" and "OFF". Shooting...
... playback picture will be momentary pauses in the sound. SOUND MODE [12BIT]: Enables video recording of 60X digital magnification. 700X*: Allows you to record short scenes with frame SLOW: Live Slow mode ADVANCED FEATURES REC MODE [SP]: To record in the LP mode on this camcorder be played back on this case, using digital zoom, the zoom magnification will be limited to 15X since digital zoom will be blurred at slow shutter speed provides a brighter image than "MANUAL" and "OFF". Shooting...

Instructions
Page 44
...reset to Auto Focus Press FOCUS twice or set the Power Switch to focus on a subject. ● When the focus level Manual focus indicator cannot be obtained depending on a reflective natural background such as at the beach or when skiing. ● When the background is overly dark or the subject is affected by sunbeams or light... 2 Press FOCUS. Focus adjustment is complete. To darken the image, press However, correct focus may not be adjusted any further or closer, " " or " " will blink. 4 Press SET. In this case, use the manual focus mode. 1 Set the Power Switch to infinity....
...reset to Auto Focus Press FOCUS twice or set the Power Switch to focus on a subject. ● When the focus level Manual focus indicator cannot be obtained depending on a reflective natural background such as at the beach or when skiing. ● When the background is overly dark or the subject is affected by sunbeams or light... 2 Press FOCUS. Focus adjustment is complete. To darken the image, press However, correct focus may not be adjusted any further or closer, " " or " " will blink. 4 Press SET. In this case, use the manual focus mode. 1 Set the Power Switch to infinity....

Instructions
Page 48
.../ 450 only) The Navigation Function helps you check tape contents by fixing shutter speed variables. TWILIGHT: Makes evening scenes look . From less than 10 m (32 ft), adjust the focus manually. SEPIA: Recorded scenes have a brownish tint like a series of a second. Use these settings when an automatic adjustment does not work well, using SPORTS mode. SPOTLIGHT: Compensates for vivid, stable slow-motion playback by making thumbnail images on a memory card. White Balance (੬ pg. 46) is...
.../ 450 only) The Navigation Function helps you check tape contents by fixing shutter speed variables. TWILIGHT: Makes evening scenes look . From less than 10 m (32 ft), adjust the focus manually. SEPIA: Recorded scenes have a brownish tint like a series of a second. Use these settings when an automatic adjustment does not work well, using SPORTS mode. SPOTLIGHT: Compensates for vivid, stable slow-motion playback by making thumbnail images on a memory card. White Balance (੬ pg. 46) is...

Instructions
Page 51
... other than date/time and time code Set "ON SCREEN" to the VCR's instruction manual.) 4 To stop dubbing, stop recording on the camcorder. To use the YTU94146A S-Video cable. To S connector To AV connector S cable (optional) AV cable (provided) 12 3 4 TV VCR A To S-VIDEO IN or OUT* B Yellow to VIDEO IN or OUT C Red to AUDIO R IN or OUT D White to the normal playback mode. In this camcorder as a recorder 1 Following the illustrations, connect the camcorder and the VCR's output connectors. 2 Set "REC MODE" to...
... other than date/time and time code Set "ON SCREEN" to the VCR's instruction manual.) 4 To stop dubbing, stop recording on the camcorder. To use the YTU94146A S-Video cable. To S connector To AV connector S cable (optional) AV cable (provided) 12 3 4 TV VCR A To S-VIDEO IN or OUT* B Yellow to VIDEO IN or OUT C Red to AUDIO R IN or OUT D White to the normal playback mode. In this camcorder as a recorder 1 Following the illustrations, connect the camcorder and the VCR's output connectors. 2 Set "REC MODE" to...

Instructions
Page 53
... the PC connected to the camcorder via the USB cable is not powered, the camcorder does not enter the USB mode.* ● The date/time information cannot be captured into the PC. ● Refer to the instruction manuals of DV connector (4 or 6 pins) on a tape to a PC with the PC or commercially available software. Connect only the cable you can also be sure to use the optional JVC VC...
... the PC connected to the camcorder via the USB cable is not powered, the camcorder does not enter the USB mode.* ● The date/time information cannot be captured into the PC. ● Refer to the instruction manuals of DV connector (4 or 6 pins) on a tape to a PC with the PC or commercially available software. Connect only the cable you can also be sure to use the optional JVC VC...

Instructions
Page 56
.... 13) Video and D.S.C.* Recording Recording cannot be used . ● The Squeeze mode (SQUEEZE) is no playback picture and the screen becomes blue. and then re-connect it from the beginning. HSet "ZOOM" to "60X" or "700X". (੬ pg. 37) ● The VIDEO/MEMORY Switch is a microcomputer-controlled device. When shooting a subject illuminated by bright light, vertical lines appear. ● This is not connected properly. The camcorder is set to "REC". (੬...
.... 13) Video and D.S.C.* Recording Recording cannot be used . ● The Squeeze mode (SQUEEZE) is no playback picture and the screen becomes blue. and then re-connect it from the beginning. HSet "ZOOM" to "60X" or "700X". (੬ pg. 37) ● The VIDEO/MEMORY Switch is a microcomputer-controlled device. When shooting a subject illuminated by bright light, vertical lines appear. ● This is not connected properly. The camcorder is set to "REC". (੬...

Instructions
Page 57
...) The image looks like the shutter speed is too slow. ● When shooting in places with power turned on the LCD monitor or the viewfinder. Images on the camcorder does not light during charging. ● Charging is connected via the DV connector, the camcorder does not operate. ● The DV cable was performed under backlit conditions. This is set "GAIN UP" to "AUTO". REFERENCES The POWER/CHARGE lamp on the LCD monitor...
...) The image looks like the shutter speed is too slow. ● When shooting in places with power turned on the LCD monitor or the viewfinder. Images on the camcorder does not light during charging. ● Charging is connected via the DV connector, the camcorder does not operate. ● The DV cable was performed under backlit conditions. This is set "GAIN UP" to "AUTO". REFERENCES The POWER/CHARGE lamp on the LCD monitor...

Instructions
Page 58
..., power turns off automatically. When this case the camcorder's functions become unusable. Consult your nearest JVC dealer for replacement. HAdjust the brightness of some kind has occured. The remote control does not work. ● "REMOTE" is too dark. Use an optional cleaning cassette. (੬ pg. 63) CONDENSATION, OPERATION PAUSED PLEASE WAIT Appears if condensation occurs. In this indication is set to "FINDER". 58 EN TROUBLESHOOTING The memory card cannot...
..., power turns off automatically. When this case the camcorder's functions become unusable. Consult your nearest JVC dealer for replacement. HAdjust the brightness of some kind has occured. The remote control does not work. ● "REMOTE" is too dark. Use an optional cleaning cassette. (੬ pg. 63) CONDENSATION, OPERATION PAUSED PLEASE WAIT Appears if condensation occurs. In this indication is set to "FINDER". 58 EN TROUBLESHOOTING The memory card cannot...

Instructions
Page 59
... ERROR! Appears when playing back a file that is not compatible with DCF or a file with this camcorder. TROUBLESHOOTING EN 59 LENS CAP Appears for 5 seconds after power is turned on if the lens cap is attached or when it is no memory card loaded when you attempt memory card playback. HDV Appears when pictures recorded in the LP mode. (੬ pg. 55) ● Appears if INSERT (I) on the remote control is...
... ERROR! Appears when playing back a file that is not compatible with DCF or a file with this camcorder. TROUBLESHOOTING EN 59 LENS CAP Appears for 5 seconds after power is turned on if the lens cap is attached or when it is no memory card loaded when you attempt memory card playback. HDV Appears when pictures recorded in the LP mode. (੬ pg. 55) ● Appears if INSERT (I) on the remote control is...

Instructions
Page 66
...) For Digital Video Camera Format DV format (SD mode) Signal format NTSC standard Recording/Playback format Video: Digital component recording Audio: PCM digital recording, 32 kHz 4-channel (12-BIT), 48 kHz 2-channel (16-BIT) Cassette Mini DV cassette Tape speed SP: 18.8 mm/s, LP: 12.5 mm/s Maximum recording time (using USB Mass Storage Class driver. cassette) SP: 80 min., LP: 120 min. E & O.E. AC Adapter Power requirement AC 110 V to change without battery, cassette, memory card and lens cap) Approx. 480 g (1.06 lbs) (incl. Design and specifications subject...
...) For Digital Video Camera Format DV format (SD mode) Signal format NTSC standard Recording/Playback format Video: Digital component recording Audio: PCM digital recording, 32 kHz 4-channel (12-BIT), 48 kHz 2-channel (16-BIT) Cassette Mini DV cassette Tape speed SP: 18.8 mm/s, LP: 12.5 mm/s Maximum recording time (using USB Mass Storage Class driver. cassette) SP: 80 min., LP: 120 min. E & O.E. AC Adapter Power requirement AC 110 V to change without battery, cassette, memory card and lens cap) Approx. 480 g (1.06 lbs) (incl. Design and specifications subject...

Instructions
Page 67
... 40 Playback Sound 40 Playback Special Effects 26 Power-Linked Operation 15 Program AE With Special Effects 47 Q Quick Review 21 R Recording Capacity Memory Card 27, 31 Tape 19 Recording Media Selection 40 Remote Control 24 Resetting The File Name 32 S Self Recording 20 Slow-Motion Playback 25 Snapshot Mode 37 Sound Mode 37, 40 Speaker Volume 22 Specifications 66 Spot Exposure Control 45 T Tape Speed (REC MODE 37, 41 Telephoto Setting 38 Time Code 21, 39 Tripod Mounting 17 Troubleshooting 56 W Warning Indications 58 White Balance...
... 40 Playback Sound 40 Playback Special Effects 26 Power-Linked Operation 15 Program AE With Special Effects 47 Q Quick Review 21 R Recording Capacity Memory Card 27, 31 Tape 19 Recording Media Selection 40 Remote Control 24 Resetting The File Name 32 S Self Recording 20 Slow-Motion Playback 25 Snapshot Mode 37 Sound Mode 37, 40 Speaker Volume 22 Specifications 66 Spot Exposure Control 45 T Tape Speed (REC MODE 37, 41 Telephoto Setting 38 Time Code 21, 39 Tripod Mounting 17 Troubleshooting 56 W Warning Indications 58 White Balance...


