Instruction Manual
Page 1
Before use of this digital video camera. DIGITAL VIDEO CAMERA GR-D250 Please visit our Homepage on the World Wide Web for Digital Video Camera: http://www.jvc.co.jp/english/cyber/ For Accessories: http://www.jvc.co.jp/english/accessory/ Dear Customer, Thank you for purchasing this product. ENGLISH GETTING STARTED 6 VIDEO RECORDING & PLAYBACK 17 ADVANCED FEATURES 22 REFERENCES 38 TERMS 47 INSTRUCTIONS To deactivate the demonstration, set "DEMO MODE" to ensure...
Before use of this digital video camera. DIGITAL VIDEO CAMERA GR-D250 Please visit our Homepage on the World Wide Web for Digital Video Camera: http://www.jvc.co.jp/english/cyber/ For Accessories: http://www.jvc.co.jp/english/accessory/ Dear Customer, Thank you for purchasing this product. ENGLISH GETTING STARTED 6 VIDEO RECORDING & PLAYBACK 17 ADVANCED FEATURES 22 REFERENCES 38 TERMS 47 INSTRUCTIONS To deactivate the demonstration, set "DEMO MODE" to ensure...

Instruction Manual
Page 5
... 10 Power 11 Operation Mode 13 Language Settings 14 Date/Time Settings 14 Grip Adjustment 14 Viewfinder Adjustment 15 Brightness Adjustment Of The Display 15 Tripod Mounting 15 Loading/Unloading A Cassette 16 VIDEO RECORDING & PLAYBACK 17 VIDEO RECORDING 17 Basic Recording 17 Tape Remaining Time 17 LCD Monitor And Viewfinder 18 Zooming 18 Journalistic Shooting 19 Time Code 19 Quick Review 19 Recording From The Middle Of A Tape...... 19 VIDEO PLAYBACK 20 Normal Playback 20 Still Playback 20 Shuttle Search 20 Blank Search 20 Connections...
... 10 Power 11 Operation Mode 13 Language Settings 14 Date/Time Settings 14 Grip Adjustment 14 Viewfinder Adjustment 15 Brightness Adjustment Of The Display 15 Tripod Mounting 15 Loading/Unloading A Cassette 16 VIDEO RECORDING & PLAYBACK 17 VIDEO RECORDING 17 Basic Recording 17 Tape Remaining Time 17 LCD Monitor And Viewfinder 18 Zooming 18 Journalistic Shooting 19 Time Code 19 Quick Review 19 Recording From The Middle Of A Tape...... 19 VIDEO PLAYBACK 20 Normal Playback 20 Still Playback 20 Shuttle Search 20 Blank Search 20 Connections...

Instruction Manual
Page 7
The logo is used during video recording and audio dubbing. To stabilise the microphone, use of an optional shoe adapter is built-in here.) b Stereo Microphone c Stud Hole (੬ pg. 15) d Tripod Mounting Socket (੬ pg. 15) e Cassette Holder Cover (੬ pg. 16) GETTING STARTED Controls A Stop Button [8] (੬ pg. 20) Backlight Compensation Button [BACK LIGHT] (੬ pg. 31) B Play/Pause Button [4/9] (੬ pg. 20) Manual Focus Button [FOCUS] (੬ pg. 29...
The logo is used during video recording and audio dubbing. To stabilise the microphone, use of an optional shoe adapter is built-in here.) b Stereo Microphone c Stud Hole (੬ pg. 15) d Tripod Mounting Socket (੬ pg. 15) e Cassette Holder Cover (੬ pg. 16) GETTING STARTED Controls A Stop Button [8] (੬ pg. 20) Backlight Compensation Button [BACK LIGHT] (੬ pg. 31) B Play/Pause Button [4/9] (੬ pg. 20) Manual Focus Button [FOCUS] (੬ pg. 29...

Instruction Manual
Page 8
... recording.) (੬ pg. 17) PAUSE: (Appears during Record-Standby mode.) (੬ pg. 17) O: (Appears when taking Snapshot.) (੬ pg. 29) Q 5S/Anim.: Displays the 5-Second Recording mode or Animation recording mode. (੬ pg. 24) R Wind Cut Indicator (੬ pg. 24) S Battery Remaining Power Indicator (੬ pg. 40) T Date/Time (੬ pg. 14) U Brightness Control Indicator (LCD monitor/ Viewfinder) (੬ pg. 15) V Manual Focus Adjustment Indicator (੬ pg. 29) W Time Code...
... recording.) (੬ pg. 17) PAUSE: (Appears during Record-Standby mode.) (੬ pg. 17) O: (Appears when taking Snapshot.) (੬ pg. 29) Q 5S/Anim.: Displays the 5-Second Recording mode or Animation recording mode. (੬ pg. 24) R Wind Cut Indicator (੬ pg. 24) S Battery Remaining Power Indicator (੬ pg. 40) T Date/Time (੬ pg. 14) U Brightness Control Indicator (LCD monitor/ Viewfinder) (੬ pg. 15) V Manual Focus Adjustment Indicator (੬ pg. 29) W Time Code...
Instruction Manual
Page 9
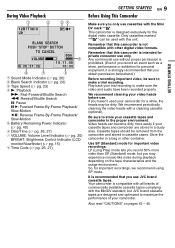
... Frame-By-Frame Playback/ Slow-Motion Y 9: Reverse Frame-By-Frame Playback/ Slow-Motion E Battery Remaining Power Indicator (੬ pg. 40) F Date/Time (੬ pg. 26, 27) G VOLUME: Volume Level Indicator (੬ pg. 20) BRIGHT: Brightness Control Indicator (LCD monitor/Viewfinder) (੬ pg. 15) H Time Code (੬ pg. 26, 27) GETTING STARTED EN 9 Before Using This Camcorder Make sure you only use only. This camcorder is not compatible with the MiniDV standard, but you...
... Frame-By-Frame Playback/ Slow-Motion Y 9: Reverse Frame-By-Frame Playback/ Slow-Motion E Battery Remaining Power Indicator (੬ pg. 40) F Date/Time (੬ pg. 26, 27) G VOLUME: Volume Level Indicator (੬ pg. 20) BRIGHT: Brightness Control Indicator (LCD monitor/Viewfinder) (੬ pg. 15) H Time Code (੬ pg. 26, 27) GETTING STARTED EN 9 Before Using This Camcorder Make sure you only use only. This camcorder is not compatible with the MiniDV standard, but you...

Instruction Manual
Page 12
... type of the battery status even though you tried to be operated. ● Charging is worn out and needs to press DATA several times, there may not light. Be sure to use , it . Using The Battery Pack Perform steps 2 - 3 in Record-Standby mode with the cassette inserted, the camcorder will automatically turn off . In such a case, consult your nearest JVC dealer. In this camcorder. In this case, the battery charge...
... type of the battery status even though you tried to be operated. ● Charging is worn out and needs to press DATA several times, there may not light. Be sure to use , it . Using The Battery Pack Perform steps 2 - 3 in Record-Standby mode with the cassette inserted, the camcorder will automatically turn off . In such a case, consult your nearest JVC dealer. In this camcorder. In this case, the battery charge...

Instruction Manual
Page 13
... the accurate battery power indication If the battery power indication differs from 110 V to 240 V. MENU/DATA Power Switch Lock Button MA POWER/ CHARGE POWER/ CHARGE lamp Choose the appropriate operation mode according to flame or excessive heat, as this can result in the AC range from the actual operating time, fully charge the battery, and then run it may not turn on the tape. ● Allows you to set various playback functions using the...
... the accurate battery power indication If the battery power indication differs from 110 V to 240 V. MENU/DATA Power Switch Lock Button MA POWER/ CHARGE POWER/ CHARGE lamp Choose the appropriate operation mode according to flame or excessive heat, as this can result in the AC range from the actual operating time, fully charge the battery, and then run it may not turn on the tape. ● Allows you to set various playback functions using the...

Instruction Manual
Page 17
... to calculate and display the remaining tape length, and the accuracy of tape used. VIDEO RECORDING & PLAYBACK Recording Start/Stop Button 1 Remove the lens cap. (੬ pg. 10) 2 Open the LCD monitor fully. 3 Set the Power Switch to "A" or "M" while pressing down the Lock Button located on the tape, the time code is interrupted and errors may vary according to "Recording From The Middle Of A Tape" (੬ pg. 19). ● To turn the camcorder on again...
... to calculate and display the remaining tape length, and the accuracy of tape used. VIDEO RECORDING & PLAYBACK Recording Start/Stop Button 1 Remove the lens cap. (੬ pg. 10) 2 Open the LCD monitor fully. 3 Set the Power Switch to "A" or "M" while pressing down the Lock Button located on the tape, the time code is interrupted and errors may vary according to "Recording From The Middle Of A Tape" (੬ pg. 19). ● To turn the camcorder on again...
Instruction Manual
Page 20
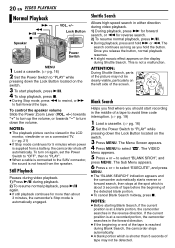
... and hold the button. The VIDEO Menu appears. 5 Press + or - Shuttle Search Allows high-speed search in either direction during Shuttle Search. Once you release the button, normal playback resumes. ● A slight mosaic effect appears on again, set the Power Switch to "OFF", then to "PLAY". ● When a cable is connected to fast-forward the tape. ATTENTION: During Shuttle Search, parts of the picture may not...
... and hold the button. The VIDEO Menu appears. 5 Press + or - Shuttle Search Allows high-speed search in either direction during Shuttle Search. Once you release the button, normal playback resumes. ● A slight mosaic effect appears on again, set the Power Switch to "OFF", then to "PLAY". ● When a cable is connected to fast-forward the tape. ATTENTION: During Shuttle Search, parts of the picture may not...

Instruction Manual
Page 22
... you wish to select the desired parameter. FUL L GA I ON - to "PLAY" while pressing down the Lock Button located on the switch. 2 Open the LCD monitor fully. (੬ pg. 18) 3 Press MENU. The CAMERA REC MODE - For Video Playback Menus: Set the Power Switch to select the desired function, RETURN and press MENU. Screen for Video Recording Menu Screen for Video Playback Menu WI PE / FADER OF F FADER-WH I TE FADER-B LACK FADER-B .W W I PE...
... you wish to select the desired parameter. FUL L GA I ON - to "PLAY" while pressing down the Lock Button located on the switch. 2 Open the LCD monitor fully. (੬ pg. 18) 3 Press MENU. The CAMERA REC MODE - For Video Playback Menus: Set the Power Switch to select the desired function, RETURN and press MENU. Screen for Video Recording Menu Screen for Video Playback Menu WI PE / FADER OF F FADER-WH I TE FADER-B LACK FADER-B .W W I PE...

Instruction Manual
Page 23
... playback of stereo sound on four separate channels, and is bright. While the shutter speed is being automatically adjusted, " " is automatically adjusted. AUTO : The shutter speed is displayed. GAIN UP OFF: Allows you to a maximum of stereo sound on two separate channels. (Equivalent to "M". [ ] = Factory-preset REC MODE [SP]: To record in the sound. SOUND MODE [12BIT]: Enables video recording of 800X digital magnification. MENUS FOR DETAILED ADJUSTMENT EN 23 Recording Menus CAMERA The "m CAMERA" settings...
... playback of stereo sound on four separate channels, and is bright. While the shutter speed is being automatically adjusted, " " is automatically adjusted. AUTO : The shutter speed is displayed. GAIN UP OFF: Allows you to a maximum of stereo sound on two separate channels. (Equivalent to "M". [ ] = Factory-preset REC MODE [SP]: To record in the sound. SOUND MODE [12BIT]: Enables video recording of 800X digital magnification. MENUS FOR DETAILED ADJUSTMENT EN 23 Recording Menus CAMERA The "m CAMERA" settings...

Instruction Manual
Page 26
... Adjustment Of The Display" ON SCREEN Playback Menus VIDEO [ ] = Factory-preset SOUND MODE and NARRATION During tape playback, the camcorder detects the sound mode in which appears when the Power Switch is set from the "R" channel is output. ON: The date/time is not displayed. REC MODE [SP] / LP Allows you use "REC MODE" in VIDEO Menu when using this camcorder as in the description on screen when the camcorder is connected to a TV. DATE/TIME SOUND MODE [STEREO ]: Sound is output on your playback picture. SOUND R : Sound from "OFF" to "A" or "M". TIME CODE...
... Adjustment Of The Display" ON SCREEN Playback Menus VIDEO [ ] = Factory-preset SOUND MODE and NARRATION During tape playback, the camcorder detects the sound mode in which appears when the Power Switch is set from the "R" channel is output. ON: The date/time is not displayed. REC MODE [SP] / LP Allows you use "REC MODE" in VIDEO Menu when using this camcorder as in the description on screen when the camcorder is connected to a TV. DATE/TIME SOUND MODE [STEREO ]: Sound is output on your playback picture. SOUND R : Sound from "OFF" to "A" or "M". TIME CODE...

Instruction Manual
Page 29
.... In this case, use the manual focus mode. 1 Set the Power Switch to "A". ADVANCED FEATURES To reset to Auto Focus Press FOCUS twice or set the Power Switch to "M". 2 Press FOCUS. A still image will be recorded for approx. 6 seconds, then the camcorder re-enters the Record-Standby mode. ● You can perform Snapshot also during recording. FEATURES FOR RECORDING EN 29 Snapshot (For Video Recording) Manual Focus This feature lets you record still images that are regularly repeated...
.... In this case, use the manual focus mode. 1 Set the Power Switch to "A". ADVANCED FEATURES To reset to Auto Focus Press FOCUS twice or set the Power Switch to "M". 2 Press FOCUS. A still image will be recorded for approx. 6 seconds, then the camcorder re-enters the Record-Standby mode. ● You can perform Snapshot also during recording. FEATURES FOR RECORDING EN 29 Snapshot (For Video Recording) Manual Focus This feature lets you record still images that are regularly repeated...
Instruction Manual
Page 32
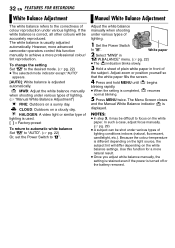
... white balance settings. HALOGEN: A video light or similar type of lighting is used. [ ] = Factory-preset To return to automatic white balance Set "u" to "AUTO". (੬ pg. 22) Or, set the Power Switch to the desired mode. (੬ pg. 22) ● The selected mode indicator except "AUTO" appears. [AUTO]: White balance is adjusted automatically. Use this function for a more advanced camcorder operators control this function manually to the correctness of colour reproduction under various types of lighting conditions indoors (natural, fluorescent, candlelight, etc.). Adjust zoom...
... white balance settings. HALOGEN: A video light or similar type of lighting is used. [ ] = Factory-preset To return to automatic white balance Set "u" to "AUTO". (੬ pg. 22) Or, set the Power Switch to the desired mode. (੬ pg. 22) ● The selected mode indicator except "AUTO" appears. [AUTO]: White balance is adjusted automatically. Use this function for a more advanced camcorder operators control this function manually to the correctness of colour reproduction under various types of lighting conditions indoors (natural, fluorescent, candlelight, etc.). Adjust zoom...
Instruction Manual
Page 38
... lens is not set to "SAVE". HSet the tape's erase protection tab to "ON". (੬ pg. 22, 26) The LCD monitor or viewfinder indications blink. ● Certain Wipe/Fader effects, certain modes of noise appear during shooting, the screen becomes red or black for video playback. (੬ pg. 21) ● The cassette holder cover is open . During recording, the date/ time does not appear. ● "DATE/TIME" is not connected properly. HSet "DATE/TIME...
... lens is not set to "SAVE". HSet the tape's erase protection tab to "ON". (੬ pg. 22, 26) The LCD monitor or viewfinder indications blink. ● Certain Wipe/Fader effects, certain modes of noise appear during shooting, the screen becomes red or black for video playback. (੬ pg. 21) ● The cassette holder cover is open . During recording, the date/ time does not appear. ● "DATE/TIME" is not connected properly. HSet "DATE/TIME...
Instruction Manual
Page 39
...; pg. 34) White Balance cannot be avoided. Images on . HConsult your nearest JVC dealer for replacement. The image taken using Snapshot is too bright. ● The subject is too dark. ● Shooting was plugged/unplugged with high-precision technology. HBy recording with a temperature of the unit. (Effective dots: more natural, set date/time has been erased. However, black spots or bright spots of light (red, green or...
...; pg. 34) White Balance cannot be avoided. Images on . HConsult your nearest JVC dealer for replacement. The image taken using Snapshot is too bright. ● The subject is too dark. ● Shooting was plugged/unplugged with high-precision technology. HBy recording with a temperature of the unit. (Effective dots: more natural, set date/time has been erased. However, black spots or bright spots of light (red, green or...

Instruction Manual
Page 40
... SNAPSHOT Button is pressed while the Power Switch is set to nil, the battery remaining power indicator blinks. TAPE! TAPE END Appears when the tape ends during recording. Appears when no tape is loaded. (੬ pg. 16) CHECK TAPE'S ERASE PROTECTION TAB Appears when the erase protection tab is set to "SAVE" while the Power Switch is set to "FINDER". When this case the camcorder's functions become unusable. H੬ pg. 41. 40 EN TROUBLESHOOTING Picture...
... SNAPSHOT Button is pressed while the Power Switch is set to nil, the battery remaining power indicator blinks. TAPE! TAPE END Appears when the tape ends during recording. Appears when no tape is loaded. (੬ pg. 16) CHECK TAPE'S ERASE PROTECTION TAB Appears when the erase protection tab is set to "SAVE" while the Power Switch is set to "FINDER". When this case the camcorder's functions become unusable. H੬ pg. 41. 40 EN TROUBLESHOOTING Picture...

Instruction Manual
Page 44
... using the cleaning cassette, the problems still exist, consult your nearest JVC dealer. While using the unit ... open the camcorder's chassis. ... in places subject to extremely high (over time. in places where humidity is extremely low (below 35%) or extremely high (above 80%). ... allow inflammables, water or metallic objects to soot or steam such as near a television set. ... keep the lens directed...
... using the cleaning cassette, the problems still exist, consult your nearest JVC dealer. While using the unit ... open the camcorder's chassis. ... in places subject to extremely high (over time. in places where humidity is extremely low (below 35%) or extremely high (above 80%). ... allow inflammables, water or metallic objects to soot or steam such as near a television set. ... keep the lens directed...
Instruction Manual
Page 46
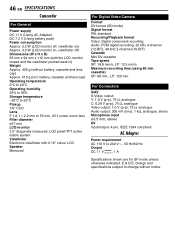
... SPECIFICATIONS Camcorder For General Power supply DC 11 V (Using AC Adapter) DC 7.2 V (Using battery pack) Power consumption Approx. 3.2 W (LCD monitor off, viewfinder on) Approx. 4.2 W (LCD monitor on, viewfinder off) Dimensions (W x H x D) 56 mm x 94 mm x 112 mm (with 0.16" colour LCD Speaker Monaural For Digital Video Camera Format DV format (SD mode) Signal format PAL standard Recording/Playback format Video: Digital component recording Audio: PCM digital recording, 32 kHz 4-channel (12-BIT), 48 kHz 2-channel (16-BIT) Cassette Mini DV cassette Tape speed...
... SPECIFICATIONS Camcorder For General Power supply DC 11 V (Using AC Adapter) DC 7.2 V (Using battery pack) Power consumption Approx. 3.2 W (LCD monitor off, viewfinder on) Approx. 4.2 W (LCD monitor on, viewfinder off) Dimensions (W x H x D) 56 mm x 94 mm x 112 mm (with 0.16" colour LCD Speaker Monaural For Digital Video Camera Format DV format (SD mode) Signal format PAL standard Recording/Playback format Video: Digital component recording Audio: PCM digital recording, 32 kHz 4-channel (12-BIT), 48 kHz 2-channel (16-BIT) Cassette Mini DV cassette Tape speed...

Instruction Manual
Page 47
... VCR 21 D Data Battery 12 Date/Time Settings 14 Demonstration Mode 25 Digital Image Stabilisation (DIS 24 Dubbing 35, 36 E Exposure Control 30 I Iris Lock 30 L LCD Monitor and Viewfinder 15, 18 Loading A Cassette 16 M Manual Focus 29 Motor Drive Mode 29 N Night-Scope 28 P Playback Sound 26 Power-Linked Operation 14 Program AE With Special Effects 34 Q Quick Review 19 R Recording Capacity Tape 17 S Snapshot Mode 23 Sound Mode 23, 26 Speaker Volume 20 Specifications 46 Spot Exposure Control...
... VCR 21 D Data Battery 12 Date/Time Settings 14 Demonstration Mode 25 Digital Image Stabilisation (DIS 24 Dubbing 35, 36 E Exposure Control 30 I Iris Lock 30 L LCD Monitor and Viewfinder 15, 18 Loading A Cassette 16 M Manual Focus 29 Motor Drive Mode 29 N Night-Scope 28 P Playback Sound 26 Power-Linked Operation 14 Program AE With Special Effects 34 Q Quick Review 19 R Recording Capacity Tape 17 S Snapshot Mode 23 Sound Mode 23, 26 Speaker Volume 20 Specifications 46 Spot Exposure Control...


