Instruction Manual
Page 2
... measures: - Reorient or relocate the receiving antenna. - INFORMATION (For U.S.A.) This equipment has been tested and found to comply with the limits for a Class B digital device, pursuant to radio or television reception, which the receiver is no user serviceable parts inside the unit; Consult the dealer or an experienced radio/TV technician for purchasing a JVC product. Caution: Changes or modifications not approved by...
... measures: - Reorient or relocate the receiving antenna. - INFORMATION (For U.S.A.) This equipment has been tested and found to comply with the limits for a Class B digital device, pursuant to radio or television reception, which the receiver is no user serviceable parts inside the unit; Consult the dealer or an experienced radio/TV technician for purchasing a JVC product. Caution: Changes or modifications not approved by...
Instruction Manual
Page 3
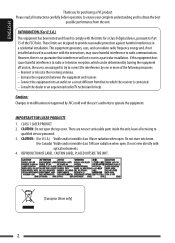
... the volume level too much, as this does not work, reset your unit • Your preset adjustments will block outside sounds, making driving dangerous. • Stop the car before operating the unit. 3 ENGLISH How to drop the disc when it ejects. • If this will also be erased (except the registered Bluetooth device, see page 13). Ex.: When you press number button 1 after pressing M MODE, to use the M MODE and SEL buttons If...
... the volume level too much, as this does not work, reset your unit • Your preset adjustments will block outside sounds, making driving dangerous. • Stop the car before operating the unit. 3 ENGLISH How to drop the disc when it ejects. • If this will also be erased (except the registered Bluetooth device, see page 13). Ex.: When you press number button 1 after pressing M MODE, to use the M MODE and SEL buttons If...
Instruction Manual
Page 4
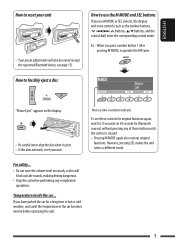
...°F), the movement of the output level. appears on volume setting: Discs produce very little noise compared with the steering wheel remote control function. • See the Installation/Connection Manual (separate volume) for connection. 4 Warning: If you need to operate the unit while driving, be sure to look around carefully or you may be halted on the display to avoid damaging the speakers by the sudden increase of animation...
...°F), the movement of the output level. appears on volume setting: Discs produce very little noise compared with the steering wheel remote control function. • See the Installation/Connection Manual (separate volume) for connection. 4 Warning: If you need to operate the unit while driving, be sure to look around carefully or you may be halted on the display to avoid damaging the speakers by the sudden increase of animation...
Instruction Manual
Page 6
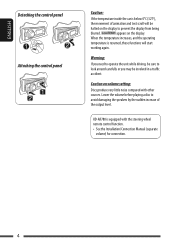
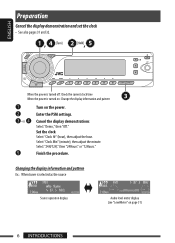
....: When tuner is turned on: Change the display information and pattern ~ Ÿ ! ] ⁄ @ Turn on page 31) 6 INTRODUCTIONS Set the clock Select "Clock Hr" (hour), then adjust the hour. Select "24H/12H," then "24Hours" or "12Hours." Select "Clock Min" (minute), then adjust the minute. Finish the procedure. Enter the PSM settings. When the power is turned off: Check the current clock time When the power is selected as the source Source operation display Audio level meter display (see...
....: When tuner is turned on: Change the display information and pattern ~ Ÿ ! ] ⁄ @ Turn on page 31) 6 INTRODUCTIONS Set the clock Select "Clock Hr" (hour), then adjust the hour. Select "24H/12H," then "24Hours" or "12Hours." Select "Clock Min" (minute), then adjust the minute. Finish the procedure. Enter the PSM settings. When the power is turned off: Check the current clock time When the power is selected as the source Source operation display Audio level meter display (see...
Instruction Manual
Page 7
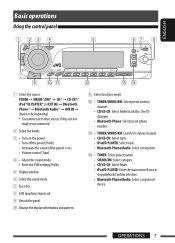
... Phone: Select preset phone number. q Enter functions mode. TUNER = SIRIUS*/XM* = CD* = CD-CH*/ iPod*/D.PLAYER* (or EXT IN) = Bluetooth Phone* = Bluetooth Audio* = AUX IN = (back to the beginning) * You cannot select these sources if they are not ready or not connected. 2 Select the bands. 3 • Turn on the power. • Turn off the power [Hold]. • Attenuate the sound (if the power is on). • Volume control [Turn]. 4 • Adjust the sound mode. • Enter the PSM settings [Hold]. 5 Display window 6 Select the sound mode. 7 Eject disc. 8 AUX (auxiliary) input...
... Phone: Select preset phone number. q Enter functions mode. TUNER = SIRIUS*/XM* = CD* = CD-CH*/ iPod*/D.PLAYER* (or EXT IN) = Bluetooth Phone* = Bluetooth Audio* = AUX IN = (back to the beginning) * You cannot select these sources if they are not ready or not connected. 2 Select the bands. 3 • Turn on the power. • Turn off the power [Hold]. • Attenuate the sound (if the power is on). • Volume control [Turn]. 4 • Adjust the sound mode. • Enter the PSM settings [Hold]. 5 Display window 6 Select the sound mode. 7 Eject disc. 8 AUX (auxiliary) input...
Instruction Manual
Page 8
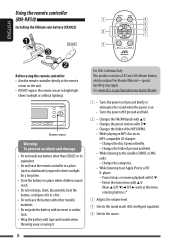
... as the menu selecting buttons.)* 3 Adjusts the volume level. 4 Selects the sound mode (iEQ: intelligent equalizer). 5 Selects the source. 8 player: - Using the remote controller (RM-RK50) Installing the lithium coin battery (CR2025) ENGLISH Before using the remote controller: • Aim the remote controller directly at the remote sensor on the unit. • DO NOT expose the remote sensor to an Apple iPod or a JVC D. Pauses/stops or resumes playback with D ∞. • Changes the folder of it . Changes the disc if pressed...
... as the menu selecting buttons.)* 3 Adjusts the volume level. 4 Selects the sound mode (iEQ: intelligent equalizer). 5 Selects the source. 8 player: - Using the remote controller (RM-RK50) Installing the lithium coin battery (CR2025) ENGLISH Before using the remote controller: • Aim the remote controller directly at the remote sensor on the unit. • DO NOT expose the remote sensor to an Apple iPod or a JVC D. Pauses/stops or resumes playback with D ∞. • Changes the folder of it . Changes the disc if pressed...
Instruction Manual
Page 10
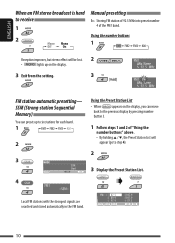
... 2 of the FM1 band. ENGLISH When an FM stereo broadcast is hard to receive 1 2 Manual presetting Ex.: Storing FM station of 92.5 MHz into preset number 4 of "Using the number buttons" above. • By holding 5 / ∞, the Preset Station List will be lost. 2 • lights up to six stations for each band. 1 2 3 Using the Preset Station List • When appears on the display. 3 Exit from the setting. 3 FM station automatic presetting-
... 2 of the FM1 band. ENGLISH When an FM stereo broadcast is hard to receive 1 2 Manual presetting Ex.: Storing FM station of 92.5 MHz into preset number 4 of "Using the number buttons" above. • By holding 5 / ∞, the Preset Station List will be lost. 2 • lights up to six stations for each band. 1 2 3 Using the Preset Station List • When appears on the display. 3 Exit from the setting. 3 FM station automatic presetting-
Instruction Manual
Page 13
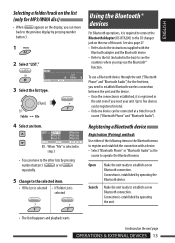
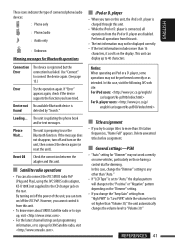
... may use a Bluetooth device through the unit ("Bluetooth Phone" and "Bluetooth Audio") for each source ("Bluetooth Phone" and "Bluetooth Audio"). See also page 27. • Refer also to the instructions supplied with a device. • Select "Bluetooth Phone" or "Bluetooth Audio" as the source to the previous display by pressing number button 5 ( ) or 6 ( ) repeatedly. 5 Change to the selected item. • If File List is selected • If Folder List is selected Using the Bluetooth® devices For Bluetooth operations, it is required to connect the Bluetooth Adapter...
... may use a Bluetooth device through the unit ("Bluetooth Phone" and "Bluetooth Audio") for each source ("Bluetooth Phone" and "Bluetooth Audio"). See also page 27. • Refer also to the instructions supplied with a device. • Select "Bluetooth Phone" or "Bluetooth Audio" as the source to the previous display by pressing number button 5 ( ) or 6 ( ) repeatedly. 5 Change to the selected item. • If File List is selected • If Folder List is selected Using the Bluetooth® devices For Bluetooth operations, it is required to connect the Bluetooth Adapter...
Instruction Manual
Page 15
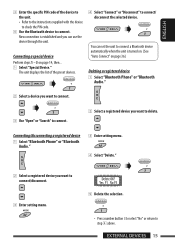
...The unit displays the list of the device to the unit. • Refer to the instructions supplied with the device to check the PIN code. 4 Use the Bluetooth device to connect. ENGLISH 3 Enter the specific PIN code of the preset devices. 4 Select "Connect" or "Disconnect" to connect/ disconnect the selected device. Connecting/disconnecting a registered device 1 Select "Bluetooth Phone" or "Bluetooth Audio." 3 Enter setting menu. 4 Select "Delete." 2 Select a registered device you want to connect/disconnect. 3 Enter setting menu. 5 Delete the selection. • Press number button 3 to...
...The unit displays the list of the device to the unit. • Refer to the instructions supplied with the device to check the PIN code. 4 Use the Bluetooth device to connect. ENGLISH 3 Enter the specific PIN code of the preset devices. 4 Select "Connect" or "Disconnect" to connect/ disconnect the selected device. Connecting/disconnecting a registered device 1 Select "Bluetooth Phone" or "Bluetooth Audio." 3 Enter setting menu. 4 Select "Delete." 2 Select a registered device you want to connect/disconnect. 3 Enter setting menu. 5 Delete the selection. • Press number button 3 to...
Instruction Manual
Page 16
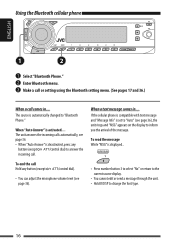
... can adjust the microphone volume level (see page 36), the unit rings and "MSG" appears on the display to answer the incoming call comes in .... When "Auto Answer" is automatically changed to "Auto" (see page 36). The source is activated.... Make a call or setting using the Bluetooth setting menu. (See pages 17 and 36.) When a call . Using the Bluetooth cellular phone ENGLISH ~ Select "Bluetooth Phone." Ÿ Enter Bluetooth menu. ! If the cellular phone is compatible with...
... can adjust the microphone volume level (see page 36), the unit rings and "MSG" appears on the display to answer the incoming call comes in .... When "Auto Answer" is automatically changed to "Auto" (see page 36). The source is activated.... Make a call or setting using the Bluetooth setting menu. (See pages 17 and 36.) When a call . Using the Bluetooth cellular phone ENGLISH ~ Select "Bluetooth Phone." Ÿ Enter Bluetooth menu. ! If the cellular phone is compatible with...
Instruction Manual
Page 26
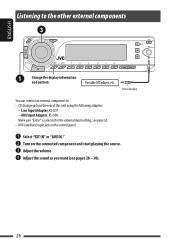
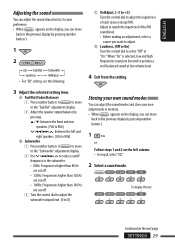
Line Input Adapter, KS-U57 - Adjust the volume. ⁄ Adjust the sound as you want (see page 33. • AUX (auxiliary) input jack on the control panel. ~ Select "EXT IN" or "AUX IN." Ÿ Turn on the rear of this unit using the following adapters: - AUX Input Adapter, KS-U58 Make sure "Ext In" is selected for the external input setting, see pages 28 - 30). 26 ENGLISH Listening to the other external components Change the display information and pattern You can connect an external component to: • CD changer jack on the connected component and start playing the source. !
Line Input Adapter, KS-U57 - Adjust the volume. ⁄ Adjust the sound as you want (see page 33. • AUX (auxiliary) input jack on the control panel. ~ Select "EXT IN" or "AUX IN." Ÿ Turn on the rear of this unit using the following adapters: - AUX Input Adapter, KS-U58 Make sure "Ext In" is selected for the external input setting, see pages 28 - 30). 26 ENGLISH Listening to the other external components Change the display information and pattern You can connect an external component to: • CD changer jack on the connected component and start playing the source. !
Instruction Manual
Page 27
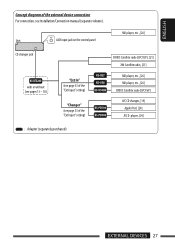
Unit AUX input jack on the control panel MD player, etc., [26] CD changer jack with or without (see pages 13 - 18) (see page 33 of the "Ext Input" setting) (see page 33 of the external device connection For connection, see Installation/Connection manual (separate volume). player, [24] : Adapter (separately purchased) EXTERNAL DEVICES 27 ENGLISH Concept diagram of the "Ext Input" setting) SIRIUS Satellite radio (JVC DLP), [21] XM Satellite radio, [21] MD player, etc., [26] MD player, etc., [26] SIRIUS Satellite radio (JVC PnP) JVC CD changer, [19] Apple iPod, [24] JVC D.
Unit AUX input jack on the control panel MD player, etc., [26] CD changer jack with or without (see pages 13 - 18) (see page 33 of the "Ext Input" setting) (see page 33 of the external device connection For connection, see Installation/Connection manual (separate volume). player, [24] : Adapter (separately purchased) EXTERNAL DEVICES 27 ENGLISH Concept diagram of the "Ext Input" setting) SIRIUS Satellite radio (JVC DLP), [21] XM Satellite radio, [21] MD player, etc., [26] MD player, etc., [26] SIRIUS Satellite radio (JVC PnP) JVC CD changer, [19] Apple iPod, [24] JVC D.
Instruction Manual
Page 29
... boosted to produce a well-balanced sound at low volume level. • For "EQ" setting, see the following. 4 Exit from the setting. 3 Adjust the selected setting item. To display the rest Continued on the display, you can move back to the previous display by pressing number button 3. 1 2 C VolAdjust, [-5 to +5] Turn the control dial to adjust the input level of the FM sound level. • Before making an adjustment, select a source you want to select "Off" or "On...
... boosted to produce a well-balanced sound at low volume level. • For "EQ" setting, see the following. 4 Exit from the setting. 3 Adjust the selected setting item. To display the rest Continued on the display, you can move back to the previous display by pressing number button 3. 1 2 C VolAdjust, [-5 to +5] Turn the control dial to adjust the input level of the FM sound level. • Before making an adjustment, select a source you want to select "Off" or "On...
Instruction Manual
Page 32
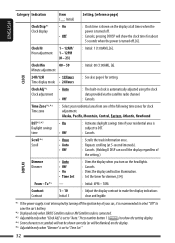
... the car's battery. *2 Displayed only when SIRIUS Satellite radio or XM Satellite radio is connected. *3 Adjustable only when "Clock Adj" is turned off . : Cancels; Clock Hr Hour adjustment 1 - 12AM/ 1 - 12PM (0 - 23) : Initial: 1 (1:00AM), [6]. Scroll *4 Scroll • Once • Auto • Off : Scrolls the track information once. : Repeats scrolling (at all times when the power is automatically adjusted using the clock data provided via the satellite radio channel. : Cancels. Category Indication Item ( : Initial) Setting, [reference...
... the car's battery. *2 Displayed only when SIRIUS Satellite radio or XM Satellite radio is connected. *3 Adjustable only when "Clock Adj" is turned off . : Cancels; Clock Hr Hour adjustment 1 - 12AM/ 1 - 12PM (0 - 23) : Initial: 1 (1:00AM), [6]. Scroll *4 Scroll • Once • Auto • Off : Scrolls the track information once. : Repeats scrolling (at all times when the power is automatically adjusted using the clock data provided via the satellite radio channel. : Cancels. Category Indication Item ( : Initial) Setting, [reference...

Instruction Manual
Page 33
... telephone muting is working. Volume 30 (Select if the maximum power of each speaker is less than 50 W to interference noises from adjacent stations, but sound quality will be selected during the day time*6; DISPLAY Font Type Font type 1 - 2 Initial: 1 : Select the font type used during the night time*6. : Positive pattern of the display. : Negative pattern of the following sources is selected-TUNER, SIRIUS, XM, CD, Bluetooth Phone, Bluetooth Audio, or AUX IN. *9 Only for KD-AR780...
... telephone muting is working. Volume 30 (Select if the maximum power of each speaker is less than 50 W to interference noises from adjacent stations, but sound quality will be selected during the day time*6; DISPLAY Font Type Font type 1 - 2 Initial: 1 : Select the font type used during the night time*6. : Positive pattern of the display. : Negative pattern of the following sources is selected-TUNER, SIRIUS, XM, CD, Bluetooth Phone, Bluetooth Audio, or AUX IN. *9 Only for KD-AR780...
Instruction Manual
Page 34
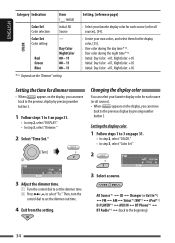
.... • In step 2, select "DISPLAY." • In step 3, select "Dimmer." 2 Select "Time Set." Changing the display color You can move back to 3 on the "Dimmer" setting. ENGLISH COLOR Category Indication Item ( : Initial) Color Sel Color selection Initial: All Source Color Set Color setting Red Green Blue - All Source*1 Ô CD Ô Changer (or Ext In*2) Ô FM Ô AM Ô Sirius*3/XM*3 Ô iPod*3/ D.PLAYER*3 Ô AUX IN Ô BT Phone*3 Ô BT Audio*3 Ô (back to set the dimmer time. 2 Press ¢ to...
.... • In step 2, select "DISPLAY." • In step 3, select "Dimmer." 2 Select "Time Set." Changing the display color You can move back to 3 on the "Dimmer" setting. ENGLISH COLOR Category Indication Item ( : Initial) Color Sel Color selection Initial: All Source Color Set Color setting Red Green Blue - All Source*1 Ô CD Ô Changer (or Ext In*2) Ô FM Ô AM Ô Sirius*3/XM*3 Ô iPod*3/ D.PLAYER*3 Ô AUX IN Ô BT Phone*3 Ô BT Audio*3 Ô (back to set the dimmer time. 2 Press ¢ to...
Instruction Manual
Page 41
... Play), using the JVC SIRIUS radio adapter, KS-U100K (not supplied) to "Volume 30." In this unit. In this case, change the "Amp Gain" setting from this unit. • To know more than 30 station frequencies, "Name Full" appears. These icons indicate the type of the unit, you can turn on the unit, then connect the device again (or reset the unit). By turning on the display. player is found detected by "Search." iPod or D. player...
... Play), using the JVC SIRIUS radio adapter, KS-U100K (not supplied) to "Volume 30." In this unit. In this case, change the "Amp Gain" setting from this unit. • To know more than 30 station frequencies, "Name Full" appears. These icons indicate the type of the unit, you can turn on the unit, then connect the device again (or reset the unit). By turning on the display. player is found detected by "Search." iPod or D. player...
Instruction Manual
Page 42
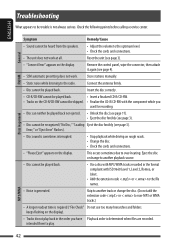
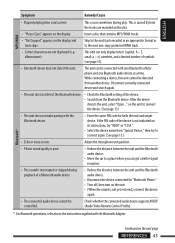
... points before calling a service center. This occurs sometimes due to the radio. Insert the disc correctly. • CD-R/CD-RW cannot be played back. • Insert a finalized CD-R/CD-RW. • Tracks on the display. ENGLISH Troubleshooting What appears to be heard from the speakers. • Adjust the volume to the optimum level. • Check the cords and connections. • The unit does not work . General FM/AM...
... points before calling a service center. This occurs sometimes due to the radio. Insert the disc correctly. • CD-R/CD-RW cannot be played back. • Insert a finalized CD-R/CD-RW. • Tracks on the display. ENGLISH Troubleshooting What appears to be heard from the speakers. • Adjust the volume to the optimum level. • Check the cords and connections. • The unit does not work . General FM/AM...
Instruction Manual
Page 43
... Bluetooth device. • Enter the same PIN code for "Bluetooth Phone." • Turn off, then turn on the display. Skip to the next track encoded in an appropriate format or to connect again. (See page 15.) • Echo or noise occurs. Z, small: a - While connecting a device, this unit cannot be connected with one Bluetooth cellular phone and one Bluetooth audio device at a time. Continued on its instructions, try "0000" or "1234." • Select...
... Bluetooth device. • Enter the same PIN code for "Bluetooth Phone." • Turn off, then turn on the display. Skip to the next track encoded in an appropriate format or to connect again. (See page 15.) • Echo or noise occurs. Z, small: a - While connecting a device, this unit cannot be connected with one Bluetooth cellular phone and one Bluetooth audio device at a time. Continued on its instructions, try "0000" or "1234." • Select...

Instruction Manual
Page 45
... work Reset the iPod or D. No tracks are owned by Victor Company of Japan, Limited (JVC) is a trademark of their respective owners. and other countries. • "SIRIUS" and the SIRIUS dog logo are registered trademarks of the iPod nano. Then, connect it again. Disconnect the adapter from both the unit and iPod/ D. after disconnecting from the iPod nano. • Update the firmware version of SIRIUS Satellite Radio Inc...
... work Reset the iPod or D. No tracks are owned by Victor Company of Japan, Limited (JVC) is a trademark of their respective owners. and other countries. • "SIRIUS" and the SIRIUS dog logo are registered trademarks of the iPod nano. Then, connect it again. Disconnect the adapter from both the unit and iPod/ D. after disconnecting from the iPod nano. • Update the firmware version of SIRIUS Satellite Radio Inc...


