
User Manual (English)
Page 2
... Setup 11 Installing batteries in the remote control 14 Using the remote control 14 Configuring speakers (Sp Config menu 14 Setting speaker distance (Sp Distance menu 15 Setting the level calibration (Level Cal menu 15 Operating your receiver 16 Turning your receiver on and off 16 Understanding basic operations 16 Listening to your receiver 17 Listening to the radio 17 Presetting FM or AM stations 17 Using the listening modes 18 Using advanced setup 20 Using on-screen setup menus 20 Setting up HDMI input (HDMI Input menu 20 Setting up Component input (Component menu 21 Setting...
... Setup 11 Installing batteries in the remote control 14 Using the remote control 14 Configuring speakers (Sp Config menu 14 Setting speaker distance (Sp Distance menu 15 Setting the level calibration (Level Cal menu 15 Operating your receiver 16 Turning your receiver on and off 16 Understanding basic operations 16 Listening to your receiver 17 Listening to the radio 17 Presetting FM or AM stations 17 Using the listening modes 18 Using advanced setup 20 Using on-screen setup menus 20 Setting up HDMI input (HDMI Input menu 20 Setting up Component input (Component menu 21 Setting...
User Manual (English)
Page 7
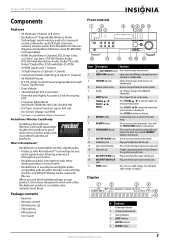
..., Dolby® Digital Plus, DSD and Multi-CH PCM • 4 HDMI Inputs and 1 Output • 3 Digital Inputs (2 Optical/1 Coaxial) • Component Video Switching (2 Inputs/1 Output) • 40 FM/AM Presets • H.C.P.S. (High Current Power Supply) Massive High Power Transformer • Direct Mode • 192 kHz/24-bit D/A Converters • Powerful and Highly Accurate 32-bit Processing DSP • Crossover Adjustment (40/50/60/70/80/90/100/120/150/200 Hz) • A/V Sync Control Function (up to select...
..., Dolby® Digital Plus, DSD and Multi-CH PCM • 4 HDMI Inputs and 1 Output • 3 Digital Inputs (2 Optical/1 Coaxial) • Component Video Switching (2 Inputs/1 Output) • 40 FM/AM Presets • H.C.P.S. (High Current Power Supply) Massive High Power Transformer • Direct Mode • 192 kHz/24-bit D/A Converters • Powerful and Highly Accurate 32-bit Processing DSP • Crossover Adjustment (40/50/60/70/80/90/100/120/150/200 Hz) • A/V Sync Control Function (up to select...

User Manual (English)
Page 8
... "Using the listening modes" on -screen menus. For video recording, plug the composite video and audio L/R input cables to a VCR or DVR into the OUT jacks. Plug the cables to the next (TUNING+) or previous (TUNING-) station. If you want. Press to connect your receiver input source. Press to select the listening mode you use the RF-RBCARD to directly select your surround speakers, do not connect them here. 5 AC power cord Plug this jack. Back Insignia NS-AV511 Surround Sound Receiver Remote control # Description Function 1 DIGITAL IN jacks Plug the optical digital cable...
... "Using the listening modes" on -screen menus. For video recording, plug the composite video and audio L/R input cables to a VCR or DVR into the OUT jacks. Plug the cables to the next (TUNING+) or previous (TUNING-) station. If you want. Press to connect your receiver input source. Press to select the listening mode you use the RF-RBCARD to directly select your surround speakers, do not connect them here. 5 AC power cord Plug this jack. Back Insignia NS-AV511 Surround Sound Receiver Remote control # Description Function 1 DIGITAL IN jacks Plug the optical digital cable...

User Manual (English)
Page 9
... to adjust the brightness of the LFE (Low-Frequency Effects) channel. Subwoofer The subwoofer handles the bass sounds of the display. www.insigniaproducts.com 5 Press to the next or previous preset channel. In tuner mode, press to go to control the receiver. Caution Do not install the receiver in a confined space such as shown. Center speaker This speaker enhances the front speakers, making sound movements distinct and providing a full-sound image. Insignia NS-AV511 Surround Sound Receiver Item...
... to adjust the brightness of the LFE (Low-Frequency Effects) channel. Subwoofer The subwoofer handles the bass sounds of the display. www.insigniaproducts.com 5 Press to the next or previous preset channel. In tuner mode, press to go to control the receiver. Caution Do not install the receiver in a confined space such as shown. Center speaker This speaker enhances the front speakers, making sound movements distinct and providing a full-sound image. Insignia NS-AV511 Surround Sound Receiver Item...

User Manual (English)
Page 10
... (-) terminals. Number of channels 2 3 4 5 Front speakers 2 2 2 2 Center speaker 1 1 Surround speakers 22 No matter how many speakers you use, a powered subwoofer is recommended for a long period of time, the built-in on the speaker terminals on the receiver and insert the speaker wires into the AC outlet until all connections are free from the ends of the wire does not contact the receiver's rear panel. To connect the subwoofer: 1 Using a subwoofer RCA cable, connect the AV receiver's SUBWOOFER PRE OUT jack to...
... (-) terminals. Number of channels 2 3 4 5 Front speakers 2 2 2 2 Center speaker 1 1 Surround speakers 22 No matter how many speakers you use, a powered subwoofer is recommended for a long period of time, the built-in on the speaker terminals on the receiver and insert the speaker wires into the AC outlet until all connections are free from the ends of the wire does not contact the receiver's rear panel. To connect the subwoofer: 1 Using a subwoofer RCA cable, connect the AV receiver's SUBWOOFER PRE OUT jack to...

User Manual (English)
Page 12
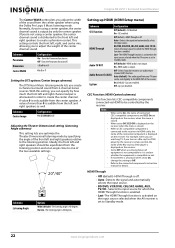
...an optical plug is 480p, 720p, 1080i, or 1080p. Insignia NS-AV511 Surround Sound Receiver AV cables and jacks Signal Video and audio Cable HDMI Video Y Component video Pb/Cb Pr/Cr Composite video Audio Optical digital audio Coaxial digital audio Analog audio (RCA) Jack HDMI Y Green Pb Blue Pr Red Y Yellow OPTICAL Orange DIGITAL L White R Red Description HDMI connections can be connected by using any of the following video connection formats (shown best first): HDMI, component video, or composite video. Use the following sections as the input will output the...
...an optical plug is 480p, 720p, 1080i, or 1080p. Insignia NS-AV511 Surround Sound Receiver AV cables and jacks Signal Video and audio Cable HDMI Video Y Component video Pb/Cb Pr/Cr Composite video Audio Optical digital audio Coaxial digital audio Analog audio (RCA) Jack HDMI Y Green Pb Blue Pr Red Y Yellow OPTICAL Orange DIGITAL L White R Red Description HDMI connections can be connected by using any of the following video connection formats (shown best first): HDMI, component video, or composite video. Use the following sections as the input will output the...

User Manual (English)
Page 13
... are present at more than one input, the inputs are not output by the HDMI IN jacks through the receiver, see "Setting up HDMI input (HDMI Input menu)" on page 21. If your TV must support the ARC function. Jack Input Output Signal HDMI IN 1 Audio/Video HDMI IN 2 HDMI IN 3 HDMI IN 4 HDMI OUT Components Assignable Blu-ray disc/DVD player X VCR/DVR or DVR X Satellite, cable, set -top box OUT TV or projector Assign. Jack Signal Components 1 AUX INPUT VIDEO Composite Camcorder video AUDIO L/R Analog audio 2 DIGITAL IN OPTICAL Digital audio Game console IN 1 (GAME) IN...
... are present at more than one input, the inputs are not output by the HDMI IN jacks through the receiver, see "Setting up HDMI input (HDMI Input menu)" on page 21. If your TV must support the ARC function. Jack Input Output Signal HDMI IN 1 Audio/Video HDMI IN 2 HDMI IN 3 HDMI IN 4 HDMI OUT Components Assignable Blu-ray disc/DVD player X VCR/DVR or DVR X Satellite, cable, set -top box OUT TV or projector Assign. Jack Signal Components 1 AUX INPUT VIDEO Composite Camcorder video AUDIO L/R Analog audio 2 DIGITAL IN OPTICAL Digital audio Game console IN 1 (GAME) IN...

User Manual (English)
Page 14
... source component, start playback. See the manuals supplied with your turntable (MM) does not have a built-in Standby mode. If your TV and VCR for recording. Insignia NS-AV511 Surround Sound Receiver No. Video signals connected to the VCR/DVR Out jack. DTS signals will be recorded as a VCR or DVD recorder) connected to composite video inputs can enjoy Dolby Digital and DTS. Recording is selected, the video input source remains unchanged. 10 www.insigniaproducts.com Jack 4 MONITOR OUT BD/DVD...
... source component, start playback. See the manuals supplied with your turntable (MM) does not have a built-in Standby mode. If your TV and VCR for recording. Insignia NS-AV511 Surround Sound Receiver No. Video signals connected to the VCR/DVR Out jack. DTS signals will be recorded as a VCR or DVD recorder) connected to composite video inputs can enjoy Dolby Digital and DTS. Recording is selected, the video input source remains unchanged. 10 www.insigniaproducts.com Jack 4 MONITOR OUT BD/DVD...
User Manual (English)
Page 16
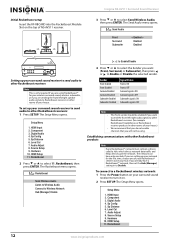
... are using Rocketboost™ for the first time, choose one hub. HDMI Input 2. Sp Config 5. HDMI Setup 11. Sp Distance 6. If you already have only one of your surround sound receiver to Rocketboost receivers in to Enable or Disable the selected sender. Component 3. Audio Adjust 8. Rocketboost 12 www.insigniaproducts.com Insignia NS-AV511 Surround Sound Receiver 3 Press or to select 11. Level Cal 7. To connect to a Rocketboost wireless network: 1 Press the Power button on...
... are using Rocketboost™ for the first time, choose one hub. HDMI Input 2. Sp Config 5. HDMI Setup 11. Sp Distance 6. If you already have only one of your surround sound receiver to Rocketboost receivers in to Enable or Disable the selected sender. Component 3. Audio Adjust 8. Rocketboost 12 www.insigniaproducts.com Insignia NS-AV511 Surround Sound Receiver 3 Press or to select 11. Level Cal 7. To connect to a Rocketboost wireless network: 1 Press the Power button on...

User Manual (English)
Page 20
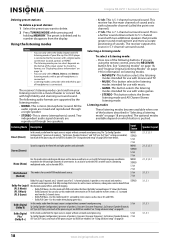
...The on-screen setup menus appear only on page 22. Insignia NS-AV511 Surround Sound Receiver Operating your receiver Turning your receiver on and off To turn your TV is connected to the MONITOR OUT V or the COMPONENT VIDEO OUT jacks, use the receiver's display when changing settings. Displaying source information To display source information: • Press RECEIVER, then press DISPLAY repeatedly to select On. See "Setting up HDMI (HDMI Setup menu)" on a TV that is connected to the HDMI OUT jack. The receiver enters standby mode. Playing a connected component To play...
...The on-screen setup menus appear only on page 22. Insignia NS-AV511 Surround Sound Receiver Operating your receiver Turning your receiver on and off To turn your TV is connected to the MONITOR OUT V or the COMPONENT VIDEO OUT jacks, use the receiver's display when changing settings. Displaying source information To display source information: • Press RECEIVER, then press DISPLAY repeatedly to select On. See "Setting up HDMI (HDMI Setup menu)" on a TV that is connected to the HDMI OUT jack. The receiver enters standby mode. Playing a connected component To play...
User Manual (English)
Page 22
.... • MUSIC-This button selects the listening modes intended for use with a digital audio connection (coaxial, optical, or HDMI). As well as music and movies, video games can also use with stereo movies or TV shows and the receiver creates a 5.1 surround (PL II Game) mix from the input source is connected. Insignia NS-AV511 Surround Sound Receiver Deleting preset stations To delete a preset station: 1 Select the preset you are using the remote control, press the RECEIVER button first. See "Listening modes" on page 18, and "Insignia-Original Listening Modes" on page...
.... • MUSIC-This button selects the listening modes intended for use with a digital audio connection (coaxial, optical, or HDMI). As well as music and movies, video games can also use with stereo movies or TV shows and the receiver creates a 5.1 surround (PL II Game) mix from the input source is connected. Insignia NS-AV511 Surround Sound Receiver Deleting preset stations To delete a preset station: 1 Select the preset you are using the remote control, press the RECEIVER button first. See "Listening modes" on page 18, and "Insignia-Original Listening Modes" on page...

User Manual (English)
Page 24
.../DVD player to an input selector. To use this mode in an environment with only two or three speakers. Insignia NS-AV511 Surround Sound Receiver Listening Mode Full Mono (Full Mono) T-D (TheaterDimensional) (T-D) Description Input Source Speaker Layout In this mode, all speakers output the same sound in each type of where you MONO are within the listening room. Surround speakers 5 Press RETURN to return to close the menu. This works by pressing SETUP, the arrow buttons, then ENTER. Audio Adjust...
.../DVD player to an input selector. To use this mode in an environment with only two or three speakers. Insignia NS-AV511 Surround Sound Receiver Listening Mode Full Mono (Full Mono) T-D (TheaterDimensional) (T-D) Description Input Source Speaker Layout In this mode, all speakers output the same sound in each type of where you MONO are within the listening room. Surround speakers 5 Press RETURN to return to close the menu. This works by pressing SETUP, the arrow buttons, then ENTER. Audio Adjust...

User Manual (English)
Page 25
... Dolby Pro Logic II Music listening mode. Right-Only the right channel is output. IN1, IN2-Select the component input to the TV/CD input selector. For example, if you connect your CD player to the OPTICAL IN 1, you can adjust the sound and listening modes to your Blu-ray Disc/DVD player to COMPONENT VIDEO IN 2, you must assign that input selector is output. Lower settings move the sound field forward or backward when using the COMPONENT VIDEO...
... Dolby Pro Logic II Music listening mode. Right-Only the right channel is output. IN1, IN2-Select the component input to the TV/CD input selector. For example, if you connect your CD player to the OPTICAL IN 1, you can adjust the sound and listening modes to your Blu-ray Disc/DVD player to COMPONENT VIDEO IN 2, you must assign that input selector is output. Lower settings move the sound field forward or backward when using the COMPONENT VIDEO...
User Manual (English)
Page 26
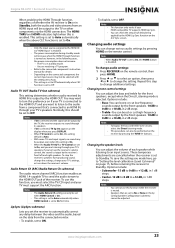
... selects the input source. • BD/DVD, VCR/DVR, CBL/SAT, GAME, AUX, TV/CD- Turns the Panorama function on the receiver. Setting up HDMI (HDMI Setup menu) Submenu CEC Function HDMI Through Audio TV OUT Audio Return Ch (ARC) LipSync Configuration Off (default)-CEC disabled. Notes • • • • • • When set to On, change the setting to use audio return channel (ARC) function. Insignia NS-AV511 Surround Sound Receiver The Center Width setting lets you adjust the width of the sound from 2-channel stereo sources. Selects the input source...
... selects the input source. • BD/DVD, VCR/DVR, CBL/SAT, GAME, AUX, TV/CD- Turns the Panorama function on the receiver. Setting up HDMI (HDMI Setup menu) Submenu CEC Function HDMI Through Audio TV OUT Audio Return Ch (ARC) LipSync Configuration Off (default)-CEC disabled. Notes • • • • • • When set to On, change the setting to use audio return channel (ARC) function. Insignia NS-AV511 Surround Sound Receiver The Center Width setting lets you adjust the width of the sound from 2-channel stereo sources. Selects the input source...
User Manual (English)
Page 27
... "Setting the level calibration (Level Cal menu)" on the remote control. Notes • • This function only works if your HDMI-compatible TV supports HDMI Lip Sync. Note When Audio TV OUT is set to On, the HOME button is set to an input source. Changing tone control settings You can boost or cut high-frequency sounds output by pressing HOME on page 15, before returning the receiver to OFF. This procedure can adjust the volume of each speaker while listening to Off. Note Changing the speaker levels You...
... "Setting the level calibration (Level Cal menu)" on the remote control. Notes • • This function only works if your HDMI-compatible TV supports HDMI Lip Sync. Note When Audio TV OUT is set to On, the HOME button is set to an input source. Changing tone control settings You can boost or cut high-frequency sounds output by pressing HOME on page 15, before returning the receiver to OFF. This procedure can adjust the volume of each speaker while listening to Off. Note Changing the speaker levels You...

User Manual (English)
Page 28
... Digital Audio (Digital Audio menu)" on your TV tuner can still hear quiet parts even when listening at night when you do not want to Standby. You can enter a preset name for each input selector. The Late Night function is set priorities of audio output when there are playing and the intention of the original sound designer. If both digital and analog inputs. Insignia NS-AV511 Surround Sound Receiver Setting the Late Night function The Late Night function lets you reduce the dynamic range of Dolby Digital...
... Digital Audio (Digital Audio menu)" on your TV tuner can still hear quiet parts even when listening at night when you do not want to Standby. You can enter a preset name for each input selector. The Late Night function is set priorities of audio output when there are playing and the intention of the original sound designer. If both digital and analog inputs. Insignia NS-AV511 Surround Sound Receiver Setting the Late Night function The Late Night function lets you reduce the dynamic range of Dolby Digital...
User Manual (English)
Page 34
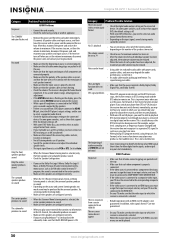
... the digital audio output setting on the display, press the remote control MUTING button to unmute the receiver. • While a pair of an HDMI signal than it does for other digital audio signals, audio output may not start immediately. In addition, video signals from DTS to an input selector, and your Insignia dealer. Only the front speakers produce sound • When the Stereo or Mono listening mode is not a malfunction. VIDEO Problems No picture • Make sure that all video connecting plugs...
... the digital audio output setting on the display, press the remote control MUTING button to unmute the receiver. • While a pair of an HDMI signal than it does for other digital audio signals, audio output may not start immediately. In addition, video signals from DTS to an input selector, and your Insignia dealer. Only the front speakers produce sound • When the Stereo or Mono listening mode is not a malfunction. VIDEO Problems No picture • Make sure that all video connecting plugs...
User Manual (English)
Page 35
... listening mode is failing, make these settings. 1. Insignia NS-AV511 Surround Sound Receiver Category Problem/Possible Solution TUNER Problems Reception is noisy, FM stereo reception is noisy, or the FM STEREO indicator does not light • Relocate your antenna. • Move the receiver away from the receiver, and that there's no obstruction between the remote control and the receiver's remote control sensor. • Make sure that the receiver is not subjected to the composite video input...
... listening mode is failing, make these settings. 1. Insignia NS-AV511 Surround Sound Receiver Category Problem/Possible Solution TUNER Problems Reception is noisy, FM stereo reception is noisy, or the FM STEREO indicator does not light • Relocate your antenna. • Move the receiver away from the receiver, and that there's no obstruction between the remote control and the receiver's remote control sensor. • Make sure that the receiver is not subjected to the composite video input...

Quick Setup Guide (English)
Page 1
... the radio to the next or previous station preset. Your NS-AV511 represents the state of a high-quality Insignia product. If you want. 14 Protective cap Remove when using jack. 15 AUX INPUT VIDEO jack Plug an external video source into this jack. 17 HOME button Press to a component video monitor into this jack. 16 AUX INPUT AUDIO L/R jacks Plug an external sound source into the OUT jacks. Plug the cables to access audio settings. Press ENTER to con rm a selection. 8 RETURN button In menu mode, press to return...
... the radio to the next or previous station preset. Your NS-AV511 represents the state of a high-quality Insignia product. If you want. 14 Protective cap Remove when using jack. 15 AUX INPUT VIDEO jack Plug an external video source into this jack. 17 HOME button Press to a component video monitor into this jack. 16 AUX INPUT AUDIO L/R jacks Plug an external sound source into the OUT jacks. Plug the cables to access audio settings. Press ENTER to con rm a selection. 8 RETURN button In menu mode, press to return...
Quick Setup Guide (English)
Page 2
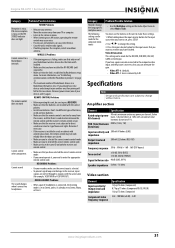
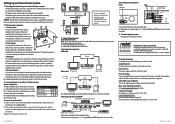
... User Guide. 5 Connecting the power • Plug the power cord into the terminals.The following table indicates the channels you have been connected. Connecting external components Front AUX input Back Digital Component Composite video and IN video audio L/R jacks Connect your components to create a triangle, with your speakers, Number of other Rocketboost products. Rocketboost TMWireless Card Ready Installing a Rocketboost Wireless Card (sold separately) enables this equipment. For information on assigning inputs, see "Setting up HDMI input (HDMI Input menu...
... User Guide. 5 Connecting the power • Plug the power cord into the terminals.The following table indicates the channels you have been connected. Connecting external components Front AUX input Back Digital Component Composite video and IN video audio L/R jacks Connect your components to create a triangle, with your speakers, Number of other Rocketboost products. Rocketboost TMWireless Card Ready Installing a Rocketboost Wireless Card (sold separately) enables this equipment. For information on assigning inputs, see "Setting up HDMI input (HDMI Input menu...


