User Manual (English)
Page 1
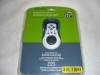
Sports armband radio I Radio-bracelet I Radio con brazalete NS-R4111
Sports armband radio I Radio-bracelet I Radio con brazalete NS-R4111
User Manual (English)
Page 3
... extreme caution or discontinue use in potentially hazardous situations. • Avoid using headphones at pedestrian crossings, can be serviced only by those specially trained in many areas. Precautions • Operate your arm band radio 3 Specifications 7 Troubleshooting 8 Legal notices 8 Français 10 Español 21 Safety information • Read all instructions before operating this radio. • To prevent fire...
... extreme caution or discontinue use in potentially hazardous situations. • Avoid using headphones at pedestrian crossings, can be serviced only by those specially trained in many areas. Precautions • Operate your arm band radio 3 Specifications 7 Troubleshooting 8 Legal notices 8 Français 10 Español 21 Safety information • Read all instructions before operating this radio. • To prevent fire...
User Manual (English)
Page 4
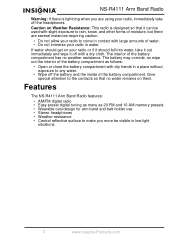
... not immerse your radio in water. Features The NS-R4111 Arm Band Radio features: • AM/FM digital radio • Easy preset digital tuning as many as 20 FM and 10 AM memory presets • Wearable oval design for arm band and belt-holder use • Stereo headphones • Weather resistance • Central reflective surface to make you are...
... not immerse your radio in water. Features The NS-R4111 Arm Band Radio features: • AM/FM digital radio • Easy preset digital tuning as many as 20 FM and 10 AM memory presets • Wearable oval design for arm band and belt-holder use • Stereo headphones • Weather resistance • Central reflective surface to make you are...
User Manual (English)
Page 5
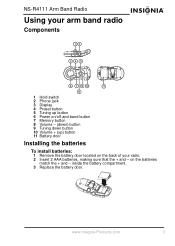
inside the battery compartment. 3 Replace the battery door. www.Insignia-Products.com 3 on the back of your radio. 2 Insert 2 AAA batteries, making sure that the + and - NS-R4111 Arm Band Radio Using your arm band radio Components 1 Hold switch 2 Phone jack 3 Display 4 Preset button 5 Tuning up button 6 Power on/off and band button 7 Memory button 8 Volume - (down) button 9 Tuning down button 10 Volume + (up) button 11 Battery door Installing the batteries To install batteries: 1 Remove the battery door located on the batteries match the + and -
inside the battery compartment. 3 Replace the battery door. www.Insignia-Products.com 3 on the back of your radio. 2 Insert 2 AAA batteries, making sure that the + and - NS-R4111 Arm Band Radio Using your arm band radio Components 1 Hold switch 2 Phone jack 3 Display 4 Preset button 5 Tuning up button 6 Power on/off and band button 7 Memory button 8 Volume - (down) button 9 Tuning down button 10 Volume + (up) button 11 Battery door Installing the batteries To install batteries: 1 Remove the battery door located on the batteries match the + and -
User Manual (English)
Page 6
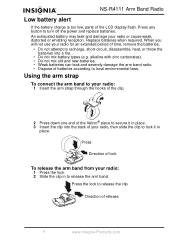
...® piece to secure it in place. NS-R4111 Arm Band Radio Low battery alert If the battery charge is too low, parts of release 4 www.Insignia-Products.com Replace batteries when required. Press Direction of batteries according to turn off the power and replace batteries. alkaline with zinc carbonates). • Do not mix old and new batteries. • Weak batteries can leak and severely damage the arm...
...® piece to secure it in place. NS-R4111 Arm Band Radio Low battery alert If the battery charge is too low, parts of release 4 www.Insignia-Products.com Replace batteries when required. Press Direction of batteries according to turn off the power and replace batteries. alkaline with zinc carbonates). • Do not mix old and new batteries. • Weak batteries can leak and severely damage the arm...
User Manual (English)
Page 7
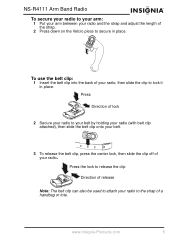
...it in place. www.Insignia-Products.com 5 Press Direction of lock 2 Secure your radio to your belt by holding your radio (with belt clip attached), then slide the belt clip onto your belt. . 3 To release the belt clip, press the center lock, then slide the clip off of your radio Press the lock to ...release the clip Direction of release Note: The belt clip can also be used to attach your radio to the strap of a handbag or tote. NS-R4111 Arm Band Radio To secure your radio to your arm: 1 Put your arm between your...
...it in place. www.Insignia-Products.com 5 Press Direction of lock 2 Secure your radio to your belt by holding your radio (with belt clip attached), then slide the belt clip onto your belt. . 3 To release the belt clip, press the center lock, then slide the clip off of your radio Press the lock to ...release the clip Direction of release Note: The belt clip can also be used to attach your radio to the strap of a handbag or tote. NS-R4111 Arm Band Radio To secure your radio to your arm: 1 Put your arm between your...
User Manual (English)
Page 8
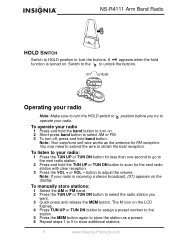
... number to the station. 5 Press the MEM button again to the next radio station. 2 Press and hold band button. on . A appears when the hold function is turned on unlock Operating your radio Note: Make sure to turn off, press and hold the TUN UP or TUN DN button to store additional stations. 6 www.Insignia-Products.com Note: Your earphone soft wire works...
... number to the station. 5 Press the MEM button again to the next radio station. 2 Press and hold band button. on . A appears when the hold function is turned on unlock Operating your radio Note: Make sure to turn off, press and hold the TUN UP or TUN DN button to store additional stations. 6 www.Insignia-Products.com Note: Your earphone soft wire works...
User Manual (English)
Page 9
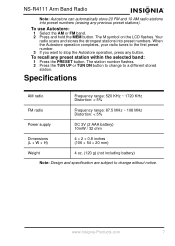
... mm) Weight 4 oz. (120 g) (not including battery) Note: Design and specification are subject to change to stop the Autostore operation, press any button. To use Autostore: 1 Select the AM or FM band. 2 Press and hold the MEM button. When the Autostore operation completes, your radio tunes to the first preset number. 3 If you want to a different stored station.
... mm) Weight 4 oz. (120 g) (not including battery) Note: Design and specification are subject to change to stop the Autostore operation, press any button. To use Autostore: 1 Select the AM or FM band. 2 Press and hold the MEM button. When the Autostore operation completes, your radio tunes to the first preset number. 3 If you want to a different stored station.
User Manual (English)
Page 10
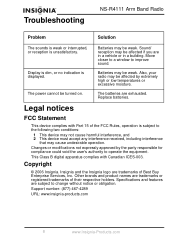
... with Part 15 of the FCC Rules, operation is subject to operate the equipment. Also, your radio may be turned on. Specifications and features are trademarks of their respective holders. Troubleshooting NS-R4111 Arm Band Radio Problem Solution The sounds is weak or interrupted, or reception is displayed. Copyright © 2006 Insignia. The batteries are trademarks or registered trademarks of Best Buy Enterprise Services, Inc...
... with Part 15 of the FCC Rules, operation is subject to operate the equipment. Also, your radio may be turned on. Specifications and features are trademarks of their respective holders. Troubleshooting NS-R4111 Arm Band Radio Problem Solution The sounds is weak or interrupted, or reception is displayed. Copyright © 2006 Insignia. The batteries are trademarks or registered trademarks of Best Buy Enterprise Services, Inc...
User Manual (English)
Page 11
... damage due to improper operation or maintenance, connection to improper voltage supply, or attempted repair by anyone other than a facility authorized by Insignia to service the Product. This warranty is valid only in exchange for defective parts for a period of 90 days from state to state, or province to province. NS-R4111 Arm Band Radio Limited 90-day...
... damage due to improper operation or maintenance, connection to improper voltage supply, or attempted repair by anyone other than a facility authorized by Insignia to service the Product. This warranty is valid only in exchange for defective parts for a period of 90 days from state to state, or province to province. NS-R4111 Arm Band Radio Limited 90-day...
