Insignia NS-PMM6230 Support and Manuals
Get Help and Manuals for this Insignia item

View All Support Options Below
Free Insignia NS-PMM6230 manuals!
Problems with Insignia NS-PMM6230?
Ask a Question
Free Insignia NS-PMM6230 manuals!
Problems with Insignia NS-PMM6230?
Ask a Question
Popular Insignia NS-PMM6230 Manual Pages
User Guide - Page 1
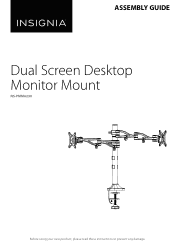
ASSEMBLY GUIDE
Dual Screen Desktop Monitor Mount
NS-PMM6230
Before using your new product, please read these instructions to prevent any damage.
User Guide - Page 2
...5 VESA mount patterns 6
Installation instructions 6
STEP 1: Preparing the monitors 6 STEP 2-Option 1: Attaching your monitor mount to a desktop edge 7 STEP 2-Option 2: Attaching your mount through a desktop grommet hole 9 STEP 3: Attaching the monitor support arms 11 STEP 4: Attaching the monitors 13 STEP 5: Adjusting the monitors 13 STEP 6: Managing cables 14
Specifications 14 ONE-YEAR...
User Guide - Page 3
... a square or rectangular table or desk. See Specifications on page 14.
The obsolete products can be installed on desk. NS-PMM6230
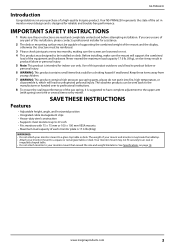
Introduction
Congratulations on your monitor mount to a glass-top table or desk. Never exceed the maximum load capacity 17.6 lb. (8 kg), or else it , which will support the combined
load of the mount and...
User Guide - Page 5
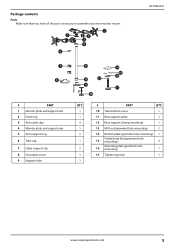
... to assemble your new monitor mount:
NS-PMM6230
#
PART
1 Monitor plate and support arm
2 Fixed ring
3 Arm cable clips
4 Monitor plate and support arm
5 Arm support ring
6 Tube cap
7 Cable support clip 8 Decorative cover 9 Support tube
QTY. 1 1 4 1 2 1
2 1 1
#
PART
QTY.
10 Tube bottom cover
1
11 Base support plate
1
12 Base support (clamp mounting)
1
13 M10 nut (grommet...
User Guide - Page 7
... insert the support tube (9) into the tube
bottom cover.
NS-PMM6230
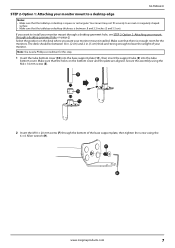
STEP 2-Option 1: Attaching your monitor mount to a desktop edge
Notes: • Make sure that the holes on the bottom cover and the plate are aligned. Make sure that the tabletop or desktop is square or rectangular. If you want to install your monitor...
User Guide - Page 8
... then tighten the screws with the desk to STEP 3: Attaching the monitor support arms on the bottom of the base support, slide the clamp assembly onto the edge of the desk, then tighten the... wrench (I).
4 Slide the decorative cover (8) all the way down the support tube until it covers the base support plate.
5 Loosen the knob on page 11.
8
www.insigniaproducts.com Desk
6 Go to prevent...
User Guide - Page 9
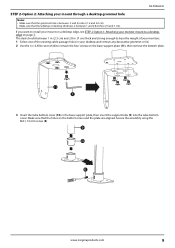
...support plate (11), then remove the bottom plate.
3 Insert the tube bottom cover (10) in your desktop and remove any decorative grommet or lid. 2 Use the 4 × 4 Allen wrench (I) to a desktop edge on page 7. NS-PMM6230... holes in the base support plate, then insert the support tube (9) into the tube bottom cover. www.insigniaproducts.com
9
If you want to install your mount on a desktop...
User Guide - Page 10
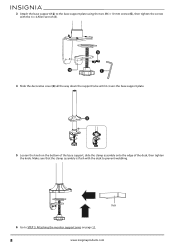
4 Slide the decorative cover (8) all the way down the support tube until it covers the base support plate.
5 Attach the bottom plate (14) to the bottom of the base plate using the four screws you removed in step 1.
6 Cover the screw heads ...
User Guide - Page 11
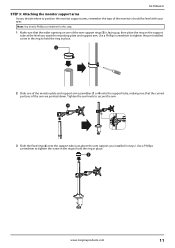
...support tube just above the arm support you installed in step 2. Tighten the arm knob to hold the ring in place.
2 Slide one of the arm support rings (5) is facing up, then place the ring on the support... plate and support arm assemblies (1 or 4) onto the support tube, making sure that the curved portions of the arm are pointed down. NS-PMM6230
STEP 3: Attaching the monitor support arms
As ...
User Guide - Page 12

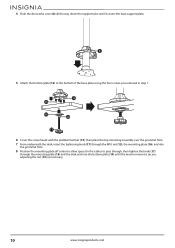
4 Slide the other monitor plate and support arm assembly (1 or 4) onto the support tube, making sure that the wider opening on the support tube at the level you want the mounting plate and support arm. Use a Phillips screwdriver to tighten the pre-installed screw in the ring to hold the ring in place.
6 Tighten the arm...
User Guide - Page 13
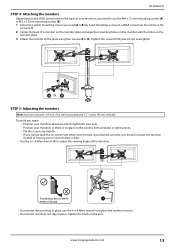
... of moving you or your monitors, you need (A or B) by hand-threading a screw in place, tighten the knob on the arm. www.insigniaproducts.com
13 NS-PMM6230
STEP 4: Attaching the monitors
Depending on the VESA screw holes on the back of your monitors closer. • Use the 4 × 4 Allen wrench (I) to adjust...
User Guide - Page 14
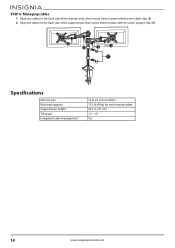
Specifications
Monitor size Max load capacity Support tube height Tilt angle Integrated cable management
10 to 27 inch monitors 17.6 lb. (8 kg) for each monitor plate 20.1 in place with the arm cable clips (3). 2 Align the cables to the back side of the support tube, then secure them in . (51 cm) -5° ~ 15°...
User Guide - Page 15
... failure of refrigerator or freezer • Customer instruction/education • Installation • Set up to three (3) pixel failures (dots that...SPECIFIC LEGAL RIGHTS, AND YOU MAY ALSO HAVE OTHER RIGHTS, WHICH VARY FROM STATE TO STATE OR PROVINCE TO PROVINCE. All rights reserved. How to obtain warranty service?
NS-PMM6230
ONE-YEAR LIMITED WARRANTY
Definitions:
The Distributor* of Insignia...
User Guide - Page 16

All rights reserved. Distributed by Best Buy Purchasing, LLC 7601 Penn Ave South, Richfield, MN 55423 U.S.A. ©2019 Best Buy. Made in China
V2 ENGLISH 19-0222 For product inquiries, please contact us with the information below: 1-877-467-4289 www.insigniaproducts.com INSIGNIA is a trademark of Best Buy and its affiliated companies.
Warranty Sheet - Page 1
...Insignia repair center or store personnel, Insignia will (at www.bestbuy.com or www.bestbuy.ca and is packaged with new or rebuilt comparable products or parts. Products and parts replaced under this product or any part of Insignia and are not returned to obtain warranty service...not cover: • Customer instruction/education • Installation • Set up to three (3) pixel failures ...
Insignia NS-PMM6230 Reviews
We have not received any reviews for Insignia yet.