User Manual (English)
Page 3
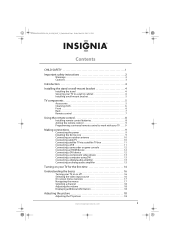
NS-P42Q-P501Q-P502Q-10A_09-0100_MAN_V1_English.book Page i Friday, March 20, 2009 3:11 PM Contents CHILD SAFETY 1 Important safety instructions 2 Warnings 2 Cautions 3 Introduction 4 Installing the stand or wall-mount bracket 4 Installing the stand 4 Securing your TV to a wall or cabinet 4 Installing a wall-mount bracket 5 TV components 5 Accessories... a digital audio amplifier 13 Connecting an analog audio amplifier 13 Turning on your TV for the first time 14 Understanding the basics 16 Turning your TV on or off 16 Selecting the video input source 16 On-screen menu overview ...
NS-P42Q-P501Q-P502Q-10A_09-0100_MAN_V1_English.book Page i Friday, March 20, 2009 3:11 PM Contents CHILD SAFETY 1 Important safety instructions 2 Warnings 2 Cautions 3 Introduction 4 Installing the stand or wall-mount bracket 4 Installing the stand 4 Securing your TV to a wall or cabinet 4 Installing a wall-mount bracket 5 TV components 5 Accessories... a digital audio amplifier 13 Connecting an analog audio amplifier 13 Turning on your TV for the first time 14 Understanding the basics 16 Turning your TV on or off 16 Selecting the video input source 16 On-screen menu overview ...
User Manual (English)
Page 4
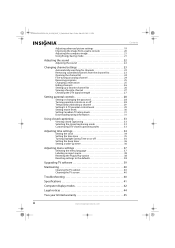
NS-P42Q-P501Q-P502Q-10A_09-0100_MAN_V1_English.book Page ii Friday, March 20, 2009 3:11 PM Contents Adjusting advanced picture settings 19 Improving the image from a game ... 37 Labeling an input source 38 Resetting the Plug & Play option 38 Resetting settings to the defaults 38 Upgrading TV software 39 Maintaining 40 Cleaning the TV cabinet 40 Cleaning the TV screen 40 Troubleshooting 40 Specifications 41 Computer display modes 42 Legal notices 44 Two-year limited warranty 45 ii www.insigniaproducts.com
NS-P42Q-P501Q-P502Q-10A_09-0100_MAN_V1_English.book Page ii Friday, March 20, 2009 3:11 PM Contents Adjusting advanced picture settings 19 Improving the image from a game ... 37 Labeling an input source 38 Resetting the Plug & Play option 38 Resetting settings to the defaults 38 Upgrading TV software 39 Maintaining 40 Cleaning the TV cabinet 40 Cleaning the TV screen 40 Troubleshooting 40 Specifications 41 Computer display modes 42 Legal notices 44 Two-year limited warranty 45 ii www.insigniaproducts.com
User Manual (English)
Page 5
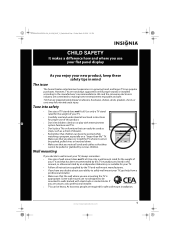
... are not designed to be mounted to walls backed with entertainment system furniture and TVs. • Don't place TVs on furniture that can easily be used as steps, such as suitable for safe wall mount installation. www.insigniaproducts.com 1 NS-P42Q-P501Q-P502Q-10A_09-0100_MAN_V1_English.book Page 1 Friday, March 20, 2009 3:11 PM...
... are not designed to be mounted to walls backed with entertainment system furniture and TVs. • Don't place TVs on furniture that can easily be used as steps, such as suitable for safe wall mount installation. www.insigniaproducts.com 1 NS-P42Q-P501Q-P502Q-10A_09-0100_MAN_V1_English.book Page 1 Friday, March 20, 2009 3:11 PM...

User Manual (English)
Page 6
NS-P42Q-P501Q-P502Q-10A_09-0100_MAN_V1_English.book Page 2 Friday, March 20, 2009 3:11 PM Important safety instructions CAUTION RISK OF ELECTRIC SHOCK DO NOT OPEN This symbol indicates that dangerous voltage constituting a risk of your TV. Servicing is required when the apparatus has been damaged... rinsing for replacement of broken glass. • If the LCD panel is in your mouth, immediately gargle, rinse, and consult with your TV. 1 Read these instructions. 2 Keep these instructions. 3 Heed all warnings. 4 Follow all servicing to this apparatus during lightning storms or ...
NS-P42Q-P501Q-P502Q-10A_09-0100_MAN_V1_English.book Page 2 Friday, March 20, 2009 3:11 PM Important safety instructions CAUTION RISK OF ELECTRIC SHOCK DO NOT OPEN This symbol indicates that dangerous voltage constituting a risk of your TV. Servicing is required when the apparatus has been damaged... rinsing for replacement of broken glass. • If the LCD panel is in your mouth, immediately gargle, rinse, and consult with your TV. 1 Read these instructions. 2 Keep these instructions. 3 Heed all warnings. 4 Follow all servicing to this apparatus during lightning storms or ...
User Manual (English)
Page 7
...the vent hole in damage and will form on the top of the plasma TV The top side of the product may be recycled and reused. To prevent this, let the TV stand in its normal operation. • If your TV has been dropped or damaged in performance. Mobile telephone warning To avoid .... This is normal and does not indicate any way. • When your TV exhibits a distinct change the location of mercury. NS-P42Q-P501Q-P502Q-10A_09-0100_MAN_V1_English.book Page 3 Friday, March 20, 2009 3:11 PM Power source Operate your TV only from the type of power source indicated on , or make sure that...
...the vent hole in damage and will form on the top of the plasma TV The top side of the product may be recycled and reused. To prevent this, let the TV stand in its normal operation. • If your TV has been dropped or damaged in performance. Mobile telephone warning To avoid .... This is normal and does not indicate any way. • When your TV exhibits a distinct change the location of mercury. NS-P42Q-P501Q-P502Q-10A_09-0100_MAN_V1_English.book Page 3 Friday, March 20, 2009 3:11 PM Power source Operate your TV only from the type of power source indicated on , or make sure that...
User Manual (English)
Page 8
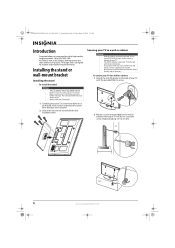
... NS-P502Q-10A represents the state of the art in place. • Make sure that you can cause it to fall resulting in serious injury or damage to your TV. • For added stability, secure your TV to the wall with the anti-fall device to the back of a high-quality Insignia ... do not think you install the base securely before moving it in plasma TV design and is heavy. Leave the screw head protruding 1/4" (6.35 mm). Securing your TV to a wall or cabinet Warnings • Pushing, pulling, or climbing on your TV can install the anti-fall and cause serious injury. • Always...
... NS-P502Q-10A represents the state of the art in place. • Make sure that you can cause it to fall resulting in serious injury or damage to your TV. • For added stability, secure your TV to the wall with the anti-fall device to the back of a high-quality Insignia ... do not think you install the base securely before moving it in plasma TV design and is heavy. Leave the screw head protruding 1/4" (6.35 mm). Securing your TV to a wall or cabinet Warnings • Pushing, pulling, or climbing on your TV can install the anti-fall and cause serious injury. • Always...
User Manual (English)
Page 9
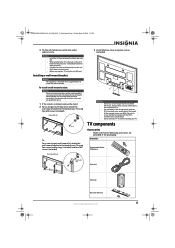
...-Insignia wall-mount kit, attach the wall-mount bracket to the back of your TV, untie the anti-fall device cord to the inside of hazards, do so. 1 If the stand is intended to the back of the required screws may cause damage to the wall or cabinet screw. NS...Installing a wall-mount bracket Warning This apparatus is installed, remove the stand. 2 For an Insignia wall-mount kit, attach the wall-mount bracket to be supported by qualified service personnel only. TV components Accessories Make sure that the following accessories are provided in the operating instructions unless you are...
...-Insignia wall-mount kit, attach the wall-mount bracket to the back of your TV, untie the anti-fall device cord to the inside of hazards, do so. 1 If the stand is intended to the back of the required screws may cause damage to the wall or cabinet screw. NS...Installing a wall-mount bracket Warning This apparatus is installed, remove the stand. 2 For an Insignia wall-mount kit, attach the wall-mount bracket to be supported by qualified service personnel only. TV components Accessories Make sure that the following accessories are provided in the operating instructions unless you are...
User Manual (English)
Page 10
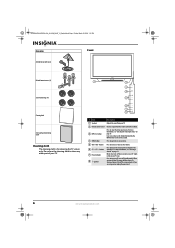
... the next or previous channel in the channel list. Press to tune to increase or decrease the volume. To disconnect power, turn off (standby mode). NS-P42Q-P501Q-P502Q-10A_09-0100_MAN_V1_English.book Page 6 Friday, March 20, 2009 3:11 PM Accessories Anti-fall device with screw Front M8 wall-mount screws (4) Screw... off the surge protector (if you are using one) or unplug the power cord. 6 www.insigniaproducts.com When you turn off when you turn your TV on page 18. Do not use the cleaning cloth to turn on page 16. Press to clean any other part of your...
... the next or previous channel in the channel list. Press to tune to increase or decrease the volume. To disconnect power, turn off (standby mode). NS-P42Q-P501Q-P502Q-10A_09-0100_MAN_V1_English.book Page 6 Friday, March 20, 2009 3:11 PM Accessories Anti-fall device with screw Front M8 wall-mount screws (4) Screw... off the surge protector (if you are using one) or unplug the power cord. 6 www.insigniaproducts.com When you turn off when you turn your TV on page 18. Do not use the cleaning cloth to turn on page 16. Press to clean any other part of your...
User Manual (English)
Page 11
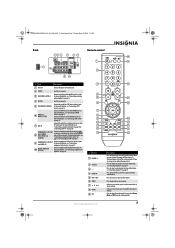
... device" on -screen menu, press to confirm selections or changes. For more information, see "Connecting an outdoor antenna" on page 10 or "Connecting cable TV" on page 10. 8 COMPONENT IN 2 PR, PB, Y and R-AUDIO-L AV1 IN VIDEO and R-AUDIO-L Connect a component video device to these ...more information, see "Connecting a DVI device" on -screen menu. To disconnect power, turn your TV, power still flows into it. You can select Stereo, Mono, or SAP (separate audio program). 7 NS-P42Q-P501Q-P502Q-10A_09-0100_MAN_V1_English.book Page 7 Friday, March 20, 2009 3:11 PM Back Remote control...
... device" on -screen menu, press to confirm selections or changes. For more information, see "Connecting an outdoor antenna" on page 10 or "Connecting cable TV" on page 10. 8 COMPONENT IN 2 PR, PB, Y and R-AUDIO-L AV1 IN VIDEO and R-AUDIO-L Connect a component video device to these ...more information, see "Connecting a DVI device" on -screen menu. To disconnect power, turn your TV, power still flows into it. You can select Stereo, Mono, or SAP (separate audio program). 7 NS-P42Q-P501Q-P502Q-10A_09-0100_MAN_V1_English.book Page 7 Friday, March 20, 2009 3:11 PM Back Remote control...
User Manual (English)
Page 12
NS-P42Q-P501Q-P502Q-10A_09-0100_MAN_V1_English.book Page 8 Friday, March 20, 2009 3:11 ...as sunshine, heat registers, or fire. • Battery chemicals can cause a rash. For more information, see "Adjusting the TV picture" on page 23. Press to tune to select the picture mode. For more information, see "Displaying additional information" ... Press to turn closed captioning on page 18. Press to set the sleep timer. For more information, see "Adjusting the TV picture" on or off. Press to select a favorite channel. symbols in component video or HDMI mode. If chemicals touch your...
NS-P42Q-P501Q-P502Q-10A_09-0100_MAN_V1_English.book Page 8 Friday, March 20, 2009 3:11 ...as sunshine, heat registers, or fire. • Battery chemicals can cause a rash. For more information, see "Adjusting the TV picture" on page 23. Press to tune to select the picture mode. For more information, see "Displaying additional information" ... Press to turn closed captioning on page 18. Press to set the sleep timer. For more information, see "Adjusting the TV picture" on or off. Press to select a favorite channel. symbols in component video or HDMI mode. If chemicals touch your...
User Manual (English)
Page 13
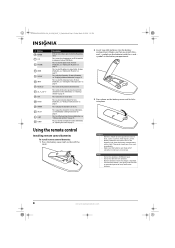
...instructions and try several codes before finding a match. 2 Follow your universal remote control's instructions to identify a code that can operate both your Insignia TV with a new or existing universal remote control. Four such remotes are listed on the chart, but many other compatible models are using a ... the core. NS-P42Q-P501Q-P502Q-10A_09-0100_MAN_V1_English.book Page 9 Friday, March 20, 2009 3:11 PM Aiming the remote control To aim the remote control: • Point the remote control towards the remote sensor on the front of power. Either move your TV. Programming a universal...
...instructions and try several codes before finding a match. 2 Follow your universal remote control's instructions to identify a code that can operate both your Insignia TV with a new or existing universal remote control. Four such remotes are listed on the chart, but many other compatible models are using a ... the core. NS-P42Q-P501Q-P502Q-10A_09-0100_MAN_V1_English.book Page 9 Friday, March 20, 2009 3:11 PM Aiming the remote control To aim the remote control: • Point the remote control towards the remote sensor on the front of power. Either move your TV. Programming a universal...
User Manual (English)
Page 14
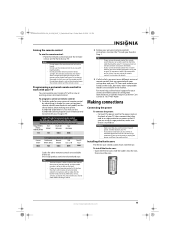
...OUT. Use a screwdriver to tighten the screws. 3 Connect the adapter to the ANT IN jack on the back of your TV. Cable in jack on the cable box. NS-P42Q-P501Q-P502Q-10A_09-0100_MAN_V1_English.book Page 10 Friday, March 20, 2009 3:11 PM Connecting an outdoor antenna Connecting a coaxial... antenna 3 Connect the combiner to the ANT IN jack on the back of your TV. To connect a cable TV box that unscrambles all channels...
...OUT. Use a screwdriver to tighten the screws. 3 Connect the adapter to the ANT IN jack on the back of your TV. Cable in jack on the cable box. NS-P42Q-P501Q-P502Q-10A_09-0100_MAN_V1_English.book Page 10 Friday, March 20, 2009 3:11 PM Connecting an outdoor antenna Connecting a coaxial... antenna 3 Connect the combiner to the ANT IN jack on the back of your TV. To connect a cable TV box that unscrambles all channels...
User Manual (English)
Page 15
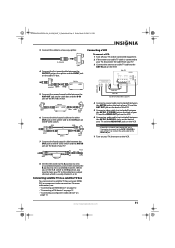
... OUTPUT RF (A/B) switch 6 Connect the third coaxial cable to the other OUT jack on the splitter and to the AV IN 1 R-AUDIO-L jacks of your TV. For more information, see: • "Connecting an HDMI device" on page 12 • "Connecting a DVI device" on page 12 • "Connecting a component video .... Connecting a VCR To connect a VCR: 1 Turn off your TV and the VIDEO OUT jack on the VCR. 6 Connect an audio cable (not included) between the ANT OUT jack on the cable box and the B-IN jack on the VCR. NS-P42Q-P501Q-P502Q-10A_09-0100_MAN_V1_English.book Page 11 Friday, March...
... OUTPUT RF (A/B) switch 6 Connect the third coaxial cable to the other OUT jack on the splitter and to the AV IN 1 R-AUDIO-L jacks of your TV. For more information, see: • "Connecting an HDMI device" on page 12 • "Connecting a DVI device" on page 12 • "Connecting a component video .... Connecting a VCR To connect a VCR: 1 Turn off your TV and the VIDEO OUT jack on the VCR. 6 Connect an audio cable (not included) between the ANT OUT jack on the cable box and the B-IN jack on the VCR. NS-P42Q-P501Q-P502Q-10A_09-0100_MAN_V1_English.book Page 11 Friday, March...
User Manual (English)
Page 16
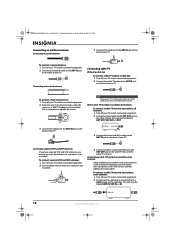
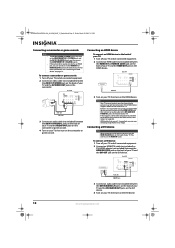
NS-P42Q-P501Q-P502Q-10A_09-0100_MAN_V1_English.book Page 12 Friday, March 20, 2009 3:11 PM Connecting a camcorder or game console Notes • • The AV IN 1 VIDEO (Y/VIDEO) jack is no image. Back of TV Connecting an HDMI device To connect an HDMI device to confirm the HDMI version, ... not 1.3-compliant may with abnormal color if the HDMI device supports HDMI versions older than 1.3. To connect a DVI device: 1 Turn off your TV. Back of TV Audio cable HDMI/DVI cable 3 Connect an audio cable (not included) between the HDMI IN 2(DVI) jack on the camcorder. If this happens...
NS-P42Q-P501Q-P502Q-10A_09-0100_MAN_V1_English.book Page 12 Friday, March 20, 2009 3:11 PM Connecting a camcorder or game console Notes • • The AV IN 1 VIDEO (Y/VIDEO) jack is no image. Back of TV Connecting an HDMI device To connect an HDMI device to confirm the HDMI version, ... not 1.3-compliant may with abnormal color if the HDMI device supports HDMI versions older than 1.3. To connect a DVI device: 1 Turn off your TV. Back of TV Audio cable HDMI/DVI cable 3 Connect an audio cable (not included) between the HDMI IN 2(DVI) jack on the camcorder. If this happens...
User Manual (English)
Page 17
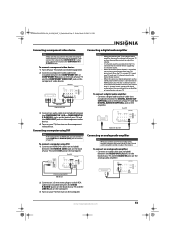
... using DVI Note If the computer has an HDMI jack, you can hear sound output from your TV sends out 5.1-channel sound to the HDMI IN 1 or HDMI IN 2(DVI) jack on the computer. NS-P42Q-P501Q-P502Q-10A_09-0100_MAN_V1_English.book Page 13 Friday, March 20, 2009 3:11 PM Connecting a... component video device Note Make sure that you connect the video and audio to the COMPONENT IN 1 R-AUDIO-L jacks. To connect a computer using a DTV signal, your TV's optical jack. When ...
... using DVI Note If the computer has an HDMI jack, you can hear sound output from your TV sends out 5.1-channel sound to the HDMI IN 1 or HDMI IN 2(DVI) jack on the computer. NS-P42Q-P501Q-P502Q-10A_09-0100_MAN_V1_English.book Page 13 Friday, March 20, 2009 3:11 PM Connecting a... component video device Note Make sure that you connect the video and audio to the COMPONENT IN 1 R-AUDIO-L jacks. To connect a computer using a DTV signal, your TV's optical jack. When ...
User Manual (English)
Page 18
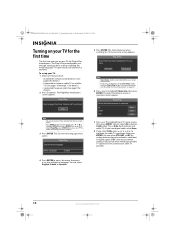
... source, the channel list, and time. Plug & Play Select the Antenna source to memorize screen appears. STD is only intended for use in your TV is accidentally set . The Plug & Play wizard guides you through 11 for details.) • Connected the power cord. (See page 9 for details.) 2 Press ...the Antenna source to memorize. You can select English, French, or Spanish. 5 Press ENTER. NS-P42Q-P501Q-P502Q-10A_09-0100_MAN_V1_English.book Page 14 Friday, March 20, 2009 3:11 PM Turning on your TV for the first time The first time you turn on your home. Start Note You can select...
... source, the channel list, and time. Plug & Play Select the Antenna source to memorize screen appears. STD is only intended for use in your TV is accidentally set . The Plug & Play wizard guides you through 11 for details.) • Connected the power cord. (See page 9 for details.) 2 Press ...the Antenna source to memorize. You can select English, French, or Spanish. 5 Press ENTER. NS-P42Q-P501Q-P502Q-10A_09-0100_MAN_V1_English.book Page 14 Friday, March 20, 2009 3:11 PM Turning on your TV for the first time The first time you turn on your home. Start Note You can select...
User Manual (English)
Page 19
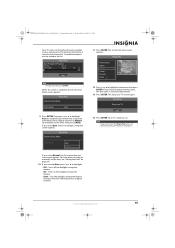
... If you select Manual, the Set current date and time screen appears. The Enjoy your TV. NS-P42Q-P501Q-P502Q-10A_09-0100_MAN_V1_English.book Page 15 Friday, March 20, 2009 3:11 PM Your TV starts searching for channels available in Progress. When the search is stored in the list. Clock... press or to highlight Auto (to use. The channel information is complete, the Set the Clock Mode screen appears. www.insigniaproducts.com 15 Your TV is selected automatically. 13 Press ENTER. Plug & Play Sets the Clock Mode. OK 14 Press ENTER. Plug & Play Sets the Clock Mode...
... If you select Manual, the Set current date and time screen appears. The Enjoy your TV. NS-P42Q-P501Q-P502Q-10A_09-0100_MAN_V1_English.book Page 15 Friday, March 20, 2009 3:11 PM Your TV starts searching for channels available in Progress. When the search is stored in the list. Clock... press or to highlight Auto (to use. The channel information is complete, the Set the Clock Mode screen appears. www.insigniaproducts.com 15 Your TV is selected automatically. 13 Press ENTER. Plug & Play Sets the Clock Mode. OK 14 Press ENTER. Plug & Play Sets the Clock Mode...
User Manual (English)
Page 20
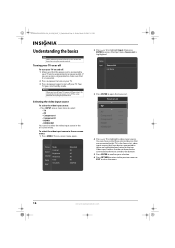
... Standard : 95 : 45 : 50 : 50 : G50/R50 2 Press or to highlight Input, then press ENTER to open the Source List. Component1 ---- NS-P42Q-P501Q-P502Q-10A_09-0100_MAN_V1_English.book Page 16 Friday, March 20, 2009 3:11 PM Understanding the basics Note Unless otherwise noted, all tasks in this... section are connected to the TV. Source List ▲ TV ▼ AV ---- HDMI1 ---- HDMI2/DVI- 4 Press or to highlight a video input source. If you turn off your selection. 6...
... Standard : 95 : 45 : 50 : 50 : G50/R50 2 Press or to highlight Input, then press ENTER to open the Source List. Component1 ---- NS-P42Q-P501Q-P502Q-10A_09-0100_MAN_V1_English.book Page 16 Friday, March 20, 2009 3:11 PM Understanding the basics Note Unless otherwise noted, all tasks in this... section are connected to the TV. Source List ▲ TV ▼ AV ---- HDMI1 ---- HDMI2/DVI- 4 Press or to highlight a video input source. If you turn off your selection. 6...
User Manual (English)
Page 21
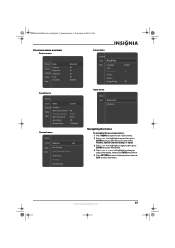
www.insigniaproducts.com 17 NS-P42Q-P501Q-P502Q-10A_09-0100_MAN_V1_English.book Page 17 Friday, March 20, 2009 3:11 PM On-screen menu overview Picture menu Picture Mode Sound Channel Contrast ... menu Picture Sound Mode : Custom Channel Setup Input Equalizer SRS TruSurround HD Preferred Language Multi-Track Sound : Off : English : Stereo Auto Volume : Off Speaker Select : TV Speaker Channel menu Sound Channel Antenna : Air Setup Input Auto Program Clear Scrambled Channel Channel List Fine Tune Signal Strength Setup menu Channel Setup Plug...
www.insigniaproducts.com 17 NS-P42Q-P501Q-P502Q-10A_09-0100_MAN_V1_English.book Page 17 Friday, March 20, 2009 3:11 PM On-screen menu overview Picture menu Picture Mode Sound Channel Contrast ... menu Picture Sound Mode : Custom Channel Setup Input Equalizer SRS TruSurround HD Preferred Language Multi-Track Sound : Off : English : Stereo Auto Volume : Off Speaker Select : TV Speaker Channel menu Sound Channel Antenna : Air Setup Input Auto Program Clear Scrambled Channel Channel List Fine Tune Signal Strength Setup menu Channel Setup Plug...
User Manual (English)
Page 22
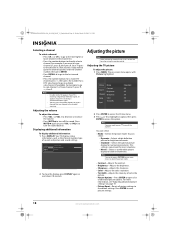
...-definition signal. Note You may need to reset picture settings. 18 www.insigniaproducts.com TV #1 DTV Air Dolby Digital 13-1 Fri, Dec 19 2:05 am 2 To close the display, press DISPLAY again or wait about 10 seconds. NS-P42Q-P501Q-P502Q-10A_09-0100_MAN_V1_English.book Page 18 Friday, March 20, 2009 3:11 PM...
...-definition signal. Note You may need to reset picture settings. 18 www.insigniaproducts.com TV #1 DTV Air Dolby Digital 13-1 Fri, Dec 19 2:05 am 2 To close the display, press DISPLAY again or wait about 10 seconds. NS-P42Q-P501Q-P502Q-10A_09-0100_MAN_V1_English.book Page 18 Friday, March 20, 2009 3:11 PM...


