User Manual (English)
Page 3
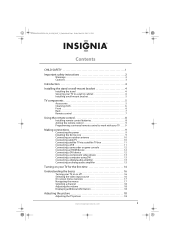
... the remote control 9 Programming a universal remote control to work with your TV . . . . 9 Making connections 9 Connecting the power 9 Installing the ferrite core 9 Connecting an outdoor antenna 10 Connecting cable TV 10 Connecting satellite TV via a satellite TV box 11 Connecting a VCR 11 Connecting a camcorder or game console 12 Connecting an HDMI device 12 Connecting a DVI device 12 Connecting a component video device 13 Connecting a computer using DVI 13 Connecting a digital audio amplifier 13 Connecting an analog audio amplifier 13 Turning on your TV for the first time 14...
... the remote control 9 Programming a universal remote control to work with your TV . . . . 9 Making connections 9 Connecting the power 9 Installing the ferrite core 9 Connecting an outdoor antenna 10 Connecting cable TV 10 Connecting satellite TV via a satellite TV box 11 Connecting a VCR 11 Connecting a camcorder or game console 12 Connecting an HDMI device 12 Connecting a DVI device 12 Connecting a component video device 13 Connecting a computer using DVI 13 Connecting a digital audio amplifier 13 Connecting an analog audio amplifier 13 Turning on your TV for the first time 14...
User Manual (English)
Page 4
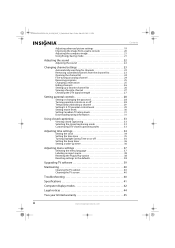
... DTV closed captioning styles 33 Adjusting time settings 34 Setting the clock 34 Setting the time zone 35 Turning Daylight Saving Time on or off 36 Setting the sleep timer 36 Setting a wake-up timer 36 Adjusting menu settings 37 Selecting the menu language 37 Labeling an input source 38 Resetting the Plug & Play option 38 Resetting settings to the defaults 38 Upgrading TV software 39 Maintaining 40 Cleaning the TV cabinet 40 Cleaning the TV screen 40 Troubleshooting 40 Specifications 41 Computer display modes 42 Legal...
... DTV closed captioning styles 33 Adjusting time settings 34 Setting the clock 34 Setting the time zone 35 Turning Daylight Saving Time on or off 36 Setting the sleep timer 36 Setting a wake-up timer 36 Adjusting menu settings 37 Selecting the menu language 37 Labeling an input source 38 Resetting the Plug & Play option 38 Resetting settings to the defaults 38 Upgrading TV software 39 Maintaining 40 Cleaning the TV cabinet 40 Cleaning the TV screen 40 Troubleshooting 40 Specifications 41 Computer display modes 42 Legal...
User Manual (English)
Page 5
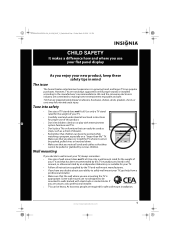
... suitable for your TV. • Follow all . Use only a TV stand rated for the weight of your TV. • Carefully read and understand all enclosed instructions for proper use your flat panel display As you enjoy your new product, keep these safety tips in this product. • Don't let children climb on or play with steel studs or cinder blocks. Wall mounting If you...
... suitable for your TV. • Follow all . Use only a TV stand rated for the weight of your TV. • Carefully read and understand all enclosed instructions for proper use your flat panel display As you enjoy your new product, keep these safety tips in this product. • Don't let children climb on or play with steel studs or cinder blocks. Wall mounting If you...
User Manual (English)
Page 7
... the cable ground must be hot after long periods of the National Electrical Code, ANSI/NFPA No. 70, provides information with your TV picture and sound, operating problems, or even damage, keep your cordless and cellular telephones away from the TV. Article 810 of use as a fixed blue, green, or red point. When this TV from the power outlet and refer servicing to qualified service personnel...
... the cable ground must be hot after long periods of the National Electrical Code, ANSI/NFPA No. 70, provides information with your TV picture and sound, operating problems, or even damage, keep your cordless and cellular telephones away from the TV. Article 810 of use as a fixed blue, green, or red point. When this TV from the power outlet and refer servicing to qualified service personnel...
User Manual (English)
Page 9
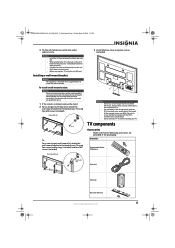
... wall or cabinet screw. Installing a wall-mount bracket Warning This apparatus is installed, remove the stand. 2 For an Insignia wall-mount kit, attach the wall-mount bracket to the inside of your TV. To install a wall-mount bracket: Warning These servicing instructions are qualified to do so. 1 If the stand is intended to be supported by qualified service personnel only. Warning • Do not use screws longer than the standard dimension, because they may differ. Warning • Install the TV close...
... wall or cabinet screw. Installing a wall-mount bracket Warning This apparatus is installed, remove the stand. 2 For an Insignia wall-mount kit, attach the wall-mount bracket to the inside of your TV. To install a wall-mount bracket: Warning These servicing instructions are qualified to do so. 1 If the stand is intended to be supported by qualified service personnel only. Warning • Do not use screws longer than the standard dimension, because they may differ. Warning • Install the TV close...
User Manual (English)
Page 10
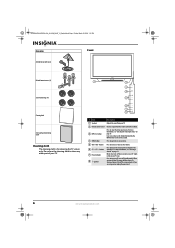
... "Selecting the video input source" on page 18. For more information, see "Selecting a channel" on page 16. Do no block. 3 INPUT button Press to open the on your TV, power still flows into it. When you turn off (standby mode). To disconnect power, turn on -screen menu. 5 VOL+/VOL- Do not use the cleaning cloth to turn off your TV. Blinks, then turns off when you turn your TV. 2 Remote control sensor Receives signals from the remote control.
... "Selecting the video input source" on page 18. For more information, see "Selecting a channel" on page 16. Do no block. 3 INPUT button Press to open the on your TV, power still flows into it. When you turn off (standby mode). To disconnect power, turn on -screen menu. 5 VOL+/VOL- Do not use the cleaning cloth to turn off your TV. Blinks, then turns off when you turn your TV. 2 Remote control sensor Receives signals from the remote control.
User Manual (English)
Page 11
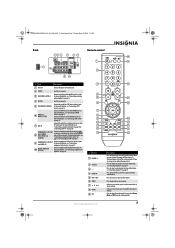
... "Connecting a DVI device" on page 12. 7 ANT IN Connect the cable for service only. For more information, see "Connecting a digital audio amplifier" on page 13. # Button 1 POWER 2 Numbers 3- 4 MUTE 5 VOL+/VOL- 6 MENU 7 8 ENTER 9 MTS www.insigniaproducts.com Description Press to turn off (standby mode). Press to turn your TV, power still flows into it. In the on -screen menu, press to select menu items or adjust settings. For more information, see "Connecting an outdoor antenna...
... "Connecting a DVI device" on page 12. 7 ANT IN Connect the cable for service only. For more information, see "Connecting a digital audio amplifier" on page 13. # Button 1 POWER 2 Numbers 3- 4 MUTE 5 VOL+/VOL- 6 MENU 7 8 ENTER 9 MTS www.insigniaproducts.com Description Press to turn off (standby mode). Press to turn your TV, power still flows into it. In the on -screen menu, press to select menu items or adjust settings. For more information, see "Connecting an outdoor antenna...
User Manual (English)
Page 13
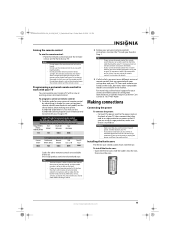
... remote control and the remote sensor. Insignia TV codes for universal remote controls (for all else fails, you must use the numbered code to program your universal remote control has a "Learn" feature, you can manually program it . See your universal remote control's instructions for your universal remote control by identifying its model (or your set -top box manufacturer, or call technical support for details. • If your remote control to work if direct sunlight or bright light shines on the remote...
... remote control and the remote sensor. Insignia TV codes for universal remote controls (for all else fails, you must use the numbered code to program your universal remote control has a "Learn" feature, you can manually program it . See your universal remote control's instructions for your universal remote control by identifying its model (or your set -top box manufacturer, or call technical support for details. • If your remote control to work if direct sunlight or bright light shines on the remote...
User Manual (English)
Page 17
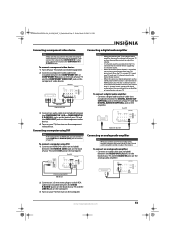
... using DVI Note If the computer has an HDMI jack, you connect your TV to a analog audio amplifier, decrease the volume level on your TV and use the amplifier controls to adjust the volume. 5.1-channel sound is possible when the TV is turned on, you connect the video and audio to matching jacks in the same row. Back of TV Digital audio optical cable Connecting an analog audio amplifier Note When you can hear sound output from your TV's optical...
... using DVI Note If the computer has an HDMI jack, you connect your TV to a analog audio amplifier, decrease the volume level on your TV and use the amplifier controls to adjust the volume. 5.1-channel sound is possible when the TV is turned on, you connect the video and audio to matching jacks in the same row. Back of TV Digital audio optical cable Connecting an analog audio amplifier Note When you can hear sound output from your TV's optical...
User Manual (English)
Page 18
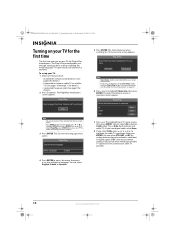
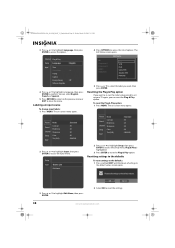
....) 2 Press (power). The Plug & Play wizard guides you have, contact your cable TV provider. 14 www.insigniaproducts.com Plug & Play Menu Language, Store Demo, Channels, and Time will be set up basic settings including the menu language, TV signal source, the channel list, and time. If your TV is accidentally set to memorize screen appears. The Select the Antenna source to Store Demo mode, reset the Plug & Play option. You can select STD, HRC, or IRC for analog (antenna-based or without a cable box) or digital signals. Menu Language : English...
....) 2 Press (power). The Plug & Play wizard guides you have, contact your cable TV provider. 14 www.insigniaproducts.com Plug & Play Menu Language, Store Demo, Channels, and Time will be set up basic settings including the menu language, TV signal source, the channel list, and time. If your TV is accidentally set to memorize screen appears. The Select the Antenna source to Store Demo mode, reset the Plug & Play option. You can select STD, HRC, or IRC for analog (antenna-based or without a cable box) or digital signals. Menu Language : English...
User Manual (English)
Page 19
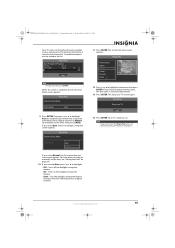
... Auto (to automatically set the time using time information from a digital channel. 11 Press ENTER. The Set the time zone screen appears. Plug & Play Enjoy your viewing area. Scrambled channels are not stored in Progress. Air : 8 DTV Cable : -- Clock Mode : AAuutoto Manual If you receive a digital channel signal, the time zone is ready to reset the Plug & Play option, see "Setting the clock" on page 38. www.insigniaproducts.com 15 Plug & Play Auto Program in the list. Note If you select Auto, the Set...
... Auto (to automatically set the time using time information from a digital channel. 11 Press ENTER. The Set the time zone screen appears. Plug & Play Enjoy your viewing area. Scrambled channels are not stored in Progress. Air : 8 DTV Cable : -- Clock Mode : AAuutoto Manual If you receive a digital channel signal, the time zone is ready to reset the Plug & Play option, see "Setting the clock" on page 38. www.insigniaproducts.com 15 Plug & Play Auto Program in the list. Note If you select Auto, the Set...
User Manual (English)
Page 22
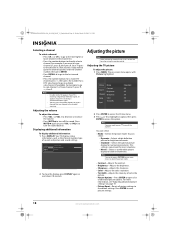
... the TV picture To adjust the picture: 1 Press MENU. Displaying additional information To display additional information: 1 Press DISPLAY. For more times to select the picture mode. • Contrast-Adjusts the contrast. • Brightness-Adjusts the brightness. • Sharpness-Adjusts the sharpness. • Color-Adjusts the color saturation. • Tint (G/R)-Adjusts the intensity of red in the picture. • Picture Options-Press ENTER to open a list of sound, and picture and sound settings. Picture Mode Sound Channel Contrast Brightness Sharpness Setup Input Color Tint...
... the TV picture To adjust the picture: 1 Press MENU. Displaying additional information To display additional information: 1 Press DISPLAY. For more times to select the picture mode. • Contrast-Adjusts the contrast. • Brightness-Adjusts the brightness. • Sharpness-Adjusts the sharpness. • Color-Adjusts the color saturation. • Tint (G/R)-Adjusts the intensity of red in the picture. • Picture Options-Press ENTER to open a list of sound, and picture and sound settings. Picture Mode Sound Channel Contrast Brightness Sharpness Setup Input Color Tint...
User Manual (English)
Page 23
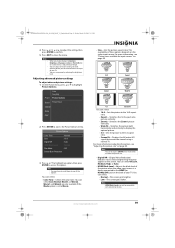
... be viewed using a normal TV. You can save power by reducing the brightness level. For more information adjusting the picture, see "Picture sizes available for each external device you make changes to select the picture size. • Digital NR-(Digital Noise Reduction) Reduces noise (static and ghosting) that cannot be compatible with all the options. Picture Options Color Tone : Normal Size : 16:9 Digital NR : Auto HDMI Black Level : Normal Film Mode : Off Screen Burn Protection...
... be viewed using a normal TV. You can save power by reducing the brightness level. For more information adjusting the picture, see "Picture sizes available for each external device you make changes to select the picture size. • Digital NR-(Digital Noise Reduction) Reduces noise (static and ghosting) that cannot be compatible with all the options. Picture Options Color Tone : Normal Size : 16:9 Digital NR : Auto HDMI Black Level : Normal Film Mode : Off Screen Burn Protection...
User Manual (English)
Page 24
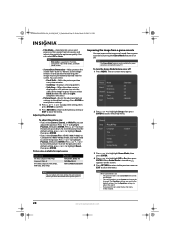
... When Game Mode is set to Custom and cannot be changed. Channel Setup Plug & Play Input Language Time Game Mode V-Chip Caption Energy Saving : English : Off : Off 3 Press or to highlight Game Mode, then press ENTER. 4 Press or to the default settings. When a screen image remains in a 4:3 picture size, sets the sides of your TV. To turn the Game Mode feature on : • The picture mode is set to Standard and cannot be permanently burned into the screen. Press ENTER to reset picture settings...
... When Game Mode is set to Custom and cannot be changed. Channel Setup Plug & Play Input Language Time Game Mode V-Chip Caption Energy Saving : English : Off : Off 3 Press or to highlight Game Mode, then press ENTER. 4 Press or to the default settings. When a screen image remains in a 4:3 picture size, sets the sides of your TV. To turn the Game Mode feature on : • The picture mode is set to Standard and cannot be permanently burned into the screen. Press ENTER to reset picture settings...
User Manual (English)
Page 25
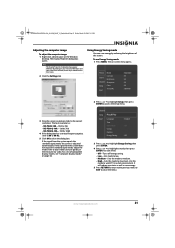
... video card user guide), or there may appear different depending on page 42. 2 Press or to highlight Setup, then press ENTER to watch TV in most cases. 2 Click the Settings tab. Note The Display Properties dialog box may be no video. Use this mode to access the Setup menu. You can save energy. 5 Press RETURN to return to the previous menu or EXIT to close the menu. Channel Setup Plug & Play Input Language Time Game Mode...
... video card user guide), or there may appear different depending on page 42. 2 Press or to highlight Setup, then press ENTER to watch TV in most cases. 2 Click the Settings tab. Note The Display Properties dialog box may be no video. Use this mode to access the Setup menu. You can save energy. 5 Press RETURN to return to the previous menu or EXIT to close the menu. Channel Setup Plug & Play Input Language Time Game Mode...

User Manual (English)
Page 26
...-Resets all the sound settings to suit your TV's speakers. • Preferred Language-Selects the language for general purposes. • Music-Lets you customize the sound settings to default settings. When you select this step. • Cancel-Cancels any changes you are based on available audio formats for an analog TV program. Picture Sound Mode : Custom Channel Equalizer Setup Input SRS TruSurround HD : Off Preferred Language : English Multi-Track Sound : Stereo Auto Volume : Off Speaker...
...-Resets all the sound settings to suit your TV's speakers. • Preferred Language-Selects the language for general purposes. • Music-Lets you customize the sound settings to default settings. When you select this step. • Cancel-Cancels any changes you are based on available audio formats for an analog TV program. Picture Sound Mode : Custom Channel Equalizer Setup Input SRS TruSurround HD : Off Preferred Language : English Multi-Track Sound : Stereo Auto Volume : Off Speaker...
User Manual (English)
Page 42
... the Input menu. The on -screen menu opens. Resetting the Plug & Play option If you want , then press ENTER. Picture Mode Sound Channel Contrast Brightness Sharpness Setup Color Tint (G/R) Input : Standard : 95 : 45 : 50 : 50 : G50/R50 2 Press or to highlight Input, then press ENTER to confirm. Resets all settings to the default values screen opens. The Edit Name screen opens. Edit Name AV Component1 Component2 HDMI1 HDMI2/DVI ---VCR DVD Cable STB...
... the Input menu. The on -screen menu opens. Resetting the Plug & Play option If you want , then press ENTER. Picture Mode Sound Channel Contrast Brightness Sharpness Setup Color Tint (G/R) Input : Standard : 95 : 45 : 50 : 50 : G50/R50 2 Press or to highlight Input, then press ENTER to confirm. Resets all settings to the default values screen opens. The Edit Name screen opens. Edit Name AV Component1 Component2 HDMI1 HDMI2/DVI ---VCR DVD Cable STB...
User Manual (English)
Page 44
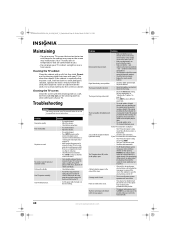
... switching channels or when pressing DISPLAY on the original production method (analog or digital). Troubleshooting Warning Do not try to dry the screen or cabinet. For more information, see "Selecting the video input source" on again. • Check the cable connections. The product settings are visible on the screen. • There may appear in areas that the power cord is working power outlet. Solution • Try another channel...
... switching channels or when pressing DISPLAY on the original production method (analog or digital). Troubleshooting Warning Do not try to dry the screen or cabinet. For more information, see "Selecting the video input source" on again. • Check the cable connections. The product settings are visible on the screen. • There may appear in areas that the power cord is working power outlet. Solution • Try another channel...

User Manual (English)
Page 48
... harmful interference, and 2.This device must accept any interference received, including interference that the ampere rating of the FCC Rules. This television receiver provides display of television closed captioning in accordance with Section 15.119 of the FCC rules. (TV broadcast receivers with picture screens 13 inches or larger in accordance with the instruction manual, may not cause harmful interference, and 2.This device must...
... harmful interference, and 2.This device must accept any interference received, including interference that the ampere rating of the FCC Rules. This television receiver provides display of television closed captioning in accordance with Section 15.119 of the FCC rules. (TV broadcast receivers with picture screens 13 inches or larger in accordance with the instruction manual, may not cause harmful interference, and 2.This device must...
User Manual (English)
Page 49
... customer service please call , an Insignia television (size and features to service the Product • Products sold as fuses or batteries • Products where the factory applied serial number has been altered or removed REPAIR REPLACEMENT AS PROVIDED UNDER THIS WARRANTY IS YOUR EXCLUSIVE REMEDY. Where is only available to the original purchaser of their respective owners. This warranty lasts as long...
... customer service please call , an Insignia television (size and features to service the Product • Products sold as fuses or batteries • Products where the factory applied serial number has been altered or removed REPAIR REPLACEMENT AS PROVIDED UNDER THIS WARRANTY IS YOUR EXCLUSIVE REMEDY. Where is only available to the original purchaser of their respective owners. This warranty lasts as long...


