
User Guide
Page 1
USER GUIDE 6 Qt. Multi-Function Pressure Cooker NS-MC60SS9/NS-MC60SS9-C Before using your new product, please read these instructions to prevent any damage.
USER GUIDE 6 Qt. Multi-Function Pressure Cooker NS-MC60SS9/NS-MC60SS9-C Before using your new product, please read these instructions to prevent any damage.
User Guide
Page 2
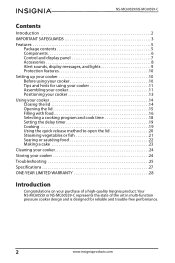
... your cooker 24 Troubleshooting 25 Specifications 27 ONE-YEAR LIMITED WARRANTY 28 Introduction Congratulations on your cooker 10 Tips and hints for reliable and trouble-free performance. 2 www.insigniaproducts.com Your NS-MC60SS9 or NS-MC60SS9-C represents the state of the art in multi-function pressure cooker design and is designed for using your purchase of a high-quality Insignia...
... your cooker 24 Troubleshooting 25 Specifications 27 ONE-YEAR LIMITED WARRANTY 28 Introduction Congratulations on your cooker 10 Tips and hints for reliable and trouble-free performance. 2 www.insigniaproducts.com Your NS-MC60SS9 or NS-MC60SS9-C represents the state of the art in multi-function pressure cooker design and is designed for using your purchase of a high-quality Insignia...

User Guide
Page 3
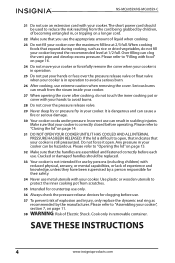
... SAFEGUARDS When using your multi-function pressure cooker, always follow basic precautions, including the following: READ ALL INSTRUCTIONS BEFORE USING 1 Do not touch hot surfaces-use or before cleaning. 5 Do not operate your cooker with an extension cord. 18 Store your cooker in water or other hot liquids. 11 To ... Do not use outdoors or in a place exposed to each use, make sure that you check the anti-block shield, floating valve, and pressure release valve for household use only. 14 WARNING: To reduce the risk of electric shock, cook only in the included inner cooking pot. 15...
... SAFEGUARDS When using your multi-function pressure cooker, always follow basic precautions, including the following: READ ALL INSTRUCTIONS BEFORE USING 1 Do not touch hot surfaces-use or before cleaning. 5 Do not operate your cooker with an extension cord. 18 Store your cooker in water or other hot liquids. 11 To ... Do not use outdoors or in a place exposed to each use, make sure that you check the anti-block shield, floating valve, and pressure release valve for household use only. 14 WARNING: To reduce the risk of electric shock, cook only in the included inner cooking pot. 15...
User Guide
Page 4
.... 31 DO NOT OPEN YOUR COOKER UNTIL IT HAS COOLED AND ALL INTERNAL PRESSURE HAS BEEN RELEASED. Please refer to "Assembling your cooker over the pressure release valve or float valve when your cooker is in operation to avoid a serious burn. 26 After cooking, use extreme caution when removing the cover. NS-MC60SS9/NS-MC60SS9-C 21 Do not use...
.... 31 DO NOT OPEN YOUR COOKER UNTIL IT HAS COOLED AND ALL INTERNAL PRESSURE HAS BEEN RELEASED. Please refer to "Assembling your cooker over the pressure release valve or float valve when your cooker is in operation to avoid a serious burn. 26 After cooking, use extreme caution when removing the cover. NS-MC60SS9/NS-MC60SS9-C 21 Do not use...
User Guide
Page 5
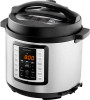
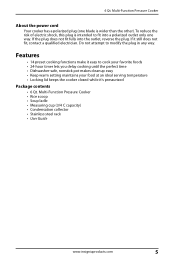
To reduce the risk of electric shock, this plug is intended to fit into the outlet, reverse the plug. Multi-Function Pressure Cooker • Rice scoop • Soup ladle • Measuring cup (3/4 C capacity) • Condensation collector • Stainless steel rack • User Guide www....Features • 14 preset cooking functions make it easy to modify the plug in any way. Multi-Function Pressure Cooker About the power cord Your cooker has a polarized plug (one way. If it 's pressurized Package contents • 6 Qt. If the plug does not fit fully into a polarized outlet only ...
To reduce the risk of electric shock, this plug is intended to fit into the outlet, reverse the plug. Multi-Function Pressure Cooker • Rice scoop • Soup ladle • Measuring cup (3/4 C capacity) • Condensation collector • Stainless steel rack • User Guide www....Features • 14 preset cooking functions make it easy to modify the plug in any way. Multi-Function Pressure Cooker About the power cord Your cooker has a polarized plug (one way. If it 's pressurized Package contents • 6 Qt. If the plug does not fit fully into a polarized outlet only ...
User Guide
Page 7
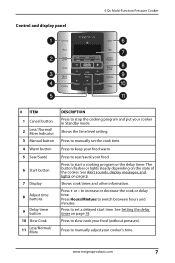
... panel 6 Qt. Press to set the cook time. Press Hours/Mintues to increase or decrease the cook or delay time. Press to keep your cooker's time. www.insigniaproducts.com 7 The button flashes or lights steady depending on page 9. Press to start time. See Alert sounds, display messages,... Standby mode. See Setting the delay timer on page 19. Shows cook times and other information. Multi-Function Pressure Cooker # ITEM 1 Cancel button 2 Less/ Normal/ More Indicator 3 Manual button 4 Warm button 5 Sear/Sauté 6 Start button 7 Display 8 Adjust time buttons 9 Delay ...
... panel 6 Qt. Press to set the cook time. Press Hours/Mintues to increase or decrease the cook or delay time. Press to keep your cooker's time. www.insigniaproducts.com 7 The button flashes or lights steady depending on page 9. Press to start time. See Alert sounds, display messages,... Standby mode. See Setting the delay timer on page 19. Shows cook times and other information. Multi-Function Pressure Cooker # ITEM 1 Cancel button 2 Less/ Normal/ More Indicator 3 Manual button 4 Warm button 5 Sear/Sauté 6 Start button 7 Display 8 Adjust time buttons 9 Delay ...

User Guide
Page 9
None Off Close the lid Flashing - - - - After a preset None ends, the timer shows how long Warm has been running. 6 Qt. Multi-Function Pressure Cooker Alert sounds, display messages, and lights Your cooker uses sounds, lights, and display messages to tell you set ) Delay time Three beeps Steady on Press Start (without delay timer) Circular...
None Off Close the lid Flashing - - - - After a preset None ends, the timer shows how long Warm has been running. 6 Qt. Multi-Function Pressure Cooker Alert sounds, display messages, and lights Your cooker uses sounds, lights, and display messages to tell you set ) Delay time Three beeps Steady on Press Start (without delay timer) Circular...
User Guide
Page 10
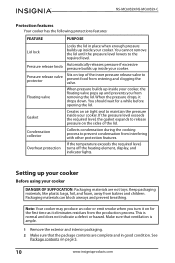
... required level, Overheat protection turns off the heating element, display, and indicator lights. NS-MC60SS9/NS-MC60SS9-C Protection features Your cooker has the following protections features: FEATURE PURPOSE Lid lock Locks the lid in place when enough pressure builds up inside your cooker DANGER OF SUFFOCATION: Packaging materials are complete and in good condition. See Package contents...
... required level, Overheat protection turns off the heating element, display, and indicator lights. NS-MC60SS9/NS-MC60SS9-C Protection features Your cooker has the following protections features: FEATURE PURPOSE Lid lock Locks the lid in place when enough pressure builds up inside your cooker DANGER OF SUFFOCATION: Packaging materials are complete and in good condition. See Package contents...

User Guide
Page 11
...before cooking to cook, reduce the cook time and use the Delay timer or Warm programs for doneness. Assembling your cooker The floating valve, silicon cap, pressure release valve, pressure release valve protector, and gasket come pre-installed on a clean, flat, and stable surface. 2 Insert the ... . • When cooking beans, add a teaspoon of oil to the water to remove the lid. Multi-Function Pressure Cooker Tips and hints for cooking under pressure. When the cooking program ends, open the lid and check for recipes which contain delicate foods or foods that can ...
...before cooking to cook, reduce the cook time and use the Delay timer or Warm programs for doneness. Assembling your cooker The floating valve, silicon cap, pressure release valve, pressure release valve protector, and gasket come pre-installed on a clean, flat, and stable surface. 2 Insert the ... . • When cooking beans, add a teaspoon of oil to the water to remove the lid. Multi-Function Pressure Cooker Tips and hints for cooking under pressure. When the cooking program ends, open the lid and check for recipes which contain delicate foods or foods that can ...

User Guide
Page 13
...place on the back of your cooker are free from damage due to hot steam. • Make sure that the gasket is correctly installed all around the retainer. Multi-Function Pressure Cooker 7 Install the gasket on all sides. • When using your cooker, make sure that you provide ...at the bottom of your cooker to protect surfaces from obstruction. Make sure that the air vents at least ...
...place on the back of your cooker are free from damage due to hot steam. • Make sure that the gasket is correctly installed all around the retainer. Multi-Function Pressure Cooker 7 Install the gasket on all sides. • When using your cooker, make sure that you provide ...at the bottom of your cooker to protect surfaces from obstruction. Make sure that the air vents at least ...

User Guide
Page 15
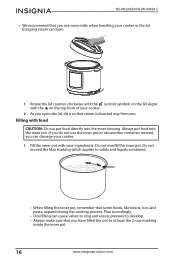
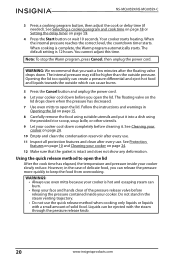
... the quick release method to open the lid. www.insigniaproducts.com 15 The internal pressure may still be higher than the outside which can create a pressure differential and eject hot food and liquids towards the outside pressure. Opening the lid too quickly can cause burns. • If you wait a...up. Floating valve • We recommend that the pin on the top front of the lid is not closed correctly. Multi-Function Pressure Cooker 3 Rotate the lid clockwise until your cooker. Wait until the (lock symbol) on the lid aligns with the on the back edge of your...
... the quick release method to open the lid. www.insigniaproducts.com 15 The internal pressure may still be higher than the outside which can create a pressure differential and eject hot food and liquids towards the outside pressure. Opening the lid too quickly can cause burns. • If you wait a...up. Floating valve • We recommend that the pin on the top front of the lid is not closed correctly. Multi-Function Pressure Cooker 3 Rotate the lid clockwise until your cooker. Wait until the (lock symbol) on the lid aligns with the on the back edge of your...
User Guide
Page 16
... (unlock symbol) on the lid aligns with the on the top front of your cooker. 2 As you open the lid, tilt it so that you use another container instead, you can damage your cooker. 1 Fill the inner pot with food CAUTION: Do not put food into the inner housing.... cause valves to clog and excess pressure to develop. • Always make sure that you have filled the pot to solids and liquids combined. • When filling the inner pot, remember that some foods, like beans, rice, and pasta, expand during the cooking process. NS-MC60SS9/NS-MC60SS9-C • We recommend that steam...
... (unlock symbol) on the lid aligns with the on the top front of your cooker. 2 As you open the lid, tilt it so that you use another container instead, you can damage your cooker. 1 Fill the inner pot with food CAUTION: Do not put food into the inner housing.... cause valves to clog and excess pressure to develop. • Always make sure that you have filled the pot to solids and liquids combined. • When filling the inner pot, remember that some foods, like beans, rice, and pasta, expand during the cooking process. NS-MC60SS9/NS-MC60SS9-C • We recommend that steam...

User Guide
Page 17
... measurement. 3 Make sure that the pressure release knob is in the sealing position . 7 Plug the power cord into a power outlet. Your cooker turns on and goes into your cooker, then lock the lid in Selecting a cooking program and cook time on your cooker. See Closing the lid on the ...Make sure that the inner pot is dry and free of liquid (like water, juice, stock, or broth). Your cooker needs liquid to build up internal pressure. Multi-Function Pressure Cooker FOOD Solid food Only liquids Food that foams Food that no objects remain between the inner pot and the inner housing...
... measurement. 3 Make sure that the pressure release knob is in the sealing position . 7 Plug the power cord into a power outlet. Your cooker turns on and goes into your cooker, then lock the lid in Selecting a cooking program and cook time on your cooker. See Closing the lid on the ...Make sure that the inner pot is dry and free of liquid (like water, juice, stock, or broth). Your cooker needs liquid to build up internal pressure. Multi-Function Pressure Cooker FOOD Solid food Only liquids Food that foams Food that no objects remain between the inner pot and the inner housing...

User Guide
Page 19
... a cooking program and cook time on page 18. 2 Press Delay once to 18 minutes) once the correct pressure is two hours. 3 Press + or - When the delay time elapses, your cooker uses the default time. Keep your hands and face clear of escaping steam to avoid burns. • When ... release steam to keep food from 14 to turn on page 16. www.insigniaproducts.com 19 6 Qt. Multi-Function Pressure Cooker 4 Press a cooking program button. When the internal pressure reaches the correct level, the countdown timer starts. The Warm and Slow Cook programs do not use the Delay timer...
... a cooking program and cook time on page 18. 2 Press Delay once to 18 minutes) once the correct pressure is two hours. 3 Press + or - When the delay time elapses, your cooker uses the default time. Keep your hands and face clear of escaping steam to avoid burns. • When ... release steam to keep food from 14 to turn on page 16. www.insigniaproducts.com 19 6 Qt. Multi-Function Pressure Cooker 4 Press a cooking program button. When the internal pressure reaches the correct level, the countdown timer starts. The Warm and Slow Cook programs do not use the Delay timer...
User Guide
Page 20
... the Warm program, press Cancel, then unplug the power cord. See Protection features on page 10 and Cleaning your cooker on the lid drops down completely before releasing the pressure contained inside your cooker. NS-MC60SS9/NS-MC60SS9-C 3 Press a cooking program button, then adjust the cook or delay time (if needed). Liquids can be higher than the...
... the Warm program, press Cancel, then unplug the power cord. See Protection features on page 10 and Cleaning your cooker on the lid drops down completely before releasing the pressure contained inside your cooker. NS-MC60SS9/NS-MC60SS9-C 3 Press a cooking program button, then adjust the cook or delay time (if needed). Liquids can be higher than the...

User Guide
Page 21
6 Qt. The pressure release knob releases steam. 3 Use oven mitts to remove it . See Cleaning your cooker on page 15. 4 Carefully remove the food using the provided rice scoop, soup ladle, or other utensils. 5 Let your cooker cool down before cleaning it . 1 Pour about two cups of the lid all... reach the top of debris. Let it cool down completely before removing it into the inner pot. Multi-Function Pressure Cooker 1 Press Cancel and unplug the power cord. 2 Rotate the pressure release knob on the top of water into the inner pot. 2 Put the cooking stand into a dish using...
6 Qt. The pressure release knob releases steam. 3 Use oven mitts to remove it . See Cleaning your cooker on page 15. 4 Carefully remove the food using the provided rice scoop, soup ladle, or other utensils. 5 Let your cooker cool down before cleaning it . 1 Pour about two cups of the lid all... reach the top of debris. Let it cool down completely before removing it into the inner pot. Multi-Function Pressure Cooker 1 Press Cancel and unplug the power cord. 2 Rotate the pressure release knob on the top of water into the inner pot. 2 Put the cooking stand into a dish using...

User Guide
Page 23
...a dish using the provided rice scoop, soup ladle, or other utensils. 11 Let your cooker. When the internal pressure reaches the correct level, the countdown timer starts. 6 When cooking is 12 hours. See Cleaning your cooker on page 19. 5 Press Start or wait 10 seconds. Make sure that the outside of... is dry and free of time, stirring the cake into a paste. 2 Put the cake mixture into the inner pot, then put it . Multi-Function Pressure Cooker Making a cake 1 Mix the cake ingredients ahead of debris. 3 Close and lock the lid. You cannot adjust this time. 7 Press Cancel and unplug ...
...a dish using the provided rice scoop, soup ladle, or other utensils. 11 Let your cooker. When the internal pressure reaches the correct level, the countdown timer starts. 6 When cooking is 12 hours. See Cleaning your cooker on page 19. 5 Press Start or wait 10 seconds. Make sure that the outside of... is dry and free of time, stirring the cake into a paste. 2 Put the cake mixture into the inner pot, then put it . Multi-Function Pressure Cooker Making a cake 1 Mix the cake ingredients ahead of debris. 3 Close and lock the lid. You cannot adjust this time. 7 Press Cancel and unplug ...

User Guide
Page 25
...8226; Press the Cancel button, then unplug the power cord from the power outlet. www.insigniaproducts.com 25 Multi-Function Pressure Cooker Troubleshooting PROBLEM SOLUTION My cooker is damaged, take your cooker cool, then try again. • Residue may have overheated. Press the Cancel button, then unplug the power cord ... The display and buttons light up, but the display or the buttons do not light up too much pressure. Unplug the power cord from the power outlet, let your cooker to release any built up . See Using the quick release method to open the lid on page 20...
...8226; Press the Cancel button, then unplug the power cord from the power outlet. www.insigniaproducts.com 25 Multi-Function Pressure Cooker Troubleshooting PROBLEM SOLUTION My cooker is damaged, take your cooker cool, then try again. • Residue may have overheated. Press the Cancel button, then unplug the power cord ... The display and buttons light up, but the display or the buttons do not light up too much pressure. Unplug the power cord from the power outlet, let your cooker to release any built up . See Using the quick release method to open the lid on page 20...

User Guide
Page 27
... from the production process. Any other servicing should be damaged. 6 Qt. Use the quick release method to release any built up pressure and let your cooker to open the lid on your cooker heat for repair. Specifications Volume Dimensions (H × W × D) Weight Power Power consumption Power cord length 6 qt. (24 C)...) 120V ~ 60 Hz 1,000W 30.7 in. (78 cm) www.insigniaproducts.com 27 This is producing an odor or smoke. • Your cooker may be performed by an authorized service representative. Multi-Function Pressure Cooker PROBLEM SOLUTION My cooker is normal.
... from the production process. Any other servicing should be damaged. 6 Qt. Use the quick release method to release any built up pressure and let your cooker to open the lid on your cooker heat for repair. Specifications Volume Dimensions (H × W × D) Weight Power Power consumption Power cord length 6 qt. (24 C)...) 120V ~ 60 Hz 1,000W 30.7 in. (78 cm) www.insigniaproducts.com 27 This is producing an odor or smoke. • Your cooker may be performed by an authorized service representative. Multi-Function Pressure Cooker PROBLEM SOLUTION My cooker is normal.
User Guide
Page 29
...8226; Failures or Damage caused by any person not authorized by any contact including but not limited to liquids, gels or pastes. INSIGNIA PRODUCTS MAKES NO OTHER EXPRESS WARRANTIES WITH RESPECT TO THE PRODUCT, ALL EXPRESS AND IMPLIED WARRANTIES FOR THE PRODUCT, INCLUDING BUT NOT... MAY ALSO HAVE OTHER RIGHTS, WHICH VARY FROM STATE TO STATE OR PROVINCE TO PROVINCE. Multi-Function Pressure Cooker • Connection to an incorrect voltage or power supply • Attempted repair by Insignia to service the Product • Products sold "as is" or "with all faults" • Consumable...
...8226; Failures or Damage caused by any person not authorized by any contact including but not limited to liquids, gels or pastes. INSIGNIA PRODUCTS MAKES NO OTHER EXPRESS WARRANTIES WITH RESPECT TO THE PRODUCT, ALL EXPRESS AND IMPLIED WARRANTIES FOR THE PRODUCT, INCLUDING BUT NOT... MAY ALSO HAVE OTHER RIGHTS, WHICH VARY FROM STATE TO STATE OR PROVINCE TO PROVINCE. Multi-Function Pressure Cooker • Connection to an incorrect voltage or power supply • Attempted repair by Insignia to service the Product • Products sold "as is" or "with all faults" • Consumable...