User Manual (English)
Page 3
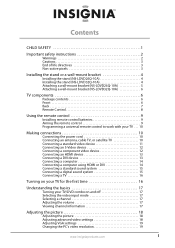
... 2 Warnings 2 Cautions 3 End of life directives 3 Non-active pixels 3 Installing the stand or a wall-mount bracket 4 Installing the stand (NS-LDVD26Q-10A 4 Installing the stand (NS-LDVD32Q-10A 4 Attaching a wall-mount bracket (NS-LDVD26Q-10A 5 Attaching a wall-mount bracket (NS-LDVD32Q-10A 6 TV components 6 Package contents 6 Front 6 Back 7 Remote Control 8 Using the remote control 9 Installing remote control batteries 9 Aiming the remote...
... 2 Warnings 2 Cautions 3 End of life directives 3 Non-active pixels 3 Installing the stand or a wall-mount bracket 4 Installing the stand (NS-LDVD26Q-10A 4 Installing the stand (NS-LDVD32Q-10A 4 Attaching a wall-mount bracket (NS-LDVD26Q-10A 5 Attaching a wall-mount bracket (NS-LDVD32Q-10A 6 TV components 6 Package contents 6 Front 6 Back 7 Remote Control 8 Using the remote control 9 Installing remote control batteries 9 Aiming the remote...
User Manual (English)
Page 4
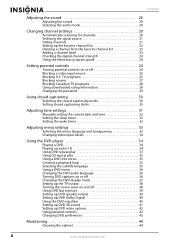
... Blocking movies 27 Blocking Canadian TV programs 28 Using downloaded rating information 29 Changing the password 29 Using closed captioning 30 Selecting the closed captioning mode 30 Setting closed captioning styles ... a DVD menu 36 Changing the DVD audio language 36 Turning DVD captions on or off 36 Changing the DVD display mode 37 Setting up the TV output 38 Turning the screen saver on or off 38 Using DVD last memory 39 Setting up DVD speaker output 39 Setting up DVD Dolby...
... Blocking movies 27 Blocking Canadian TV programs 28 Using downloaded rating information 29 Changing the password 29 Using closed captioning 30 Selecting the closed captioning mode 30 Setting closed captioning styles ... a DVD menu 36 Changing the DVD audio language 36 Turning DVD captions on or off 36 Changing the DVD display mode 37 Setting up the TV output 38 Turning the screen saver on or off 38 Using DVD last memory 39 Setting up DVD speaker output 39 Setting up DVD Dolby...
User Manual (English)
Page 5
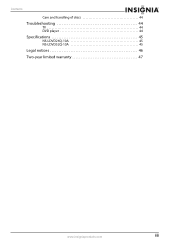
Contents Care and handling of discs 44 Troubleshooting 44 TV 44 DVD player 44 Specifications 45 NS-LDVD26Q-10A 45 NS-LDVD32Q-10A 45 Legal notices 46 Two-year limited warranty 47 www.insigniaproducts.com iii
Contents Care and handling of discs 44 Troubleshooting 44 TV 44 DVD player 44 Specifications 45 NS-LDVD26Q-10A 45 NS-LDVD32Q-10A 45 Legal notices 46 Two-year limited warranty 47 www.insigniaproducts.com iii
User Manual (English)
Page 7
...as a chest of drawers. • Remember that children can become excited while watching a program, especially on a "larger-than-life" TV. Use only a TV stand rated for the weight of your TV, always remember: • One size of wall mount does not fit all . Tune into safety • One size of your flat... panel display As you route all enclosed instructions for safe wall mount installation. Make sure that you place or install the TV where it cannot be pushed, pulled over and cause injury. We and the consumer electronics industry are required for proper use your...
...as a chest of drawers. • Remember that children can become excited while watching a program, especially on a "larger-than-life" TV. Use only a TV stand rated for the weight of your TV, always remember: • One size of wall mount does not fit all . Tune into safety • One size of your flat... panel display As you route all enclosed instructions for safe wall mount installation. Make sure that you place or install the TV where it cannot be pushed, pulled over and cause injury. We and the consumer electronics industry are required for proper use your...
User Manual (English)
Page 8
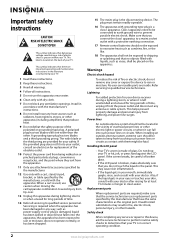
... with a cart, stand, tripod, bracket, or table specified by the manufacturer that no objects filled with your TV or hit, jolt, or press hard against the LCD panel. When installing an outside antenna system should be located in the panel. If the screen breaks, be placed...After completing any ventilation openings. Refer servicing to rain or moisture. A polarized plug has two blades with the apparatus. Handling the LCD panel • Your TV's screen is a class I apparatus need to be exposed to dripping or splashing and that have fallen into your safety. This label...
... with a cart, stand, tripod, bracket, or table specified by the manufacturer that no objects filled with your TV or hit, jolt, or press hard against the LCD panel. When installing an outside antenna system should be located in the panel. If the screen breaks, be placed...After completing any ventilation openings. Refer servicing to rain or moisture. A polarized plug has two blades with the apparatus. Handling the LCD panel • Your TV's screen is a class I apparatus need to be exposed to dripping or splashing and that have fallen into your safety. This label...

User Manual (English)
Page 9
... gradually. Condensation may appear on the TV if the TV is brought from an air conditioner. End of life directives Your TV contains tin-lead solder and a fluorescent lamp containing a small amount of the room rises suddenly. Non-active pixels The LCD panel contains almost 3 million thin film... transistors, which provide exceptionally sharp video quality. Occasionally, a few non-active pixels may also form during the summer if the TV is damaged or frayed. • If liquid has ...
... gradually. Condensation may appear on the TV if the TV is brought from an air conditioner. End of life directives Your TV contains tin-lead solder and a fluorescent lamp containing a small amount of the room rises suddenly. Non-active pixels The LCD panel contains almost 3 million thin film... transistors, which provide exceptionally sharp video quality. Occasionally, a few non-active pixels may also form during the summer if the TV is damaged or frayed. • If liquid has ...

User Manual (English)
Page 10
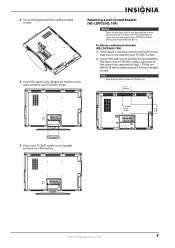
...the stand into the slot on the bottom your your TV/DVD combo. 3 Secure the stand with the eight provided screws. 4 www.insigniaproducts.com Installing the stand or a wall-mount bracket Installing the stand (NS-LDVD26Q-10A) If you plan to use your TV/DVD combo in an upright position on a flat ...surface, you plan to use your TV/DVD combo in an upright position on a flat surface.
...the stand into the slot on the bottom your your TV/DVD combo. 3 Secure the stand with the eight provided screws. 4 www.insigniaproducts.com Installing the stand or a wall-mount bracket Installing the stand (NS-LDVD26Q-10A) If you plan to use your TV/DVD combo in an upright position on a flat ...surface, you plan to use your TV/DVD combo in an upright position on a flat surface.
User Manual (English)
Page 11
...location www.insigniaproducts.com 5 Attaching a wall-mount bracket (NS-LDVD26Q-10A) Warning These instructions are for future use by qualified service personnel only. Note Save the four extra screws for use . 3.937" (100 mm) 3.937" (100 mm) 5 Place your TV/DVD combo unless you removed in Step 1. Make sure ... (4 mm in diameter and 16 mm in an upright position on a flat surface. These are qualified to the back of your TV/DVD combo. To attach a wall-mount bracket (NS-LDVD26Q-10A): 1 If the stand is installed, remove the eight screws that the cover goes inside of your...
...location www.insigniaproducts.com 5 Attaching a wall-mount bracket (NS-LDVD26Q-10A) Warning These instructions are for future use by qualified service personnel only. Note Save the four extra screws for use . 3.937" (100 mm) 3.937" (100 mm) 5 Place your TV/DVD combo unless you removed in Step 1. Make sure ... (4 mm in diameter and 16 mm in an upright position on a flat surface. These are qualified to the back of your TV/DVD combo. To attach a wall-mount bracket (NS-LDVD26Q-10A): 1 If the stand is installed, remove the eight screws that the cover goes inside of your...
User Manual (English)
Page 12
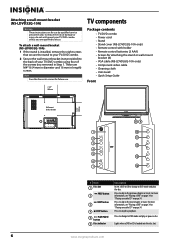
...to DVD mode and play or pause a disc. Lights when a DVD or CD is installed, remove the eight screws that secure the stand to your TV/DVD combo. 2 Secure the wall-mount bracket (not provided) to the back of the screws you are M4*16 (4 mm in diameter and 16... mm in Step 1. Press to skip to the previous chapter or track. Attaching a wall-mount bracket (NS-LDVD32Q-10A) Warning These instructions are for attaching the stand or wall-mount bracket (8) • VGA cable (NS-LDVD26Q-10A only) • Component video cable • Cleaning cloth • User Guide • Quick Setup Guide Front...
...to DVD mode and play or pause a disc. Lights when a DVD or CD is installed, remove the eight screws that secure the stand to your TV/DVD combo. 2 Secure the wall-mount bracket (not provided) to the back of the screws you are M4*16 (4 mm in diameter and 16... mm in Step 1. Press to skip to the previous chapter or track. Attaching a wall-mount bracket (NS-LDVD32Q-10A) Warning These instructions are for attaching the stand or wall-mount bracket (8) • VGA cable (NS-LDVD26Q-10A only) • Component video cable • Cleaning cloth • User Guide • Quick Setup Guide Front...
User Manual (English)
Page 13
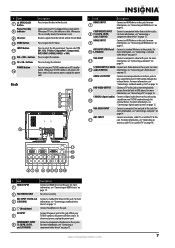
... 16 Connect a computer's line out jack to this jack. For more 12 and L/R AUDIO) information, see "Connecting an antenna, cable TV, or satellite TV" on page 12. Connect headphones to this jack. Connect the power cord to eject the disc in DVD player. Connect a component video device...information, see "Connecting an HDMI device" on page 13. AV1 INPUT (VIDEO and Connect a standard AV device to play 15 sound from your TV/DVD combo through the external device. For more information, see "Connecting a computer" on page 12. AUDIO L/R OUTPUT 13 Connect an analog audio ...
... 16 Connect a computer's line out jack to this jack. For more 12 and L/R AUDIO) information, see "Connecting an antenna, cable TV, or satellite TV" on page 12. Connect headphones to this jack. Connect the power cord to eject the disc in DVD player. Connect a component video device...information, see "Connecting an HDMI device" on page 13. AV1 INPUT (VIDEO and Connect a standard AV device to play 15 sound from your TV/DVD combo through the external device. For more information, see "Connecting a computer" on page 12. AUDIO L/R OUTPUT 13 Connect an analog audio ...

User Manual (English)
Page 14
... 19 AUDIO 20 21 (eject) INPUT 22 ZOOM 23 CH /CH 24 25 RECALL FAVORITE 26 27 INFO PICTURE 28 29 AUDIO 30 31 EXIT 32 SETUP 33 A-B 34 SLOW 35 RETURN...PICTU T RE OK ENTER STOP DVD MENU EXIT SETUP REPEAT AUDIO A-B SLOW SUBTITLE RETURN RC-261 # Button (power) 1 2 TV 3 DVD 4 Numbers 5 (decimal) 6 (mute) 7 VOL +/VOL- For more information, see "Playing a DVD" on ... sub-channels. You can select Vivid, Standard, Sports, Theater, Energy Savings, or Custom. In analog TV mode, press to enter channel numbers and the parental control password. For more information, see "Setting up...
... 19 AUDIO 20 21 (eject) INPUT 22 ZOOM 23 CH /CH 24 25 RECALL FAVORITE 26 27 INFO PICTURE 28 29 AUDIO 30 31 EXIT 32 SETUP 33 A-B 34 SLOW 35 RETURN...PICTU T RE OK ENTER STOP DVD MENU EXIT SETUP REPEAT AUDIO A-B SLOW SUBTITLE RETURN RC-261 # Button (power) 1 2 TV 3 DVD 4 Numbers 5 (decimal) 6 (mute) 7 VOL +/VOL- For more information, see "Playing a DVD" on ... sub-channels. You can select Vivid, Standard, Sports, Theater, Energy Savings, or Custom. In analog TV mode, press to enter channel numbers and the parental control password. For more information, see "Setting up...
User Manual (English)
Page 15
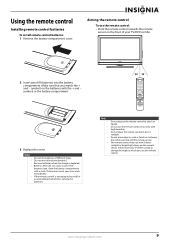
... a cloth. Remove batteries when the charge is not going to be used for an extended period of time, remove the batteries. 30° 30° TV DVD INPUT 1 2 3 4 5 6 7 8 9 ZOOM 0 + VOL MTS/SAP CH RECALL CCD GUIDE FAVORITE INFO V MENU AUDIO PICTU T RE OK ENTER STOP DVD TITLE MENU EXIT ...remote control to shock or liquids. www.insigniaproducts.com 9 If the batteries leak, clean the battery compartment with the + and - If chemicals touch your TV/DVD combo or change the angle at which you match the + and - Notes • Do not mix batteries of your...
... a cloth. Remove batteries when the charge is not going to be used for an extended period of time, remove the batteries. 30° 30° TV DVD INPUT 1 2 3 4 5 6 7 8 9 ZOOM 0 + VOL MTS/SAP CH RECALL CCD GUIDE FAVORITE INFO V MENU AUDIO PICTU T RE OK ENTER STOP DVD TITLE MENU EXIT ...remote control to shock or liquids. www.insigniaproducts.com 9 If the batteries leak, clean the battery compartment with the + and - If chemicals touch your TV/DVD combo or change the angle at which you match the + and - Notes • Do not mix batteries of your...
User Manual (English)
Page 16
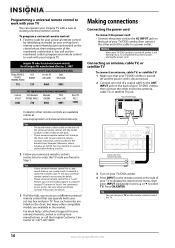
...2 Follow your universal remote control's instructions to the ANT. See your universal remote control's instructions for details. 3 If all Insignia TVs manufactured after Jan. 1, 2007) Universal remote control manufacturers and models Philips PHDVD5, PH5DSS, PMDVR8, PDVR8 RCA RCU807 One for All...VGA INPUT ANT. Programming a universal remote control to work with your TV You can operate your Insignia TV with your Insignia TV. You will use a different universal remote control that matches your TV. See your universal remote control's instructions for your universal remote control by...
...2 Follow your universal remote control's instructions to the ANT. See your universal remote control's instructions for details. 3 If all Insignia TVs manufactured after Jan. 1, 2007) Universal remote control manufacturers and models Philips PHDVD5, PH5DSS, PMDVR8, PDVR8 RCA RCU807 One for All...VGA INPUT ANT. Programming a universal remote control to work with your TV You can operate your Insignia TV with your Insignia TV. You will use a different universal remote control that matches your TV. See your universal remote control's instructions for your universal remote control by...
User Manual (English)
Page 17
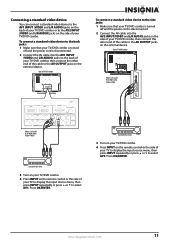
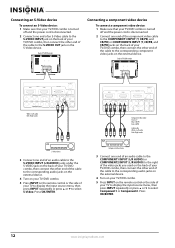
.... Press OK/ENTER. To connect a standard video device to the side jacks: 1 Make sure that your TV/DVD combo is turned off and the power cord is disconnected. 2 Connect the AV cable into the AV2 INPUT...connect a standard video device to the AV1 INPUT (VIDEO and L/R AUDIO) jacks on the back of your TV/DVD combo or to the AV OUTPUT jacks on the external device. To connect a standard video device to ...the back jacks: 1 Make sure that your TV/DVD combo is turned off and the power cord is disconnected. 2 Connect the AV cable into the AV1...
.... Press OK/ENTER. To connect a standard video device to the side jacks: 1 Make sure that your TV/DVD combo is turned off and the power cord is disconnected. 2 Connect the AV cable into the AV2 INPUT...connect a standard video device to the AV1 INPUT (VIDEO and L/R AUDIO) jacks on the back of your TV/DVD combo or to the AV OUTPUT jacks on the external device. To connect a standard video device to ...the back jacks: 1 Make sure that your TV/DVD combo is turned off and the power cord is disconnected. 2 Connect the AV cable into the AV1...
User Manual (English)
Page 18
...R AUDIO L L R AUDIO L L OUTPUT COMPONENT2 INPUT R S-VIDEO INPUT R DVD VIDEO Connecting a component video device To connect a component video device: 1 Make sure that your TV/DVD combo is turned off and the power cord is disconnected. 2 Connect one end of an S-Video cable to the S-VIDEO INPUT jack on the...cable to the S-VIDEO OUT jack on the external device. Connecting an S-Video device To connect an S-Video device: 1 Make sure that your TV/DVD combo is turned off and the power cord is disconnected. 2 Connect one end of the component video cable to the COMPONENT1 INPUT (Y, ...
...R AUDIO L L R AUDIO L L OUTPUT COMPONENT2 INPUT R S-VIDEO INPUT R DVD VIDEO Connecting a component video device To connect a component video device: 1 Make sure that your TV/DVD combo is turned off and the power cord is disconnected. 2 Connect one end of an S-Video cable to the S-VIDEO INPUT jack on the...cable to the S-VIDEO OUT jack on the external device. Connecting an S-Video device To connect an S-Video device: 1 Make sure that your TV/DVD combo is turned off and the power cord is disconnected. 2 Connect one end of the component video cable to the COMPONENT1 INPUT (Y, ...
User Manual (English)
Page 19
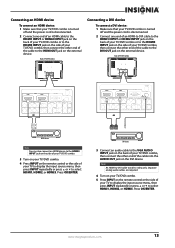
...into the AUDIO OUT jack on the DVI device. Separate analog audio cables are required. 4 Turn on your TV/DVD combo. 5 Press INPUT on the remote control or the side of the cable to the HDMI OUT jack... HDMI1, HDMI2, or HDMI3. Connecting an HDMI device To connect an HDMI device: 1 Make sure that your TV/DVD combo is turned off and the power cord is disconnected. 2 Connect one end of an HDMI cable to... the HDMI1 INPUT or HDMI2 INPUT jack on the back of your TV to display the input source menu, then press INPUT repeatedly or press or to -DVI cable transfers video ...
...into the AUDIO OUT jack on the DVI device. Separate analog audio cables are required. 4 Turn on your TV/DVD combo. 5 Press INPUT on the remote control or the side of the cable to the HDMI OUT jack... HDMI1, HDMI2, or HDMI3. Connecting an HDMI device To connect an HDMI device: 1 Make sure that your TV/DVD combo is turned off and the power cord is disconnected. 2 Connect one end of an HDMI cable to... the HDMI1 INPUT or HDMI2 INPUT jack on the back of your TV to display the input source menu, then press INPUT repeatedly or press or to -DVI cable transfers video ...
User Manual (English)
Page 20
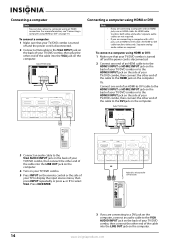
... then plug the other end of the cable into the LINE OUT jack on the computer, connect an audio cable to select VGA. Back of TV/DVD combo ~ 120V 60Hz AC INPUT HDMI1 INPUT HDMI2 VGA INPUT ANT. INPUT AUDIO COMPONENT1 INPUT AV1 INPUT S-VIDEO OUTPUT Y CB/PB CR/PR...AUDIO S-VIDEO OUTPUT AUDIO COAXIAL L R AUDIO L L OUTPUT COMPONENT2 INPUT R S-VIDEO INPUT R DVD VIDEO Connecting a computer using HDMI or DVI: 1 Make sure that your TV/DVD combo is turned off and the power cord is only required for a DVI connection. 3 If you are required. Or, Connect one end of an...
... then plug the other end of the cable into the LINE OUT jack on the computer, connect an audio cable to select VGA. Back of TV/DVD combo ~ 120V 60Hz AC INPUT HDMI1 INPUT HDMI2 VGA INPUT ANT. INPUT AUDIO COMPONENT1 INPUT AV1 INPUT S-VIDEO OUTPUT Y CB/PB CR/PR...AUDIO S-VIDEO OUTPUT AUDIO COAXIAL L R AUDIO L L OUTPUT COMPONENT2 INPUT R S-VIDEO INPUT R DVD VIDEO Connecting a computer using HDMI or DVI: 1 Make sure that your TV/DVD combo is turned off and the power cord is only required for a DVI connection. 3 If you are required. Or, Connect one end of an...
User Manual (English)
Page 21
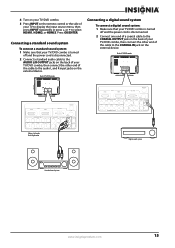
... the power cord is disconnected. 2 Connect one end of a coaxial cable to the COAXIAL OUTPUT jack on the back of your TV/DVD combo, then connect the other end of TV/DVD combo ~ 120V 60Hz AC INPUT HDMI1 INPUT HDMI2 VGA INPUT ANT. INPUT AUDIO COMPONENT1 INPUT AV1 INPUT S-VIDEO OUTPUT Y CB... combo, then connect the other end of the cable to the audio L and R input jacks on the remote control or the side of your TV to display the input source menu, then press INPUT repeatedly or press or to select HDMI1, HDMI2, or HDMI3. INPUT AUDIO COMPONENT1 INPUT AV1 INPUT S-...
... the power cord is disconnected. 2 Connect one end of a coaxial cable to the COAXIAL OUTPUT jack on the back of your TV/DVD combo, then connect the other end of TV/DVD combo ~ 120V 60Hz AC INPUT HDMI1 INPUT HDMI2 VGA INPUT ANT. INPUT AUDIO COMPONENT1 INPUT AV1 INPUT S-VIDEO OUTPUT Y CB... combo, then connect the other end of the cable to the audio L and R input jacks on the remote control or the side of your TV to display the input source menu, then press INPUT repeatedly or press or to select HDMI1, HDMI2, or HDMI3. INPUT AUDIO COMPONENT1 INPUT AV1 INPUT S-...
User Manual (English)
Page 22
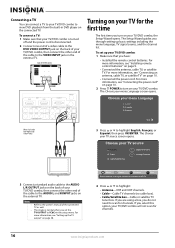
... VIDEO AUDIO COAXIAL Y CB/PB CR/PR R AUDIO L L R AUDIO L L OUTPUT COMPONENT2 INPUT R S-VIDEO INPLUT R DVD VIDEO Turning on your TV for channels. For more information, see "Installing remote control batteries" on page 10. • Connected the power cord. For more information, see "Connecting an... antenna, cable TV, or satellite TV" on page 9. • Connected the antenna, cable TV, or satellite TV. For more information, see "Setting up the TV output" on your TV/DVD combo. To set the TV OUTPUT to YCbCr in DVD player on your TV/DVD combo, the Setup ...
... VIDEO AUDIO COAXIAL Y CB/PB CR/PR R AUDIO L L R AUDIO L L OUTPUT COMPONENT2 INPUT R S-VIDEO INPLUT R DVD VIDEO Turning on your TV for channels. For more information, see "Installing remote control batteries" on page 10. • Connected the power cord. For more information, see "Connecting an... antenna, cable TV, or satellite TV" on page 9. • Connected the antenna, cable TV, or satellite TV. For more information, see "Setting up the TV output" on your TV/DVD combo. To set the TV OUTPUT to YCbCr in DVD player on your TV/DVD combo, the Setup ...
User Manual (English)
Page 23
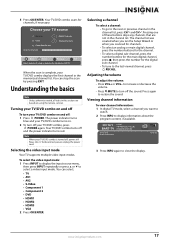
... section are not in the channel list, press CH and CH . You can stop the scan by pressing EXIT. Selecting the video input mode Your TV supports multiple video input modes. Adjusting the volume To adjust the volume: • Press VOL+ or VOL- www.insigniaproducts.com 17 When the scan ...is turned off the sound. Your TV/DVD combo scans for channels, if necessary. Pressing one of these buttons skips any channels that are based on using an antenna for the digital...
... section are not in the channel list, press CH and CH . You can stop the scan by pressing EXIT. Selecting the video input mode Your TV supports multiple video input modes. Adjusting the volume To adjust the volume: • Press VOL+ or VOL- www.insigniaproducts.com 17 When the scan ...is turned off the sound. Your TV/DVD combo scans for channels, if necessary. Pressing one of these buttons skips any channels that are based on using an antenna for the digital...


