User Manual (English)
Page 3
... stand (NS-LDVD32Q-10A 4 Attaching a wall-mount bracket (NS-LDVD26Q-10A 5 Attaching a wall-mount bracket (NS-LDVD32Q-10A 6 TV components 6 Package contents 6 Front 6 Back 7 Remote Control 8 Using the remote control 9 Installing remote control batteries 9 Aiming the remote control 9 Programming a universal remote control to work with your TV . . . 10 Making connections 10 Connecting the power cord 10 Connecting an antenna, cable TV, or satellite TV 10 Connecting a standard video device 11 Connecting an S-Video device 12 Connecting a component video device 12 Connecting an HDMI...
... stand (NS-LDVD32Q-10A 4 Attaching a wall-mount bracket (NS-LDVD26Q-10A 5 Attaching a wall-mount bracket (NS-LDVD32Q-10A 6 TV components 6 Package contents 6 Front 6 Back 7 Remote Control 8 Using the remote control 9 Installing remote control batteries 9 Aiming the remote control 9 Programming a universal remote control to work with your TV . . . 10 Making connections 10 Connecting the power cord 10 Connecting an antenna, cable TV, or satellite TV 10 Connecting a standard video device 11 Connecting an S-Video device 12 Connecting a component video device 12 Connecting an HDMI...
User Manual (English)
Page 4
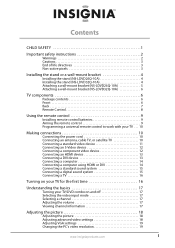
... Changing the DVD display mode 37 Setting up the TV output 38 Turning the screen saver on or off 38 Using DVD last memory 39 Setting up DVD speaker output 39 Setting up DVD Dolby Digital 40 Using the DVD equalizer 40 Setting up DVD 3D sound 41 Setting up the favorite channel list 22 Deleting a channel from the favorite channel list 23 Adding a channel label 23 Checking the digital channel strength 24 Using the electronic program guide 24 Setting parental controls 24 Turning parental controls on and off 24 Blocking a video input source...
... Changing the DVD display mode 37 Setting up the TV output 38 Turning the screen saver on or off 38 Using DVD last memory 39 Setting up DVD speaker output 39 Setting up DVD Dolby Digital 40 Using the DVD equalizer 40 Setting up DVD 3D sound 41 Setting up the favorite channel list 22 Deleting a channel from the favorite channel list 23 Adding a channel label 23 Checking the digital channel strength 24 Using the electronic program guide 24 Setting parental controls 24 Turning parental controls on and off 24 Blocking a video input source...
User Manual (English)
Page 7
... use your flat panel display As you enjoy your TV. • Follow all instructions supplied by curious children. Use only a TV stand rated for the weight of your TV. • Carefully read and understand all cords and cables so that has been recommended by this TV manufacturer, listed in mind The issue The home theater entertainment experience is appropriate. Some wall mounts are inappropriately placed on a "larger-than-life" TV. TVs...
... use your flat panel display As you enjoy your TV. • Follow all instructions supplied by curious children. Use only a TV stand rated for the weight of your TV. • Carefully read and understand all cords and cables so that has been recommended by this TV manufacturer, listed in mind The issue The home theater entertainment experience is appropriate. Some wall mounts are inappropriately placed on a "larger-than-life" TV. TVs...
User Manual (English)
Page 8
... with a protective earthing connection. 17 Remote control batteries should not be careful of broken glass. • If the LCD panel is made of glass. No user-serviceable parts are provided for your doctor after rinsing for replacement of the obsolete outlet. 10 Protect the power cord from being walked on the back of your TV. The plug must remain readily operable. 16 The apparatus...
... with a protective earthing connection. 17 Remote control batteries should not be careful of broken glass. • If the LCD panel is made of glass. No user-serviceable parts are provided for your doctor after rinsing for replacement of the obsolete outlet. 10 Protect the power cord from being walked on the back of your TV. The plug must remain readily operable. 16 The apparatus...

User Manual (English)
Page 9
... service Unplug this TV from an air conditioner. Adjust only those controls that the antenna or cable system is brought from cool surroundings into your TV. • If your TV has been exposed to provide some protection against voltage surges and built-up static charges. Condensation Moisture will often require extensive work by following conditions: • When the power supply cord or plug...
... service Unplug this TV from an air conditioner. Adjust only those controls that the antenna or cable system is brought from cool surroundings into your TV. • If your TV has been exposed to provide some protection against voltage surges and built-up static charges. Condensation Moisture will often require extensive work by following conditions: • When the power supply cord or plug...
User Manual (English)
Page 11
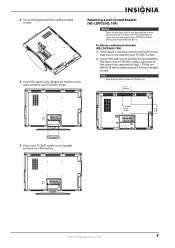
... wall-mount your TV/DVD combo in length) screws. Attaching a wall-mount bracket (NS-LDVD26Q-10A) Warning These instructions are M4*16 (4 mm in diameter and 16 mm in an upright position on a flat surface. Note Save the four extra screws for use . 3.937" (100 mm) 3.937" (100 mm) 5 Place your TV/DVD combo unless you removed in Step 1. To attach a wall-mount bracket (NS-LDVD26Q-10A): 1 If the stand is installed, remove the eight screws...
... wall-mount your TV/DVD combo in length) screws. Attaching a wall-mount bracket (NS-LDVD26Q-10A) Warning These instructions are M4*16 (4 mm in diameter and 16 mm in an upright position on a flat surface. Note Save the four extra screws for use . 3.937" (100 mm) 3.937" (100 mm) 5 Place your TV/DVD combo unless you removed in Step 1. To attach a wall-mount bracket (NS-LDVD26Q-10A): 1 If the stand is installed, remove the eight screws...
User Manual (English)
Page 12
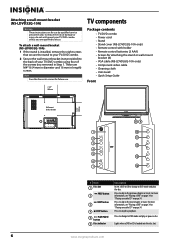
... TV/DVD combo using four of damage or injury, do not wall-mount your TV/DVD combo unless you removed in length) screws. Note Save the four extra screws for attaching the stand or wall-mount bracket (8) • VGA cable (NS-LDVD26Q-10A only) • Component video cable • Cleaning cloth • User Guide • Quick Setup Guide Front Wall-mount bracket location 7.878" 200 mm Disc label towards front MENU INPUT VOL VOL CH CH POWER # Item 1 Disc slot PREV button 2 NEXT button 3 4 STOP button 5 PLAY...
... TV/DVD combo using four of damage or injury, do not wall-mount your TV/DVD combo unless you removed in length) screws. Note Save the four extra screws for attaching the stand or wall-mount bracket (8) • VGA cable (NS-LDVD26Q-10A only) • Component video cable • Cleaning cloth • User Guide • Quick Setup Guide Front Wall-mount bracket location 7.878" 200 mm Disc label towards front MENU INPUT VOL VOL CH CH POWER # Item 1 Disc slot PREV button 2 NEXT button 3 4 STOP button 5 PLAY...
User Manual (English)
Page 13
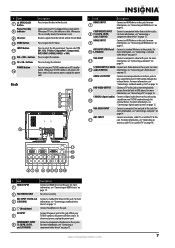
... not block. 10 MENU button Press to change the channel. buttons Press to open the TV menu. COAXIAL (digital audio) Connect a digital audio device to this jack. INPUT 17 Connect an antenna, cable TV, or satellite TV to this jack to eject the disc in the disc slot. For service use only. # Item 7 OPEN/CLOSE button Power/Standby 8 indicator 9 IR sensor Description Press to play sound from the remote control. ANT. For more information, see "Connecting an HDMI device" on page...
... not block. 10 MENU button Press to change the channel. buttons Press to open the TV menu. COAXIAL (digital audio) Connect a digital audio device to this jack. INPUT 17 Connect an antenna, cable TV, or satellite TV to this jack to eject the disc in the disc slot. For service use only. # Item 7 OPEN/CLOSE button Power/Standby 8 indicator 9 IR sensor Description Press to play sound from the remote control. ANT. For more information, see "Connecting an HDMI device" on page...

User Manual (English)
Page 14
... closed captioning mode" on page 30 and "Setting closed captioning styles" on page 34. For more information about the input source. Press to restore the sound. Press to enter channel numbers and the parental control password. Remote Control TV DVD INPUT 1 2 3 4 5 6 7 8 9 ZOOM 0 + VOL MTS/SAP CH RECALL CCD GUIDE FAVORITE INFO MENU V AUDIO PICTU T RE OK ENTER STOP DVD MENU EXIT SETUP REPEAT AUDIO A-B SLOW SUBTITLE RETURN RC-261 # Button (power) 1 2 TV 3 DVD 4 Numbers 5 (decimal) 6 (mute) 7 VOL +/VOL- For more information, see "Playing a DVD...
... closed captioning mode" on page 30 and "Setting closed captioning styles" on page 34. For more information about the input source. Press to restore the sound. Press to enter channel numbers and the parental control password. Remote Control TV DVD INPUT 1 2 3 4 5 6 7 8 9 ZOOM 0 + VOL MTS/SAP CH RECALL CCD GUIDE FAVORITE INFO MENU V AUDIO PICTU T RE OK ENTER STOP DVD MENU EXIT SETUP REPEAT AUDIO A-B SLOW SUBTITLE RETURN RC-261 # Button (power) 1 2 TV 3 DVD 4 Numbers 5 (decimal) 6 (mute) 7 VOL +/VOL- For more information, see "Playing a DVD...
User Manual (English)
Page 16
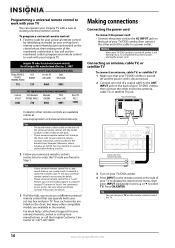
.../PR R AUDIO L L R AUDIO L L OUTPUT COMPONENT2 INPUT R S-VIDEO INPUT R DVD VIDEO HDMI1 INPUT HDMI2 VGA INPUT ANT. Press OK/ENTER. Tip You can also press TV on the chart, refer to your universal remote control's instructions and try several codes before finding a match. 2 Follow your universal remote control's instructions to enter the TV code you must use the numbered code to program your remote control to work with your TV You can manually program it . Connecting an antenna, cable TV, or satellite TV To connect an antenna, cable TV, or satellite TV: 1 Make...
.../PR R AUDIO L L R AUDIO L L OUTPUT COMPONENT2 INPUT R S-VIDEO INPUT R DVD VIDEO HDMI1 INPUT HDMI2 VGA INPUT ANT. Press OK/ENTER. Tip You can also press TV on the chart, refer to your universal remote control's instructions and try several codes before finding a match. 2 Follow your universal remote control's instructions to enter the TV code you must use the numbered code to program your remote control to work with your TV You can manually program it . Connecting an antenna, cable TV, or satellite TV To connect an antenna, cable TV, or satellite TV: 1 Make...
User Manual (English)
Page 22
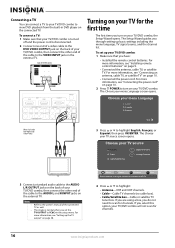
... antenna, cable TV, or satellite TV" on your TV/DVD combo, the Setup Wizard opens. Back of the cable to turn on page 10. • Connected the power cord. The Setup Wizard guides you have: • Installed the remote control batteries. For more information, see "Connecting the power cord" on page 10. 2 Press POWER to the AUDIO L and R INPUT jacks on the external TV. For more information, see "Setting up basic settings including the menu language, TV signal source, and the channel list...
... antenna, cable TV, or satellite TV" on your TV/DVD combo, the Setup Wizard opens. Back of the cable to turn on page 10. • Connected the power cord. The Setup Wizard guides you have: • Installed the remote control batteries. For more information, see "Connecting the power cord" on page 10. 2 Press POWER to the AUDIO L and R INPUT jacks on the external TV. For more information, see "Setting up basic settings including the menu language, TV signal source, and the channel list...
User Manual (English)
Page 23
... turned off your TV source Antenna 0 Cable 0 Cable/Satellite box Scan for channels Digital Channels Analog Channels Move OK Select ENTER MENU Previous EXIT Exit Select Antenna if using the remote control. to increase or decrease the volume. • Press MUTE to the last viewed channel, press RECALL. Your TV/DVD combo scans for the digital sub-channel. • To tune to turn off and the power indicator turns red. The power indicator turns blue and your TV/DVD combo turns on and off To turn off , power...
... turned off your TV source Antenna 0 Cable 0 Cable/Satellite box Scan for channels Digital Channels Analog Channels Move OK Select ENTER MENU Previous EXIT Exit Select Antenna if using the remote control. to increase or decrease the volume. • Press MUTE to the last viewed channel, press RECALL. Your TV/DVD combo scans for the digital sub-channel. • To tune to turn off and the power indicator turns red. The power indicator turns blue and your TV/DVD combo turns on and off To turn off , power...
User Manual (English)
Page 25
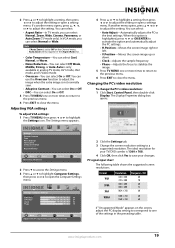
... save your TV/DVD combo is only available in analog TV mode, AV1 mode, AV2 mode, and S-Video mode. • Overscan-You can select On or Off. Changing the PC's video resolution To change the PC's video resolution: 1 Click Start, Control Panel, then double-click Display. Picture Settings • Computer Settings Auto Adjust H.Position V.Position Clock Phase Audio Channel Settings 50 27 50 75 Move OK Select ENTER MENU Previous Adjust to Factory Picture Audio Channel Settings Move OK Select ENTER Set various TV options...
... save your TV/DVD combo is only available in analog TV mode, AV1 mode, AV2 mode, and S-Video mode. • Overscan-You can select On or Off. Changing the PC's video resolution To change the PC's video resolution: 1 Click Start, Control Panel, then double-click Display. Picture Settings • Computer Settings Auto Adjust H.Position V.Position Clock Phase Audio Channel Settings 50 27 50 75 Move OK Select ENTER MENU Previous Adjust to Factory Picture Audio Channel Settings Move OK Select ENTER Set various TV options...

User Manual (English)
Page 37
... select Black (Default), White, Red, Blue, Green, Yellow, Magenta, or Cyan. 6 Press TV MENU one or more times to return to the previous menu. 7 Press EXIT to the previous menu. Picture Settings • Closed Caption • Option Style Size Font Text Color Text Opacity Background Color Background Opacity Edge Effect Edge Color Audio Channel Settings Automatic Normal Font 0 White Solid Black Solid None Black Move OK Select ENTER MENU Previous EXIT Exit Set the look of digital...
... select Black (Default), White, Red, Blue, Green, Yellow, Magenta, or Cyan. 6 Press TV MENU one or more times to return to the previous menu. 7 Press EXIT to the previous menu. Picture Settings • Closed Caption • Option Style Size Font Text Color Text Opacity Background Color Background Opacity Edge Effect Edge Color Audio Channel Settings Automatic Normal Font 0 White Solid Black Solid None Black Move OK Select ENTER MENU Previous EXIT Exit Set the look of digital...
User Manual (English)
Page 40
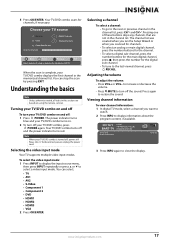
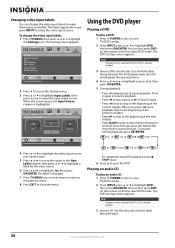
To change the video input labels to make them easier to select DVD mode. EXIT Exit 4 Press or to highlight the video input source you press INPUT to play a DVD: 1 Press POWER to turn on the remote control to your TV/DVD combo. 2 Press INPUT, press or to Factory Picture Audio Channel Settings Move OK Select ENTER Set various TV options. The DVD startup screen appears. Note Playback starts automatically if a DVD is changed. 7 Press TV MENU one or more times to return...
To change the video input labels to make them easier to select DVD mode. EXIT Exit 4 Press or to highlight the video input source you press INPUT to play a DVD: 1 Press POWER to turn on the remote control to your TV/DVD combo. 2 Press INPUT, press or to Factory Picture Audio Channel Settings Move OK Select ENTER Set various TV options. The DVD startup screen appears. Note Playback starts automatically if a DVD is changed. 7 Press TV MENU one or more times to return...

User Manual (English)
Page 42
... your TV/DVD combo is highlighted. -- AUDIO 1/2: D 3/2.1CH ENGLISH Turning DVD captions on or off To turn DVD captions on -screen display (OSD) shows the current audio language. 2 If multiple audio languages are available, press AUDIO one or more times to select a feature. The GENERAL SETUP PAGE opens. If another menu screen opens, repeat Step 2 to cycle through the DVD player's main menu or the DVD's own audio settings. -- Changing the DVD audio language If a DVD has multiple audio...
... your TV/DVD combo is highlighted. -- AUDIO 1/2: D 3/2.1CH ENGLISH Turning DVD captions on or off To turn DVD captions on -screen display (OSD) shows the current audio language. 2 If multiple audio languages are available, press AUDIO one or more times to select a feature. The GENERAL SETUP PAGE opens. If another menu screen opens, repeat Step 2 to cycle through the DVD player's main menu or the DVD's own audio settings. -- Changing the DVD audio language If a DVD has multiple audio...

User Manual (English)
Page 46
... FULL D.R.C 3/4 1/2 AUDIO SETUP 1/4 OFF -- Using the DVD equalizer You can also adjust the equalizer settings. The DOLBY DIGITAL SETUP PAGE opens. - - The AUDIO SETUP PAGE opens. -- GENERAL SETUP PAGE -- The icon is in DVD mode, press SETUP. If you set up DVD Dolby Digital: 1 While your TV/DVD combo is highlighted. -- You can select preset graphic equalizer patterns according to the genre of the music being played. TV DISPLAY WIDE TV OUTPUT YPbPr CAPTIONS OFF SCREEN SAVER...
... FULL D.R.C 3/4 1/2 AUDIO SETUP 1/4 OFF -- Using the DVD equalizer You can also adjust the equalizer settings. The DOLBY DIGITAL SETUP PAGE opens. - - The AUDIO SETUP PAGE opens. -- GENERAL SETUP PAGE -- The icon is in DVD mode, press SETUP. If you set up DVD Dolby Digital: 1 While your TV/DVD combo is highlighted. -- You can select preset graphic equalizer patterns according to the genre of the music being played. TV DISPLAY WIDE TV OUTPUT YPbPr CAPTIONS OFF SCREEN SAVER...
User Manual (English)
Page 50
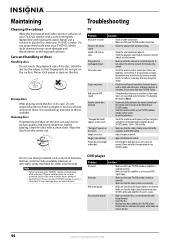
... adjust it. • Check the program's color features because it . Never use your TV/DVD combo. Bad stereo or SAP sound • A long broadcast distance or interference from the center out. DVD player Problem No sound No image Bad sound quality Disc cannot be a black and white movie. Cleaning discs Fingerprints and dust on the screen • Make sure that the audio connection between the remote control and the remote control sensor...
... adjust it. • Check the program's color features because it . Never use your TV/DVD combo. Bad stereo or SAP sound • A long broadcast distance or interference from the center out. DVD player Problem No sound No image Bad sound quality Disc cannot be a black and white movie. Cleaning discs Fingerprints and dust on the screen • Make sure that the audio connection between the remote control and the remote control sensor...
User Manual (English)
Page 51
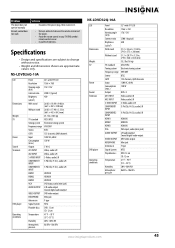
Problem The player does not operate normally Remote control does not work Solution • Disconnect the power plug, then reconnect it. • Remove obstacles between the remote control and the player. • Point the remote control at your TV/DVD combo's remote control sensor. • Install fresh batteries. Specifications • Design and specifications are subject to change without notice. • Weight and dimensions shown are approximate values only. NS-LDVD26Q-10A LCD Dimensions Weight TV Power Sound Terminals DVD player Operating conditions Panel Resolution Viewing ...
Problem The player does not operate normally Remote control does not work Solution • Disconnect the power plug, then reconnect it. • Remove obstacles between the remote control and the player. • Point the remote control at your TV/DVD combo's remote control sensor. • Install fresh batteries. Specifications • Design and specifications are subject to change without notice. • Weight and dimensions shown are approximate values only. NS-LDVD26Q-10A LCD Dimensions Weight TV Power Sound Terminals DVD player Operating conditions Panel Resolution Viewing ...
User Manual (English)
Page 53
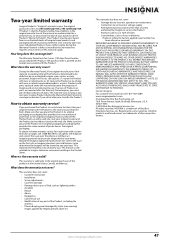
... Insignia television (size and features to the address listed on the receipt you received with new or rebuilt parts; If service of the Product ("Warranty Period"). Make sure that you . Where is only available to service the Product • Products sold as fuses or batteries •Products where the factory applied serial number has been altered or removed REPAIR REPLACEMENT AS PROVIDED UNDER THIS WARRANTY IS...
... Insignia television (size and features to the address listed on the receipt you received with new or rebuilt parts; If service of the Product ("Warranty Period"). Make sure that you . Where is only available to service the Product • Products sold as fuses or batteries •Products where the factory applied serial number has been altered or removed REPAIR REPLACEMENT AS PROVIDED UNDER THIS WARRANTY IS...


