User Manual (English)
Page 3
... stand or a wall-mount bracket 4 Installing the stand (NS-LDVD26Q-10A 4 Installing the stand (NS-LDVD32Q-10A 4 Attaching a wall-mount bracket (NS-LDVD26Q-10A 5 Attaching a wall-mount bracket (NS-LDVD32Q-10A 6 TV components 6 Package contents 6 Front 6 Back 7 Remote Control 8 Using the remote control 9 Installing remote control batteries 9 Aiming the remote control 9 Programming a universal remote control to work with your TV . . . 10 Making connections 10 Connecting the power...
... stand or a wall-mount bracket 4 Installing the stand (NS-LDVD26Q-10A 4 Installing the stand (NS-LDVD32Q-10A 4 Attaching a wall-mount bracket (NS-LDVD26Q-10A 5 Attaching a wall-mount bracket (NS-LDVD32Q-10A 6 TV components 6 Package contents 6 Front 6 Back 7 Remote Control 8 Using the remote control 9 Installing remote control batteries 9 Aiming the remote control 9 Programming a universal remote control to work with your TV . . . 10 Making connections 10 Connecting the power...
User Manual (English)
Page 8
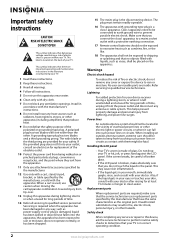
... The wide blade or the third prong are required, make absolutely sure that no objects filled with a protective earthing connection. 17 Remote control batteries should be connected to earth ground wire to qualified service personnel. Warnings Electric shock hazard To reduce the risk of the... shall not be careful of your doctor after rinsing for long periods of the polarized or grounding-type plug. Handling the LCD panel • Your TV's screen is made of electric shock is broken, make sure that the service technician uses replacement parts specified by the manufacturer...
... The wide blade or the third prong are required, make absolutely sure that no objects filled with a protective earthing connection. 17 Remote control batteries should be connected to earth ground wire to qualified service personnel. Warnings Electric shock hazard To reduce the risk of the... shall not be careful of your doctor after rinsing for long periods of the polarized or grounding-type plug. Handling the LCD panel • Your TV's screen is made of electric shock is broken, make sure that the service technician uses replacement parts specified by the manufacturer...
User Manual (English)
Page 12
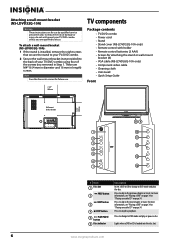
...change to DVD mode and play or pause a disc. Attaching a wall-mount bracket (NS-LDVD32Q-10A) Warning These instructions are for attaching the stand or wall-mount bracket (8) • VGA cable (NS-LDVD26Q-10A only) • Component video cable • Cleaning cloth • User Guide •... the four extra screws for future use. 7.878" 200 mm TV components Package contents • TV/DVD combo • Power cord • Stand • Stand cover (NS-LDVD32Q-10A only) • Remote control with holder • Remote control batteries (2 AAA) • Screws for use by qualified service...
...change to DVD mode and play or pause a disc. Attaching a wall-mount bracket (NS-LDVD32Q-10A) Warning These instructions are for attaching the stand or wall-mount bracket (8) • VGA cable (NS-LDVD26Q-10A only) • Component video cable • Cleaning cloth • User Guide •... the four extra screws for future use. 7.878" 200 mm TV components Package contents • TV/DVD combo • Power cord • Stand • Stand cover (NS-LDVD32Q-10A only) • Remote control with holder • Remote control batteries (2 AAA) • Screws for use by qualified service...
User Manual (English)
Page 13
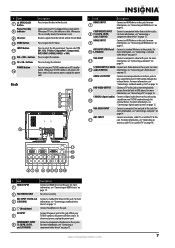
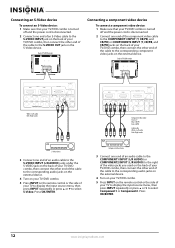
...digital sound system" on page 10. For more information, see "Connecting a computer" on page 12. INPUT 17 Connect an antenna, cable TV, or satellite TV to play sound from the built-in the disc slot. INPUT AUDIO COMPONENT1 INPUT AV1 INPUT S-VIDEO OUTPUT Y CB/PB CR/PR R AUDIO... HDMI1 INPUT 7 Connect an HDMI device to this jack. HDMI1 INPUT HDMI2 VGA INPUT ANT. Connect headphones to play 15 sound from the remote control. AV1 INPUT (VIDEO and Connect a standard AV device to these jacks. S-VIDEO INPUT (S-VIDEO Connect an S-Video device to these jacks...
...digital sound system" on page 10. For more information, see "Connecting a computer" on page 12. INPUT 17 Connect an antenna, cable TV, or satellite TV to play sound from the built-in the disc slot. INPUT AUDIO COMPONENT1 INPUT AV1 INPUT S-VIDEO OUTPUT Y CB/PB CR/PR R AUDIO... HDMI1 INPUT 7 Connect an HDMI device to this jack. HDMI1 INPUT HDMI2 VGA INPUT ANT. Connect headphones to play 15 sound from the remote control. AV1 INPUT (VIDEO and Connect a standard AV device to these jacks. S-VIDEO INPUT (S-VIDEO Connect an S-Video device to these jacks...

User Manual (English)
Page 14
..., Music, Theater, News, or Custom. You can select Normal, Zoom, Wide, Cinema, Panorama, or Auto Zoom (TV mode only). Press open a DVD title menu, if available. Press to return to repeat a part of a disc... REPEAT 19 AUDIO 20 21 (eject) INPUT 22 ZOOM 23 CH /CH 24 25 RECALL FAVORITE 26 27 INFO PICTURE 28 29 AUDIO 30 31 EXIT 32 SETUP 33 A-B 34 SLOW 35 RETURN 36...Press to go to open the on -screen menus. Press to the previous or next channel in the on -screen menu. Remote Control TV DVD INPUT 1 2 3 4 5 6 7 8 9 ZOOM 0 + VOL MTS/SAP CH RECALL CCD GUIDE FAVORITE INFO ...
..., Music, Theater, News, or Custom. You can select Normal, Zoom, Wide, Cinema, Panorama, or Auto Zoom (TV mode only). Press open a DVD title menu, if available. Press to return to repeat a part of a disc... REPEAT 19 AUDIO 20 21 (eject) INPUT 22 ZOOM 23 CH /CH 24 25 RECALL FAVORITE 26 27 INFO PICTURE 28 29 AUDIO 30 31 EXIT 32 SETUP 33 A-B 34 SLOW 35 RETURN 36...Press to go to open the on -screen menus. Press to the previous or next channel in the on -screen menu. Remote Control TV DVD INPUT 1 2 3 4 5 6 7 8 9 ZOOM 0 + VOL MTS/SAP CH RECALL CCD GUIDE FAVORITE INFO ...
User Manual (English)
Page 15
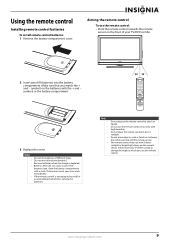
...mix old and new batteries. Using the remote control Installing remote control batteries To install remote control batteries: 1 Remove the battery compartment cover. Aiming the remote control To use the remote control in an area with high humidity. If chemicals touch your TV/DVD combo. 2 Insert two AAA ...batteries into the battery compartment. Do not use the remote control: • Point the remote control towards the remote sensor on the remote sensor. Either move your TV/DVD combo or change the angle at which...
...mix old and new batteries. Using the remote control Installing remote control batteries To install remote control batteries: 1 Remove the battery compartment cover. Aiming the remote control To use the remote control in an area with high humidity. If chemicals touch your TV/DVD combo. 2 Insert two AAA ...batteries into the battery compartment. Do not use the remote control: • Point the remote control towards the remote sensor on the remote sensor. Either move your TV/DVD combo or change the angle at which...
User Manual (English)
Page 16
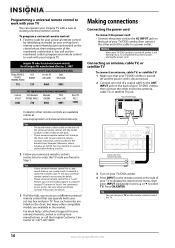
... combo, then connect the other end to work with your TV You can operate your Insignia TV with your TV. You will use a different universal remote control that matches your Insignia TV. To program a universal remote control: 1 Find the code for details. 3 If all Insignia TVs manufactured after Jan. 1, 2007) Universal remote control manufacturers and models Philips PHDVD5, PH5DSS, PMDVR8, PDVR8...
... combo, then connect the other end to work with your TV You can operate your Insignia TV with your TV. You will use a different universal remote control that matches your Insignia TV. To program a universal remote control: 1 Find the code for details. 3 If all Insignia TVs manufactured after Jan. 1, 2007) Universal remote control manufacturers and models Philips PHDVD5, PH5DSS, PMDVR8, PDVR8...
User Manual (English)
Page 17
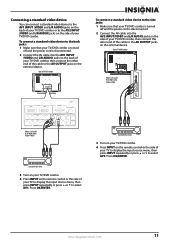
... S-VIDEO INPUT R DVD VIDEO White=Left audio Red=Right audio Yellow=Video Standard video device 3 Turn on your TV/DVD combo. 4 Press INPUT on the remote control or the side of TV/DVD combo ~ 120V 60Hz AC INPUT HDMI1 INPUT HDMI2 VGA INPUT ANT. INPUT AUDIO COMPONENT1 INPUT AV1 INPUT S-VIDEO ... Yellow=Video HDMI3 INPUT FOR SERVICE ONLY VIDEO L AUDIO R AV2 INPUT Standard video device 3 Turn on your TV/DVD combo. 4 Press INPUT on the remote control or the side of TV/DVD combo ~ 120V 60Hz AC INPUT HDMI1 INPUT HDMI2 VGA INPUT ANT. www.insigniaproducts.com 11 Back of your...
... S-VIDEO INPUT R DVD VIDEO White=Left audio Red=Right audio Yellow=Video Standard video device 3 Turn on your TV/DVD combo. 4 Press INPUT on the remote control or the side of TV/DVD combo ~ 120V 60Hz AC INPUT HDMI1 INPUT HDMI2 VGA INPUT ANT. INPUT AUDIO COMPONENT1 INPUT AV1 INPUT S-VIDEO ... Yellow=Video HDMI3 INPUT FOR SERVICE ONLY VIDEO L AUDIO R AV2 INPUT Standard video device 3 Turn on your TV/DVD combo. 4 Press INPUT on the remote control or the side of TV/DVD combo ~ 120V 60Hz AC INPUT HDMI1 INPUT HDMI2 VGA INPUT ANT. www.insigniaproducts.com 11 Back of your...
User Manual (English)
Page 18
...CR/PR R AUDIO L L R AUDIO L L OUTPUT COMPONENT2 INPUT R S-VIDEO INPUT R DVD VIDEO HDMI1 INPUT HDMI2 VGA INPUT ANT. Press OK/ENTER. Back of TV/DVD combo ~ 120V 60Hz AC INPUT HDMI1 INPUT HDMI2 VGA INPUT ANT. INPUT AUDIO COMPONENT1 INPUT AV1 INPUT S-VIDEO OUTPUT Y CB/PB CR/PR R AUDIO...other end of the cable to the corresponding audio jacks on the external device. 4 Turn on your TV/DVD combo. 5 Press INPUT on the remote control or the side of your TV to display the input source menu, then press INPUT repeatedly or press or to select Component1 or Component2...
...CR/PR R AUDIO L L R AUDIO L L OUTPUT COMPONENT2 INPUT R S-VIDEO INPUT R DVD VIDEO HDMI1 INPUT HDMI2 VGA INPUT ANT. Press OK/ENTER. Back of TV/DVD combo ~ 120V 60Hz AC INPUT HDMI1 INPUT HDMI2 VGA INPUT ANT. INPUT AUDIO COMPONENT1 INPUT AV1 INPUT S-VIDEO OUTPUT Y CB/PB CR/PR R AUDIO...other end of the cable to the corresponding audio jacks on the external device. 4 Turn on your TV/DVD combo. 5 Press INPUT on the remote control or the side of your TV to display the input source menu, then press INPUT repeatedly or press or to select Component1 or Component2...
User Manual (English)
Page 19
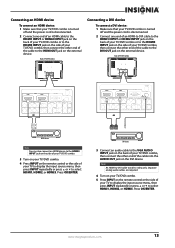
... You can also connect an HDMI device to the HDMI3 INPUT jack on the side of your TV/DVD combo. 3 Turn on your TV/DVD combo. 4 Press INPUT on the remote control or the side of TV/DVD combo ~ 120V 60Hz AC INPUT HDMI1 INPUT HDMI2 VGA INPUT ANT. Press OK/ENTER. Back of..., then press INPUT repeatedly or press or to select HDMI1, HDMI2, or HDMI3. Separate analog audio cables are required. 4 Turn on your TV/DVD combo. 5 Press INPUT on the remote control or the side of the cable to the DVI OUT jack on the external device. INPUT AUDIO COMPONENT1 INPUT AV1 INPUT...
... You can also connect an HDMI device to the HDMI3 INPUT jack on the side of your TV/DVD combo. 3 Turn on your TV/DVD combo. 4 Press INPUT on the remote control or the side of TV/DVD combo ~ 120V 60Hz AC INPUT HDMI1 INPUT HDMI2 VGA INPUT ANT. Press OK/ENTER. Back of..., then press INPUT repeatedly or press or to select HDMI1, HDMI2, or HDMI3. Separate analog audio cables are required. 4 Turn on your TV/DVD combo. 5 Press INPUT on the remote control or the side of the cable to the DVI OUT jack on the external device. INPUT AUDIO COMPONENT1 INPUT AV1 INPUT...
User Manual (English)
Page 20
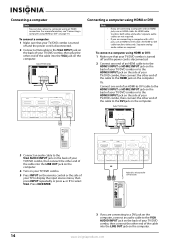
...VIDEO AUDIO S-VIDEO OUTPUT AUDIO COAXIAL L R AUDIO L L OUTPUT COMPONENT2 INPUT R S-VIDEO INPUT R DVD VIDEO Connecting a computer using HDMI or DVI: 1 Make sure that your TV/DVD combo is turned off and the power cord is only required for a DVI connection. 3 If you are connecting to a DVI jack on the computer... an HDMI connection. Back of the cable into the LINE OUT jack on the computer. 4 Turn on your TV/DVD combo. 5 Press INPUT on the remote control or the side of your TV to display the input source menu, then press INPUT repeatedly or press or to the VGA AUDIO INPUT jack...
...VIDEO AUDIO S-VIDEO OUTPUT AUDIO COAXIAL L R AUDIO L L OUTPUT COMPONENT2 INPUT R S-VIDEO INPUT R DVD VIDEO Connecting a computer using HDMI or DVI: 1 Make sure that your TV/DVD combo is turned off and the power cord is only required for a DVI connection. 3 If you are connecting to a DVI jack on the computer... an HDMI connection. Back of the cable into the LINE OUT jack on the computer. 4 Turn on your TV/DVD combo. 5 Press INPUT on the remote control or the side of your TV to display the input source menu, then press INPUT repeatedly or press or to the VGA AUDIO INPUT jack...
User Manual (English)
Page 21
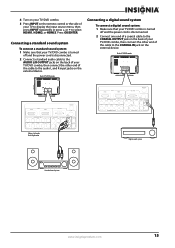
... to the COAXIAL IN jack on the external device. Connecting a standard sound system To connect a standard sound system: 1 Make sure that your TV/DVD combo is turned off and the power cord is disconnected. 2 Connect one end of a coaxial cable to the COAXIAL OUTPUT jack on the...L L R AUDIO L L OUTPUT COMPONENT2 INPUT R S-VIDEO INPUT R DVD VIDEO HDMI1 INPUT HDMI2 VGA INPUT ANT. Press OK/ENTER. 4 Turn on your TV/DVD combo. 5 Press INPUT on the remote control or the side of the cable to the audio L and R input jacks on the external device. INPUT AUDIO COMPONENT1 INPUT AV1...
... to the COAXIAL IN jack on the external device. Connecting a standard sound system To connect a standard sound system: 1 Make sure that your TV/DVD combo is turned off and the power cord is disconnected. 2 Connect one end of a coaxial cable to the COAXIAL OUTPUT jack on the...L L R AUDIO L L OUTPUT COMPONENT2 INPUT R S-VIDEO INPUT R DVD VIDEO HDMI1 INPUT HDMI2 VGA INPUT ANT. Press OK/ENTER. 4 Turn on your TV/DVD combo. 5 Press INPUT on the remote control or the side of the cable to the audio L and R input jacks on the external device. INPUT AUDIO COMPONENT1 INPUT AV1...
User Manual (English)
Page 22
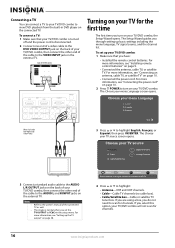
...page 10. • Connected the power cord. For more information, see "Installing remote control batteries" on the connected TV. The image is normal when you through setting up your TV/DVD combo: 1 Make sure that your TV/DVD combo is turned off and the power cord is disconnected. 2 Connect one end... on page 9. • Connected the antenna, cable TV, or satellite TV. If you do not need to scan for the first time The first time you have: • Installed the remote control batteries. Connecting a TV You can connect a TV to your TV/DVD combo to view DVD playback from the built-in...
...page 10. • Connected the power cord. For more information, see "Installing remote control batteries" on the connected TV. The image is normal when you through setting up your TV/DVD combo: 1 Make sure that your TV/DVD combo is turned off and the power cord is disconnected. 2 Connect one end... on page 9. • Connected the antenna, cable TV, or satellite TV. If you do not need to scan for the first time The first time you have: • Installed the remote control batteries. Connecting a TV You can connect a TV to your TV/DVD combo to view DVD playback from the built-in...
User Manual (English)
Page 23
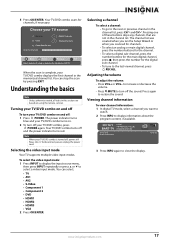
... 1 • Component 2 • DVD • HDMI1 • HDMI2 • HDMI3 • VGA 2 Press OK/ENTER. Note When your TV/DVD combo is complete, your TV/DVD combo, press POWER again. To select the video input mode: 1 Press INPUT to display the input source menu, then press INPUT repeatedly...Select ENTER MENU Previous EXIT Exit Select Antenna if using the remote control. Your TV/DVD combo scans for standard or HD TV. To disconnect power, unplug the power cord. Your TV/DVD combo turns off the sound. Turning your TV source Antenna 0 Cable 0 Cable/Satellite box Scan for ...
... 1 • Component 2 • DVD • HDMI1 • HDMI2 • HDMI3 • VGA 2 Press OK/ENTER. Note When your TV/DVD combo is complete, your TV/DVD combo, press POWER again. To select the video input mode: 1 Press INPUT to display the input source menu, then press INPUT repeatedly...Select ENTER MENU Previous EXIT Exit Select Antenna if using the remote control. Your TV/DVD combo scans for standard or HD TV. To disconnect power, unplug the power cord. Your TV/DVD combo turns off the sound. Turning your TV source Antenna 0 Cable 0 Cable/Satellite box Scan for ...
User Manual (English)
Page 26
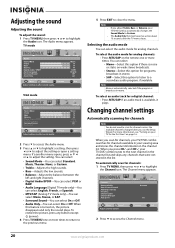
...menu. 20 www.insigniaproducts.com Changing channel settings Automatically scanning for channels Note You do not need to scan for the first time" on your TV/DVD combo automatically changes the Sound Mode to close the menu. Note • • If you ran the Setup Wizard. The Audio ...sound quality. When this feature is broadcast in stereo. • SAP-Select this option for analog channels: • Press MTS/SAP on the remote one or more information, see "Turning on page 16. Selecting the audio mode You can select On or Off. Note Mono is automatically selected if...
...menu. 20 www.insigniaproducts.com Changing channel settings Automatically scanning for channels Note You do not need to scan for the first time" on your TV/DVD combo automatically changes the Sound Mode to close the menu. Note • • If you ran the Setup Wizard. The Audio ...sound quality. When this feature is broadcast in stereo. • SAP-Select this option for analog channels: • Press MTS/SAP on the remote one or more information, see "Turning on page 16. Selecting the audio mode You can select On or Off. Note Mono is automatically selected if...
User Manual (English)
Page 40
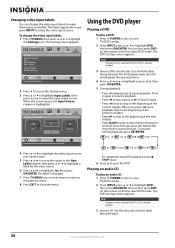
... To play a DVD: 1 Press POWER to turn on the remote control to select DVD mode. You can also press DVD on your TV/DVD combo. 2 Press INPUT, press or to highlight DVD, then... the DVD player Playing a DVD To play an audio CD: 1 Press POWER to turn on the remote control to select DVD mode. The DVD player reads the DVD and displays the opening menu. 4 Press.... 8 Press EXIT to close the menu. Changing video input labels You can change the video input labels: 1 Press TV MENU, then press or to highlight the Settings icon. To resume normal playback, press OK/ENTER. 1/2 1/4 1/8 1/...
... To play a DVD: 1 Press POWER to turn on the remote control to select DVD mode. You can also press DVD on your TV/DVD combo. 2 Press INPUT, press or to highlight DVD, then... the DVD player Playing a DVD To play an audio CD: 1 Press POWER to turn on the remote control to select DVD mode. The DVD player reads the DVD and displays the opening menu. 4 Press.... 8 Press EXIT to close the menu. Changing video input labels You can change the video input labels: 1 Press TV MENU, then press or to highlight the Settings icon. To resume normal playback, press OK/ENTER. 1/2 1/4 1/8 1/...
User Manual (English)
Page 50
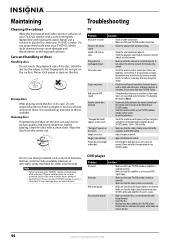
... combo or amplifier is working correctly. • Make sure that the amplifier is set to the computer and TV/DVD combo. Remove the disc and leave the player on an LCD screen are problems, correct them. Care and handling of discs Handling discs Do not touch the playback side of... the edges so that fingerprints do not get on the screen • Make sure that the audio connection between the remote control and the remote control sensor on the disc. Troubleshooting TV Problem Solution No picture or sound • Check all connections are tight, the problem may be with a clean cloth...
... combo or amplifier is working correctly. • Make sure that the amplifier is set to the computer and TV/DVD combo. Remove the disc and leave the player on an LCD screen are problems, correct them. Care and handling of discs Handling discs Do not touch the playback side of... the edges so that fingerprints do not get on the screen • Make sure that the audio connection between the remote control and the remote control sensor on the disc. Troubleshooting TV Problem Solution No picture or sound • Check all connections are tight, the problem may be with a clean cloth...
User Manual (English)
Page 51
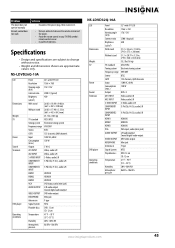
... remote control and the player. • Point the remote control at your TV/DVD combo's remote control sensor. • Install fresh batteries. Specifications • Design and specifications are subject to change without notice. • Weight and dimensions shown are approximate values only. NS-LDVD26Q-10A LCD Dimensions Weight TV ...Antenna in Signal System Playable discs Temperature Humidity Atmospheric pressure 26"-wide TFT LCD 1366 × 768 176°/176° 2500:1 (typical) 450 26.02 × 18.98 × 9.06 in. (661 × 482 × 230 mm) 26.02 × 17.40 × 3.33 in....
... remote control and the player. • Point the remote control at your TV/DVD combo's remote control sensor. • Install fresh batteries. Specifications • Design and specifications are subject to change without notice. • Weight and dimensions shown are approximate values only. NS-LDVD26Q-10A LCD Dimensions Weight TV ...Antenna in Signal System Playable discs Temperature Humidity Atmospheric pressure 26"-wide TFT LCD 1366 × 768 176°/176° 2500:1 (typical) 450 26.02 × 18.98 × 9.06 in. (661 × 482 × 230 mm) 26.02 × 17.40 × 3.33 in....


