User Manual (English)
Page 6
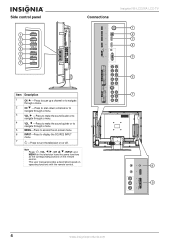
This user manual provides a description based on the remote control. Note Power , VOL / , CH / , INPUT, and MENU on the television have the same functions as the corresponding buttons on operating functions with the remote control. 7 8 9 4 www.insignia-products.com Side control panel 1 2 3 4 5 6 7 Connections VGA Insignia NS-LCD26A LCD TV 1 2 3 4 5 6 Item Description 1 CH -Press to scan...
This user manual provides a description based on the remote control. Note Power , VOL / , CH / , INPUT, and MENU on the television have the same functions as the corresponding buttons on operating functions with the remote control. 7 8 9 4 www.insignia-products.com Side control panel 1 2 3 4 5 6 7 Connections VGA Insignia NS-LCD26A LCD TV 1 2 3 4 5 6 Item Description 1 CH -Press to scan...
User Manual (English)
Page 9
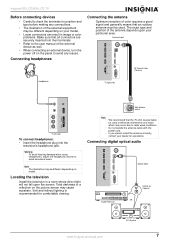
Insignia NS-LCD26A LCD TV Before connecting devices • Carefully check the terminals for position and type before making any issues. Soft and indirect lighting is recommended for assistance. Connecting digital optical audio Optical cable VGA Audio Processor S/PDIF IN (Optical) OR www.insignia-products.com... S-232 TV left side To connect headphones: • Insert the headphone plug into their terminals. • Refer to the user manual of color requires a good signal and generally means that the 75-ohm coaxial cable be different depending on your model. • Loose...
Insignia NS-LCD26A LCD TV Before connecting devices • Carefully check the terminals for position and type before making any issues. Soft and indirect lighting is recommended for assistance. Connecting digital optical audio Optical cable VGA Audio Processor S/PDIF IN (Optical) OR www.insignia-products.com... S-232 TV left side To connect headphones: • Insert the headphone plug into their terminals. • Refer to the user manual of color requires a good signal and generally means that the 75-ohm coaxial cable be different depending on your model. • Loose...

User Manual (English)
Page 14
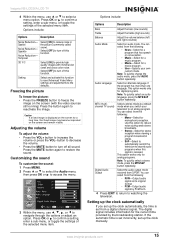
... you can use the Add On Channel Search option to search for new stations, and add them to stop the search, press the EXIT button. Insignia NS-LCD26A LCD TV 3 Press or to select Auto Ch Search, then press OK or to your television is connected to. The television automatically searches for...) program. 3 Press or to select Tuning Band, then press OK or to access the submenu. If you want to begin the auto channel search. To manually add or delete channels: 1 Press MENU. 2 Press or to select Setup menu, then press OK or to watching the television. To search for new stations...
... you can use the Add On Channel Search option to search for new stations, and add them to stop the search, press the EXIT button. Insignia NS-LCD26A LCD TV 3 Press or to select Auto Ch Search, then press OK or to your television is connected to. The television automatically searches for...) program. 3 Press or to select Tuning Band, then press OK or to access the submenu. If you want to begin the auto channel search. To manually add or delete channels: 1 Press MENU. 2 Press or to select Setup menu, then press OK or to watching the television. To search for new stations...
User Manual (English)
Page 15
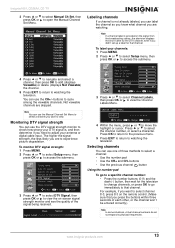
... so you know what channel you want to select channel 8-3, press 8-3 on the remote control. (Make sure that channel. www.insignia-products.com 13 Insignia NS-LCD26A LCD TV 3 Press or to select Manual Ch Set, then press OK or to cycle among the viewable channels. Labeling channels If a channel is provided on -screen...
... so you know what channel you want to select channel 8-3, press 8-3 on the remote control. (Make sure that channel. www.insignia-products.com 13 Insignia NS-LCD26A LCD TV 3 Press or to select Manual Ch Set, then press OK or to cycle among the viewable channels. Labeling channels If a channel is provided on -screen...
User Manual (English)
Page 17
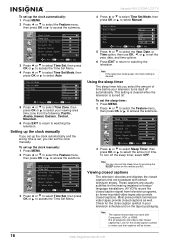
...imprinted on the screen (with minimal dot crawl and cross color noise. Press OK or to select a menu option. Setting up the clock manually. Select [OFF] to turn off all sound. You can select from the following : • RAW-Output audio signal as a default ... set incorrectly, set from S/PDIF. The digital signal includes information for stereo reception when viewing a program broadcast in the picture (commonly called snow). Insignia NS-LCD26A LCD TV 4 Within the menu, use , , , or to restore the sound. Options include: Options Description Noise Reduction- Select and activate...
...imprinted on the screen (with minimal dot crawl and cross color noise. Press OK or to select a menu option. Setting up the clock manually. Select [OFF] to turn off all sound. You can select from the following : • RAW-Output audio signal as a default ... set incorrectly, set from S/PDIF. The digital signal includes information for stereo reception when viewing a program broadcast in the picture (commonly called snow). Insignia NS-LCD26A LCD TV 4 Within the menu, use , , , or to restore the sound. Options include: Options Description Noise Reduction- Select and activate...
User Manual (English)
Page 18
... shows. To set the year, date, and time options. 6 Press EXIT to return to watching the television. Insignia NS-LCD26A LCD TV 4 Press or to select Time Set Mode, then press OK or to select Manual. 3 Press or to select Time Set, then press OK or to access the Time Set Menu. 4 Press... television schedule and on the remote control. Viewing closed captions The television decodes and displays the closed captions that captions will be shown. 16 www.insignia-products.com Note You can set the sleep timer: 1 Press MENU. 2 Press or to select the Feature menu, then press OK or to access the...
... shows. To set the year, date, and time options. 6 Press EXIT to return to watching the television. Insignia NS-LCD26A LCD TV 4 Press or to select Time Set Mode, then press OK or to select Manual. 3 Press or to select Time Set, then press OK or to access the Time Set Menu. 4 Press... television schedule and on the remote control. Viewing closed captions The television decodes and displays the closed captions that captions will be shown. 16 www.insignia-products.com Note You can set the sleep timer: 1 Press MENU. 2 Press or to select the Feature menu, then press OK or to access the...


