FAQs (English)
Page 1
...of the universal remote control, and the model number is often visible on the back. o TIP: If your universal remote control's instructions and try codes for other universal remotes are available online at: NS-L19Q-10A: http://insigniaproducts.com/products/televisions/NS-L19Q10A.html FAQs Insignia FY10 LCD TVs (NS-L19Q-10A, NS-L19W1Q-10A, NS-L22Q-10A, NS-L26Q-10A, NS-L32Q-10A, NS-L37Q-10A, NS-L42Q-10A) July 29, 2010 Setup ...1 Image/Picture Issues 5 Hardware Issues 8 Channel Issues ...8 General ...11 Audio Issues ...12 Setup 1. Insignia TV codes for universal remote controls...
...of the universal remote control, and the model number is often visible on the back. o TIP: If your universal remote control's instructions and try codes for other universal remotes are available online at: NS-L19Q-10A: http://insigniaproducts.com/products/televisions/NS-L19Q10A.html FAQs Insignia FY10 LCD TVs (NS-L19Q-10A, NS-L19W1Q-10A, NS-L22Q-10A, NS-L26Q-10A, NS-L32Q-10A, NS-L37Q-10A, NS-L42Q-10A) July 29, 2010 Setup ...1 Image/Picture Issues 5 Hardware Issues 8 Channel Issues ...8 General ...11 Audio Issues ...12 Setup 1. Insignia TV codes for universal remote controls...
FAQs (English)
Page 2
... your Insignia Universal Remote: 1. Press and hold the SET button on the device (for example, your DVD player) and, if needed, load media such as each code for the device that you find one that you have the NS-L32Q-10A, NS-L37Q-10A, or NS-L42Q-10A, your remote control." 7. Aim the remote at the device and press the Power button. The device codes can be using. 2. NS-L19W1Q-10A: http://insigniaproducts.com/products/televisions/NS...
... your Insignia Universal Remote: 1. Press and hold the SET button on the device (for example, your DVD player) and, if needed, load media such as each code for the device that you find one that you have the NS-L32Q-10A, NS-L37Q-10A, or NS-L42Q-10A, your remote control." 7. Aim the remote at the device and press the Power button. The device codes can be using. 2. NS-L19W1Q-10A: http://insigniaproducts.com/products/televisions/NS...
FAQs (English)
Page 4
.... How do I hook up my external device (e.g., cable/satellite box, Blu-ray/DVD player, Game System, VCR, etc.)? Have you tried using your TV and to the correct mode. Connect an HDMI cable to the HDMI jack on the HDMI device. 2. o Component Video Cables are red and white. 1. Turn on the component device, then set it to the HDMI Out jack on the back or side of your Quick Setup Guide to open the Auto Channel Search screen. 4. See...
.... How do I hook up my external device (e.g., cable/satellite box, Blu-ray/DVD player, Game System, VCR, etc.)? Have you tried using your TV and to the correct mode. Connect an HDMI cable to the HDMI jack on the HDMI device. 2. o Component Video Cables are red and white. 1. Turn on the component device, then set it to the HDMI Out jack on the back or side of your Quick Setup Guide to open the Auto Channel Search screen. 4. See...

FAQs (English)
Page 5
... select the channel you are using an antenna, the signal strength of the base. The stand comes pre-installed on the A/V device. 2. It is possible you want and to the aspect ratio. To play from damages and scratches. 2. Image/Picture Issues 5. I have a yellow video cable, and red and white audio cables. 1. o A/V Cables (RCA Cables, Composite Cables) have black bars around my picture. This is due to view the selected channel strength...
... select the channel you are using an antenna, the signal strength of the base. The stand comes pre-installed on the A/V device. 2. It is possible you want and to the aspect ratio. To play from damages and scratches. 2. Image/Picture Issues 5. I have a yellow video cable, and red and white audio cables. 1. o A/V Cables (RCA Cables, Composite Cables) have black bars around my picture. This is due to view the selected channel strength...
FAQs (English)
Page 8
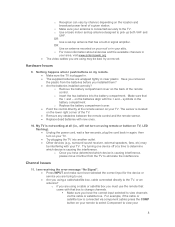
... antenna? I push buttons on my remote. Make sure the TV is not working at the remote sensor on the back of the TV. Remove any obstacles between the remote control and the remote sensor. Replace dead batteries with the + and - o If you have the correct input selected to view channels via component cables press the COMP button on TV, LED flashing). Unplug the power cord, wait a few seconds, plug the cord back in signal...
... antenna? I push buttons on my remote. Make sure the TV is not working at the remote sensor on the back of the TV. Remove any obstacles between the remote control and the remote sensor. Replace dead batteries with the + and - o If you have the correct input selected to view channels via component cables press the COMP button on TV, LED flashing). Unplug the power cord, wait a few seconds, plug the cord back in signal...
User Manual (English)
Page 3
... Installing a wall-mount bracket 4 NS-L37Q-10A (37-inch 4 NS-L42Q-10A (42-inch 4 TV components 5 Accessories 5 Cleaning cloth 5 Front 5 Back 6 Side 6 Remote control 7 Using the remote control 8 Installing the remote control batteries 8 Aiming the remote control 8 Using the remote control holder 9 Programming a universal remote control to work with your TV . . . . 9 Making connections 9 Connecting the power 9 Connecting an outdoor antenna 9 Connecting an indoor antenna 10 Connecting cable TV 10 Connecting satellite TV via a satellite TV box 11 Connecting a VCR 11 Connecting...
... Installing a wall-mount bracket 4 NS-L37Q-10A (37-inch 4 NS-L42Q-10A (42-inch 4 TV components 5 Accessories 5 Cleaning cloth 5 Front 5 Back 6 Side 6 Remote control 7 Using the remote control 8 Installing the remote control batteries 8 Aiming the remote control 8 Using the remote control holder 9 Programming a universal remote control to work with your TV . . . . 9 Making connections 9 Connecting the power 9 Connecting an outdoor antenna 9 Connecting an indoor antenna 10 Connecting cable TV 10 Connecting satellite TV via a satellite TV box 11 Connecting a VCR 11 Connecting...
User Manual (English)
Page 4
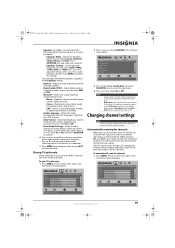
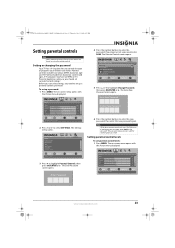
... Video settings 18 Freezing the picture 18 Adjusting the sound 18 Adjusting the sound 18 Playing TV audio only 19 Changing channel settings 19 Automatically scanning for channels 19 Hiding channels 20 Setting up a favorite channel list 21 Viewing a favorite channel 21 Adding or changing a channel label 21 Checking the DTV signal strength 22 Setting parental controls 23 Setting or changing the password 23 Setting parental control levels 23 Blocking unrated TV 25 Downloading rating information 26 Locking control buttons 26 Using closed captioning 27 Viewing closed captioning...
... Video settings 18 Freezing the picture 18 Adjusting the sound 18 Adjusting the sound 18 Playing TV audio only 19 Changing channel settings 19 Automatically scanning for channels 19 Hiding channels 20 Setting up a favorite channel list 21 Viewing a favorite channel 21 Adding or changing a channel label 21 Checking the DTV signal strength 22 Setting parental controls 23 Setting or changing the password 23 Setting parental control levels 23 Blocking unrated TV 25 Downloading rating information 26 Locking control buttons 26 Using closed captioning 27 Viewing closed captioning...
User Manual (English)
Page 6
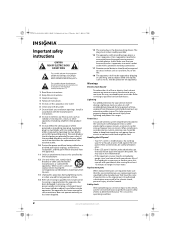
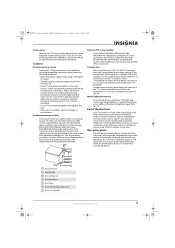
... you connect the class I apparatus. When installing an outside antenna system should be placed on the apparatus. If the screen breaks, be careful of broken glass. • If the LCD panel is the disconnecting device. A grounding type plug has two blades and a third grounding prong. Safety check After completing any heat sources such as contact with a cart, stand, tripod, bracket, or table...
... you connect the class I apparatus. When installing an outside antenna system should be placed on the apparatus. If the screen breaks, be careful of broken glass. • If the LCD panel is the disconnecting device. A grounding type plug has two blades and a third grounding prong. Safety check After completing any heat sources such as contact with a cart, stand, tripod, bracket, or table...
User Manual (English)
Page 7
... TV picture and sound, operating problems, or even damage, keep your cordless and cellular telephones away from the TV. Specifically, it on the screen as a fixed blue, green, or red point. End of life directives Your TV contains tin-lead solder and a fluorescent lamp containing a small amount of cable entry as close to the breeze from an air conditioner. Adjust only those controls that the antenna or cable...
... TV picture and sound, operating problems, or even damage, keep your cordless and cellular telephones away from the TV. Specifically, it on the screen as a fixed blue, green, or red point. End of life directives Your TV contains tin-lead solder and a fluorescent lamp containing a small amount of cable entry as close to the breeze from an air conditioner. Adjust only those controls that the antenna or cable...
User Manual (English)
Page 8
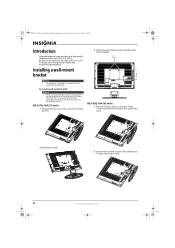
... Listed wall mount bracket. To install a wall-mount bracket: Warning These servicing instructions are qualified to your purchase of the art in the operating instructions unless you are for reliable and trouble-free performance. NS-L37Q-10A (37-inch) 1 Remove the four screws that secure the stand to do not perform any servicing other than that contained in LCD TV design and is intended to be supported by qualified service personnel only. Your NS-L37Q-10A or NS-L42Q-10A...
... Listed wall mount bracket. To install a wall-mount bracket: Warning These servicing instructions are qualified to your purchase of the art in the operating instructions unless you are for reliable and trouble-free performance. NS-L37Q-10A (37-inch) 1 Remove the four screws that secure the stand to do not perform any servicing other than that contained in LCD TV design and is intended to be supported by qualified service personnel only. Your NS-L37Q-10A or NS-L42Q-10A...
User Manual (English)
Page 12
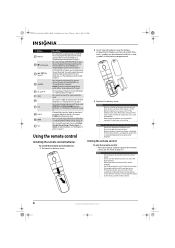
... turn closed captioning" on page 31. For more information, see "Adjusting Advanced Video settings" on page 17. Using the remote control Installing the remote control batteries To install the remote control batteries: 1 Remove the battery cover. 2 Insert two AA batteries into the battery compartment. Aiming the remote control To aim the remote control: • Point the remote control towards the remote sensor on the front of your remote control" on page 27. You need to program the remote control to control connected...
... turn closed captioning" on page 31. For more information, see "Adjusting Advanced Video settings" on page 17. Using the remote control Installing the remote control batteries To install the remote control batteries: 1 Remove the battery cover. 2 Insert two AA batteries into the battery compartment. Aiming the remote control To aim the remote control: • Point the remote control towards the remote sensor on the front of your remote control" on page 27. You need to program the remote control to control connected...
User Manual (English)
Page 19
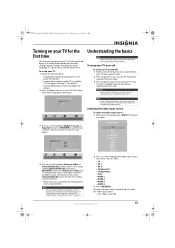
... direct input button to select the video input source. • Press TV to turn on using an antenna for channels at a later date. To set up basic settings including the menu language, TV signal source, and the channel list. Choose your TV source Antenna Cable Cable/Satellite box 0 Analog Channels 0 Digital Channels Scan for channels MOVE OK ENTER SELECT MENU PREVIOUS Select Antenna If using the remote control. To disconnect power, unplug the power cord. Source List TV AV 1 AV 2 Component 1 Component 2 VGA HDMI 1 HDMI 2 HDMI 3 HDMI 4 2 Press or to highlight Antenna, Cable...
... direct input button to select the video input source. • Press TV to turn on using an antenna for channels at a later date. To set up basic settings including the menu language, TV signal source, and the channel list. Choose your TV source Antenna Cable Cable/Satellite box 0 Analog Channels 0 Digital Channels Scan for channels MOVE OK ENTER SELECT MENU PREVIOUS Select Antenna If using the remote control. To disconnect power, unplug the power cord. Source List TV AV 1 AV 2 Component 1 Component 2 VGA HDMI 1 HDMI 2 HDMI 3 HDMI 4 2 Press or to highlight Antenna, Cable...

User Manual (English)
Page 22
... 4:27 PM Adjusting Advanced Video settings To adjust advanced video settings: 1 On the Picture menu, press or to select AUDIO. Note If SRS TruSurround HD is connected to change the overall color of 0~30. • Noise Reduction-Controls video noise. Picture Advanced Video Aspect Ratio Overscan Color Temperature Backlight Noise Reduction Advanced Contrast PICTURE AUDIO CHANNELS SETTINGS Auto On Cool 30 Middle MOVE OK ENTER SELECT Adjust how the picture fills the screen MENU PREVIOUS EXIT...
... 4:27 PM Adjusting Advanced Video settings To adjust advanced video settings: 1 On the Picture menu, press or to select AUDIO. Note If SRS TruSurround HD is connected to change the overall color of 0~30. • Noise Reduction-Controls video noise. Picture Advanced Video Aspect Ratio Overscan Color Temperature Backlight Noise Reduction Advanced Contrast PICTURE AUDIO CHANNELS SETTINGS Auto On Cool 30 Middle MOVE OK ENTER SELECT Adjust how the picture fills the screen MENU PREVIOUS EXIT...
User Manual (English)
Page 23
... TV, you change from a list of the Equalizer setting: • Balance-Adjusts the sound between columns. The Channels menu opens. Picture Mode Brightness Contrast Color Tint Sharpness PICTURE AUDIO CHANNELS SETTINGS Vivid 42 45 54 0 +5 MOVE OK ENTER SELECT Adjust settings to the audio only. Press or to move from left and right speakers. • Digital Audio/SPDIF-Sends digital audio to be consistent across programs and channels. The on the languages supported by pressing or to scan...
... TV, you change from a list of the Equalizer setting: • Balance-Adjusts the sound between columns. The Channels menu opens. Picture Mode Brightness Contrast Color Tint Sharpness PICTURE AUDIO CHANNELS SETTINGS Vivid 42 45 54 0 +5 MOVE OK ENTER SELECT Adjust settings to the audio only. Press or to move from left and right speakers. • Digital Audio/SPDIF-Sends digital audio to be consistent across programs and channels. The on the languages supported by pressing or to scan...
User Manual (English)
Page 27
...Settings Parental Controls PICTURE AUDIO CHANNELS SETTINGS Button Lock Off Block Unrated TV Off USA Parental Locks Canadian Parental Locks Change Password MOVE OK ENTER SELECT Lock or unlock the buttons on the TV MENU PREVIOUS EXIT EXIT 5 Press or to highlight Parental Controls, then press OK/ENTER or . Note Write down your password and save it for resetting your password. Setting or changing the password Your TV has a V-chip that lets you can watch. Settings Parental Controls Closed Caption Time Menu Settings Input labels Computer Settings PICTURE AUDIO CHANNELS SETTINGS...
...Settings Parental Controls PICTURE AUDIO CHANNELS SETTINGS Button Lock Off Block Unrated TV Off USA Parental Locks Canadian Parental Locks Change Password MOVE OK ENTER SELECT Lock or unlock the buttons on the TV MENU PREVIOUS EXIT EXIT 5 Press or to highlight Parental Controls, then press OK/ENTER or . Note Write down your password and save it for resetting your password. Setting or changing the password Your TV has a V-chip that lets you can watch. Settings Parental Controls Closed Caption Time Menu Settings Input labels Computer Settings PICTURE AUDIO CHANNELS SETTINGS...
User Manual (English)
Page 35
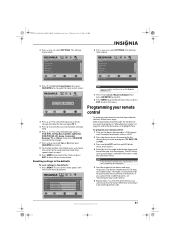
... to your remote control: 1 Turn on the device (for example, a DVD player) and, if needed, load media such as each digit is valid, the LED blinks twice. The LED blinks once as a DVD. 2 Press the device key on -screen menu. Note If the LED does not blink twice, repeat steps 2 to open the Input Labels screen. Settings Parental Controls Closed Caption Time Menu Settings Input labels Computer Settings PICTURE AUDIO CHANNELS SETTINGS MOVE OK ENTER SELECT Set various TV options MENU PREVIOUS EXIT EXIT Settings Parental Controls Closed Caption Time Menu Settings Input labels Computer...
... to your remote control: 1 Turn on the device (for example, a DVD player) and, if needed, load media such as each digit is valid, the LED blinks twice. The LED blinks once as a DVD. 2 Press the device key on -screen menu. Note If the LED does not blink twice, repeat steps 2 to open the Input Labels screen. Settings Parental Controls Closed Caption Time Menu Settings Input labels Computer Settings PICTURE AUDIO CHANNELS SETTINGS MOVE OK ENTER SELECT Set various TV options MENU PREVIOUS EXIT EXIT Settings Parental Controls Closed Caption Time Menu Settings Input labels Computer...
User Manual (English)
Page 36
...; 0-Cable (cable converters, video accessories, satellite receivers) • 1-TV (TVs) • 2-VCR (VCRs, DVD players) • 3-Audio (audio amplifiers, audio amps/tuners, CD players) 6 Aim the remote at the top of ambient light such as VCR Tracking Up or Down). Precautions • Your original remote controls must be in mind. In either your device. Using learning This universal remote control includes a learning feature (some models may need to find out which five-digit code is operating...
...; 0-Cable (cable converters, video accessories, satellite receivers) • 1-TV (TVs) • 2-VCR (VCRs, DVD players) • 3-Audio (audio amplifiers, audio amps/tuners, CD players) 6 Aim the remote at the top of ambient light such as VCR Tracking Up or Down). Precautions • Your original remote controls must be in mind. In either your device. Using learning This universal remote control includes a learning feature (some models may need to find out which five-digit code is operating...
User Manual (English)
Page 51
... modes can make the picture difficult to see "Playing TV audio only" on your TV. • Make sure that Audio Only option is turned on, the picture may be caused by obstructions to the antenna, such as a hair dryer or neon light. Turn off one or more information, see . • If an S-VHS camera or a camcorder is connected correctly. • Check the closed caption settings. Your TV works best...
... modes can make the picture difficult to see "Playing TV audio only" on your TV. • Make sure that Audio Only option is turned on, the picture may be caused by obstructions to the antenna, such as a hair dryer or neon light. Turn off one or more information, see . • If an S-VHS camera or a camcorder is connected correctly. • Check the closed caption settings. Your TV works best...
User Manual (English)
Page 52
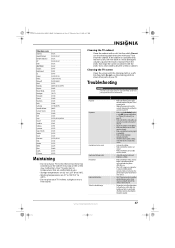
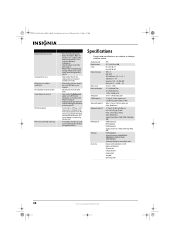
... appear Picture has a few bright or dark dots on an LCD screen is normal. Specifications Design and specifications are connected correctly and securely. • Make sure that you have selected the correct VGA mode on your TV. • Bright or fluorescent lighting may interfere with the remote control signal. Analog standard Digital standard Screen Channel coverage Power source Power consumption Audio power S-Video input (2) Video/audio input (2) Component input (2) HDMI input (4) VGA input Accessories NTSC ATSC, 8-VSB, Clear-QAM NS-L37Q-10A: 37" NS-L42Q-10A: 42...
... appear Picture has a few bright or dark dots on an LCD screen is normal. Specifications Design and specifications are connected correctly and securely. • Make sure that you have selected the correct VGA mode on your TV. • Bright or fluorescent lighting may interfere with the remote control signal. Analog standard Digital standard Screen Channel coverage Power source Power consumption Audio power S-Video input (2) Video/audio input (2) Component input (2) HDMI input (4) VGA input Accessories NTSC ATSC, 8-VSB, Clear-QAM NS-L37Q-10A: 37" NS-L42Q-10A: 42...
User Manual (English)
Page 55
... parts charges. Products and parts replaced under this warranty become the property of Insignia and are trademarks of their respective owners. What does this warranty apply. Make sure that you place the Product in ). If service of protection as is repaired and returned, at no charge to you. Where is printed on the receipt you received with this new NS-L37Q-10A/NS-L42Q-10A...
... parts charges. Products and parts replaced under this warranty become the property of Insignia and are trademarks of their respective owners. What does this warranty apply. Make sure that you place the Product in ). If service of protection as is repaired and returned, at no charge to you. Where is printed on the receipt you received with this new NS-L37Q-10A/NS-L42Q-10A...


