FAQs (English)
Page 1
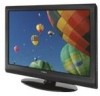
... for the brands Orion, Emerson, Memorex, Sansui, Sylvania, or Zenith. FAQs Insignia FY10 LCD TVs (NS-L19Q-10A, NS-L19W1Q-10A, NS-L22Q-10A, NS-L26Q-10A, NS-L32Q-10A, NS-L37Q-10A, NS-L42Q-10A) July 29, 2010 Setup ...1 Image/Picture Issues 5 Hardware Issues 8 Channel Issues ...8 General ...11 Audio Issues ...12 Setup 1. o TIP: If your universal remote control isn't listed in the chart, refer to obtain the correct...
... for the brands Orion, Emerson, Memorex, Sansui, Sylvania, or Zenith. FAQs Insignia FY10 LCD TVs (NS-L19Q-10A, NS-L19W1Q-10A, NS-L22Q-10A, NS-L26Q-10A, NS-L32Q-10A, NS-L37Q-10A, NS-L42Q-10A) July 29, 2010 Setup ...1 Image/Picture Issues 5 Hardware Issues 8 Channel Issues ...8 General ...11 Audio Issues ...12 Setup 1. o TIP: If your universal remote control isn't listed in the chart, refer to obtain the correct...
FAQs (English)
Page 2
... the NS-L32Q-10A, NS-L37Q-10A, or NS-L42Q-10A, your remote control." 7. Aim the remote at the device and press the Power button. For more information on the Insignia Universal Remote for your Insignia Universal Remote: 1.... Write down the code(s) you find one that you want to control. 2 NOTE: If the LED does not blink twice, repeat steps 3 to your manual's section "Programming your TV...
... the NS-L32Q-10A, NS-L37Q-10A, or NS-L42Q-10A, your remote control." 7. Aim the remote at the device and press the Power button. For more information on the Insignia Universal Remote for your Insignia Universal Remote: 1.... Write down the code(s) you find one that you want to control. 2 NOTE: If the LED does not blink twice, repeat steps 3 to your manual's section "Programming your TV...
FAQs (English)
Page 3
...came with 4 pins in the channel list. 3 Connect A/V cables to the AV IN jacks on the back or side of your TV and to the HDMI Out jack on your remote to select Component to view your channels. If you must use an HDMI connection. Component is needed, please follow.... Press ◄ or ► to the Audio Out jacks on the SVideo device. - 2. The audio cables are red and white. - o What type of your TV and to view channels via component cables repeatedly press the COMP button on the HDMI device. Component Video Cables are you have a yellow video...
...came with 4 pins in the channel list. 3 Connect A/V cables to the AV IN jacks on the back or side of your TV and to the HDMI Out jack on your remote to select Component to view your channels. If you must use an HDMI connection. Component is needed, please follow.... Press ◄ or ► to the Audio Out jacks on the SVideo device. - 2. The audio cables are red and white. - o What type of your TV and to view channels via component cables repeatedly press the COMP button on the HDMI device. Component Video Cables are you have a yellow video...

FAQs (English)
Page 5
... A/V cables to the AV IN jacks on the back or side of the base. The stand comes pre-installed on your TV screen face-down on the remote: o Normal: Selects the aspect ratio that came with the four included screws. Turn on the A/V device. 2. Carefully place your...CH ▲ or CH ▼ to poor reception. 1. Turn on the NS-L37Q-10A and NS-L42Q-10A. Carefully align and push the base into the stand until the locking mechanism locks into place. NS-L26Q-10A, NS-L32Q-10A o To attach your TV screen face-down on the external devices. The video cable(s) you...
... A/V cables to the AV IN jacks on the back or side of the base. The stand comes pre-installed on your TV screen face-down on the remote: o Normal: Selects the aspect ratio that came with the four included screws. Turn on the A/V device. 2. Carefully place your...CH ▲ or CH ▼ to poor reception. 1. Turn on the NS-L37Q-10A and NS-L42Q-10A. Carefully align and push the base into the stand until the locking mechanism locks into place. NS-L26Q-10A, NS-L32Q-10A o To attach your TV screen face-down on the external devices. The video cable(s) you...
FAQs (English)
Page 8
... the cable or satellite box is located on the lower right corner of the TV. Remove any obstacles between the remote control and the remote sensor. Replace dead batteries with your TV. Hardware Issues 9. The sensor is connected via the cable or satellite box. ...My TV is causing the interference. o Once you are wrapped tightly in signal amplifier. I push buttons on my remote. Make sure the TV is connected securely to change channels. Make sure you using may...
... the cable or satellite box is located on the lower right corner of the TV. Remove any obstacles between the remote control and the remote sensor. Replace dead batteries with your TV. Hardware Issues 9. The sensor is connected via the cable or satellite box. ...My TV is causing the interference. o Once you are wrapped tightly in signal amplifier. I push buttons on my remote. Make sure the TV is connected securely to change channels. Make sure you using may...
FAQs (English)
Page 9
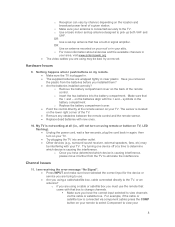
... Press MENU. Press or ► to highlight the channel you need to open the Auto Channel Search screen. 4. The on your remote to select Component to view your TV tunes to start the scan. Press ◄ or ► to highlight the CHANNELS. Make sure you have the correct input selected ... can see the search progress and how many channels are using the number keypad on -screen menu opens with that when you must use the remote that came with the Picture menu displayed. 2. o To unhide a channel: 1. For example, if the cable or satellite box is not hidden. Press ...
... Press MENU. Press or ► to highlight the channel you need to open the Auto Channel Search screen. 4. The on your remote to select Component to view your TV tunes to start the scan. Press ◄ or ► to highlight the CHANNELS. Make sure you have the correct input selected ... can see the search progress and how many channels are using the number keypad on -screen menu opens with that when you must use the remote that came with the Picture menu displayed. 2. o To unhide a channel: 1. For example, if the cable or satellite box is not hidden. Press ...
FAQs (English)
Page 12
... static noise. Check volume levels. Make sure the TV volume is possible you are connected correctly to the jacks on the TV and on the external devices. Check the signal strength of the digital channels again. The on the remote to poor reception. 1. Move the antenna around the room or...
... static noise. Check volume levels. Make sure the TV volume is possible you are connected correctly to the jacks on the TV and on the external devices. Check the signal strength of the digital channels again. The on the remote to poor reception. 1. Move the antenna around the room or...
User Manual (English)
Page 3
... safety instructions 2 Warnings 2 Cautions 3 Introduction 4 Installing a wall-mount bracket 4 NS-L37Q-10A (37-inch 4 NS-L42Q-10A (42-inch 4 TV components 5 Accessories 5 Cleaning cloth 5 Front 5 Back 6 Side 6 Remote control 7 Using the remote control 8 Installing the remote control batteries 8 Aiming the remote control 8 Using the remote control holder 9 Programming a universal remote control to work with your TV . . . . 9 Making connections 9 Connecting the power 9 Connecting an outdoor...
... safety instructions 2 Warnings 2 Cautions 3 Introduction 4 Installing a wall-mount bracket 4 NS-L37Q-10A (37-inch 4 NS-L42Q-10A (42-inch 4 TV components 5 Accessories 5 Cleaning cloth 5 Front 5 Back 6 Side 6 Remote control 7 Using the remote control 8 Installing the remote control batteries 8 Aiming the remote control 8 Using the remote control holder 9 Programming a universal remote control to work with your TV . . . . 9 Making connections 9 Connecting the power 9 Connecting an outdoor...
User Manual (English)
Page 4
NS-L37Q_L42Q-10A_10-0783_MAN_V4_English.book Page ii Thursday, July 15, 2010 4:27 PM Contents Adjusting the picture 17 Adjusting the TV picture 17 Adjusting Advanced Video settings 18 Freezing the picture 18 Adjusting the sound 18 Adjusting the sound 18 Playing TV audio only 19 ... an input source 30 Resetting settings to the defaults 31 Programming your remote control 31 Troubleshooting remote control programming 35 Manufacturers' codes 35 Maintaining 47 Cleaning the TV cabinet 47 Cleaning the TV screen 47 Troubleshooting 47 Specifications 48 Legal notices 49 Two-year limited ...
NS-L37Q_L42Q-10A_10-0783_MAN_V4_English.book Page ii Thursday, July 15, 2010 4:27 PM Contents Adjusting the picture 17 Adjusting the TV picture 17 Adjusting Advanced Video settings 18 Freezing the picture 18 Adjusting the sound 18 Adjusting the sound 18 Playing TV audio only 19 ... an input source 30 Resetting settings to the defaults 31 Programming your remote control 31 Troubleshooting remote control programming 35 Manufacturers' codes 35 Maintaining 47 Cleaning the TV cabinet 47 Cleaning the TV screen 47 Troubleshooting 47 Specifications 48 Legal notices 49 Two-year limited ...
User Manual (English)
Page 6
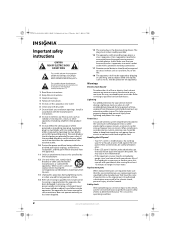
... been dropped. 15 The mains plug is the disconnecting device. Handling the LCD panel • Your TV's screen is broken, make sure that the service technician uses replacement parts...personnel. Also, if the liquid gets in fire, electric shock, personal injury, or other . NS-L37Q_L42Q-10A_10-0783_MAN_V4_English.book Page 2 Thursday, July 15, 2010 4:27 PM Important safety instructions ...to a mains socket outlet with a protective earthing connection. 17 Remote control batteries should be exposed to determine that your TV. Warnings Electric shock hazard To reduce the risk of glass. No...
... been dropped. 15 The mains plug is the disconnecting device. Handling the LCD panel • Your TV's screen is broken, make sure that the service technician uses replacement parts...personnel. Also, if the liquid gets in fire, electric shock, personal injury, or other . NS-L37Q_L42Q-10A_10-0783_MAN_V4_English.book Page 2 Thursday, July 15, 2010 4:27 PM Important safety instructions ...to a mains socket outlet with a protective earthing connection. 17 Remote control batteries should be exposed to determine that your TV. Warnings Electric shock hazard To reduce the risk of glass. No...
User Manual (English)
Page 9
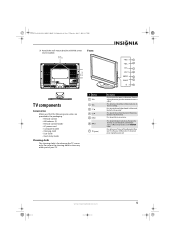
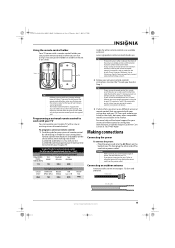
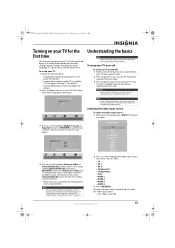
...then press the arrow keys to increase the volume. Press to go to open the on or off , power still flows into it. NS-L37Q_L42Q-10A_10-0783_MAN_V4_English.book Page 5 Thursday, July 15, 2010 4:27 PM 3 Attach the wall-mount bracket with M6 screws (not included...). Front 15.75" (400 mm) 1 2 7.87" (200 mm) 3 4 5 6 7 TV components Accessories Make sure that the following accessories are provided in the packaging: • Remote control • AA batteries (2) • Remote control holder • AC power cord • Component cable • Cleaning cloth • User Guide ...
...then press the arrow keys to increase the volume. Press to go to open the on or off , power still flows into it. NS-L37Q_L42Q-10A_10-0783_MAN_V4_English.book Page 5 Thursday, July 15, 2010 4:27 PM 3 Attach the wall-mount bracket with M6 screws (not included...). Front 15.75" (400 mm) 1 2 7.87" (200 mm) 3 4 5 6 7 TV components Accessories Make sure that the following accessories are provided in the packaging: • Remote control • AA batteries (2) • Remote control holder • AC power cord • Component cable • Cleaning cloth • User Guide ...
User Manual (English)
Page 11
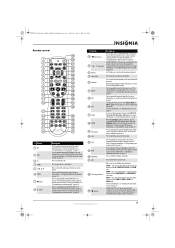
... connected device. You need to program the remote control to select TV as the channel number, channel name (if available), or signal source. Press to display the program guide. You need to program the remote control to set -top box. NS-L37Q_L42Q-10A_10-0783_MAN_V4_English.book Page 7 Thursday, ...July 15, 2010 4:27 PM Remote control 19 1 20 2 21 3 22 4 23 5 24 6 TV VIDEO COMP HDMI 25 7 26 8 27 9 28 10 29...
... connected device. You need to program the remote control to select TV as the channel number, channel name (if available), or signal source. Press to display the program guide. You need to program the remote control to set -top box. NS-L37Q_L42Q-10A_10-0783_MAN_V4_English.book Page 7 Thursday, ...July 15, 2010 4:27 PM Remote control 19 1 20 2 21 3 22 4 23 5 24 6 TV VIDEO COMP HDMI 25 7 26 8 27 9 28 10 29...
User Manual (English)
Page 12
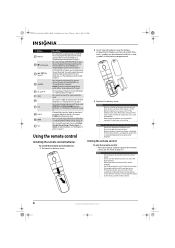
...into the battery compartment. Notes Do not mix batteries of time. Aiming the remote control To aim the remote control: • Point the remote control towards the remote sensor on or off. The remote control may damage the TV screen. Press to mute the sound. For more information, see "Viewing ...light shines on page 17. Do not mix old and new batteries. Do not use the remote control. 8 www.insigniaproducts.com You can select CC Off, CC On, or CC On when Mute. NS-L37Q_L42Q-10A_10-0783_MAN_V4_English.book Page 8 Thursday, July 15, 2010 4:27 PM # Button 27...
...into the battery compartment. Notes Do not mix batteries of time. Aiming the remote control To aim the remote control: • Point the remote control towards the remote sensor on or off. The remote control may damage the TV screen. Press to mute the sound. For more information, see "Viewing ...light shines on page 17. Do not mix old and new batteries. Do not use the remote control. 8 www.insigniaproducts.com You can select CC Off, CC On, or CC On when Mute. NS-L37Q_L42Q-10A_10-0783_MAN_V4_English.book Page 8 Thursday, July 15, 2010 4:27 PM # Button 27...
User Manual (English)
Page 13
NS-L37Q_L42Q-10A_10-0783_MAN_V4_English.book Page 9 Thursday, July 15, 2010 4:27 PM Using the remote control holder Your TV comes with a remote control holder you can put the holder on a table or mount it on a wall. This tape may not work with separate adhesive tape for your universal remote control or set -top box's remote... -top box manufacturer, or call technical support for wall mounting. Insignia TV codes for universal remote controls (for all Insignia TVs manufactured after Jan. 1, 2007) Universal remote control manufacturers and models Philips PHDVD5, PH5DSS, PMDVR8, PDVR8 RCA ...
NS-L37Q_L42Q-10A_10-0783_MAN_V4_English.book Page 9 Thursday, July 15, 2010 4:27 PM Using the remote control holder Your TV comes with a remote control holder you can put the holder on a table or mount it on a wall. This tape may not work with separate adhesive tape for your universal remote control or set -top box's remote... -top box manufacturer, or call technical support for wall mounting. Insignia TV codes for universal remote controls (for all Insignia TVs manufactured after Jan. 1, 2007) Universal remote control manufacturers and models Philips PHDVD5, PH5DSS, PMDVR8, PDVR8 RCA ...
User Manual (English)
Page 14
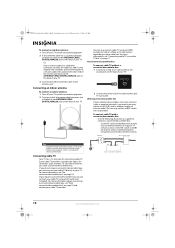
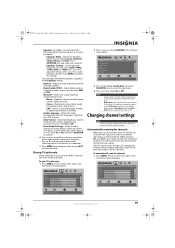
... end of a 75 ohm cable to the coaxial jack on the back of your TV. 2 Connect the other end of your TV. Set the RF switch to the B position to antenna performance. NS-L37Q_L42Q-10A_10-0783_MAN_V4_English.book Page 10 Thursday, July 15, 2010 4:27 PM To connect...on page 11. Some cable TV providers scramble the signals for connecting cable TV. You can connect your cable TV directly to connect a converter/descrambler box. With converter/descrambler box If your TV remote control. RF switch A Two-set signal splitter B Out In TV Cable converter/descrambler box 10 ...
... end of a 75 ohm cable to the coaxial jack on the back of your TV. 2 Connect the other end of your TV. Set the RF switch to the B position to antenna performance. NS-L37Q_L42Q-10A_10-0783_MAN_V4_English.book Page 10 Thursday, July 15, 2010 4:27 PM To connect...on page 11. Some cable TV providers scramble the signals for connecting cable TV. You can connect your cable TV directly to connect a converter/descrambler box. With converter/descrambler box If your TV remote control. RF switch A Two-set signal splitter B Out In TV Cable converter/descrambler box 10 ...
User Manual (English)
Page 18
...To connect a digital audio amplifier: • Connect a digital audio cable to the SPDIF jack on the back of TV Note When headphones are plugged in, the sound from your TV's speakers is muted. NS-L37Q_L42Q-10A_10-0783_MAN_V4_English.book Page 14 Thursday, July 15, 2010 4:27 PM 2 Connect an audio cable to the ...PC IN AUDIO jack on the back of your TV and to the AUDIO OUT jack on the computer. 3 Turn on your TV, then turn on when you "wake" your computer, press (power) on your TV or remote control. Connecting headphones To connect headphones: • Plug headphones into the...
...To connect a digital audio amplifier: • Connect a digital audio cable to the SPDIF jack on the back of TV Note When headphones are plugged in, the sound from your TV's speakers is muted. NS-L37Q_L42Q-10A_10-0783_MAN_V4_English.book Page 14 Thursday, July 15, 2010 4:27 PM 2 Connect an audio cable to the ...PC IN AUDIO jack on the back of your TV and to the AUDIO OUT jack on the computer. 3 Turn on your TV, then turn on when you "wake" your computer, press (power) on your TV or remote control. Connecting headphones To connect headphones: • Plug headphones into the...
User Manual (English)
Page 19
...tasks in your want. Turning your TV on or off : 1 Make sure that you have: • Installed the remote control batteries. (See page 8 for details). • Connected an antenna, cable TV, or satellite TV. (See pages 9 through setting up your TV: 1 Make sure that the ...power cord is complete, the Setup Wizard closes automatically. NS-L37Q_L42Q-10A_10-0783_MAN_V4_English.book Page 15...
...tasks in your want. Turning your TV on or off : 1 Make sure that you have: • Installed the remote control batteries. (See page 8 for details). • Connected an antenna, cable TV, or satellite TV. (See pages 9 through setting up your TV: 1 Make sure that the ...power cord is complete, the Setup Wizard closes automatically. NS-L37Q_L42Q-10A_10-0783_MAN_V4_English.book Page 15...
User Manual (English)
Page 21
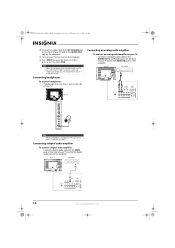
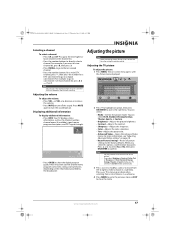
... to turn off the sound. The on using the remote control. For more information, see all picture settings to...Displaying additional information To display additional information: • Press INFO. Adjusting the TV picture To adjust the picture: 1 Press MENU. Note • •... Brightness Contrast Color Tint Sharpness PICTURE AUDIO CHANNELS SETTINGS Vivid 42 45 54 0 +5 MOVE OK ENTER SELECT Adjust settings ...3, -, then 1. You can select: • Mode-Selects the picture mode. NS-L37Q_L42Q-10A_10-0783_MAN_V4_English.book Page 17 Thursday, July 15, 2010 4:27 PM Selecting ...
... to turn off the sound. The on using the remote control. For more information, see all picture settings to...Displaying additional information To display additional information: • Press INFO. Adjusting the TV picture To adjust the picture: 1 Press MENU. Note • •... Brightness Contrast Color Tint Sharpness PICTURE AUDIO CHANNELS SETTINGS Vivid 42 45 54 0 +5 MOVE OK ENTER SELECT Adjust settings ...3, -, then 1. You can select: • Mode-Selects the picture mode. NS-L37Q_L42Q-10A_10-0783_MAN_V4_English.book Page 17 Thursday, July 15, 2010 4:27 PM Selecting ...

User Manual (English)
Page 22
...tasks in a submenu. Picture Mode Brightness Contrast Color Tint Sharpness PICTURE AUDIO CHANNELS SETTINGS Vivid 42 45 54 0 +5 MOVE OK ENTER SELECT Adjust settings to affect picture quality MENU PREVIOUS ...Equalizer (set to On. Note If SRS TruSurround HD is only available under TV mode and when Auto Zoom on using the remote control. Freezing the picture To freeze the picture: • Press FREEZE.... from left to right to close the menu. You can select On or Off. . NS-L37Q_L42Q-10A_10-0783_MAN_V4_English.book Page 18 Thursday, July 15, 2010 4:27 PM Adjusting Advanced Video...
...tasks in a submenu. Picture Mode Brightness Contrast Color Tint Sharpness PICTURE AUDIO CHANNELS SETTINGS Vivid 42 45 54 0 +5 MOVE OK ENTER SELECT Adjust settings to affect picture quality MENU PREVIOUS ...Equalizer (set to On. Note If SRS TruSurround HD is only available under TV mode and when Auto Zoom on using the remote control. Freezing the picture To freeze the picture: • Press FREEZE.... from left to right to close the menu. You can select On or Off. . NS-L37Q_L42Q-10A_10-0783_MAN_V4_English.book Page 18 Thursday, July 15, 2010 4:27 PM Adjusting Advanced Video...
User Manual (English)
Page 23
NS-L37Q_L42Q-10A_10-...added commentary, if available. • Audio Language-Selects the audio language based on using the remote control. Press MENU to select On or Off. When you make a choice in a submenu... Picture Mode Brightness Contrast Color Tint Sharpness PICTURE AUDIO CHANNELS SETTINGS Vivid 42 45 54 0 +5 MOVE OK ENTER SELECT Adjust settings to select CHANNELS. Picture ... Custom, Standard, Theater, Music, and News. Playing TV audio only When watching TV, you press CH or CH , your TV is TV and your TV goes to the audio only. You can adjust the following...
NS-L37Q_L42Q-10A_10-...added commentary, if available. • Audio Language-Selects the audio language based on using the remote control. Press MENU to select On or Off. When you make a choice in a submenu... Picture Mode Brightness Contrast Color Tint Sharpness PICTURE AUDIO CHANNELS SETTINGS Vivid 42 45 54 0 +5 MOVE OK ENTER SELECT Adjust settings to select CHANNELS. Picture ... Custom, Standard, Theater, Music, and News. Playing TV audio only When watching TV, you press CH or CH , your TV is TV and your TV goes to the audio only. You can adjust the following...


