FAQs (English)
Page 1
FAQs Insignia FY10 LCD TVs (NS-L19Q-10A, NS-L19W1Q-10A, NS-L22Q-10A, NS-L26Q-10A, NS-L32Q-10A, NS-L37Q-10A, NS-L42Q-10A) July 29, 2010 Setup ...1 Image/Picture Issues 5 Hardware Issues 8 Channel Issues ...8 General ...11 Audio Issues ...12 Setup 1. I am programming my universal remote, what code is often visible on the back. Insignia TV codes for universal remote controls (for all Insignia TVs manufactured after Jan. 1, 2007) Universal remote control manufacturers and...
FAQs Insignia FY10 LCD TVs (NS-L19Q-10A, NS-L19W1Q-10A, NS-L22Q-10A, NS-L26Q-10A, NS-L32Q-10A, NS-L37Q-10A, NS-L42Q-10A) July 29, 2010 Setup ...1 Image/Picture Issues 5 Hardware Issues 8 Channel Issues ...8 General ...11 Audio Issues ...12 Setup 1. I am programming my universal remote, what code is often visible on the back. Insignia TV codes for universal remote controls (for all Insignia TVs manufactured after Jan. 1, 2007) Universal remote control manufacturers and...
FAQs (English)
Page 2
... code(s) you have the NS-L32Q-10A, NS-L37Q-10A, or NS-L42Q-10A, your TV came with a universal remote. NOTE: If the LED...Insignia Universal Remote, please refer to your manual's section "Programming your remote control." 7. NS-L19W1Q-10A: http://insigniaproducts.com/products/televisions/NS-L19W1Q10A.html NS-L22Q-10A: http://insigniaproducts.com/products/televisions/NS-L22Q10A.html NS-L26Q-10A: http://insigniaproducts.com/products/televisions/NS-L26Q10A.html NS-L32Q-10A: http://insigniaproducts.com/products/televisions/NS-L32Q10A.html NS-L37Q-10A...
... code(s) you have the NS-L32Q-10A, NS-L37Q-10A, or NS-L42Q-10A, your TV came with a universal remote. NOTE: If the LED...Insignia Universal Remote, please refer to your manual's section "Programming your remote control." 7. NS-L19W1Q-10A: http://insigniaproducts.com/products/televisions/NS-L19W1Q10A.html NS-L22Q-10A: http://insigniaproducts.com/products/televisions/NS-L22Q10A.html NS-L26Q-10A: http://insigniaproducts.com/products/televisions/NS-L26Q10A.html NS-L32Q-10A: http://insigniaproducts.com/products/televisions/NS-L32Q10A.html NS-L37Q-10A...
FAQs (English)
Page 3
... press the COMP button on your remote to select Component to view your TV and to the AV Out jacks on the back or side of your TV tunes to the TV, or an antenna? ... o Do you must use an HDMI connection. Component is complete, the menu closes and your TV and to the COMPONENT Out jacks on the back of your channels. If you using a cable...box you need help selecting the best connection? To get the best digital audio and picture, use the remote that box to the COMPONENT jacks on the component device. S-Video Cables are using ? ...
... press the COMP button on your remote to select Component to view your TV and to the AV Out jacks on the back or side of your TV tunes to the TV, or an antenna? ... o Do you must use an HDMI connection. Component is complete, the menu closes and your TV and to the COMPONENT Out jacks on the back of your channels. If you using a cable...box you need help selecting the best connection? To get the best digital audio and picture, use the remote that box to the COMPONENT jacks on the component device. S-Video Cables are using ? ...

FAQs (English)
Page 5
... base into the stand until the locking mechanism locks into place. NS-L26Q-10A, NS-L32Q-10A o To attach your TV screen face-down on the A/V device. 2. The screws go in the bottom of the base. The stand comes pre-installed on the remote: o Normal: Selects the aspect ratio that came with the four included...
... base into the stand until the locking mechanism locks into place. NS-L26Q-10A, NS-L32Q-10A o To attach your TV screen face-down on the A/V device. 2. The screws go in the bottom of the base. The stand comes pre-installed on the remote: o Normal: Selects the aspect ratio that came with the four included...
FAQs (English)
Page 8
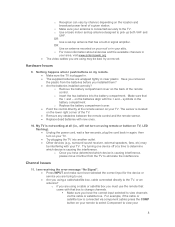
... message "No Signal". Press INPUT and make sure have selected the correct input for the device or service you are using remote or button on TV, LED flashing). Unplug the power cord, wait a few seconds, plug the cord back in your attic. Have you removed...61623; The supplied batteries are using a cable/satellite box, cable connected directly to view your TV. OR Use an antenna mounted on the lower right corner of the TV. Remove any obstacles between the remote control and the remote sensor. Replace dead batteries with the + and - o Use a basic indoor...
... message "No Signal". Press INPUT and make sure have selected the correct input for the device or service you are using remote or button on TV, LED flashing). Unplug the power cord, wait a few seconds, plug the cord back in your attic. Have you removed...61623; The supplied batteries are using a cable/satellite box, cable connected directly to view your TV. OR Use an antenna mounted on the lower right corner of the TV. Remove any obstacles between the remote control and the remote sensor. Replace dead batteries with the + and - o Use a basic indoor...
FAQs (English)
Page 9
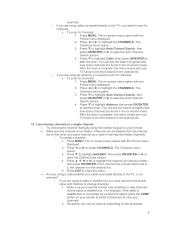
... first channel in the channel list. 5. Make sure you using a cable or satellite box you are found in the on your remote to select Component to view your TV tunes to view channels via component cables press the COMP button on -screen menu. The on -screen menu opens with the Picture...it will skip the hidden channels. The Channels menu opens. 3. o If you must use the remote that came with the Picture menu displayed. 2. Press ▼ to highlight Cable, then press OK/ENTER to the TV, or an antenna? After the scan is connected via the cable or satellite box. Press ◄...
... first channel in the channel list. 5. Make sure you using a cable or satellite box you are found in the on your remote to select Component to view your TV tunes to view channels via component cables press the COMP button on -screen menu. The on -screen menu opens with the Picture...it will skip the hidden channels. The Channels menu opens. 3. o If you must use the remote that came with the Picture menu displayed. 2. Press ▼ to highlight Cable, then press OK/ENTER to the TV, or an antenna? After the scan is connected via the cable or satellite box. Press ◄...
FAQs (English)
Page 12
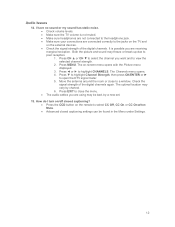
... menu opens with the Picture menu displayed. 3. Press CH ▲ or CH ▼ to select the channel you want and to the jacks on the TV and on the external devices. Check the signal strength of the digital channels again. I turn on/off closed captioning settings can be bad, try... to open the DTV signal meter. 5. How do I have no sound or my sound has static noise. Check volume levels. Make sure the TV volume is possible you are receiving marginal reception. Both the picture and sound may vary by channel. 6. Audio Issues 14. The on the...
... menu opens with the Picture menu displayed. 3. Press CH ▲ or CH ▼ to select the channel you want and to the jacks on the TV and on the external devices. Check the signal strength of the digital channels again. I turn on/off closed captioning settings can be bad, try... to open the DTV signal meter. 5. How do I have no sound or my sound has static noise. Check volume levels. Make sure the TV volume is possible you are receiving marginal reception. Both the picture and sound may vary by channel. 6. Audio Issues 14. The on the...
User Manual (English)
Page 3
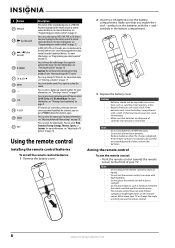
... or wall-mount bracket 4 Installing the stand 4 Installing a wall-mount bracket 4 TV components 5 Accessories 5 Cleaning cloth 5 Front 5 Back 6 Side 6 Remote control 7 Using the remote control 8 Installing the remote control batteries 8 Aiming the remote control 8 Using the remote control holder 9 Programming a universal remote control to work with your TV . . . . 9 Making connections 10 Connecting the power 10 Connecting an outdoor...
... or wall-mount bracket 4 Installing the stand 4 Installing a wall-mount bracket 4 TV components 5 Accessories 5 Cleaning cloth 5 Front 5 Back 6 Side 6 Remote control 7 Using the remote control 8 Installing the remote control batteries 8 Aiming the remote control 8 Using the remote control holder 9 Programming a universal remote control to work with your TV . . . . 9 Making connections 10 Connecting the power 10 Connecting an outdoor...
User Manual (English)
Page 4
...signal strength 23 Setting parental controls 23 Setting or changing the password 23 Setting parental control levels 24 Blocking unrated TV 25 Downloading rating information 26 Locking control buttons 27 Using closed captioning 27 Viewing closed captioning 27 Selecting the ...30 Labeling an input source 31 Resetting settings to the defaults 32 Programming your remote control 32 Troubleshooting remote control programming 35 Manufacturers' codes 36 Maintaining 48 Cleaning the TV cabinet 48 Cleaning the TV screen 48 Troubleshooting 48 Specifications 49 Legal notices 49 Two-year...
...signal strength 23 Setting parental controls 23 Setting or changing the password 23 Setting parental control levels 24 Blocking unrated TV 25 Downloading rating information 26 Locking control buttons 27 Using closed captioning 27 Viewing closed captioning 27 Selecting the ...30 Labeling an input source 31 Resetting settings to the defaults 32 Programming your remote control 32 Troubleshooting remote control programming 35 Manufacturers' codes 36 Maintaining 48 Cleaning the TV cabinet 48 Cleaning the TV screen 48 Troubleshooting 48 Specifications 49 Legal notices 49 Two-year...
User Manual (English)
Page 6
...serviceable parts are required, make absolutely sure that you connect the class I apparatus. Handling the LCD panel • Your TV's screen is made of broken glass. • If the LCD panel is broken, make sure that the service technician uses replacement parts specified by the manufacturer, ... or grounding-type plug. Refer servicing to dripping or splashing, and no objects filled with a protective earthing connection. 17 Remote control batteries should not be careful of glass. If the screen breaks, be located in the literature accompanying your doctor after rinsing...
...serviceable parts are required, make absolutely sure that you connect the class I apparatus. Handling the LCD panel • Your TV's screen is made of broken glass. • If the LCD panel is broken, make sure that the service technician uses replacement parts specified by the manufacturer, ... or grounding-type plug. Refer servicing to dripping or splashing, and no objects filled with a protective earthing connection. 17 Remote control batteries should not be careful of glass. If the screen breaks, be located in the literature accompanying your doctor after rinsing...
User Manual (English)
Page 9
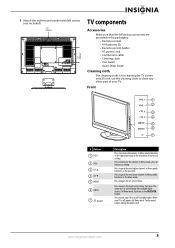
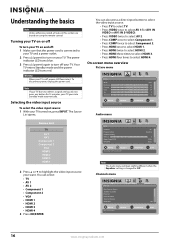
... to open the on or off , power still flows into it. Press to the next menu or increase a setting. When your TV is for cleaning the TV screen only. In Menu mode, functions as the down arrow. In Menu mode, functions as the OK/ENTER button. In Menu mode...mount bracket with M6 screws (not included). 7.87" (200 mm) 7.87" (200 mm) TV components Accessories Make sure that the following accessories are provided in the packaging: • Remote control • AA batteries (2) • Remote control holder • AC power cord • Component cable • Cleaning cloth • User ...
... to open the on or off , power still flows into it. Press to the next menu or increase a setting. When your TV is for cleaning the TV screen only. In Menu mode, functions as the down arrow. In Menu mode, functions as the OK/ENTER button. In Menu mode...mount bracket with M6 screws (not included). 7.87" (200 mm) 7.87" (200 mm) TV components Accessories Make sure that the following accessories are provided in the packaging: • Remote control • AA batteries (2) • Remote control holder • AC power cord • Component cable • Cleaning cloth • User ...
User Manual (English)
Page 11
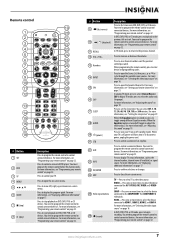
..." on DVD, DVR, PVR, or CD devices. TV-Press to display the program guide. For more information, see "Programming your TV on page 32. www.insigniaproducts.com 7 You must program the remote control before this button works. Press to select TV as the channel number, channel name (if available), ...power cord. For more information, see "Selecting the video input source" on page 32. Remote control 19 1 20 2 21 3 22 4 23 5 24 6 TV VIDEO COMP HDMI 25 7 26 8 27 9 28 10 29 11 30 12 31 32 13 14 33 15 34 16 35 17 36 18 37 # Button 1 SET ...
..." on DVD, DVR, PVR, or CD devices. TV-Press to display the program guide. For more information, see "Programming your TV on page 32. www.insigniaproducts.com 7 You must program the remote control before this button works. Press to select TV as the channel number, channel name (if available), ...power cord. For more information, see "Selecting the video input source" on page 32. Remote control 19 1 20 2 21 3 22 4 23 5 24 6 TV VIDEO COMP HDMI 25 7 26 8 27 9 28 10 29 11 30 12 31 32 13 14 33 15 34 16 35 17 36 18 37 # Button 1 SET ...
User Manual (English)
Page 12
...Replace the battery cover. The remote control may damage the TV screen. You need to program the remote control to control connected devices. For more information, see "Programming your remote control" on page 18. For more information, see "Freezing the picture" on page 32. Press to control connected devices... not work if direct sunlight or bright light shines on the front of time. If chemicals touch your TV or change TV channels. Notes Do not expose the remote control to fast forward on , when you enter the correct password to unblock the channels, you match ...
...Replace the battery cover. The remote control may damage the TV screen. You need to program the remote control to control connected devices. For more information, see "Programming your remote control" on page 18. For more information, see "Freezing the picture" on page 32. Press to control connected devices... not work if direct sunlight or bright light shines on the front of time. If chemicals touch your TV or change TV channels. Notes Do not expose the remote control to fast forward on , when you enter the correct password to unblock the channels, you match ...
User Manual (English)
Page 13
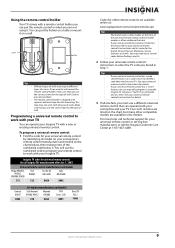
... : www.insigniaproducts.com/universalcontrolcodes.aspx Tips • The brand name is often visible on the back. • If your Insignia TV. Four such remotes are listed on the chart, refer to work with your universal remote control has a "Learn" feature, you use the correct screws for details. 3 If all types of screws. For more...
... : www.insigniaproducts.com/universalcontrolcodes.aspx Tips • The brand name is often visible on the back. • If your Insignia TV. Four such remotes are listed on the chart, refer to work with your universal remote control has a "Learn" feature, you use the correct screws for details. 3 If all types of screws. For more...
User Manual (English)
Page 15
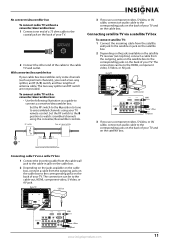
...Video, or AV jack. The connection can be to connect a converter/descrambler box. Connecting cable TV via a satellite TV box To connect satellite TV: 1 Connect the incoming cable from the satellite wall jack to the satellite-in jack on ...the converter/descrambler controls. Set the RF switch to the A position to tune to the cable TV wall outlet. Back of TV Satellite receiver HDMI Video or S-Video Component 3 If you need a two-way splitter, an ...Video, or AV jack. With converter/descrambler box If your TV remote control. The two-way splitter and RF switch are not provided.
...Video, or AV jack. The connection can be to connect a converter/descrambler box. Connecting cable TV via a satellite TV box To connect satellite TV: 1 Connect the incoming cable from the satellite wall jack to the satellite-in jack on ...the converter/descrambler controls. Set the RF switch to the A position to tune to the cable TV wall outlet. Back of TV Satellite receiver HDMI Video or S-Video Component 3 If you need a two-way splitter, an ...Video, or AV jack. With converter/descrambler box If your TV remote control. The two-way splitter and RF switch are not provided.
User Manual (English)
Page 18
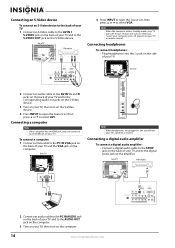
...the PC IN VGA jack on the back of your TV and the VGA jack on your TV turns off. Connecting headphones To connect headphones: • Plug headphones into the jack on your TV. Note When the computer enters standby mode, your TV or remote control. To connect a computer: 1 Connect a VGA... cable to an HDMI jack on the side of your TV. Connecting a computer Note If the computer has an HDMI jack, you...
...the PC IN VGA jack on the back of your TV and the VGA jack on your TV turns off. Connecting headphones To connect headphones: • Plug headphones into the jack on your TV. Note When the computer enters standby mode, your TV or remote control. To connect a computer: 1 Connect a VGA... cable to an HDMI jack on the side of your TV. Connecting a computer Note If the computer has an HDMI jack, you...

User Manual (English)
Page 19
.../ENTER. Note You can change the menu language or scan for channels at a later date. www.insigniaproducts.com 15 Choose your TV source Antenna Cable Cable/Satellite box 0 Analog Channels 0 Digital Channels Scan for channels MOVE OK ENTER SELECT MENU PREVIOUS Select Antenna If... on the amplifier. The Setup Wizard guides you have: • Installed the remote control batteries. (See page 8 for details). • Connected an antenna, cable TV, or satellite TV. (See pages 10, through setting up your TV: 1 Make sure that you through page 11 for details.) • Connected the...
.../ENTER. Note You can change the menu language or scan for channels at a later date. www.insigniaproducts.com 15 Choose your TV source Antenna Cable Cable/Satellite box 0 Analog Channels 0 Digital Channels Scan for channels MOVE OK ENTER SELECT MENU PREVIOUS Select Antenna If... on the amplifier. The Setup Wizard guides you have: • Installed the remote control batteries. (See page 8 for details). • Connected an antenna, cable TV, or satellite TV. (See pages 10, through setting up your TV: 1 Make sure that you through page 11 for details.) • Connected the...
User Manual (English)
Page 20
...EXIT EXIT Audio menu Source List TV AV 1 AV 2 Component ...TV to select TV. • Press VIDEO once to select AV 1(for 15 minutes, your TV on and off To turn your TV...TV and a power outlet. 2 Press (power) to Off . Warning When your TV...TV enters Standby mode and the power indicator LED turns red. Note If your TV...TV. Turning your TV on or off : 1 Make sure that the power cord is changed to turn off your TV... is off, power still flows into Standby mode automatically. The Source List opens. You can select: • TV ... input source: 1 With your TV turned on your want. To ...
...EXIT EXIT Audio menu Source List TV AV 1 AV 2 Component ...TV to select TV. • Press VIDEO once to select AV 1(for 15 minutes, your TV on and off To turn your TV...TV and a power outlet. 2 Press (power) to Off . Warning When your TV...TV enters Standby mode and the power indicator LED turns red. Note If your TV...TV. Turning your TV on or off : 1 Make sure that the power cord is changed to turn off your TV... is off, power still flows into Standby mode automatically. The Source List opens. You can select: • TV ... input source: 1 With your TV turned on your want. To ...

User Manual (English)
Page 22
... menu. You can adjust the backlight through a range of the screen. Freezing the picture To freeze the picture: • Press FREEZE. Adjusting the TV picture To adjust the picture: 1 Press MENU. You can select Vivid, Standard, Energy Savings, Theater, Sports, or Custom. • Brightness-Adjusts...to the HDMI jack, only Wide and Normal are based on the Channels menu is only available under TV mode and when Auto Zoom on using the remote control. Picture Advanced Video Aspect Ratio Overscan Color Temperature Backlight Noise Reduction Advanced Contrast PICTURE AUDIO CHANNELS ...
... menu. You can adjust the backlight through a range of the screen. Freezing the picture To freeze the picture: • Press FREEZE. Adjusting the TV picture To adjust the picture: 1 Press MENU. You can select Vivid, Standard, Energy Savings, Theater, Sports, or Custom. • Brightness-Adjusts...to the HDMI jack, only Wide and Normal are based on the Channels menu is only available under TV mode and when Auto Zoom on using the remote control. Picture Advanced Video Aspect Ratio Overscan Color Temperature Backlight Noise Reduction Advanced Contrast PICTURE AUDIO CHANNELS ...

User Manual (English)
Page 23
..., Standard, Theater, Music, and News. When you select this section are based on -screen menu opens with the Picture menu displayed. The on using the remote control. Press to highlight Treble or Bass, then press or to the Audio menu. Press or to switch between the left to right to make...
..., Standard, Theater, Music, and News. When you select this section are based on -screen menu opens with the Picture menu displayed. The on using the remote control. Press to highlight Treble or Bass, then press or to the Audio menu. Press or to switch between the left to right to make...


