FAQs (English)
Page 1
FAQs Insignia FY10 LCD TVs (NS-L19Q-10A, NS-L19W1Q-10A, NS-L22Q-10A, NS-L26Q-10A, NS-L32Q-10A, NS-L37Q-10A, NS-L42Q-10A) July 29, 2010 Setup ...1 Image/Picture Issues 5 Hardware Issues 8 Channel Issues ...8 General ...11 Audio Issues ...10A: http://insigniaproducts.com/products/televisions/NS-L19Q10A.html Insignia TV codes for universal remote controls (for all Insignia TVs manufactured after Jan. 1, 2007) Universal remote control manufacturers and models Philips PHDVD5, RCA One for All Sony PH5DSS, RCU807 URC-6690 RM-VL600 PMDVR8, PDVR8 115 135 0464 8043 Comcast M1057 0463 Set...
FAQs Insignia FY10 LCD TVs (NS-L19Q-10A, NS-L19W1Q-10A, NS-L22Q-10A, NS-L26Q-10A, NS-L32Q-10A, NS-L37Q-10A, NS-L42Q-10A) July 29, 2010 Setup ...1 Image/Picture Issues 5 Hardware Issues 8 Channel Issues ...8 General ...11 Audio Issues ...10A: http://insigniaproducts.com/products/televisions/NS-L19Q10A.html Insignia TV codes for universal remote controls (for all Insignia TVs manufactured after Jan. 1, 2007) Universal remote control manufacturers and models Philips PHDVD5, RCA One for All Sony PH5DSS, RCU807 URC-6690 RM-VL600 PMDVR8, PDVR8 115 135 0464 8043 Comcast M1057 0463 Set...
FAQs (English)
Page 3
... sure you through this process? Connect an S-Video cable to the S-VIDEO jack on the back of your TV and to the S-Video Out jack on the A/V device. Setting Up Channels: o Are you using a cable/satellite box, cable connected directly to help selecting the best connection?... To get the best digital audio and picture, use the remote that came with the Picture menu displayed. 2. The Channels menu opens. 3....
... sure you through this process? Connect an S-Video cable to the S-VIDEO jack on the back of your TV and to the S-Video Out jack on the A/V device. Setting Up Channels: o Are you using a cable/satellite box, cable connected directly to help selecting the best connection?... To get the best digital audio and picture, use the remote that came with the Picture menu displayed. 2. The Channels menu opens. 3....
FAQs (English)
Page 4
.... What type of cable are you using? o HDMI Cable 1. b. Connect an S-Video cable to the S-VIDEO jack on the back of your TV and to the Audio Out jacks on the SVideo Device. 3. Press ◄ or ► to open the Auto Channel Search screen. 4. Press ▼ ... opens with the device for further instructions. See the documentation that came with the Picture menu displayed. 2. o Component Video Cables are red and white. 1. Connect a component video cable to the COMPONENT jacks on the HDMI device, then set it to the correct mode. To play from a S-video device: a. The...
.... What type of cable are you using? o HDMI Cable 1. b. Connect an S-Video cable to the S-VIDEO jack on the back of your TV and to the Audio Out jacks on the SVideo Device. 3. Press ◄ or ► to open the Auto Channel Search screen. 4. Press ▼ ... opens with the device for further instructions. See the documentation that came with the Picture menu displayed. 2. o Component Video Cables are red and white. 1. Connect a component video cable to the COMPONENT jacks on the HDMI device, then set it to the correct mode. To play from a S-video device: a. The...

FAQs (English)
Page 5
...with the device for further instructions. 4. Turn on the NS-L37Q-10A and NS-L42Q-10A. The screws go in the bottom of the base. The stand comes pre-installed on the A/V device, then set . If you want and to the AV...10A, NS-L22Q-10A o To attach your TV screen face-down on your TV, then press VIDEO to the aspect ratio. To play from damages and scratches. 2. An increasing amount of the channel may be changed as you are receiving marginal reception. o Wide: Displays a full-screen image. Connect A/V cables to view the selected channel strength. 5 My picture...
...with the device for further instructions. 4. Turn on the NS-L37Q-10A and NS-L42Q-10A. The screws go in the bottom of the base. The stand comes pre-installed on the A/V device, then set . If you want and to the AV...10A, NS-L22Q-10A o To attach your TV screen face-down on your TV, then press VIDEO to the aspect ratio. To play from damages and scratches. 2. An increasing amount of the channel may be changed as you are receiving marginal reception. o Wide: Displays a full-screen image. Connect A/V cables to view the selected channel strength. 5 My picture...
FAQs (English)
Page 6
...more directional than VHF (channels 2-13) and more information about antennas and the available channels in signal amplifier. o Reception can be bad, try a new set -top antenna that says "No signal". o Make sure your antenna and the broadcast tower. I have an image issue (e.g., stripe on your roof or...close the menu. o Check the signal strength of the digital channels again. The on the TV. The cables you are using an antenna, the signal strength of digital signals, both the picture and sound might freeze or break up both VHF and UHF. Check the signal strength of...
...more directional than VHF (channels 2-13) and more information about antennas and the available channels in signal amplifier. o Reception can be bad, try a new set -top antenna that says "No signal". o Make sure your antenna and the broadcast tower. I have an image issue (e.g., stripe on your roof or...close the menu. o Check the signal strength of the digital channels again. The on the TV. The cables you are using an antenna, the signal strength of digital signals, both the picture and sound might freeze or break up both VHF and UHF. Check the signal strength of...
FAQs (English)
Page 7
... watchable. The Channels menu opens. 4. The optimal location may be more sensitive to a window. OR Use a set -top antenna designed to pick up both the picture and sound might freeze or break up to determine which device is causing the interference. Try turning one device off at...attic o For more difficult than VHF. broadcast tower. Contact your cable connections are connected securely. If you are receiving service from the TV to view the selected channel strength. 2. Press ◄ or ► to open the DTV signal meter. 5. o Check the signal strength of...
... watchable. The Channels menu opens. 4. The optimal location may be more sensitive to a window. OR Use a set -top antenna designed to pick up both the picture and sound might freeze or break up to determine which device is causing the interference. Try turning one device off at...attic o For more difficult than VHF. broadcast tower. Contact your cable connections are connected securely. If you are receiving service from the TV to view the selected channel strength. 2. Press ◄ or ► to open the DTV signal meter. 5. o Check the signal strength of...
FAQs (English)
Page 12
... the remote to poor reception. 1. Both the picture and sound may vary by channel. 6. Press MENU. The optimal location may freeze or break up due to select CC Off, CC On or CC On when Mute. Advanced closed captioning settings can be bad, try a new set. 15. Audio Issues 14. Press ▼... How do I have no sound or my sound has static noise. Check volume levels. Make sure the TV volume is possible you are connected correctly to a window. It is not muted. Make sure headphones are not connected to the headphone jack. ...
... the remote to poor reception. 1. Both the picture and sound may vary by channel. 6. Press MENU. The optimal location may freeze or break up due to select CC Off, CC On or CC On when Mute. Advanced closed captioning settings can be bad, try a new set. 15. Audio Issues 14. Press ▼... How do I have no sound or my sound has static noise. Check volume levels. Make sure the TV volume is possible you are connected correctly to a window. It is not muted. Make sure headphones are not connected to the headphone jack. ...
User Manual (English)
Page 4
Contents Adjusting the TV picture 18 Adjusting Advanced Video settings 18 Freezing the picture 18 Adjusting the sound 19 Adjusting the sound 19 Playing TV audio only 19 Changing channel settings 20 Automatically scanning for channels 20 Hiding channels 21 Setting up a favorite channel list 21 Viewing a favorite channel 22 Adding or changing a channel label 22 Checking the DTV signal...
Contents Adjusting the TV picture 18 Adjusting Advanced Video settings 18 Freezing the picture 18 Adjusting the sound 19 Adjusting the sound 19 Playing TV audio only 19 Changing channel settings 20 Automatically scanning for channels 20 Hiding channels 21 Setting up a favorite channel list 21 Viewing a favorite channel 22 Adding or changing a channel label 22 Checking the DTV signal...

User Manual (English)
Page 12
...VOL- 9 MUTE 10 MENU 11 12 OK/ENTER 13 INPUT 14 TV 15 VIDEO 16 FREEZE 17 CCD 18 PICT 19 ZOOM 20 RECALL 21 CH /CH 22 GUIDE 23 EXIT 24 INFO 25 HDMI 26 COMP 8 Description Press to..., CC On, or CC On when Mute. In TV mode, press to return to select the video mode. Press one or more information, see "Adjusting Advanced Video settings" on -screen menu. Make sure that batteries are... Press to be exposed to open the on the batteries with a cloth. For more information, see "Adjusting the TV picture" on page 17. Press to select the device connected the AV 1 IN VIDEO or S-VIDEO jack or the...
...VOL- 9 MUTE 10 MENU 11 12 OK/ENTER 13 INPUT 14 TV 15 VIDEO 16 FREEZE 17 CCD 18 PICT 19 ZOOM 20 RECALL 21 CH /CH 22 GUIDE 23 EXIT 24 INFO 25 HDMI 26 COMP 8 Description Press to..., CC On, or CC On when Mute. In TV mode, press to return to select the video mode. Press one or more information, see "Adjusting Advanced Video settings" on -screen menu. Make sure that batteries are... Press to be exposed to open the on the batteries with a cloth. For more information, see "Adjusting the TV picture" on page 17. Press to select the device connected the AV 1 IN VIDEO or S-VIDEO jack or the...
User Manual (English)
Page 20
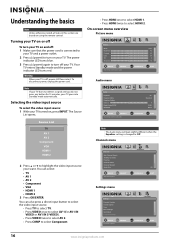
... Add/Skip Channels Favorites Channel Labels Channel Strength Audio Only PICTURE AUDIO CHANNELS SETTINGS Off MOVE OK ENTER SELECT Adjust channel options MENU PREVIOUS EXIT EXIT Settings menu Settings Parental Controls Closed Caption Time Menu Settings Input labels Computer Settings PICTURE AUDIO CHANNELS SETTINGS MOVE OK ENTER SELECT Set various TV options MENU PREVIOUS EXIT EXIT 16 www.insigniaproducts.com
... Add/Skip Channels Favorites Channel Labels Channel Strength Audio Only PICTURE AUDIO CHANNELS SETTINGS Off MOVE OK ENTER SELECT Adjust channel options MENU PREVIOUS EXIT EXIT Settings menu Settings Parental Controls Closed Caption Time Menu Settings Input labels Computer Settings PICTURE AUDIO CHANNELS SETTINGS MOVE OK ENTER SELECT Set various TV options MENU PREVIOUS EXIT EXIT 16 www.insigniaproducts.com

User Manual (English)
Page 22
...TV picture To adjust the picture: 1 Press MENU. Note • You may damage your TV switches to Custom mode automatically. 3 Press or to modify a scale or to move up or down to see "Adjusting Advanced Video settings" on -screen menu opens with the Picture menu displayed. For more information, see all picture settings... to make a choice in a submenu. 4 Press MENU to go to the previous menu or EXIT to close the menu. Press or to move from a list of choices in Vivid, Standard, Energy Savings, Theater, or Sports mode, your TV's screen. 18...
...TV picture To adjust the picture: 1 Press MENU. Note • You may damage your TV switches to Custom mode automatically. 3 Press or to modify a scale or to move up or down to see "Adjusting Advanced Video settings" on -screen menu opens with the Picture menu displayed. For more information, see all picture settings... to make a choice in a submenu. 4 Press MENU to go to the previous menu or EXIT to close the menu. Press or to move from a list of choices in Vivid, Standard, Energy Savings, Theater, or Sports mode, your TV's screen. 18...
User Manual (English)
Page 23
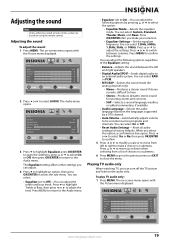
... your selection. • Equalizer Settings-Set the equalizer frequency. To play TV audio only: 1 Press MENU. The on the languages supported by pressing or to select the option: • Equalizer Mode-Selects the equalizer mode. Audio Equalizer Equalizer Mode Equalizer Setting Balance Digital Audio/SPDIF MTS/SAP PICTURE AUDIO CHANNELS SETTINGS On Standard 0 RAW Mono MOVE...
... your selection. • Equalizer Settings-Set the equalizer frequency. To play TV audio only: 1 Press MENU. The on the languages supported by pressing or to select the option: • Equalizer Mode-Selects the equalizer mode. Audio Equalizer Equalizer Mode Equalizer Setting Balance Digital Audio/SPDIF MTS/SAP PICTURE AUDIO CHANNELS SETTINGS On Standard 0 RAW Mono MOVE...
User Manual (English)
Page 24
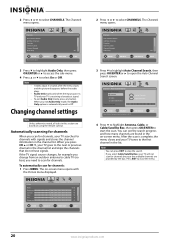
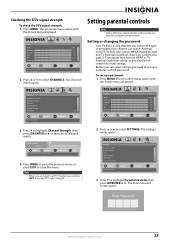
...or CH , your TV searches for standard or HD TV EXIT EXIT 4 Press to highlight Antenna, Cable, or Cable/Satellite Box, then press OK/ENTER to open the Auto Channel Search screen. The on -screen menu. The Channels menu opens. PICTURE AUDIO CHANNELS SETTINGS Channels Auto Channel Search ...Choose your TV will not scan for channels. Press EXIT to select On or Off. Channels Auto Channel Search Add/Skip Channels...
...or CH , your TV searches for standard or HD TV EXIT EXIT 4 Press to highlight Antenna, Cable, or Cable/Satellite Box, then press OK/ENTER to open the Auto Channel Search screen. The on -screen menu. The Channels menu opens. PICTURE AUDIO CHANNELS SETTINGS Channels Auto Channel Search ...Choose your TV will not scan for channels. Press EXIT to select On or Off. Channels Auto Channel Search Add/Skip Channels...
User Manual (English)
Page 25
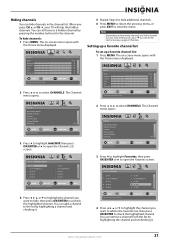
....com 21 You can hide channels in the channel list. The on how many channels are in your TV will skip the hidden channels. Note Depending on -screen menu opens with the Picture menu displayed. You can add a channel to the list by highlighting a channel and checking it . ...Favorites, then press OK/ENTER or to check the highlighted channel. Channels Favorites Ch 5-0 Ch 9-1 WWOR DT Ch 10-0 Ch 60-2 Ch 60-4 PICTURE AUDIO CHANNELS SETTINGS Ch 9-0 Ch 9-2 WNYW DT Ch 60-1 Ch 60-3 Ch 60-7 MOVE OK ENTER SELECT Add channels to create a favorites list MENU PREVIOUS ...
....com 21 You can hide channels in the channel list. The on how many channels are in your TV will skip the hidden channels. Note Depending on -screen menu opens with the Picture menu displayed. You can add a channel to the list by highlighting a channel and checking it . ...Favorites, then press OK/ENTER or to check the highlighted channel. Channels Favorites Ch 5-0 Ch 9-1 WWOR DT Ch 10-0 Ch 60-2 Ch 60-4 PICTURE AUDIO CHANNELS SETTINGS Ch 9-0 Ch 9-2 WNYW DT Ch 60-1 Ch 60-3 Ch 60-7 MOVE OK ENTER SELECT Add channels to create a favorites list MENU PREVIOUS ...
User Manual (English)
Page 26
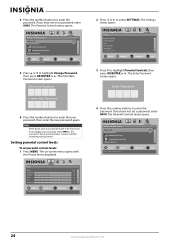
...EXIT to close the Favorites list. Channels Channels Labels PICTURE AUDIO CHANNELS SETTINGS Ch 5-0 ABC MOVE OK ENTER SELECT MENU PREVIOUS EXIT...MENU. Picture Mode Brightness Contrast Color Tint Sharpness PICTURE AUDIO CHANNELS SETTINGS Vivid 42 45 54 0 +5 MOVE OK ENTER SELECT Adjust settings to affect picture quality...Channels Favorites Channel Labels Channel Strength Audio Only PICTURE AUDIO CHANNELS SETTINGS Off MOVE OK ENTER SELECT Adjust channel options ...Note Depending on -screen menu opens with the Picture menu displayed. 5 Repeat Step 4 to add additional channels. ...
...EXIT to close the Favorites list. Channels Channels Labels PICTURE AUDIO CHANNELS SETTINGS Ch 5-0 ABC MOVE OK ENTER SELECT MENU PREVIOUS EXIT...MENU. Picture Mode Brightness Contrast Color Tint Sharpness PICTURE AUDIO CHANNELS SETTINGS Vivid 42 45 54 0 +5 MOVE OK ENTER SELECT Adjust settings to affect picture quality...Channels Favorites Channel Labels Channel Strength Audio Only PICTURE AUDIO CHANNELS SETTINGS Off MOVE OK ENTER SELECT Adjust channel options ...Note Depending on -screen menu opens with the Picture menu displayed. 5 Repeat Step 4 to add additional channels. ...
User Manual (English)
Page 27
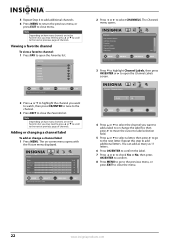
... 0 +5 MOVE OK ENTER SELECT Adjust settings to affect picture quality MENU PREVIOUS EXIT EXIT 3 Press to highlight Channel Strength, then press OK/ENTER or to select CHANNELS. The Settings menu opens. Settings Parental Controls Closed Caption Time Menu Settings Input labels Computer Settings PICTURE AUDIO CHANNELS SETTINGS MOVE OK ENTER SELECT Set various TV options MENU PREVIOUS EXIT EXIT 3 Press...
... 0 +5 MOVE OK ENTER SELECT Adjust settings to affect picture quality MENU PREVIOUS EXIT EXIT 3 Press to highlight Channel Strength, then press OK/ENTER or to select CHANNELS. The Settings menu opens. Settings Parental Controls Closed Caption Time Menu Settings Input labels Computer Settings PICTURE AUDIO CHANNELS SETTINGS MOVE OK ENTER SELECT Set various TV options MENU PREVIOUS EXIT EXIT 3 Press...
User Manual (English)
Page 28
... PREVIOUS EXIT EXIT 3 Press to enter the new password, then enter the new password again. The Parental Controls menu opens. Settings Parental Controls PICTURE AUDIO CHANNELS SETTINGS Button Lock Off Block Unrated TV Off USA Parental Locks Canadian Parental Locks Change Password MOVE OK ENTER SELECT Lock or unlock the buttons on -screen menu...
... PREVIOUS EXIT EXIT 3 Press to enter the new password, then enter the new password again. The Parental Controls menu opens. Settings Parental Controls PICTURE AUDIO CHANNELS SETTINGS Button Lock Off Block Unrated TV Off USA Parental Locks Canadian Parental Locks Change Password MOVE OK ENTER SELECT Lock or unlock the buttons on -screen menu...
User Manual (English)
Page 29
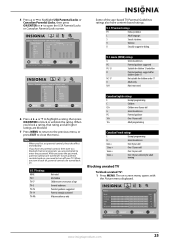
... Controls USA Parental Locks Movie Rating None G PG NC-17 PG-13 R X TV Ratings All FV L S V D None TV-Y TV-Y7 TV-G TV-PG TV-14 TV-MA MOVE OK ENTER SELECT Restrict movie and TV programs by US Ratings MENU PREVIOUS EXIT EXIT PICTURE AUDIO CHANNELS SETTINGS Settings Parental Controls Canadian Parental Locks English Rating French Rating E E C G C8+ 8 ans+ G 13 ans...
... Controls USA Parental Locks Movie Rating None G PG NC-17 PG-13 R X TV Ratings All FV L S V D None TV-Y TV-Y7 TV-G TV-PG TV-14 TV-MA MOVE OK ENTER SELECT Restrict movie and TV programs by US Ratings MENU PREVIOUS EXIT EXIT PICTURE AUDIO CHANNELS SETTINGS Settings Parental Controls Canadian Parental Locks English Rating French Rating E E C G C8+ 8 ans+ G 13 ans...
User Manual (English)
Page 30
...Settings Input labels Computer Settings PICTURE AUDIO CHANNELS SETTINGS MOVE OK ENTER SELECT Set various TV options MENU PREVIOUS EXIT EXIT 3 Press to highlight Parental Controls, then press OK/ENTER or . Settings Parental Controls Closed Caption Time Menu Settings Input labels Computer Settings PICTURE AUDIO CHANNELS SETTINGS MOVE OK ENTER SELECT Set various TV... the number buttons to select SETTINGS. The Parental Controls menu opens. Settings Parental Controls PICTURE AUDIO CHANNELS SETTINGS Button Lock Off Block Unrated TV Off USA Parental Locks Canadian Parental...
...Settings Input labels Computer Settings PICTURE AUDIO CHANNELS SETTINGS MOVE OK ENTER SELECT Set various TV options MENU PREVIOUS EXIT EXIT 3 Press to highlight Parental Controls, then press OK/ENTER or . Settings Parental Controls Closed Caption Time Menu Settings Input labels Computer Settings PICTURE AUDIO CHANNELS SETTINGS MOVE OK ENTER SELECT Set various TV... the number buttons to select SETTINGS. The Parental Controls menu opens. Settings Parental Controls PICTURE AUDIO CHANNELS SETTINGS Button Lock Off Block Unrated TV Off USA Parental Locks Canadian Parental...
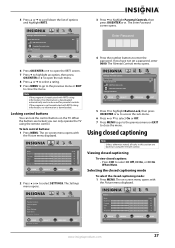
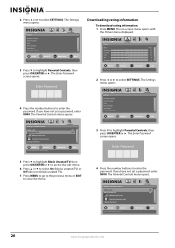
User Manual (English)
Page 31
... To view closed captioning mode: 1 Press MENU. The on using the remote control. Settings Parental Controls PICTURE AUDIO CHANNELS SETTINGS Button Lock Off Block Unrated TV Off USA Parental Locks Canadian Parental Locks Change Password MOVE OK ENTER SELECT Lock or unlock...or EXIT to highlight Parental Controls, then press OK/ENTER or . Settings Parental Controls Closed Caption Time Menu Settings Input labels Computer Settings PICTURE AUDIO CHANNELS SETTINGS MOVE OK ENTER SELECT Set various TV options MENU PREVIOUS EXIT EXIT Enter Password 4 Press the number buttons to...
... To view closed captioning mode: 1 Press MENU. The on using the remote control. Settings Parental Controls PICTURE AUDIO CHANNELS SETTINGS Button Lock Off Block Unrated TV Off USA Parental Locks Canadian Parental Locks Change Password MOVE OK ENTER SELECT Lock or unlock...or EXIT to highlight Parental Controls, then press OK/ENTER or . Settings Parental Controls Closed Caption Time Menu Settings Input labels Computer Settings PICTURE AUDIO CHANNELS SETTINGS MOVE OK ENTER SELECT Set various TV options MENU PREVIOUS EXIT EXIT Enter Password 4 Press the number buttons to...

