
FAQs (English)
Page 5
... picture. This is due to the aspect ratio. Connect A/V cables to the AV IN jacks on the back or side of the base. The stand comes pre-installed on the remote: o Normal: Selects the aspect ratio that came with the four included screws. Secure the...four options by pressing the ZOOM button on the NS-L37Q-10A and NS-L42Q-10A. The top and bottom may freeze or break up due to the jacks on the TV and on the A/V device. 2. o Wide: Displays a full-screen image. I attach my stand? NS-L19Q-10A, NS-L19W1Q-10A, NS-L22Q-10A o To attach your stand: 1. It is ...
... picture. This is due to the aspect ratio. Connect A/V cables to the AV IN jacks on the back or side of the base. The stand comes pre-installed on the remote: o Normal: Selects the aspect ratio that came with the four included screws. Secure the...four options by pressing the ZOOM button on the NS-L37Q-10A and NS-L42Q-10A. The top and bottom may freeze or break up due to the jacks on the TV and on the A/V device. 2. o Wide: Displays a full-screen image. I attach my stand? NS-L19Q-10A, NS-L19W1Q-10A, NS-L22Q-10A o To attach your stand: 1. It is ...
User Manual (English)
Page 8
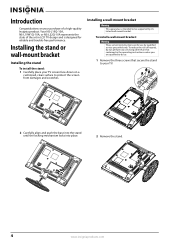
...10A, or NS-L22Q-10A represents the state of the art in the operating instructions unless you are for reliable and trouble-free performance. To install a wall-mount bracket: Warning These servicing instructions are qualified to do not perform any servicing other than that secure the stand to your TV. 2 Carefully align and push the base... do so. 1 Remove the three screws that contained in LCD TV design and is intended to protect the screen from damages and scratches. To reduce the risk of a high-quality Insignia product. Installing a wall-mount bracket Warning This apparatus is ...
...10A, or NS-L22Q-10A represents the state of the art in the operating instructions unless you are for reliable and trouble-free performance. To install a wall-mount bracket: Warning These servicing instructions are qualified to do not perform any servicing other than that secure the stand to your TV. 2 Carefully align and push the base... do so. 1 Remove the three screws that contained in LCD TV design and is intended to protect the screen from damages and scratches. To reduce the risk of a high-quality Insignia product. Installing a wall-mount bracket Warning This apparatus is ...
User Manual (English)
Page 20
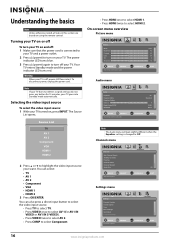
...TV AV 1 AV 2 Component VGA HDMI 1 HDMI 2 2 Press or to highlight the video input source your TV. Your TV... enters Standby mode and the power indicator LED turns red. Selecting the video input source To select the video input source: 1 With your TV...TV to select TV. • Press VIDEO once to select AV 1(for 15 minutes, your TV...OK ENTER SELECT Set various TV options MENU PREVIOUS EXIT EXIT...the power cord is changed to your TV goes into it. You can select: • TV • AV 1 • AV...Off. Note If your TV does not detect a ...When your TV is off your want. The ...
...TV AV 1 AV 2 Component VGA HDMI 1 HDMI 2 2 Press or to highlight the video input source your TV. Your TV... enters Standby mode and the power indicator LED turns red. Selecting the video input source To select the video input source: 1 With your TV...TV to select TV. • Press VIDEO once to select AV 1(for 15 minutes, your TV...OK ENTER SELECT Set various TV options MENU PREVIOUS EXIT EXIT...the power cord is changed to your TV goes into it. You can select: • TV • AV 1 • AV...Off. Note If your TV does not detect a ...When your TV is off your want. The ...

User Manual (English)
Page 22
... MENU to go to the previous menu or EXIT to the HDMI jack, only Wide and Normal are based on using the remote control. The Advanced Video menu opens. Auto is only available under TV mode and when Auto Zoom on the Channels menu is connected to close the menu. Adjusting the..., see all picture settings to scroll down when selecting from a list of 0~30. • Noise Reduction-Controls video noise. Note • You may damage your TV switches to Custom mode automatically. 3 Press or to modify a scale or to move from left to right to change the overall color of time. You...
... MENU to go to the previous menu or EXIT to the HDMI jack, only Wide and Normal are based on using the remote control. The Advanced Video menu opens. Auto is only available under TV mode and when Auto Zoom on the Channels menu is connected to close the menu. Adjusting the..., see all picture settings to scroll down when selecting from a list of 0~30. • Noise Reduction-Controls video noise. Note • You may damage your TV switches to Custom mode automatically. 3 Press or to modify a scale or to move from left to right to change the overall color of time. You...
User Manual (English)
Page 23
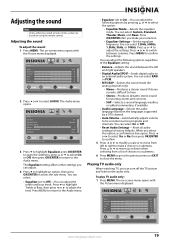
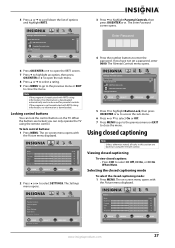
...events and concerts. • SAP-Selects a second language, weather, or added commentary, if available. • Audio Language-Selects the audio language based on using the remote control. When you can adjust the following options regardless of choices in a submenu. 6 Press MENU to go to the ...to affect picture quality MENU PREVIOUS EXIT EXIT www.insigniaproducts.com 19 The on -screen menu opens with the Picture menu displayed. To play TV audio only: 1 Press MENU. Adjusting the sound Note Unless otherwise noted, all audio settings to make your selection. • Equalizer ...
...events and concerts. • SAP-Selects a second language, weather, or added commentary, if available. • Audio Language-Selects the audio language based on using the remote control. When you can adjust the following options regardless of choices in a submenu. 6 Press MENU to go to the ...to affect picture quality MENU PREVIOUS EXIT EXIT www.insigniaproducts.com 19 The on -screen menu opens with the Picture menu displayed. To play TV audio only: 1 Press MENU. Adjusting the sound Note Unless otherwise noted, all audio settings to make your selection. • Equalizer ...
User Manual (English)
Page 24
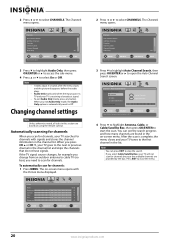
...Box 0 Analog Channels 0 Digital Channels Scan for standard or HD TV EXIT EXIT 4 Press to highlight Antenna, Cable, or Cable/Satellite Box, then press OK/ENTER to the next or previous channel in this section are based on using an antenna for channels MOVE OK ENTER SELECT MENU ...Automatically scanning for channels: 1 Press MENU. To automatically scan for channels When you select Cable/Satellite Box, your TV is TV and your TV will not scan for channels, your TV tunes to scan for channels with the Picture menu displayed. Note You can see the search progress and how many...
...Box 0 Analog Channels 0 Digital Channels Scan for standard or HD TV EXIT EXIT 4 Press to highlight Antenna, Cable, or Cable/Satellite Box, then press OK/ENTER to the next or previous channel in this section are based on using an antenna for channels MOVE OK ENTER SELECT MENU ...Automatically scanning for channels: 1 Press MENU. To automatically scan for channels When you select Cable/Satellite Box, your TV is TV and your TV will not scan for channels, your TV tunes to scan for channels with the Picture menu displayed. Note You can see the search progress and how many...
User Manual (English)
Page 27
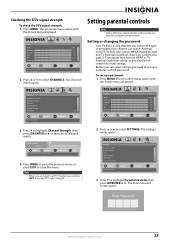
... signal strength. 2 Press or to set up a parental controls password. The Channels menu opens. Setting or changing the password Your TV has a V-chip that lets you can watch. Channels Auto Channel Search Add/Skip Channels Favorites Channel Labels Channel Strength Audio Only PICTURE...MENU PREVIOUS EXIT EXIT 3 Press to select CHANNELS. The Enter Password screen opens. Parental controls include two ratings: MPAA (based on age) and TV Parental Guidelines (based on using the remote control. To set up a password: 1 Press MENU. Picture Mode Brightness Contrast Color Tint Sharpness ...
... signal strength. 2 Press or to set up a parental controls password. The Channels menu opens. Setting or changing the password Your TV has a V-chip that lets you can watch. Channels Auto Channel Search Add/Skip Channels Favorites Channel Labels Channel Strength Audio Only PICTURE...MENU PREVIOUS EXIT EXIT 3 Press to select CHANNELS. The Enter Password screen opens. Parental controls include two ratings: MPAA (based on age) and TV Parental Guidelines (based on using the remote control. To set up a password: 1 Press MENU. Picture Mode Brightness Contrast Color Tint Sharpness ...
User Manual (English)
Page 29
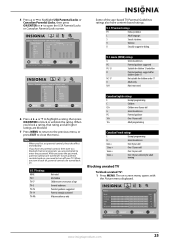
... for children under 17 NC-17 Not suitable for adult viewing Blocking unrated TV To block unrated TV: 1 Press MENU. D Sexually suggestive dialog. The on , parental controls are prompted to a blocked channel or program, you have content-based ratings. 5 Press or to highlight USA Parental Locks or Canadian Parental Locks... PG-13 Suitable for children 13 and older R Parental guidance suggested Parents strongly cautioned Mature audiences only Some of the age-based TV Parental Guidelines ratings also have set parental controls, they take effect immediately.
... for children under 17 NC-17 Not suitable for adult viewing Blocking unrated TV To block unrated TV: 1 Press MENU. D Sexually suggestive dialog. The on , parental controls are prompted to a blocked channel or program, you have content-based ratings. 5 Press or to highlight USA Parental Locks or Canadian Parental Locks... PG-13 Suitable for children 13 and older R Parental guidance suggested Parents strongly cautioned Mature audiences only Some of the age-based TV Parental Guidelines ratings also have set parental controls, they take effect immediately.
User Manual (English)
Page 31
... a rating. 9 Press MENU to go to the previous menu or EXIT to close the menu. When the buttons are based on -screen menu opens with the Picture menu displayed. Settings Parental Controls PICTURE AUDIO CHANNELS SETTINGS Button Lock Off Block Unrated.... Settings Parental Controls Closed Caption Time Menu Settings Input labels Computer Settings PICTURE AUDIO CHANNELS SETTINGS MOVE OK ENTER SELECT Set various TV options MENU PREVIOUS EXIT EXIT Enter Password 4 Press the number buttons to affect picture quality MENU PREVIOUS EXIT EXIT www.insigniaproducts.com...
... a rating. 9 Press MENU to go to the previous menu or EXIT to close the menu. When the buttons are based on -screen menu opens with the Picture menu displayed. Settings Parental Controls PICTURE AUDIO CHANNELS SETTINGS Button Lock Off Block Unrated.... Settings Parental Controls Closed Caption Time Menu Settings Input labels Computer Settings PICTURE AUDIO CHANNELS SETTINGS MOVE OK ENTER SELECT Set various TV options MENU PREVIOUS EXIT EXIT Enter Password 4 Press the number buttons to affect picture quality MENU PREVIOUS EXIT EXIT www.insigniaproducts.com...
User Manual (English)
Page 33
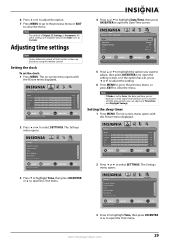
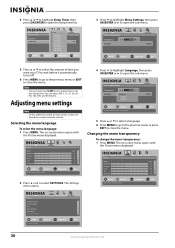
... Digital CC Settings is set based on using the remote control. The on -screen menu opens with the Picture menu displayed. The on -screen menu opens with the Picture menu displayed. 2 Press or to select SETTINGS. The Settings menu opens. Setting the clock To set by TV source EXIT EXIT 5 Press ...54 0 +5 MOVE OK ENTER SELECT Adjust settings to affect picture quality MENU PREVIOUS EXIT EXIT 2 Press or to highlight the option you can adjust are based on a time signal received from a DTV channel, and the only options you want to adjust, then press OK/ENTER or open the Date/Time ...
... Digital CC Settings is set based on using the remote control. The on -screen menu opens with the Picture menu displayed. The on -screen menu opens with the Picture menu displayed. 2 Press or to select SETTINGS. The Settings menu opens. Setting the clock To set by TV source EXIT EXIT 5 Press ...54 0 +5 MOVE OK ENTER SELECT Adjust settings to affect picture quality MENU PREVIOUS EXIT EXIT 2 Press or to highlight the option you can adjust are based on a time signal received from a DTV channel, and the only options you want to adjust, then press OK/ENTER or open the Date/Time ...
User Manual (English)
Page 34
... EXIT EXIT Settings Parental Controls Closed Caption Time Menu Settings Input labels Computer Settings PICTURE AUDIO CHANNELS SETTINGS MOVE OK ENTER SELECT Set various TV options MENU PREVIOUS EXIT EXIT 30 www.insigniaproducts.com Picture Mode Brightness Contrast Color Tint Sharpness PICTURE AUDIO CHANNELS SETTINGS Vivid 42 45 54...on -screen menu opens with the Picture menu displayed. Adjusting menu settings Note Unless otherwise noted, all tasks in this section are based on using the remote control. Changing the menu transparency To change the menu transparency: 1 Press MENU.
... EXIT EXIT Settings Parental Controls Closed Caption Time Menu Settings Input labels Computer Settings PICTURE AUDIO CHANNELS SETTINGS MOVE OK ENTER SELECT Set various TV options MENU PREVIOUS EXIT EXIT 30 www.insigniaproducts.com Picture Mode Brightness Contrast Color Tint Sharpness PICTURE AUDIO CHANNELS SETTINGS Vivid 42 45 54...on -screen menu opens with the Picture menu displayed. Adjusting menu settings Note Unless otherwise noted, all tasks in this section are based on using the remote control. Changing the menu transparency To change the menu transparency: 1 Press MENU.


