User Manual (English)
Page 2
NS-L19X-10A_09-0241_MAN_V2_English.book Page i Tuesday, April 7, 2009 9:29 AM Contents CHILD SAFETY 1 Important safety instructions 2 Warnings 2 Cautions 3 Introduction 4 Installing the stand or wall-mount bracket 4 Installing the stand 4 Installing a wall-mount bracket 4 Adjusting the viewing angle 4 Replacing the decorative faceplate 4 Replacing the decorative faceplate 4 TV... components 5 Accessories 5 Front 5 Side buttons 5 Back 6 Remote control 6 Using the remote control 7 Installing the remote control ...
NS-L19X-10A_09-0241_MAN_V2_English.book Page i Tuesday, April 7, 2009 9:29 AM Contents CHILD SAFETY 1 Important safety instructions 2 Warnings 2 Cautions 3 Introduction 4 Installing the stand or wall-mount bracket 4 Installing the stand 4 Installing a wall-mount bracket 4 Adjusting the viewing angle 4 Replacing the decorative faceplate 4 Replacing the decorative faceplate 4 TV... components 5 Accessories 5 Front 5 Side buttons 5 Back 6 Remote control 6 Using the remote control 7 Installing the remote control ...
User Manual (English)
Page 3
NS-L19X-10A_09-0241_MAN_V2_English.book Page ii Tuesday, April 7, 2009 9:29 AM Contents Adjusting the picture 16 Adjusting the TV picture 16 Adjusting Advanced Video settings 16 Adjusting the computer image 17 Adjusting component settings 17 Adjusting the sound 18 Adjusting the sound 18 Selecting the audio mode 18 Playing TV audio only 19...changing the password 22 Turning the button lock on or off 22 Blocking unrated TV 23 Setting parental control levels 23 Downloading rating information 24 Using closed captioning 25 Turning closed captioning on or off 25 Setting the analog ...
NS-L19X-10A_09-0241_MAN_V2_English.book Page ii Tuesday, April 7, 2009 9:29 AM Contents Adjusting the picture 16 Adjusting the TV picture 16 Adjusting Advanced Video settings 16 Adjusting the computer image 17 Adjusting component settings 17 Adjusting the sound 18 Adjusting the sound 18 Selecting the audio mode 18 Playing TV audio only 19...changing the password 22 Turning the button lock on or off 22 Blocking unrated TV 23 Setting parental control levels 23 Downloading rating information 24 Using closed captioning 25 Turning closed captioning on or off 25 Setting the analog ...
User Manual (English)
Page 5
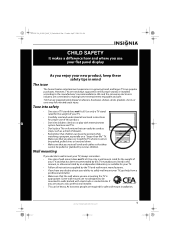
...system furniture and TVs. • Don't place TVs on or play with steel studs or cinder blocks. Use only a TV stand rated for the weight of your TV. • Carefully read and understand all enclosed instructions for the weight of TV stand does not fit all . NS-L19X-10A_09-0241_MAN_V2_English.book... Page 1 Tuesday, April 7, 2009 9:29 AM f CHILD SAFETY It makes a difference how and where you use of this manual, or otherwise listed by an independent ...
...system furniture and TVs. • Don't place TVs on or play with steel studs or cinder blocks. Use only a TV stand rated for the weight of your TV. • Carefully read and understand all enclosed instructions for the weight of TV stand does not fit all . NS-L19X-10A_09-0241_MAN_V2_English.book... Page 1 Tuesday, April 7, 2009 9:29 AM f CHILD SAFETY It makes a difference how and where you use of this manual, or otherwise listed by an independent ...
User Manual (English)
Page 6
...exposed to prevent possible electric shock. Also, if the liquid gets in the literature accompanying your doctor after rinsing for your TV. NS-L19X-10A_09-0241_MAN_V2_English.book Page 2 Tuesday, April 7, 2009 9:29 AM Important safety instructions CAUTION RISK OF ELECTRIC SHOCK DO NOT ...a class I apparatus need to be careful of the polarized or grounding-type plug. Handling the LCD panel • Your TV's screen is used, use attachments/accessories specified by the manufacturer. 12 Use only with a cart, stand, tripod, bracket, or table specified by the manufacturer that produce ...
...exposed to prevent possible electric shock. Also, if the liquid gets in the literature accompanying your doctor after rinsing for your TV. NS-L19X-10A_09-0241_MAN_V2_English.book Page 2 Tuesday, April 7, 2009 9:29 AM Important safety instructions CAUTION RISK OF ELECTRIC SHOCK DO NOT ...a class I apparatus need to be careful of the polarized or grounding-type plug. Handling the LCD panel • Your TV's screen is used, use attachments/accessories specified by the manufacturer. 12 Use only with a cart, stand, tripod, bracket, or table specified by the manufacturer that produce ...
User Manual (English)
Page 8
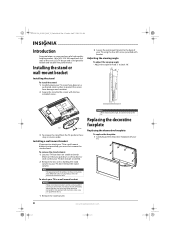
...TV, perform these instructions may differ from damages and scratches. 2 Secure the stand to the screen with bracket. Your NS-L19X-10A represents the state of a high-quality Insignia product. To remove the stand column: 1 Lay your TV...or wall-mount bracket Installing the stand To install the stand: 1 Carefully place your TV using the four M4 screws provided with the two included screws. 2 Secure the wall-mount..., do so. 1 Remove the stand column. Note The appearance of the product in LCD TV design and is for reliable and trouble-free performance. Adjusting the viewing angle To adjust ...
...TV, perform these instructions may differ from damages and scratches. 2 Secure the stand to the screen with bracket. Your NS-L19X-10A represents the state of a high-quality Insignia product. To remove the stand column: 1 Lay your TV...or wall-mount bracket Installing the stand To install the stand: 1 Carefully place your TV using the four M4 screws provided with the two included screws. 2 Secure the wall-mount..., do so. 1 Remove the stand column. Note The appearance of the product in LCD TV design and is for reliable and trouble-free performance. Adjusting the viewing angle To adjust ...

User Manual (English)
Page 10
NS-L19X-10A_09-0241_MAN_V2_English.book Page 6 Tuesday, April 7, 2009 9:29 AM Back # Jack Description 10 11 11 SERVICE PORT 12 FM Service port for HDMI 1. Do not use . Connect an HDMI device, such as a DVD player, camcorder, or game console to this jack. For more information, see "Connecting...to this jack. Remote control 1 12 2 13 3 14 4 15 5 16 17 18 6 19 20 7 8 21 9 22 10 23 24 11 25 # Button 1 (power) 2 ZOOM 3 COMP 4 HDMI 5 Numbers 6 VOL +/VOL - When your TV sound through a stereo amplifier. You can select Normal, Zoom, Wide, Cinema, or Auto Zoom....
NS-L19X-10A_09-0241_MAN_V2_English.book Page 6 Tuesday, April 7, 2009 9:29 AM Back # Jack Description 10 11 11 SERVICE PORT 12 FM Service port for HDMI 1. Do not use . Connect an HDMI device, such as a DVD player, camcorder, or game console to this jack. For more information, see "Connecting...to this jack. Remote control 1 12 2 13 3 14 4 15 5 16 17 18 6 19 20 7 8 21 9 22 10 23 24 11 25 # Button 1 (power) 2 ZOOM 3 COMP 4 HDMI 5 Numbers 6 VOL +/VOL - When your TV sound through a stereo amplifier. You can select Normal, Zoom, Wide, Cinema, or Auto Zoom....

User Manual (English)
Page 11
...battery into the bottom of time, remove the battery. If chemicals touch your favorite channel list. NS-L19X-10A_09-0241_MAN_V2_English.book Page 7 Tuesday, April 7, 2009 9:29 AM # Button 7 ENTER 8 9 MENU 10 ...SLEEP 11 MTS/SAP 12 FM 13 INFO 14 TV 15 VIDEO 16 MUTE 17 GUIDE 18 (dot) 19 RECALL 20 FAVORITE 21 INPUT 22 CCD 23 EXIT 24 PICTURE 25 AUDIO ... audio program), or MONO. Cautions • Batteries should not be used for a digital sub-channel. Press once for S-VIDEO1. Press to select TV mode. Press to select the picture mode. For more than one ...
...battery into the bottom of time, remove the battery. If chemicals touch your favorite channel list. NS-L19X-10A_09-0241_MAN_V2_English.book Page 7 Tuesday, April 7, 2009 9:29 AM # Button 7 ENTER 8 9 MENU 10 ...SLEEP 11 MTS/SAP 12 FM 13 INFO 14 TV 15 VIDEO 16 MUTE 17 GUIDE 18 (dot) 19 RECALL 20 FAVORITE 21 INPUT 22 CCD 23 EXIT 24 PICTURE 25 AUDIO ... audio program), or MONO. Cautions • Batteries should not be used for a digital sub-channel. Press once for S-VIDEO1. Press to select TV mode. Press to select the picture mode. For more than one ...
User Manual (English)
Page 12
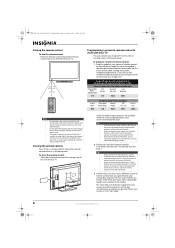
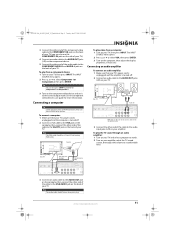
...or set -top box's remote control manufacturer and model) on the charts below, then making note of the numbered code below it using the Insignia TV remote to "teach" the commands one at 1-877-467-4289. 8 www.insigniaproducts.com The heat may need to try codes for...NS-L19X-10A_09-0241_MAN_V2_English.book Page 8 Tuesday, April 7, 2009 9:29 AM Aiming the remote control To aim the remote control: • Point the remote control toward the remote control sensor on the front of your TV. 16.4 ft (5 m) Programming a universal remote control to work with your TV You can operate your TV or use...
...or set -top box's remote control manufacturer and model) on the charts below, then making note of the numbered code below it using the Insignia TV remote to "teach" the commands one at 1-877-467-4289. 8 www.insigniaproducts.com The heat may need to try codes for...NS-L19X-10A_09-0241_MAN_V2_English.book Page 8 Tuesday, April 7, 2009 9:29 AM Aiming the remote control To aim the remote control: • Point the remote control toward the remote control sensor on the front of your TV. 16.4 ft (5 m) Programming a universal remote control to work with your TV You can operate your TV or use...
User Manual (English)
Page 13
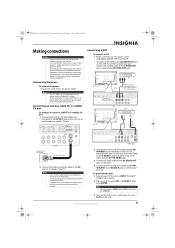
... connecting external equipment. For a better picture, you have questions, refer to select AV1 or S-VIDEO 1, then press ENTER. Notes • • Your TV should only be using an AV cable with your equipment. • Always turn the power off . The INPUT SOURCE menu opens. 2 Press or to the user manual that... came with the AV1 IN VIDEO jack. 3 Connect an audio cable to the AV AUDIO OUT jacks on the VCR. 4 Connect the other cables. NS-L19X-...
... connecting external equipment. For a better picture, you have questions, refer to select AV1 or S-VIDEO 1, then press ENTER. Notes • • Your TV should only be using an AV cable with your equipment. • Always turn the power off . The INPUT SOURCE menu opens. 2 Press or to the user manual that... came with the AV1 IN VIDEO jack. 3 Connect an audio cable to the AV AUDIO OUT jacks on the VCR. 4 Connect the other cables. NS-L19X-...

User Manual (English)
Page 14
... to the correct output mode. See the HDMI device's user guide for more information. To play from a camcorder or game: 1 Turn on your TV, then press INPUT. See the camcorder's or game's user guides for more information. The INPUT SOURCE menu opens. 2 Press or to the HDMI .... 2 Connect a component video cable to connectors. 10 www.insigniaproducts.com NS-L19X-10A_09-0241_MAN_V2_English.book Page 10 Tuesday, April 7, 2009 9:29 AM Connecting a camcorder or game Tip Some game consoles have an HDMI connector, which can be used for HDMI. 3 Turn on the HDMI device, and set it to...
... to the correct output mode. See the HDMI device's user guide for more information. To play from a camcorder or game: 1 Turn on your TV, then press INPUT. See the camcorder's or game's user guides for more information. The INPUT SOURCE menu opens. 2 Press or to the HDMI .... 2 Connect a component video cable to connectors. 10 www.insigniaproducts.com NS-L19X-10A_09-0241_MAN_V2_English.book Page 10 Tuesday, April 7, 2009 9:29 AM Connecting a camcorder or game Tip Some game consoles have an HDMI connector, which can be used for HDMI. 3 Turn on the HDMI device, and set it to...
User Manual (English)
Page 15
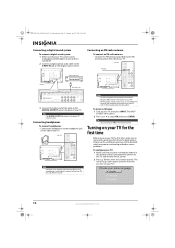
... end of the cable to white. 3 Connect the other end of your TV. Connecting a computer Tip Some computers have a stereo mini plug. Note The VGA cable should have an HDMI connector, which can be a 15-pin D-Sub (analog RGB) cable. NS-L19X-10A_09-0241_MAN_V2_English.book Page 11 Tuesday, April 7, 2009 9:29 AM 3 Connect... to red and white to the VGA PIC jack on the back of the cable to connectors. Tip You can also use the COMPONENT2 IN jacks on the side of your TV). 4 Connect an audio cable to the AUDIO OUT jacks (L/R) on the component device. 5 Connect the other end of the cable...
... end of the cable to white. 3 Connect the other end of your TV. Connecting a computer Tip Some computers have a stereo mini plug. Note The VGA cable should have an HDMI connector, which can be a 15-pin D-Sub (analog RGB) cable. NS-L19X-10A_09-0241_MAN_V2_English.book Page 11 Tuesday, April 7, 2009 9:29 AM 3 Connect... to red and white to the VGA PIC jack on the back of the cable to connectors. Tip You can also use the COMPONENT2 IN jacks on the side of your TV). 4 Connect an audio cable to the AUDIO OUT jacks (L/R) on the component device. 5 Connect the other end of the cable...
User Manual (English)
Page 16
... best reception, fully extend the FM antenna. Note The DIGITAL OUTPUT jack works with 75 ohm coaxial cable (not provided). When using headphones, use your TV the first time, make sure to remove the protection film from the back cabinet, otherwise the ventilation openings will be blocked, which... audio cable to the S/PDIF IN jack on the remote control. NS-L19X-10A_09-0241_MAN_V2_English.book Page 12 Tuesday, April 7, 2009 9:29 AM Connecting a digital sound system To connect a digital sound system: 1 Make sure that your TV's power cord is unplugged and the digital sound system is poor in...
... best reception, fully extend the FM antenna. Note The DIGITAL OUTPUT jack works with 75 ohm coaxial cable (not provided). When using headphones, use your TV the first time, make sure to remove the protection film from the back cabinet, otherwise the ventilation openings will be blocked, which... audio cable to the S/PDIF IN jack on the remote control. NS-L19X-10A_09-0241_MAN_V2_English.book Page 12 Tuesday, April 7, 2009 9:29 AM Connecting a digital sound system To connect a digital sound system: 1 Make sure that your TV's power cord is unplugged and the digital sound system is poor in...

User Manual (English)
Page 17
...; VIDEO-Press once to select FM radio. Press four times to select S-Video 2. • TV-Press to select TV. • FM-Press to select AV1. If you are using an antenna for several minutes. NS-L19X-10A_09-0241_MAN_V2_English.book Page 13 Tuesday, April 7, 2009 9:29 AM 3 Press or to select HDMI... 2. Selecting the video input source To select the video input source: 1 Turn on your TV, then press the INPUT key ...
...; VIDEO-Press once to select FM radio. Press four times to select S-Video 2. • TV-Press to select TV. • FM-Press to select AV1. If you are using an antenna for several minutes. NS-L19X-10A_09-0241_MAN_V2_English.book Page 13 Tuesday, April 7, 2009 9:29 AM 3 Press or to select HDMI... 2. Selecting the video input source To select the video input source: 1 Turn on your TV, then press the INPUT key ...
User Manual (English)
Page 19
...Time-Lets you set closed captioning on the back and side of your TV's input jacks. Displaying additional information To display additional information: 1 Press INFO to optimize a computer display. Broadcasters may use these sub-channels to transmit a variety of main channel 5. Adjusting ..., current time, and current program start and end times. www.insigniaproducts.com 15 Digital sub-channels A digital TV signal transmits more than an analog signal. NS-L19X-10A_09-0241_MAN_V2_English.book Page 15 Tuesday, April 7, 2009 9:29 AM • To select a digital sub-channel...
...Time-Lets you set closed captioning on the back and side of your TV's input jacks. Displaying additional information To display additional information: 1 Press INFO to optimize a computer display. Broadcasters may use these sub-channels to transmit a variety of main channel 5. Adjusting ..., current time, and current program start and end times. www.insigniaproducts.com 15 Digital sub-channels A digital TV signal transmits more than an analog signal. NS-L19X-10A_09-0241_MAN_V2_English.book Page 15 Tuesday, April 7, 2009 9:29 AM • To select a digital sub-channel...
User Manual (English)
Page 23
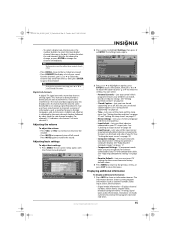
...option is automatically reset to your TV through a tuner box, select Cable/Satellite Box. 5 Press ENTER when you are using an antenna for a standard or HD TV signal, select Antenna. • If your cable is connected directly to the TV (using no tuner box), select Cable...PICTURE AUDIO CHANNELS SETTINGS RADIO On MOVE OK SELECT ENTER MENU PREVIOUS MAauntoumalalyticaadldlyasnedarsckhipfocrhcahnannenlseilns.your TV is connected to Off. NS-L19X-10A_09-0241_MAN_V2_English.book Page 19 Tuesday, April 7, 2009 9:29 AM Playing TV audio only You can turn off . www.insigniaproducts.com...
...option is automatically reset to your TV through a tuner box, select Cable/Satellite Box. 5 Press ENTER when you are using an antenna for a standard or HD TV signal, select Antenna. • If your cable is connected directly to the TV (using no tuner box), select Cable...PICTURE AUDIO CHANNELS SETTINGS RADIO On MOVE OK SELECT ENTER MENU PREVIOUS MAauntoumalalyticaadldlyasnedarsckhipfocrhcahnannenlseilns.your TV is connected to Off. NS-L19X-10A_09-0241_MAN_V2_English.book Page 19 Tuesday, April 7, 2009 9:29 AM Playing TV audio only You can turn off . www.insigniaproducts.com...
User Manual (English)
Page 24
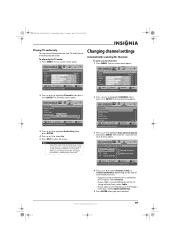
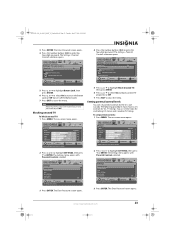
... your favorite channels by using the number buttons. If you will need to run the auto channel search again to create a channel list. The Channels menu opens. Setting up the favorite channel list: 1 Press MENU. The Channels menu opens. NS-L19X-10A_09-0241_MAN_V2_English.book Page 20... Tuesday, April 7, 2009 9:29 AM If you selected Antenna or Cable, the TV searches automatically for available channels in your area and stores the channel information in ...
... your favorite channels by using the number buttons. If you will need to run the auto channel search again to create a channel list. The Channels menu opens. Setting up the favorite channel list: 1 Press MENU. The Channels menu opens. NS-L19X-10A_09-0241_MAN_V2_English.book Page 20... Tuesday, April 7, 2009 9:29 AM If you selected Antenna or Cable, the TV searches automatically for available channels in your area and stores the channel information in ...
User Manual (English)
Page 27
... to highlight SETTINGS, then press or ENTER. www.insigniaproducts.com 23 Parental Controls submenu opens. Blocking unrated TV To block unrated TV: 1 Press MENU. You use similar steps for the U.S. The Settings - Settings Parental Controls Closed Caption Time Menu Settings Input Labels Input...number buttons (0-9) to highlight SETTINGS, then press or ENTER. The Enter Password screen opens. 4 Press the number buttons (0-9) to Off. NS-L19X-10A_09-0241_MAN_V2_English.book Page 23 Tuesday, April 7, 2009 9:29 AM 3 Press ENTER. Note Removing the AC power and reconnecting it resets the...
... to highlight SETTINGS, then press or ENTER. www.insigniaproducts.com 23 Parental Controls submenu opens. Blocking unrated TV To block unrated TV: 1 Press MENU. You use similar steps for the U.S. The Settings - Settings Parental Controls Closed Caption Time Menu Settings Input Labels Input...number buttons (0-9) to highlight SETTINGS, then press or ENTER. The Enter Password screen opens. 4 Press the number buttons (0-9) to Off. NS-L19X-10A_09-0241_MAN_V2_English.book Page 23 Tuesday, April 7, 2009 9:29 AM 3 Press ENTER. Note Removing the AC power and reconnecting it resets the...

User Manual (English)
Page 28
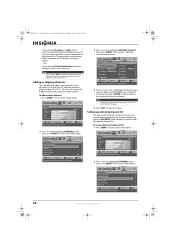
... CHANNELS SETTINGS RADIO Standard 70 40 60 0 -16 MOVE OK SELECT ENTER MENU PREVIOUS Adjust settings to close the menu. NS-L19X-10A_09-0241_MAN_V2_English.book Page 24 Tuesday, April 7, 2009 9:29 AM 4 Press the number buttons to highlight USA Parental Locks ...Rating for Canadian), then press , , , or to select the rating. 9 Press ENTER to use when setting parental controls. U.S. To download rating information: 1 Press MENU. U.S. L Strong language. TV-Y All children. Canadian English ratings E Exempt programming. PG-13 Suitable for all higher ratings are...
... CHANNELS SETTINGS RADIO Standard 70 40 60 0 -16 MOVE OK SELECT ENTER MENU PREVIOUS Adjust settings to close the menu. NS-L19X-10A_09-0241_MAN_V2_English.book Page 24 Tuesday, April 7, 2009 9:29 AM 4 Press the number buttons to highlight USA Parental Locks ...Rating for Canadian), then press , , , or to select the rating. 9 Press ENTER to use when setting parental controls. U.S. To download rating information: 1 Press MENU. U.S. L Strong language. TV-Y All children. Canadian English ratings E Exempt programming. PG-13 Suitable for all higher ratings are...
User Manual (English)
Page 29
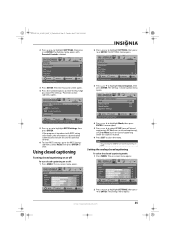
...to affect picture quality EXIT EXIT 2 Press or to close the menu. The Settings - Using closed captioning Turning closed captioning on or off To turn closed captioning when the sound is ... 4 Press the number buttons to highlight Mode, then press ENTER. Closed Caption menu opens. NS-L19X-10A_09-0241_MAN_V2_English.book Page 25 Tuesday, April 7, 2009 9:29 AM 2 Press or to highlight ...Settings Input Labels Input Sensor PICTURE AUDIO CHANNELS SETTINGS RADIO Off MOVE OK ENTER SELECT Set TV parental controls MENU PREVIOUS EXIT EXIT 3 Press or to highlight SETTINGS, then press or...
...to affect picture quality EXIT EXIT 2 Press or to close the menu. The Settings - Using closed captioning Turning closed captioning on or off To turn closed captioning when the sound is ... 4 Press the number buttons to highlight Mode, then press ENTER. Closed Caption menu opens. NS-L19X-10A_09-0241_MAN_V2_English.book Page 25 Tuesday, April 7, 2009 9:29 AM 2 Press or to highlight ...Settings Input Labels Input Sensor PICTURE AUDIO CHANNELS SETTINGS RADIO Off MOVE OK ENTER SELECT Set TV parental controls MENU PREVIOUS EXIT EXIT 3 Press or to highlight SETTINGS, then press or...
User Manual (English)
Page 30
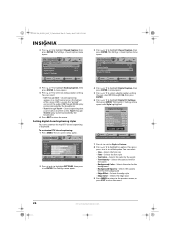
...CAPTION MOVE OK ENTER SELECT MENU PREVIOUS EXIT EXIT Set the lock of the audio. You can customize the way DTV closed captioning: 1 Press MENU. NS-L19X-10A_09-0241_MAN_V2_English.book Page 26 Tuesday, April 7, 2009 9:29 AM 3 Press or to select a digital caption setting. The on-screen menu opens. ...Closed Caption, then press ENTER. You can select: • CC1 through Text4-Closed captioning that covers half or all of the screen. Automatic uses broadcaster's style. 7 Press to set the Style to Custom. 8 Press or to highlight an option, then press press or to highlight Analog ...
...CAPTION MOVE OK ENTER SELECT MENU PREVIOUS EXIT EXIT Set the lock of the audio. You can customize the way DTV closed captioning: 1 Press MENU. NS-L19X-10A_09-0241_MAN_V2_English.book Page 26 Tuesday, April 7, 2009 9:29 AM 3 Press or to select a digital caption setting. The on-screen menu opens. ...Closed Caption, then press ENTER. You can select: • CC1 through Text4-Closed captioning that covers half or all of the screen. Automatic uses broadcaster's style. 7 Press to set the Style to Custom. 8 Press or to highlight an option, then press press or to highlight Analog ...


