User Manual (English)
Page 1
NS-L19X-10A_09-0241_MAN_V2_English.book Page 0 Tuesday, April 7, 2009 9:29 AM User Guide 19" LCD TV with Decorative Faceplates NS-L19X-10A
NS-L19X-10A_09-0241_MAN_V2_English.book Page 0 Tuesday, April 7, 2009 9:29 AM User Guide 19" LCD TV with Decorative Faceplates NS-L19X-10A
User Manual (English)
Page 2
NS-L19X-10A_09-0241_MAN_V2_English.book Page i Tuesday, April 7, 2009 9:29 AM Contents CHILD SAFETY 1 Important safety instructions 2 Warnings 2 Cautions 3 Introduction 4 Installing the stand or wall-mount bracket 4 Installing the stand 4 Installing a wall-mount bracket 4 Adjusting the viewing angle 4 Replacing the decorative faceplate 4 Replacing the decorative faceplate 4 TV...Programming a universal remote control to work with your TV . . . . 8 Making connections 9 Connecting the power 9 Connecting an antenna, cable TV, or satellite TV box 9 Connecting a VCR 9 Connecting a ...
NS-L19X-10A_09-0241_MAN_V2_English.book Page i Tuesday, April 7, 2009 9:29 AM Contents CHILD SAFETY 1 Important safety instructions 2 Warnings 2 Cautions 3 Introduction 4 Installing the stand or wall-mount bracket 4 Installing the stand 4 Installing a wall-mount bracket 4 Adjusting the viewing angle 4 Replacing the decorative faceplate 4 Replacing the decorative faceplate 4 TV...Programming a universal remote control to work with your TV . . . . 8 Making connections 9 Connecting the power 9 Connecting an antenna, cable TV, or satellite TV box 9 Connecting a VCR 9 Connecting a ...
User Manual (English)
Page 3
NS-L19X-10A_09-0241_MAN_V2_English.book Page ii Tuesday, April 7, 2009 9:29 AM Contents Adjusting the picture 16 Adjusting the TV picture 16 Adjusting Advanced Video settings 16 Adjusting the computer image 17 Adjusting component settings 17 Adjusting the sound 18 Adjusting the sound 18 Selecting the audio mode 18 Playing TV audio only 19... Changing channel settings 19 Automatically scanning for channels 19 Adding or skipping channels 20 Setting up a favorite channel list 20 Adding ...
NS-L19X-10A_09-0241_MAN_V2_English.book Page ii Tuesday, April 7, 2009 9:29 AM Contents Adjusting the picture 16 Adjusting the TV picture 16 Adjusting Advanced Video settings 16 Adjusting the computer image 17 Adjusting component settings 17 Adjusting the sound 18 Adjusting the sound 18 Selecting the audio mode 18 Playing TV audio only 19... Changing channel settings 19 Automatically scanning for channels 19 Adding or skipping channels 20 Setting up a favorite channel list 20 Adding ...
User Manual (English)
Page 5
NS-L19X-10A_09-0241_MAN_V2_English.book Page 1 Tuesday, April 7, 2009 9:29 AM f CHILD SAFETY It makes a difference how and where you use of this manual, or otherwise listed by an independent laboratory as a chest of wall mount does not fit all. Use only a TV stand rated for the weight of your TV,...or knocked down. • Make sure that you route all instructions supplied by curious children. Tune into safety • One size of your TV, get help from a professional installer. • Make sure that they cannot be used as steps, such as suitable for safe wall mount installation...
NS-L19X-10A_09-0241_MAN_V2_English.book Page 1 Tuesday, April 7, 2009 9:29 AM f CHILD SAFETY It makes a difference how and where you use of this manual, or otherwise listed by an independent laboratory as a chest of wall mount does not fit all. Use only a TV stand rated for the weight of your TV,...or knocked down. • Make sure that you route all instructions supplied by curious children. Tune into safety • One size of your TV, get help from a professional installer. • Make sure that they cannot be used as steps, such as suitable for safe wall mount installation...
User Manual (English)
Page 6
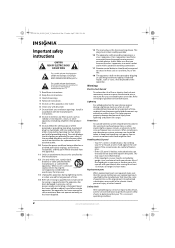
...outlet with the apparatus. This helps prevent property damage and personal injury from the power outlet and disconnect any antenna or cable system. NS-L19X-10A_09-0241_MAN_V2_English.book Page 2 Tuesday, April 7, 2009 9:29 AM Important safety instructions CAUTION RISK OF ELECTRIC SHOCK DO NOT OPEN This...registers, stoves, or other electric light or power circuits, or where it from lightning and power line surges. Handling the LCD panel • Your TV's screen is used, use caution when moving the S3125A cart/apparatus combination to avoid injury from the apparatus. 11 Only ...
...outlet with the apparatus. This helps prevent property damage and personal injury from the power outlet and disconnect any antenna or cable system. NS-L19X-10A_09-0241_MAN_V2_English.book Page 2 Tuesday, April 7, 2009 9:29 AM Important safety instructions CAUTION RISK OF ELECTRIC SHOCK DO NOT OPEN This...registers, stoves, or other electric light or power circuits, or where it from lightning and power line surges. Handling the LCD panel • Your TV's screen is used, use caution when moving the S3125A cart/apparatus combination to avoid injury from the apparatus. 11 Only ...
User Manual (English)
Page 7
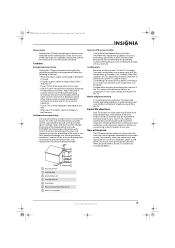
....org to its new surroundings for environmental reasons. Non-active pixels The LCD panel contains almost 3 million thin film transistors, which provide exceptionally sharp video quality. NS-L19X-10A_09-0241_MAN_V2_English.book Page 3 Tuesday, April 7, 2009 9:29 AM Power source Operate your TV only from the type of mercury. Cautions Damage requiring service Unplug this...
....org to its new surroundings for environmental reasons. Non-active pixels The LCD panel contains almost 3 million thin film transistors, which provide exceptionally sharp video quality. NS-L19X-10A_09-0241_MAN_V2_English.book Page 3 Tuesday, April 7, 2009 9:29 AM Power source Operate your TV only from the type of mercury. Cautions Damage requiring service Unplug this...
User Manual (English)
Page 8
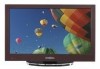
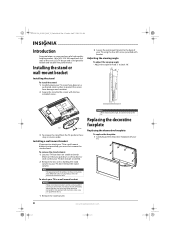
...LCD TV design and is for use by qualified service personnel only. Caution When adjusting the angle, be careful not to your TV screen face-down on a table or bench. Installing the stand or wall-mount bracket Installing the stand To install the stand: 1 Carefully place your TV, then remove the stand column. NS-L19X...-10A_09-0241_MAN_V2_English.book Page 4 Tuesday, April 7, 2009 9:29 AM Introduction Congratulations on your TV. 4 www.insigniaproducts.com Your NS-L19X-10A represents the state of a high-quality Insignia product....
...LCD TV design and is for use by qualified service personnel only. Caution When adjusting the angle, be careful not to your TV screen face-down on a table or bench. Installing the stand or wall-mount bracket Installing the stand To install the stand: 1 Carefully place your TV, then remove the stand column. NS-L19X...-10A_09-0241_MAN_V2_English.book Page 4 Tuesday, April 7, 2009 9:29 AM Introduction Congratulations on your TV. 4 www.insigniaproducts.com Your NS-L19X-10A represents the state of a high-quality Insignia product....

User Manual (English)
Page 9
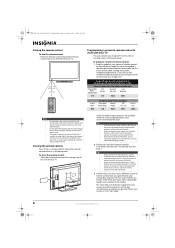
...Source menu and select the video input source. Press to turn your TV on or off , power still flows into it . When your TV is off , power still flows into it . Press to install the new decorative faceplate. NS-L19X-10A_09-0241_MAN_V2_English.book Page 5 Tuesday, April 7, 2009 9:29 AM... 2 Align the plastic studs on the new faceplate with the holes on the front of your TV, then press firmly to decrease or increase the volume. www....
...Source menu and select the video input source. Press to turn your TV on or off , power still flows into it . When your TV is off , power still flows into it . Press to install the new decorative faceplate. NS-L19X-10A_09-0241_MAN_V2_English.book Page 5 Tuesday, April 7, 2009 9:29 AM... 2 Align the plastic studs on the new faceplate with the holes on the front of your TV, then press firmly to decrease or increase the volume. www....

User Manual (English)
Page 10
... cable carries both video and audio, so you do not need to make an audio connection. Remote control 1 12 2 13 3 14 4 15 5 16 17 18 6 19 20 7 8 21 9 22 10 23 24 11 25 # Button 1 (power) 2 ZOOM 3 COMP 4 HDMI 5 Numbers 6 VOL +/VOL - For more information, see "...jacks to an external audio amplifier to this jack. Press twice for HDMI 1. Connect the 75 ohm coaxial cable from your TV on page 9. Press once for HDMI 2. NS-L19X-10A_09-0241_MAN_V2_English.book Page 6 Tuesday, April 7, 2009 9:29 AM Back # Jack Description 10 11 11 SERVICE PORT 12...
... cable carries both video and audio, so you do not need to make an audio connection. Remote control 1 12 2 13 3 14 4 15 5 16 17 18 6 19 20 7 8 21 9 22 10 23 24 11 25 # Button 1 (power) 2 ZOOM 3 COMP 4 HDMI 5 Numbers 6 VOL +/VOL - For more information, see "...jacks to an external audio amplifier to this jack. Press twice for HDMI 1. Connect the 75 ohm coaxial cable from your TV on page 9. Press once for HDMI 2. NS-L19X-10A_09-0241_MAN_V2_English.book Page 6 Tuesday, April 7, 2009 9:29 AM Back # Jack Description 10 11 11 SERVICE PORT 12...

User Manual (English)
Page 11
...into the battery holder. For more information, see "Setting the sleep timer" on page 16. Press to select TV mode. Press three times for a digital sub-channel. Press to enter a program number for S-VIDEO1. For more...display the information banner. Do not burn or incinerate. Press to set the sleep timer. NS-L19X-10A_09-0241_MAN_V2_English.book Page 7 Tuesday, April 7, 2009 9:29 AM # Button 7 ENTER 8 9 MENU 10 ...SLEEP 11 MTS/SAP 12 FM 13 INFO 14 TV 15 VIDEO 16 MUTE 17 GUIDE 18 (dot) 19 RECALL 20 FAVORITE 21 INPUT 22 CCD 23 EXIT 24 PICTURE 25 AUDIO Description ...
...into the battery holder. For more information, see "Setting the sleep timer" on page 16. Press to select TV mode. Press three times for a digital sub-channel. Press to enter a program number for S-VIDEO1. For more...display the information banner. Do not burn or incinerate. Press to set the sleep timer. NS-L19X-10A_09-0241_MAN_V2_English.book Page 7 Tuesday, April 7, 2009 9:29 AM # Button 7 ENTER 8 9 MENU 10 ...SLEEP 11 MTS/SAP 12 FM 13 INFO 14 TV 15 VIDEO 16 MUTE 17 GUIDE 18 (dot) 19 RECALL 20 FAVORITE 21 INPUT 22 CCD 23 EXIT 24 PICTURE 25 AUDIO Description ...
User Manual (English)
Page 12
... • If your universal remote control isn't listed on the chart, refer to work with a new or existing universal remote control. NS-L19X-10A_09-0241_MAN_V2_English.book Page 8 Tuesday, April 7, 2009 9:29 AM Aiming the remote control To aim the remote control: • Point ... a match. 2 Follow your universal remote control's instructions to shock. See your universal remote control's instructions for details. 3 If all Insignia TVs manufactured after Jan. 1, 2007) Universal remote control manufacturers and models Philips PHDVD5, PH5DSS, PMDVR8, PDVR8 RCA RCU807 One for All URC-...
... • If your universal remote control isn't listed on the chart, refer to work with a new or existing universal remote control. NS-L19X-10A_09-0241_MAN_V2_English.book Page 8 Tuesday, April 7, 2009 9:29 AM Aiming the remote control To aim the remote control: • Point ... a match. 2 Follow your universal remote control's instructions to shock. See your universal remote control's instructions for details. 3 If all Insignia TVs manufactured after Jan. 1, 2007) Universal remote control manufacturers and models Philips PHDVD5, PH5DSS, PMDVR8, PDVR8 RCA RCU807 One for All URC-...
User Manual (English)
Page 13
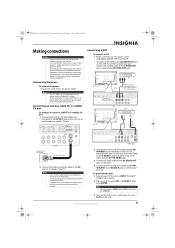
... the problem. Connecting a VCR To connect a VCR: 1 Make sure that your equipment. • Always turn the power off . Back of TV VCR AV cable Note: Cables are tight and secure. • The external audio/video equipment shown in image or color problems. Make sure that came...power: • Plug the AC cord into an AC power outlet. Connecting an antenna, cable TV, or satellite TV box To connect an antenna, cable TV, or satellite TV box: 1 Connect one end of using your TV. NS-L19X-10A_09-0241_MAN_V2_English.book Page 9 Tuesday, April 7, 2009 9:29 AM Making connections Cautions • ...
... the problem. Connecting a VCR To connect a VCR: 1 Make sure that your equipment. • Always turn the power off . Back of TV VCR AV cable Note: Cables are tight and secure. • The external audio/video equipment shown in image or color problems. Make sure that came...power: • Plug the AC cord into an AC power outlet. Connecting an antenna, cable TV, or satellite TV box To connect an antenna, cable TV, or satellite TV box: 1 Connect one end of using your TV. NS-L19X-10A_09-0241_MAN_V2_English.book Page 9 Tuesday, April 7, 2009 9:29 AM Making connections Cautions • ...

User Manual (English)
Page 14
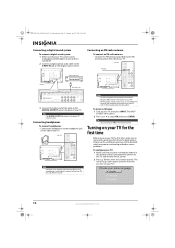
... can also press VIDEO twice for more information. To play from the HDMI device: 1 Turn on your TV's power cord is unplugged and the component video device is turned off . NS-L19X-10A_09-0241_MAN_V2_English.book Page 10 Tuesday, April 7, 2009 9:29 AM Connecting a camcorder or game Tip Some game... consoles have an HDMI connector, which can be used for more information. Side of TV AV cable 3 Connect the other end of ...
... can also press VIDEO twice for more information. To play from the HDMI device: 1 Turn on your TV's power cord is unplugged and the component video device is turned off . NS-L19X-10A_09-0241_MAN_V2_English.book Page 10 Tuesday, April 7, 2009 9:29 AM Connecting a camcorder or game Tip Some game... consoles have an HDMI connector, which can be used for more information. Side of TV AV cable 3 Connect the other end of ...
User Manual (English)
Page 15
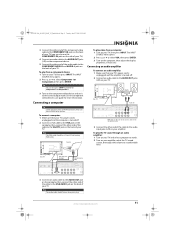
... 15-pin D-Sub (analog RGB) cable. To play the TV sound through an audio amplifier: 1 Turn on your TV and select a program to watch. 2 Turn on your amplifier, select the TV sound source, then adjust the volume to a comfortable level. NS-L19X-10A_09-0241_MAN_V2_English.book Page 11 Tuesday, April 7, 2009 9:29 ...AM 3 Connect the other end of the component video cable to the COMPONENT1 IN jacks on the back of your TV (you can also use...
... 15-pin D-Sub (analog RGB) cable. To play the TV sound through an audio amplifier: 1 Turn on your TV and select a program to watch. 2 Turn on your amplifier, select the TV sound source, then adjust the volume to a comfortable level. NS-L19X-10A_09-0241_MAN_V2_English.book Page 11 Tuesday, April 7, 2009 9:29 ...AM 3 Connect the other end of the component video cable to the COMPONENT1 IN jacks on the back of your TV (you can also use...
User Manual (English)
Page 16
... volume setting that still lets you hear the sound. The initial setup screen opens (only the first time you turn on the side of your TV. NS-L19X-10A_09-0241_MAN_V2_English.book Page 12 Tuesday, April 7, 2009 9:29 AM Connecting a digital sound system To connect a digital sound system: 1 Make sure ...from the back cabinet, otherwise the ventilation openings will be blocked, which may cause overheating and other end of the cable to your TV with digital TV channels only. Keep the FM antenna as horizontal as possible. Notes For best reception, fully extend the FM antenna. To listen to...
... volume setting that still lets you hear the sound. The initial setup screen opens (only the first time you turn on the side of your TV. NS-L19X-10A_09-0241_MAN_V2_English.book Page 12 Tuesday, April 7, 2009 9:29 AM Connecting a digital sound system To connect a digital sound system: 1 Make sure ...from the back cabinet, otherwise the ventilation openings will be blocked, which may cause overheating and other end of the cable to your TV with digital TV channels only. Keep the FM antenna as horizontal as possible. Notes For best reception, fully extend the FM antenna. To listen to...

User Manual (English)
Page 17
... 1. This may take several minutes, it automatically goes into standby mode. Warning When your TV, it is still receiving power. Press three times to select AV1. If you want, then press ENTER. NS-L19X-10A_09-0241_MAN_V2_English.book Page 13 Tuesday, April 7, 2009 9:29 AM 3 Press or to ...; If you will need to run the auto channel search again to select Antenna, Cable, or Cable/Satellite Box, depending on your TV through the Input Source menu. Input Source TV FM AV 1 AV 2 S-Video 1 S-Video 2 Component 1 Component 2 VGA HDMI 1 HDMI 2 HDMI 3 2 Press or to select HDMI...
... 1. This may take several minutes, it automatically goes into standby mode. Warning When your TV, it is still receiving power. Press three times to select AV1. If you want, then press ENTER. NS-L19X-10A_09-0241_MAN_V2_English.book Page 13 Tuesday, April 7, 2009 9:29 AM 3 Press or to ...; If you will need to run the auto channel search again to select Antenna, Cable, or Cable/Satellite Box, depending on your TV through the Input Source menu. Input Source TV FM AV 1 AV 2 S-Video 1 S-Video 2 Component 1 Component 2 VGA HDMI 1 HDMI 2 HDMI 3 2 Press or to select HDMI...
User Manual (English)
Page 18
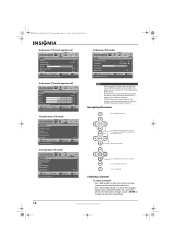
NS-L19X-10A_09-0241_MAN_V2_English.book Page 14 Tuesday, April 7, 2009 9:29 AM Audio menu (TV mode, equalizer on) Audio Equalizer Equalizer Mode Equalizer Setting Balance Digital Audio/SPDIF MTS/SAP PICTURE AUDIO CHANNELS SETTINGS RADIO On Custom 0 RA W ... Labels Channel Strength Audio Only PICTURE AUDIO CHANNELS SETTINGS RADIO Off MOVE OK ENTER SELECT Adjust channel options MENU PREVIOUS EXIT EXIT Settings menu (TV mode) Settings Parental Controls Closed Caption Time Menu Settings Input Labels Input Sensor PICTURE AUDIO CHANNELS SETTINGS RADIO Off MOVE OK ENTER SELECT Set...
NS-L19X-10A_09-0241_MAN_V2_English.book Page 14 Tuesday, April 7, 2009 9:29 AM Audio menu (TV mode, equalizer on) Audio Equalizer Equalizer Mode Equalizer Setting Balance Digital Audio/SPDIF MTS/SAP PICTURE AUDIO CHANNELS SETTINGS RADIO On Custom 0 RA W ... Labels Channel Strength Audio Only PICTURE AUDIO CHANNELS SETTINGS RADIO Off MOVE OK ENTER SELECT Adjust channel options MENU PREVIOUS EXIT EXIT Settings menu (TV mode) Settings Parental Controls Closed Caption Time Menu Settings Input Labels Input Sensor PICTURE AUDIO CHANNELS SETTINGS RADIO Off MOVE OK ENTER SELECT Set...
User Manual (English)
Page 19
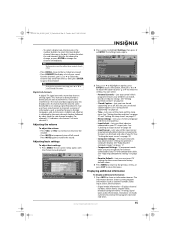
...This increase in data provides a better picture and sound with the Picture menu displayed. For example, 5.1 indicates sub-channel 1 of your TV with component cables. Settings Parental Controls Closed Caption Time Menu Settings Input Labels Input Sensor PICTURE AUDIO CHANNELS SETTINGS RADIO Off MOVE OK ENTER SELECT...press or to adjust the option or press or to select the sub-channel. See "Setting the input sensor" on or off all sound. NS-L19X-10A_09-0241_MAN_V2_English.book Page 15 Tuesday, April 7, 2009 9:29 AM • To select a digital sub-channel, press the number buttons to ...
...This increase in data provides a better picture and sound with the Picture menu displayed. For example, 5.1 indicates sub-channel 1 of your TV with component cables. Settings Parental Controls Closed Caption Time Menu Settings Input Labels Input Sensor PICTURE AUDIO CHANNELS SETTINGS RADIO Off MOVE OK ENTER SELECT...press or to adjust the option or press or to select the sub-channel. See "Setting the input sensor" on or off all sound. NS-L19X-10A_09-0241_MAN_V2_English.book Page 15 Tuesday, April 7, 2009 9:29 AM • To select a digital sub-channel, press the number buttons to ...
User Manual (English)
Page 20
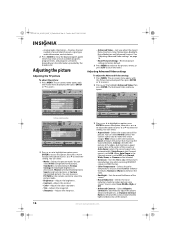
...Lets you adjust the Aspect Ratio, OverScan, Color Temperature, Backlight, Noise Reduction and Advanced Contrast. Adjusting the picture Adjusting the TV picture To adjust the picture: 1 Press MENU. See "Adjusting Advanced Video settings" on the information provided by the broadcaster....HDMI/DVI signals in the Channels menu is decreased), Theater (a finely detailed picture), Sports (a dynamic picture), or Custom (customized picture). NS-L19X-10A_09-0241_MAN_V2_English.book Page 16 Tuesday, April 7, 2009 9:29 AM • Analog mode information-Displays channel number, channel label (if...
...Lets you adjust the Aspect Ratio, OverScan, Color Temperature, Backlight, Noise Reduction and Advanced Contrast. Adjusting the picture Adjusting the TV picture To adjust the picture: 1 Press MENU. See "Adjusting Advanced Video settings" on the information provided by the broadcaster....HDMI/DVI signals in the Channels menu is decreased), Theater (a finely detailed picture), Sports (a dynamic picture), or Custom (customized picture). NS-L19X-10A_09-0241_MAN_V2_English.book Page 16 Tuesday, April 7, 2009 9:29 AM • Analog mode information-Displays channel number, channel label (if...
User Manual (English)
Page 21
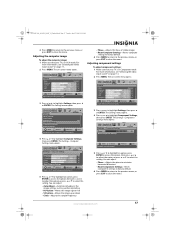
...press or to highlight Settings, then press or ENTER. Adjusting the computer image To adjust the computer image: 1 Make sure that your TV is connected to the TV EXIT EXIT • Phase-Adjusts the focus of stable images • Reset Computer Settings-Resets computer settings to factory default. 6 Press...70 40 60 0 -16 MOVE OK SELECT ENTER MENU PREVIOUS Adjust settings to affect picture quality EXIT EXIT 3 Press or to select the setting. NS-L19X-10A_09-0241_MAN_V2_English.book Page 17 Tuesday, April 7, 2009 9:29 AM 4 Press MENU to return to the previous menu, or press EXIT to close...
...press or to highlight Settings, then press or ENTER. Adjusting the computer image To adjust the computer image: 1 Make sure that your TV is connected to the TV EXIT EXIT • Phase-Adjusts the focus of stable images • Reset Computer Settings-Resets computer settings to factory default. 6 Press...70 40 60 0 -16 MOVE OK SELECT ENTER MENU PREVIOUS Adjust settings to affect picture quality EXIT EXIT 3 Press or to select the setting. NS-L19X-10A_09-0241_MAN_V2_English.book Page 17 Tuesday, April 7, 2009 9:29 AM 4 Press MENU to return to the previous menu, or press EXIT to close...


