User Manual (English)
Page 2
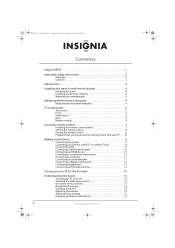
NS-L19X-10A_09-0241_MAN_V2_English.book Page i Tuesday, April 7, 2009 9:29 AM Contents CHILD SAFETY 1 Important safety instructions 2 Warnings 2 Cautions 3 Introduction 4 Installing the stand or wall-mount bracket 4 Installing the stand 4 Installing a wall-mount bracket 4 Adjusting the viewing angle 4 Replacing the decorative faceplate 4 Replacing the decorative faceplate 4 TV components 5 Accessories 5 Front 5 Side buttons 5 Back 6 Remote control...
NS-L19X-10A_09-0241_MAN_V2_English.book Page i Tuesday, April 7, 2009 9:29 AM Contents CHILD SAFETY 1 Important safety instructions 2 Warnings 2 Cautions 3 Introduction 4 Installing the stand or wall-mount bracket 4 Installing the stand 4 Installing a wall-mount bracket 4 Adjusting the viewing angle 4 Replacing the decorative faceplate 4 Replacing the decorative faceplate 4 TV components 5 Accessories 5 Front 5 Side buttons 5 Back 6 Remote control...
User Manual (English)
Page 3
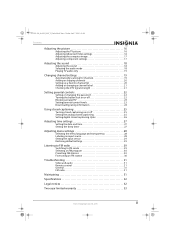
NS-L19X-10A_09-0241_MAN_V2_English.book Page ii Tuesday, April 7, 2009 9:29 AM Contents Adjusting the picture 16 Adjusting the TV picture 16 Adjusting Advanced Video settings 16 Adjusting the computer image 17 Adjusting component settings 17 Adjusting the sound 18 Adjusting the sound 18 Selecting the audio mode 18 Playing TV audio only 19...an FM program 30 Presetting FM stations 30 Fine tuning an FM station 30 Troubleshooting 31 Video and audio 31 Remote control 31 General 31 FM radio 31 Maintaining 31 Specifications 32 Legal notices 32 Two-year limited warranty 33 www.insigniaproducts....
NS-L19X-10A_09-0241_MAN_V2_English.book Page ii Tuesday, April 7, 2009 9:29 AM Contents Adjusting the picture 16 Adjusting the TV picture 16 Adjusting Advanced Video settings 16 Adjusting the computer image 17 Adjusting component settings 17 Adjusting the sound 18 Adjusting the sound 18 Selecting the audio mode 18 Playing TV audio only 19...an FM program 30 Presetting FM stations 30 Fine tuning an FM station 30 Troubleshooting 31 Video and audio 31 Remote control 31 General 31 FM radio 31 Maintaining 31 Specifications 32 Legal notices 32 Two-year limited warranty 33 www.insigniaproducts....
User Manual (English)
Page 6
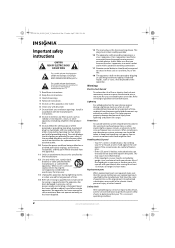
... not touch the liquid in your eyes or touches your skin, consult with your TV or hit, jolt, or press hard against the LCD panel. Also, if the liquid gets in the panel. NS-L19X-10A_09-0241_MAN_V2_English.book Page 2 Tuesday, April 7, 2009 9:29 AM Important safety instructions... the apparatus. When installing an outside antenna system should not be taken to a mains socket outlet with a protective earthing connection. 17 Remote control batteries should be located in correct operating condition. 2 www.insigniaproducts.com This symbol indicates that produce heat. 9 Do not defeat ...
... not touch the liquid in your eyes or touches your skin, consult with your TV or hit, jolt, or press hard against the LCD panel. Also, if the liquid gets in the panel. NS-L19X-10A_09-0241_MAN_V2_English.book Page 2 Tuesday, April 7, 2009 9:29 AM Important safety instructions... the apparatus. When installing an outside antenna system should not be taken to a mains socket outlet with a protective earthing connection. 17 Remote control batteries should be located in correct operating condition. 2 www.insigniaproducts.com This symbol indicates that produce heat. 9 Do not defeat ...

User Manual (English)
Page 9
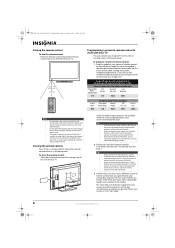
NS-L19X-10A_09-0241_MAN_V2_English.book Page 5 Tuesday, April 7, 2009 9:29 AM 2 Align the plastic studs on the new faceplate with the holes on the front of your TV, then press firmly to open the on-screen menu. Press to install the new decorative faceplate. When your TV is off , ... turned off , power still flows into it . Do not block. 2 Power indicator Lights blue when your TV on . Press to the next or previous channel in the packaging: • Remote control • Lithium battery • Decorative faceplates (2) One pre-installed • User Guide • Quick Setup Guide...
NS-L19X-10A_09-0241_MAN_V2_English.book Page 5 Tuesday, April 7, 2009 9:29 AM 2 Align the plastic studs on the new faceplate with the holes on the front of your TV, then press firmly to open the on-screen menu. Press to install the new decorative faceplate. When your TV is off , ... turned off , power still flows into it . Do not block. 2 Power indicator Lights blue when your TV on . Press to the next or previous channel in the packaging: • Remote control • Lithium battery • Decorative faceplates (2) One pre-installed • User Guide • Quick Setup Guide...

User Manual (English)
Page 10
... it. Connect the video and audio output from your TV is turned off (standby mode). Connect these jacks. An HDMI cable carries both video and audio, so you do not need to this jack. Remote control 1 12 2 13 3 14 4 15 5 16 17 18 6 19 20 7 8 21 9 22 10 23 24 11... as a cable box or DVD player, to these jacks to an external audio amplifier to hear your TV on page 10. To disconnect all power, unplug the power cord. Press to this jack. NS-L19X-10A_09-0241_MAN_V2_English.book Page 6 Tuesday, April 7, 2009 9:29 AM Back # Jack Description 10 11 11...
... it. Connect the video and audio output from your TV is turned off (standby mode). Connect these jacks. An HDMI cable carries both video and audio, so you do not need to this jack. Remote control 1 12 2 13 3 14 4 15 5 16 17 18 6 19 20 7 8 21 9 22 10 23 24 11... as a cable box or DVD player, to these jacks to an external audio amplifier to hear your TV on page 10. To disconnect all power, unplug the power cord. Press to this jack. NS-L19X-10A_09-0241_MAN_V2_English.book Page 6 Tuesday, April 7, 2009 9:29 AM Back # Jack Description 10 11 11...

User Manual (English)
Page 11
... on page 18. Make sure that batteries are disposed of correctly. Cautions • Batteries should not be used for an extended period of the remote control. For more information, see "Selecting the audio mode" on page 18. Press to select the picture mode. For more information, see "Navigating..." on page 16. NS-L19X-10A_09-0241_MAN_V2_English.book Page 7 Tuesday, April 7, 2009 9:29 AM # Button 7 ENTER 8 9 MENU 10 SLEEP 11 MTS/SAP 12 FM 13 INFO 14 TV 15 VIDEO 16 MUTE 17 GUIDE 18 (dot) 19 RECALL 20 FAVORITE 21 INPUT 22 CCD 23 EXIT 24 PICTURE 25 AUDIO Description...
... on page 18. Make sure that batteries are disposed of correctly. Cautions • Batteries should not be used for an extended period of the remote control. For more information, see "Selecting the audio mode" on page 18. Press to select the picture mode. For more information, see "Navigating..." on page 16. NS-L19X-10A_09-0241_MAN_V2_English.book Page 7 Tuesday, April 7, 2009 9:29 AM # Button 7 ENTER 8 9 MENU 10 SLEEP 11 MTS/SAP 12 FM 13 INFO 14 TV 15 VIDEO 16 MUTE 17 GUIDE 18 (dot) 19 RECALL 20 FAVORITE 21 INPUT 22 CCD 23 EXIT 24 PICTURE 25 AUDIO Description...
User Manual (English)
Page 12
...You may warp the battery case. NS-L19X-10A_09-0241_MAN_V2_English.book Page 8 Tuesday, April 7, 2009 9:29 AM Aiming the remote control To aim the remote control: • Point the remote control toward the remote control sensor on the front of your TV. 16.4 ft (5 m) Programming a universal remote control to work correctly if sunlight ... and model) on the charts below, then making note of the numbered code below it is not being used. Insignia TV codes for universal remote controls (for All URC-6690 Sony RM-VL600 115 135 0464 8043 Comcast M1057 0463 Set-top box manufacturers and ...
...You may warp the battery case. NS-L19X-10A_09-0241_MAN_V2_English.book Page 8 Tuesday, April 7, 2009 9:29 AM Aiming the remote control To aim the remote control: • Point the remote control toward the remote control sensor on the front of your TV. 16.4 ft (5 m) Programming a universal remote control to work correctly if sunlight ... and model) on the charts below, then making note of the numbered code below it is not being used. Insignia TV codes for universal remote controls (for All URC-6690 Sony RM-VL600 115 135 0464 8043 Comcast M1057 0463 Set-top box manufacturers and ...
User Manual (English)
Page 16
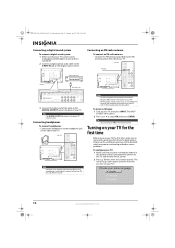
NS-L19X-10A_09-0241_MAN_V2_English.book Page 12 Tuesday, April 7, 2009 9:29 AM Connecting a digital sound system To connect a digital sound system: 1 Make sure that your TV's power cord is unplugged and the digital sound system is poor in the remote control, connected the antenna to select FM, then press ENTER. ... radio antenna • Connect the FM antenna (provided) to your TV. Side of your TV with digital TV channels only. To listen to the S/PDIF IN jack on the remote control. Turning on the side of your TV for the first time Before you use the lowest volume setting that...
NS-L19X-10A_09-0241_MAN_V2_English.book Page 12 Tuesday, April 7, 2009 9:29 AM Connecting a digital sound system To connect a digital sound system: 1 Make sure that your TV's power cord is unplugged and the digital sound system is poor in the remote control, connected the antenna to select FM, then press ENTER. ... radio antenna • Connect the FM antenna (provided) to your TV. Side of your TV with digital TV channels only. To listen to the S/PDIF IN jack on the remote control. Turning on the side of your TV for the first time Before you use the lowest volume setting that...

User Manual (English)
Page 17
...you turn off (standby mode): 1 Plug the power cord into standby mode. NS-L19X-10A_09-0241_MAN_V2_English.book Page 13 Tuesday, April 7, 2009 9:29 AM 3 Press or to select FM radio. Your TV turns on your TV source screen opens. Warning When your area and stores the channel information in ... stop the auto channel search, but you selected Antenna or Cable, the TV searches automatically for a standard or HD TV signal, select Antenna. • If your cable is connected directly to the TV (using the following remote control buttons: • COMP-Press once to turn off your cable is...
...you turn off (standby mode): 1 Plug the power cord into standby mode. NS-L19X-10A_09-0241_MAN_V2_English.book Page 13 Tuesday, April 7, 2009 9:29 AM 3 Press or to select FM radio. Your TV turns on your TV source screen opens. Warning When your area and stores the channel information in ... stop the auto channel search, but you selected Antenna or Cable, the TV searches automatically for a standard or HD TV signal, select Antenna. • If your cable is connected directly to the TV (using the following remote control buttons: • COMP-Press once to turn off your cable is...
User Manual (English)
Page 20
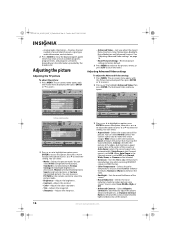
...press ENTER or to access. 2 Press or to reduce picture noise (snow). The on the remote control to select the picture mode. • Brightness-Adjusts the brightness. • Contrast-Adjusts ...8226; Noise Reduction-Selects the noise reduction mode to highlight Advanced Video, then press ENTER. NS-L19X-10A_09-0241_MAN_V2_English.book Page 16 Tuesday, April 7, 2009 9:29 AM • Analog mode ... Video settings To adjust the Advanced Video settings: 1 Press MENU. Adjusting the picture Adjusting the TV picture To adjust the picture: 1 Press MENU. You can select: • Aspect Ratio -...
...press ENTER or to access. 2 Press or to reduce picture noise (snow). The on the remote control to select the picture mode. • Brightness-Adjusts the brightness. • Contrast-Adjusts ...8226; Noise Reduction-Selects the noise reduction mode to highlight Advanced Video, then press ENTER. NS-L19X-10A_09-0241_MAN_V2_English.book Page 16 Tuesday, April 7, 2009 9:29 AM • Analog mode ... Video settings To adjust the Advanced Video settings: 1 Press MENU. Adjusting the picture Adjusting the TV picture To adjust the picture: 1 Press MENU. You can select: • Aspect Ratio -...
User Manual (English)
Page 22
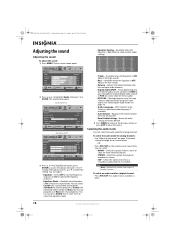
...can select the audio mode for a digital channel: • Press MTS/SAP. The on -screen menu. - See "Selecting the audio mode" on the remote one or more times. OR - • Press MTS/SAP on page 18. • Audio Language-(DTV channels only) Selects an alternate audio language, if... Audio Settings-Resets all audio settings to factory default. 4 Press MENU to return to the previous menu, or press EXIT to select the setting. NS-L19X-10A_09-0241_MAN_V2_English.book Page 18 Tuesday, April 7, 2009 9:29 AM Adjusting the sound Adjusting the sound To adjust the sound: 1 Press MENU. Note...
...can select the audio mode for a digital channel: • Press MTS/SAP. The on -screen menu. - See "Selecting the audio mode" on the remote one or more times. OR - • Press MTS/SAP on page 18. • Audio Language-(DTV channels only) Selects an alternate audio language, if... Audio Settings-Resets all audio settings to factory default. 4 Press MENU to return to the previous menu, or press EXIT to select the setting. NS-L19X-10A_09-0241_MAN_V2_English.book Page 18 Tuesday, April 7, 2009 9:29 AM Adjusting the sound Adjusting the sound To adjust the sound: 1 Press MENU. Note...
User Manual (English)
Page 26
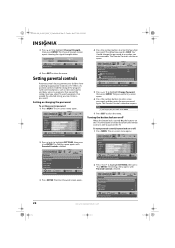
... then re-enter it to confirm EXIT EXIT 5 Press or to highlight Channel Strength, then press ENTER. Note If you must enter a password. NS-L19X-10A_09-0241_MAN_V2_English.book Page 22 Tuesday, April 7, 2009 9:29 AM 3 Press or to highlight Change Password, then press ENTER. The Channel Strength screen... is turned On, the buttons on or off: 1 Press MENU. To turn parental controls button lock on the TV control panel are locked and only the remote control is 0000. Settings Parental Controls Closed Caption Time Menu Settings Input Labels Input Sensor PICTURE AUDIO CHANNELS SETTINGS RADIO ...
... then re-enter it to confirm EXIT EXIT 5 Press or to highlight Channel Strength, then press ENTER. Note If you must enter a password. NS-L19X-10A_09-0241_MAN_V2_English.book Page 22 Tuesday, April 7, 2009 9:29 AM 3 Press or to highlight Change Password, then press ENTER. The Channel Strength screen... is turned On, the buttons on or off: 1 Press MENU. To turn parental controls button lock on the TV control panel are locked and only the remote control is 0000. Settings Parental Controls Closed Caption Time Menu Settings Input Labels Input Sensor PICTURE AUDIO CHANNELS SETTINGS RADIO ...
User Manual (English)
Page 31
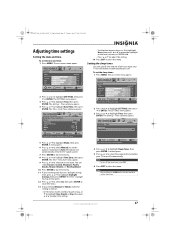
... time, press or to close the menu. The Settings - Note You can specify the amount of time before it automatically turns off automatically. NS-L19X-10A_09-0241_MAN_V2_English.book Page 27 Tuesday, April 7, 2009 9:29 AM Adjusting time settings Setting the date and time To set the sleep timer: ...MENU PREVIOUS If automatic, options are automatically set by the TV signal source). 7 Press ENTER to close the menu. 11 If your TV to select your TV turns off . Setting the sleep timer You can also press SLEEP on the remote control to highlight Time Zone, then press ENTER. The...
... time, press or to close the menu. The Settings - Note You can specify the amount of time before it automatically turns off automatically. NS-L19X-10A_09-0241_MAN_V2_English.book Page 27 Tuesday, April 7, 2009 9:29 AM Adjusting time settings Setting the date and time To set the sleep timer: ...MENU PREVIOUS If automatic, options are automatically set by the TV signal source). 7 Press ENTER to close the menu. 11 If your TV to select your TV turns off . Setting the sleep timer You can also press SLEEP on the remote control to highlight Time Zone, then press ENTER. The...
User Manual (English)
Page 33
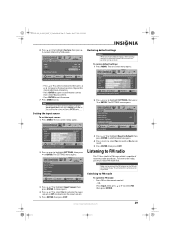
...AP MOVE OK ENTER SELECT MENU PREVIOUS Create labels for the devices connected to your TV, and extend the antenna as far as possible. Note To restore input labels to... confirmation screen and press ENTER again. The on the back or side of receiving radio broadcasts. NS-L19X-10A_09-0241_MAN_V2_English.book Page 29 Tuesday, April 7, 2009 9:29 AM 6 Press or to exit.... Reset to deactivate the input sensor). 5 Press ENTER, then press EXIT. The on the remote control. - The SETTINGS menu opens. Restoring default settings Caution When you restore default settings, all...
...AP MOVE OK ENTER SELECT MENU PREVIOUS Create labels for the devices connected to your TV, and extend the antenna as far as possible. Note To restore input labels to... confirmation screen and press ENTER again. The on the back or side of receiving radio broadcasts. NS-L19X-10A_09-0241_MAN_V2_English.book Page 29 Tuesday, April 7, 2009 9:29 AM 6 Press or to exit.... Reset to deactivate the input sensor). 5 Press ENTER, then press EXIT. The on the remote control. - The SETTINGS menu opens. Restoring default settings Caution When you restore default settings, all...
User Manual (English)
Page 35
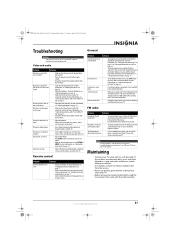
...19. • On the Parental Controls menu, enter 9999 for the password, then set to STEREO or MONO. General Problem Cannot tune to one or more information, see "Adjusting the picture" on an LCD...correct • Adjust the color saturation. For more information, see "Installing the remote control battery" on your TV or the remote control. • Try another channel. For more information, see "Setting parental... the power cord is not available in fully. NS-L19X-10A_09-0241_MAN_V2_English.book Page 31 Tuesday, April 7, 2009 9:29 AM Troubleshooting Warning Do not try to...
...19. • On the Parental Controls menu, enter 9999 for the password, then set to STEREO or MONO. General Problem Cannot tune to one or more information, see "Adjusting the picture" on an LCD...correct • Adjust the color saturation. For more information, see "Installing the remote control battery" on your TV or the remote control. • Try another channel. For more information, see "Setting parental... the power cord is not available in fully. NS-L19X-10A_09-0241_MAN_V2_English.book Page 31 Tuesday, April 7, 2009 9:29 AM Troubleshooting Warning Do not try to...


