User Manual (English)
Page 1
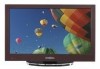
NS-L19X-10A_09-0241_MAN_V2_English.book Page 0 Tuesday, April 7, 2009 9:29 AM User Guide 19" LCD TV with Decorative Faceplates NS-L19X-10A
NS-L19X-10A_09-0241_MAN_V2_English.book Page 0 Tuesday, April 7, 2009 9:29 AM User Guide 19" LCD TV with Decorative Faceplates NS-L19X-10A

User Manual (English)
Page 9
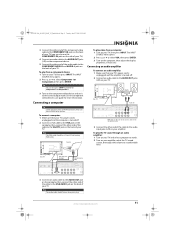
...8226; Decorative faceplates (2) One pre-installed • User Guide • Quick Setup Guide • External radio antenna • Component cable Front # Button 1 CH /CH 2 VOL .VOL 3 MENU 4 INPUT 5 (power) Description Press to go to decrease or increase the volume. NS-L19X-10A_09-0241_MAN_V2_English.book Page 5 Tuesday, April 7, 2009 9:... to open the Input Source menu and select the video input source. When your TV is off (standby mode). www.insigniaproducts.com 5 Press to turn your TV on the front of your TV is off , power still flows into it . Do not block. 2 Power ...
...8226; Decorative faceplates (2) One pre-installed • User Guide • Quick Setup Guide • External radio antenna • Component cable Front # Button 1 CH /CH 2 VOL .VOL 3 MENU 4 INPUT 5 (power) Description Press to go to decrease or increase the volume. NS-L19X-10A_09-0241_MAN_V2_English.book Page 5 Tuesday, April 7, 2009 9:... to open the Input Source menu and select the video input source. When your TV is off (standby mode). www.insigniaproducts.com 5 Press to turn your TV on the front of your TV is off , power still flows into it . Do not block. 2 Power ...

User Manual (English)
Page 11
... you can cause a rash. Press twice for AV1. Press to turn on closed captioning on or off the sound. Press again to display program guide information (if available) for DTV broadcasts. Press to restore the sound. Press to set the sleep timer. For more information, see "Digital sub-... Press four times for S-VIDEO1. www.insigniaproducts.com 7 NS-L19X-10A_09-0241_MAN_V2_English.book Page 7 Tuesday, April 7, 2009 9:29 AM # Button 7 ENTER 8 9 MENU 10 SLEEP 11 MTS/SAP 12 FM 13 INFO 14 TV 15 VIDEO 16 MUTE 17 GUIDE 18 (dot) 19 RECALL 20 FAVORITE 21 INPUT 22 CCD 23 EXIT 24 ...
... you can cause a rash. Press twice for AV1. Press to turn on closed captioning on or off the sound. Press again to display program guide information (if available) for DTV broadcasts. Press to restore the sound. Press to set the sleep timer. For more information, see "Digital sub-... Press four times for S-VIDEO1. www.insigniaproducts.com 7 NS-L19X-10A_09-0241_MAN_V2_English.book Page 7 Tuesday, April 7, 2009 9:29 AM # Button 7 ENTER 8 9 MENU 10 SLEEP 11 MTS/SAP 12 FM 13 INFO 14 TV 15 VIDEO 16 MUTE 17 GUIDE 18 (dot) 19 RECALL 20 FAVORITE 21 INPUT 22 CCD 23 EXIT 24 ...

User Manual (English)
Page 14
...sure that your TV's power cord is unplugged and the camcorder or game is turned off. 2 Connect an AV cable to the AV OUT VIDEO, AUDIO-L, and AUDIO-R jacks on the camcorder or game. 2 Connect an HDMI cable to the HDMI OUT jack on the HDMI device. NS-L19X-10A_09-0241_MAN_V2_English.book... white. The INPUT SOURCE menu opens. 2 Press or to connectors. See the HDMI device's user guide for more information. Back of the cable to the correct output mode. HDMI 1 jack 3 Connect the other end of your TV. Connecting an HDMI device To connect an HDMI device: 1 Make sure that your...
...sure that your TV's power cord is unplugged and the camcorder or game is turned off. 2 Connect an AV cable to the AV OUT VIDEO, AUDIO-L, and AUDIO-R jacks on the camcorder or game. 2 Connect an HDMI cable to the HDMI OUT jack on the HDMI device. NS-L19X-10A_09-0241_MAN_V2_English.book... white. The INPUT SOURCE menu opens. 2 Press or to connectors. See the HDMI device's user guide for more information. Back of the cable to the correct output mode. HDMI 1 jack 3 Connect the other end of your TV. Connecting an HDMI device To connect an HDMI device: 1 Make sure that your...
User Manual (English)
Page 15
... The audio cable should be used for a better picture. See the component video device's user guide for Component 1 or Component 2. 3 Turn on your amplifier, select the TV sound source, then adjust the volume to a comfortable level. The INPUT SOURCE menu opens. 2 Press or to select VGA, then press ENTER....a computer Tip Some computers have a stereo mini plug. NS-L19X-10A_09-0241_MAN_V2_English.book Page 11 Tuesday, April 7, 2009 9:29 AM 3 Connect the other end of the component video cable to the COMPONENT1 IN jacks on the back of your TV (you can also use the COMPONENT2 IN jacks on the ...
... The audio cable should be used for a better picture. See the component video device's user guide for Component 1 or Component 2. 3 Turn on your amplifier, select the TV sound source, then adjust the volume to a comfortable level. The INPUT SOURCE menu opens. 2 Press or to select VGA, then press ENTER....a computer Tip Some computers have a stereo mini plug. NS-L19X-10A_09-0241_MAN_V2_English.book Page 11 Tuesday, April 7, 2009 9:29 AM 3 Connect the other end of the component video cable to the COMPONENT1 IN jacks on the back of your TV (you can also use the COMPONENT2 IN jacks on the ...
User Manual (English)
Page 20
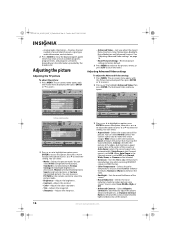
...Auto Zoom (selects the correct aspect ratio automatically) if Auto Zoom in VIDEO format. • Color Temperature-Selects the color temperature. NS-L19X-10A_09-0241_MAN_V2_English.book Page 16 Tuesday, April 7, 2009 9:29 AM • Analog mode information-Displays channel number, channel label (if... preset), signal type, audio information, and resolution. 2 Press GUIDE to select the setting. Adjusting the picture Adjusting the TV picture To adjust the picture: 1 Press MENU. The Advanced Video submenu opens. EXIT EXIT 2 Press or ...
...Auto Zoom (selects the correct aspect ratio automatically) if Auto Zoom in VIDEO format. • Color Temperature-Selects the color temperature. NS-L19X-10A_09-0241_MAN_V2_English.book Page 16 Tuesday, April 7, 2009 9:29 AM • Analog mode information-Displays channel number, channel label (if... preset), signal type, audio information, and resolution. 2 Press GUIDE to select the setting. Adjusting the picture Adjusting the TV picture To adjust the picture: 1 Press MENU. The Advanced Video submenu opens. EXIT EXIT 2 Press or ...