
Marketing Sheet
Page 1
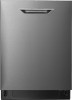
Top Control Dishwasher FEATURES • Status indicator light • Very quiet operation (46-dBA) • Flexible three-rack system • Lighted interior • Accommodates up to 16 place settings • High-temperature wash for better, safer cleaning • Optional heated dry • Available in stainless steel, black stainless steel, or white INCLUDED • Dishwasher • User Guide • Installation Guide STAINLESS STEEL MODEL PICTURED NS-DWR2BS8 / NS-DWR2WH8 / NS-DWR2SS8 PRODUCT SPECIFICATIONS Warranty Capacity Dimensions W×D×H Weight 1 year limited Max...
Top Control Dishwasher FEATURES • Status indicator light • Very quiet operation (46-dBA) • Flexible three-rack system • Lighted interior • Accommodates up to 16 place settings • High-temperature wash for better, safer cleaning • Optional heated dry • Available in stainless steel, black stainless steel, or white INCLUDED • Dishwasher • User Guide • Installation Guide STAINLESS STEEL MODEL PICTURED NS-DWR2BS8 / NS-DWR2WH8 / NS-DWR2SS8 PRODUCT SPECIFICATIONS Warranty Capacity Dimensions W×D×H Weight 1 year limited Max...
Installation Guide
Page 3
... governing codes and ordinances. • Note to heat the water. This installation guide will show you should be installed to allow for the consumer's and local inspector's use. • Note to three hours. New installations require more time than replacement installations. NS-DWH2BS8 / NS-DWH2SS8 / NS-DWR2BS8 / NS-DWR2WH8 Top Control Dishwasher Introduction Congratulations on . IMPORTANT • Observe all CAUTIONS and WARNINGS shown throughout these instructions completely and carefully. Installation of...
... governing codes and ordinances. • Note to heat the water. This installation guide will show you should be installed to allow for the consumer's and local inspector's use. • Note to three hours. New installations require more time than replacement installations. NS-DWH2BS8 / NS-DWH2SS8 / NS-DWR2BS8 / NS-DWR2WH8 Top Control Dishwasher Introduction Congratulations on . IMPORTANT • Observe all CAUTIONS and WARNINGS shown throughout these instructions completely and carefully. Installation of...
Installation Guide
Page 4
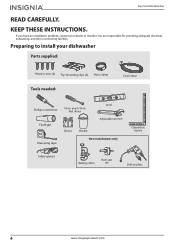
If you have an installation problem, contact your dishwasher Parts supplied: Wood screws (4) Top mounting clips (2) Hose clamp Tools needed: Drain hose Phillips screwdriver Flashlight Measuring tape 1/4 in . Nut driver Level Adjustable wrench Gloves Bucket New installations only Carpenters square Safety glasses Tubing cutter Hole saw set Drill and bits 4 www.insigniaproducts.com KEEP THESE INSTRUCTIONS. and 5/16 in . Preparing to install your dealer or installer. Top Control Dishwasher READ CAREFULLY. You are...
If you have an installation problem, contact your dishwasher Parts supplied: Wood screws (4) Top mounting clips (2) Hose clamp Tools needed: Drain hose Phillips screwdriver Flashlight Measuring tape 1/4 in . Nut driver Level Adjustable wrench Gloves Bucket New installations only Carpenters square Safety glasses Tubing cutter Hole saw set Drill and bits 4 www.insigniaproducts.com KEEP THESE INSTRUCTIONS. and 5/16 in . Preparing to install your dealer or installer. Top Control Dishwasher READ CAREFULLY. You are...

Installation Guide
Page 6
... drain hose. • Do not connect the drain lines from the front of the dishwasher for door opening the door. Otherwise, either Method 1 or Method 2 may be used if the waste tee or garbage disposal connection is less than 32 in. (81.28 cm) above the floor, to prevent siphoning. Top Control Dishwasher If installing into the dishwasher. • An air gap must be connected to a waste line with...
... drain hose. • Do not connect the drain lines from the front of the dishwasher for door opening the door. Otherwise, either Method 1 or Method 2 may be used if the waste tee or garbage disposal connection is less than 32 in. (81.28 cm) above the floor, to prevent siphoning. Top Control Dishwasher If installing into the dishwasher. • An air gap must be connected to a waste line with...

Installation Guide
Page 7
...: Remove the house fuse or open the circuit breaker before proceeding. Cable Direct This appliance must be plugged into an appropriate outlet that is properly grounded. The plug must be connected to its own, properly grounded branch circuit that is protected by providing a path of electric shock. High drain with a waste tee or garbage disposal connection You must be grounded. Power Cord Models...
...: Remove the house fuse or open the circuit breaker before proceeding. Cable Direct This appliance must be plugged into an appropriate outlet that is properly grounded. The plug must be connected to its own, properly grounded branch circuit that is protected by providing a path of electric shock. High drain with a waste tee or garbage disposal connection You must be grounded. Power Cord Models...

Installation Guide
Page 8
... . (6.5-9.0 cm) from an authorized store. The power cord and connections must comply with Dishwasher Install Kit With Power Cord, available for purchase from cabinet Ground White Black 8 www.insigniaproducts.com If the cabinet wall is 54 in. (1.4 m) min. Cabinet preparation and wire routing • The wiring may pass through the same hole as the drain hose and hot water line, but power cords with plugs must pass through the wall of...
... . (6.5-9.0 cm) from an authorized store. The power cord and connections must comply with Dishwasher Install Kit With Power Cord, available for purchase from cabinet Ground White Black 8 www.insigniaproducts.com If the cabinet wall is 54 in. (1.4 m) min. Cabinet preparation and wire routing • The wiring may pass through the same hole as the drain hose and hot water line, but power cords with plugs must pass through the wall of...

Installation Guide
Page 21
... sink hot water faucet and verify the water temperature. See Step 10: Level the dishwasher on page 16. • Make sure that power is left in the literature package. • Read the User Guide for operating instructions. • Check the door opening and closing. If the door hits the cabinet, reposition or relevel the dishwasher. Tighten connections if needed. • Remove any protective film (if present) from the control panel and door...
... sink hot water faucet and verify the water temperature. See Step 10: Level the dishwasher on page 16. • Make sure that power is left in the literature package. • Read the User Guide for operating instructions. • Check the door opening and closing. If the door hits the cabinet, reposition or relevel the dishwasher. Tighten connections if needed. • Remove any protective film (if present) from the control panel and door...

Installation Guide
Page 22
... www.insigniaproducts.com If leaks are found , turn power off , then tighten connections. Also check the drain line for instructions). 3 Close the door, select the Rinse only cycle, and press START/Cancel. 4 Make sure that water enters the dishwasher. Allow the toekick to be caused by door rubbing or hitting against the legs of the water has drained. Restore power after the leak is found , turn the power supply off at the breaker...
... www.insigniaproducts.com If leaks are found , turn power off , then tighten connections. Also check the drain line for instructions). 3 Close the door, select the Rinse only cycle, and press START/Cancel. 4 Make sure that water enters the dishwasher. Allow the toekick to be caused by door rubbing or hitting against the legs of the water has drained. Restore power after the leak is found , turn the power supply off at the breaker...
FAQs
Page 1
... my dishwasher doesn't start ? The Child Lock indicator turns off , press Steam Wash and Vortex Wash at the same time. Question 3: Why does it 2 Question 8: Does the dishwasher machine come with a food dispenser 2 Question 9: Are racks adjustable?...2 Question 10: What do the error codes mean? ...3 Frequently Asked Questions Question 1: How do you turn the child lock on the bottom rack? To cancel the delayed start delay? Question 2: What should I do if my dishes aren't drying...
... my dishwasher doesn't start ? The Child Lock indicator turns off , press Steam Wash and Vortex Wash at the same time. Question 3: Why does it 2 Question 8: Does the dishwasher machine come with a food dispenser 2 Question 9: Are racks adjustable?...2 Question 10: What do the error codes mean? ...3 Frequently Asked Questions Question 1: How do you turn the child lock on the bottom rack? To cancel the delayed start delay? Question 2: What should I do if my dishes aren't drying...
FAQs
Page 2
... have adjustable racks. • NS-DWH2SS8 and NS-DWR2SS8 have a qualified person raise the hot water heater thermostat setting. Turn on the hot water faucet near the dishwasher, and let it pulls the moisture off . OR • Reset the breaker where the washing machine is reduced before starting the dishwasher. As the sides cool, it run for more information and adjustment instructions, see the User Guide that came with a food dispenser? This error...
... have adjustable racks. • NS-DWH2SS8 and NS-DWR2SS8 have a qualified person raise the hot water heater thermostat setting. Turn on the hot water faucet near the dishwasher, and let it pulls the moisture off . OR • Reset the breaker where the washing machine is reduced before starting the dishwasher. As the sides cool, it run for more information and adjustment instructions, see the User Guide that came with a food dispenser? This error...

User Guide
Page 2
... operation 11 Preparing and loading dishes 12 Adding a dish 17 Filling the detergent dispenser 18 Filling the rinse aid dispenser 18 Factors affecting performance 20 Using rinse aid 20 Water temperature 20 Water pressure 20 Maintaining your dishwasher 21 Cleaning the stainless steel panel 21 Cleaning the control panel 21 Cleaning the stainless steel inner door and tub 21 Cleaning the filters 21 Cleaning the door and tub gaskets 23 Cleaning the air gap 24 Protecting your dishwasher for long periods 24 Troubleshooting 25 Troubleshooting 25 Error codes 25 Specifications...
... operation 11 Preparing and loading dishes 12 Adding a dish 17 Filling the detergent dispenser 18 Filling the rinse aid dispenser 18 Factors affecting performance 20 Using rinse aid 20 Water temperature 20 Water pressure 20 Maintaining your dishwasher 21 Cleaning the stainless steel panel 21 Cleaning the control panel 21 Cleaning the stainless steel inner door and tub 21 Cleaning the filters 21 Cleaning the door and tub gaskets 23 Cleaning the air gap 24 Protecting your dishwasher for long periods 24 Troubleshooting 25 Troubleshooting 25 Error codes 25 Specifications...

User Guide
Page 3
Your NS-DWH2BS8/NS-DWH2SS8/NS-DWR2BS8/NS-DWR2WH8/NS-DWR2SS8 represents the state of the art in the literature accompanying your dishwasher. WARNING - This symbol indicates that there are important operating and maintenance instructions in dishwasher design and is designed for reliable and trouble-free performance. Servicing is present within your dishwasher. www.insigniaproducts.com 3 Install in any ventilation openings. Top Control Dishwasher Introduction Congratulations on your dishwasher, follow basic safety...
Your NS-DWH2BS8/NS-DWH2SS8/NS-DWR2BS8/NS-DWR2WH8/NS-DWR2SS8 represents the state of the art in the literature accompanying your dishwasher. WARNING - This symbol indicates that there are important operating and maintenance instructions in dishwasher design and is designed for reliable and trouble-free performance. Servicing is present within your dishwasher. www.insigniaproducts.com 3 Install in any ventilation openings. Top Control Dishwasher Introduction Congratulations on your dishwasher, follow basic safety...
User Guide
Page 4
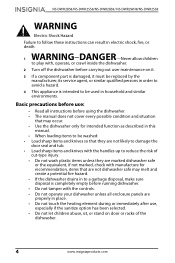
... out user maintenance on door or racks of the dishwasher. 4 www.insigniaproducts.com NS-DWH2BS8/NS-DWH2SS8/NS-DWR2BS8/ NS-DWR2WH8/NS-DWR2SS8 WARNING Electric Shock Hazard Failure to follow these instructions can result in electric shock, fire, or death. 1 WARNING-DANGER-Neverallowchildren to play with the controls. • Do not operate your dishwasher unless all enclosure panels are properly in place. • Do not touch the heating element during...
... out user maintenance on door or racks of the dishwasher. 4 www.insigniaproducts.com NS-DWH2BS8/NS-DWH2SS8/NS-DWR2BS8/ NS-DWR2WH8/NS-DWR2SS8 WARNING Electric Shock Hazard Failure to follow these instructions can result in electric shock, fire, or death. 1 WARNING-DANGER-Neverallowchildren to play with the controls. • Do not operate your dishwasher unless all enclosure panels are properly in place. • Do not touch the heating element during...
User Guide
Page 6
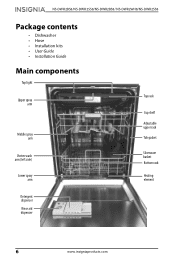
NS-DWH2BS8/NS-DWH2SS8/NS-DWR2BS8/ NS-DWR2WH8/NS-DWR2SS8 Package contents • Dishwasher • Hose • Installation kits • User Guide • Installation Guide Main components Top light Upper spray arm Middle spray arm Vortex wash arm (left side) Lower spray arm Top rack Cup shelf Adjustable upper rack Tub gasket Silverware basket Bottom rack Heating element Detergent dispenser Rinse aid dispenser 6 www.insigniaproducts.com
NS-DWH2BS8/NS-DWH2SS8/NS-DWR2BS8/ NS-DWR2WH8/NS-DWR2SS8 Package contents • Dishwasher • Hose • Installation kits • User Guide • Installation Guide Main components Top light Upper spray arm Middle spray arm Vortex wash arm (left side) Lower spray arm Top rack Cup shelf Adjustable upper rack Tub gasket Silverware basket Bottom rack Heating element Detergent dispenser Rinse aid dispenser 6 www.insigniaproducts.com

User Guide
Page 7
... soil loads. Filter system Your dishwasher has a multiple filter system which includes four separate filter meshes. www.insigniaproducts.com 7 Before using a soft cloth. Understanding your dishwasher's features How your local power source. Top Control Dishwasher Installing and setting up your dishwasher 1 Remove the interior packing. 2 Clean the interior surface with lukewarm water using your dishwasher, refer to the Installation Guide provided. Providing a proper power supply Check your dishwasher cleans The dishwasher fills with less water and less energy. Hot water is...
... soil loads. Filter system Your dishwasher has a multiple filter system which includes four separate filter meshes. www.insigniaproducts.com 7 Before using a soft cloth. Understanding your dishwasher's features How your local power source. Top Control Dishwasher Installing and setting up your dishwasher 1 Remove the interior packing. 2 Clean the interior surface with lukewarm water using your dishwasher, refer to the Installation Guide provided. Providing a proper power supply Check your dishwasher cleans The dishwasher fills with less water and less energy. Hot water is...
User Guide
Page 10
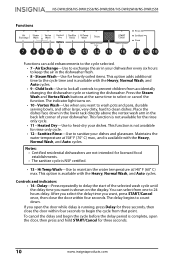
... clean dishes. Functions NS-DWH2BS8/NS-DWH2SS8/NS-DWR2BS8/ NS-DWR2WH8/NS-DWR2SS8 Functions can select from one to select or cancel the function. Child lock-Use to lock all controls to the cycle selected. • 7 - Heated Dry-Use to begin the cycle before the delay period is complete, open the door while delay is available with the Heavy, Normal Wash, and Auto cycles. Controls and indicators • 14 - Vortex Wash-Use when you want is available with the Heavy, Normal Wash, and Auto cycles...
... clean dishes. Functions NS-DWH2BS8/NS-DWH2SS8/NS-DWR2BS8/ NS-DWR2WH8/NS-DWR2SS8 Functions can select from one to select or cancel the function. Child lock-Use to lock all controls to the cycle selected. • 7 - Heated Dry-Use to begin the cycle before the delay period is complete, open the door while delay is available with the Heavy, Normal Wash, and Auto cycles. Controls and indicators • 14 - Vortex Wash-Use when you want is available with the Heavy, Normal Wash, and Auto cycles...
User Guide
Page 20
..., the hot water supply line for several minutes. 2 Hold a thermometer (a candy or meat thermometer will work) in your load that it run hot water from the pipe before starting the cycle. In addition, the heated dry option will have a qualified person raise the hot water heater thermostat setting. The rinse aid dispenser, located next to refill. Heat dry function The heat dry function, when used with a rinse aid, enhances drying performance. If the rinse aid is low, the rinse aid light turns on at...
..., the hot water supply line for several minutes. 2 Hold a thermometer (a candy or meat thermometer will work) in your load that it run hot water from the pipe before starting the cycle. In addition, the heated dry option will have a qualified person raise the hot water heater thermostat setting. The rinse aid dispenser, located next to refill. Heat dry function The heat dry function, when used with a rinse aid, enhances drying performance. If the rinse aid is low, the rinse aid light turns on at...

User Guide
Page 24
... the end of your dishwasher, make sure it into a pan. Have a qualified person do the following: To disconnect service: 1 Turn off the electrical power to leave it for long periods Your dishwasher should be cleaned with a toothpick. NS-DWH2BS8/NS-DWH2SS8/NS-DWR2BS8/ NS-DWR2WH8/NS-DWR2SS8 The inside of the dishwasher is self-cleaning under the inlet valve, then disconnect water line from the inlet valve and drain it is clean so the dishwasher will drain properly...
... the end of your dishwasher, make sure it into a pan. Have a qualified person do the following: To disconnect service: 1 Turn off the electrical power to leave it for long periods Your dishwasher should be cleaned with a toothpick. NS-DWH2BS8/NS-DWH2SS8/NS-DWR2BS8/ NS-DWR2WH8/NS-DWR2SS8 The inside of the dishwasher is self-cleaning under the inlet valve, then disconnect water line from the inlet valve and drain it is clean so the dishwasher will drain properly...

User Guide
Page 25
... distributary valve not working. The rinse aid light is activated. Top Control Dishwasher 2 Turn on page 10. The dishwasher This is normal and beeps at the indicates that the door is Refer to make sure they do not leak. E9 A button has been touched for service. The delay start option is closed and won't start closed properly. "Controls and indicators" on water and electrical power supply. 3 Fill the detergent cup and the rinse aid cup and run the dishwasher through a heated-wash cycle. 4 Check all connections...
... distributary valve not working. The rinse aid light is activated. Top Control Dishwasher 2 Turn on page 10. The dishwasher This is normal and beeps at the indicates that the door is Refer to make sure they do not leak. E9 A button has been touched for service. The delay start option is closed and won't start closed properly. "Controls and indicators" on water and electrical power supply. 3 Fill the detergent cup and the rinse aid cup and run the dishwasher through a heated-wash cycle. 4 Check all connections...

User Guide
Page 28
....insigniaproducts.com If the noise continues after loading will stop. Turn on the water valve. Make sure that the door is normal. opening/drain pump. the tub is turned off. The dishwasher won't fill (the dishwasher will beep) The water valve is stained Reddish stain. NS-DWH2BS8/NS-DWH2SS8/NS-DWR2BS8/ NS-DWR2WH8/NS-DWR2SS8 PROBLEM POSSIBLE CAUSE POSSIBLE SOLUTION The interior of the rinse only cycle right after the cycle is ground up the noise will help this .
....insigniaproducts.com If the noise continues after loading will stop. Turn on the water valve. Make sure that the door is normal. opening/drain pump. the tub is turned off. The dishwasher won't fill (the dishwasher will beep) The water valve is stained Reddish stain. NS-DWH2BS8/NS-DWH2SS8/NS-DWR2BS8/ NS-DWR2WH8/NS-DWR2SS8 PROBLEM POSSIBLE CAUSE POSSIBLE SOLUTION The interior of the rinse only cycle right after the cycle is ground up the noise will help this .