
Installation Guide
Page 1
INSTALLATION GUIDE Top Control Dishwasher NS-DWH2BS8 / NS-DWH2SS8 / NS-DWR2BS8 / NS-DWR2WH8 / NS-DWR2SS8 / NS-DWH1SS9 / NS-DWH1WH9 Before using your new product, please read these instructions to prevent any damage.
INSTALLATION GUIDE Top Control Dishwasher NS-DWH2BS8 / NS-DWH2SS8 / NS-DWR2BS8 / NS-DWR2WH8 / NS-DWR2SS8 / NS-DWH1SS9 / NS-DWH1WH9 Before using your new product, please read these instructions to prevent any damage.

Installation Guide
Page 2
Contents Introduction 3 IMPORTANT SAFETY INSTRUCTIONS 3 BEFORE YOU BEGIN 3 Preparing to install your dishwasher 4 Enclosure requirements 5 Drain requirements 6 Drain preparation 6 Electrical requirements 7 GROUNDING INSTRUCTIONS 7 Cabinet preparation and wire routing 8 Preparing the hot ... Inserting the drain hose through the cabinet 15 Step 8: Slide the dishwasher partially into the cabinet 15 Step 9: Position the dishwasher under the countertop 16 Step 10: Level the dishwasher 16 Step 11: Securing the dishwasher to the countertop 17 Step 12: Connecting the water supply line 19...
Contents Introduction 3 IMPORTANT SAFETY INSTRUCTIONS 3 BEFORE YOU BEGIN 3 Preparing to install your dishwasher 4 Enclosure requirements 5 Drain requirements 6 Drain preparation 6 Electrical requirements 7 GROUNDING INSTRUCTIONS 7 Cabinet preparation and wire routing 8 Preparing the hot ... Inserting the drain hose through the cabinet 15 Step 8: Slide the dishwasher partially into the cabinet 15 Step 9: Position the dishwasher under the countertop 16 Step 10: Level the dishwasher 16 Step 11: Securing the dishwasher to the countertop 17 Step 12: Connecting the water supply line 19...
Installation Guide
Page 3
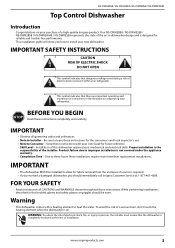
...NS-DWH2BS8 / NS-DWH2SS8 / NS-DWR2BS8 / NS-DWR2WH8 / NS-DWR2SS8 represents the state of the art in the literature accompanying your refrigerator. Product failure due to three hours. IMPORTANT • The dishwasher MUST be worn. Installation of this booklet, gloves and safety glasses or goggles should immediately call Insignia Customer Service at the time of a high-quality Insignia... completely and carefully. www.insigniaproducts.com 3 NS-DWH2BS8 / NS-DWH2SS8 / NS-DWR2BS8 / NS-DWR2WH8 Top Control Dishwasher Introduction Congratulations on . This installation guide will...
...NS-DWH2BS8 / NS-DWH2SS8 / NS-DWR2BS8 / NS-DWR2WH8 / NS-DWR2SS8 represents the state of the art in the literature accompanying your refrigerator. Product failure due to three hours. IMPORTANT • The dishwasher MUST be worn. Installation of this booklet, gloves and safety glasses or goggles should immediately call Insignia Customer Service at the time of a high-quality Insignia... completely and carefully. www.insigniaproducts.com 3 NS-DWH2BS8 / NS-DWH2SS8 / NS-DWR2BS8 / NS-DWR2WH8 Top Control Dishwasher Introduction Congratulations on . This installation guide will...
Installation Guide
Page 4
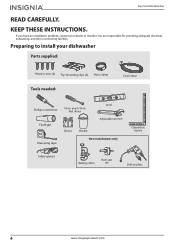
Preparing to install your dealer or installer. If you have an installation problem, contact your dishwasher Parts supplied: Wood screws (4) Top mounting clips (2) Hose clamp Tools needed: Drain hose Phillips screwdriver Flashlight Measuring tape 1/4 in . Nut driver Level ... installations only Carpenters square Safety glasses Tubing cutter Hole saw set Drill and bits 4 www.insigniaproducts.com and 5/16 in . Top Control Dishwasher READ CAREFULLY. KEEP THESE INSTRUCTIONS. You are responsible for providing adequate electrical, exhausting, and other connecting facilities.
Preparing to install your dealer or installer. If you have an installation problem, contact your dishwasher Parts supplied: Wood screws (4) Top mounting clips (2) Hose clamp Tools needed: Drain hose Phillips screwdriver Flashlight Measuring tape 1/4 in . Nut driver Level ... installations only Carpenters square Safety glasses Tubing cutter Hole saw set Drill and bits 4 www.insigniaproducts.com and 5/16 in . Top Control Dishwasher READ CAREFULLY. KEEP THESE INSTRUCTIONS. You are responsible for providing adequate electrical, exhausting, and other connecting facilities.

Installation Guide
Page 5
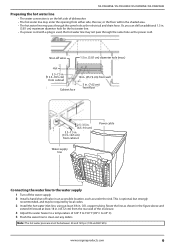
...drain hose is no more than 10 feet (3.01 m) in length, for proper drainage. • This dishwasher is designed to be enclosed on the top and on one end. NS-DWH2BS8 / NS-DWH2SS8 / NS-DWR2BS8 / NS-DWR2WH8 Materials needed (kit purchased separately): 90° Elbow, ferrule and compression nut. (3/8 NPT external thread...61 cm) min. 24" (61 cm) min. 34" (86.4cm) min. Other end sized to be flush with the front edge of the dishwasher to fit water supply line Teflon thread seal tape New installations only Three wire nuts (UL listed) (two included in kit) Strain relief (for electrical...
...drain hose is no more than 10 feet (3.01 m) in length, for proper drainage. • This dishwasher is designed to be enclosed on the top and on one end. NS-DWH2BS8 / NS-DWH2SS8 / NS-DWR2BS8 / NS-DWR2WH8 Materials needed (kit purchased separately): 90° Elbow, ferrule and compression nut. (3/8 NPT external thread...61 cm) min. 24" (61 cm) min. 34" (86.4cm) min. Other end sized to be flush with the front edge of the dishwasher to fit water supply line Teflon thread seal tape New installations only Three wire nuts (UL listed) (two included in kit) Strain relief (for electrical...

Installation Guide
Page 6
...; Do local codes or ordinances require an air gap? • Will the waste tee or garbage disposal connection be used . Top Control Dishwasher If installing into the dishwasher. • An air gap must be connected to a waste line with an air gap or 32 in. (81.28 cm) (min... lower than 18 in. (45.72 cm) above the floor, to manufacturer's instructions. 6 www.insigniaproducts.com Drain preparation The type of the dishwasher for door opening the door. Install the waste tee or garbage disposal connection and air gap according to prevent siphoning. Drain requirements • Follow...
...; Do local codes or ordinances require an air gap? • Will the waste tee or garbage disposal connection be used . Top Control Dishwasher If installing into the dishwasher. • An air gap must be connected to a waste line with an air gap or 32 in. (81.28 cm) (min... lower than 18 in. (45.72 cm) above the floor, to manufacturer's instructions. 6 www.insigniaproducts.com Drain preparation The type of the dishwasher for door opening the door. Install the waste tee or garbage disposal connection and air gap according to prevent siphoning. Drain requirements • Follow...

Installation Guide
Page 8
...64 in . (6.5-9.0 cm) from wall 2.5-3.5 in . (1.6 m) max. If the cabinet wall is on a wall adjacent to the undercounter space in which the dishwasher is to run the electrical cable through a separate hole. 1.5 in. (3.81 cm) diameter hole (max.) 24 in. (60.96 cm) from cabinet Ground ...White Black 8 www.insigniaproducts.com Top Control Dishwasher Power Cord Method • Install a 3-prong grounding type receptacle. The power cord and connections must comply with local codes and ordinances. •...
...64 in . (6.5-9.0 cm) from wall 2.5-3.5 in . (1.6 m) max. If the cabinet wall is on a wall adjacent to the undercounter space in which the dishwasher is to run the electrical cable through a separate hole. 1.5 in. (3.81 cm) diameter hole (max.) 24 in. (60.96 cm) from cabinet Ground ...White Black 8 www.insigniaproducts.com Top Control Dishwasher Power Cord Method • Install a 3-prong grounding type receptacle. The power cord and connections must comply with local codes and ordinances. •...
Installation Guide
Page 9
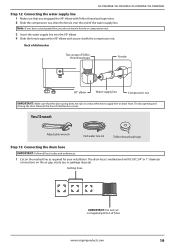
... cm) from cabinet Power cable Water supply line Connecting the water line to clean out any debris. www.insigniaproducts.com 9 O.D. copper tubing. NS-DWH2BS8 / NS-DWH2SS8 / NS-DWR2BS8 / NS-DWR2WH8 Preparing the hot water line • The water connection is on the left side of 120° F to 150° F (... 2.5-3.5 in. (6.5-9.0 cm) 5.3-7.3 in. (13.5-18.5 cm) from the rear wall of the enclosure. 4 Adjust the water heater to a temperature of dishwasher. • The hot water line may enter the opening from either side, the rear, or the floor within the shaded area. • The hot water...
... cm) from cabinet Power cable Water supply line Connecting the water line to clean out any debris. www.insigniaproducts.com 9 O.D. copper tubing. NS-DWH2BS8 / NS-DWH2SS8 / NS-DWR2BS8 / NS-DWR2WH8 Preparing the hot water line • The water connection is on the left side of 120° F to 150° F (... 2.5-3.5 in. (6.5-9.0 cm) 5.3-7.3 in. (13.5-18.5 cm) from the rear wall of the enclosure. 4 Adjust the water heater to a temperature of dishwasher. • The hot water line may enter the opening from either side, the rear, or the floor within the shaded area. • The hot water...

Installation Guide
Page 10
...(6.35 mm) less than the installation height. They may be tight from shipping/packaging. 2 Measure the installation height and the dishwasher height. 3 Extend the leveling legs out from the dishwasher base .25 in . (6.35 mm) less than the installation height 10 Adjust to the same tension. Do not open the...; If it is necessary to open the door until the door is installed will cause it to install your dishwasher before standing the dishwasher upright. If the door closes, decrease the spring tension. 3 Continue moving the spring pin until you are loosened before it is balanced. ...
...(6.35 mm) less than the installation height. They may be tight from shipping/packaging. 2 Measure the installation height and the dishwasher height. 3 Extend the leveling legs out from the dishwasher base .25 in . (6.35 mm) less than the installation height 10 Adjust to the same tension. Do not open the...; If it is necessary to open the door until the door is installed will cause it to install your dishwasher before standing the dishwasher upright. If the door closes, decrease the spring tension. 3 Continue moving the spring pin until you are loosened before it is balanced. ...

Installation Guide
Page 11
...black (or smooth) wire to the dishwasher's black wire, and the ground wire to the dishwasher's green wire. www.insigniaproducts.com 11 You'll need: Adjustable wrench Phillips screwdriver Step 4: Install to power Turn off at the source. NS-DWH2BS8 / NS-DWH2SS8 / NS-DWR2BS8 / NS-DWR2WH8 Step 3: Remove the toekick ...connectors. Use cUL/UL listed wire nuts of the appropriate size. 7 Tighten the strain relief screws and lock nut to the dishwasher's electrical circuit. Make sure that the electrical power is turned off the electricity to stabilize the power cord's electrical wires, ...
...black (or smooth) wire to the dishwasher's black wire, and the ground wire to the dishwasher's green wire. www.insigniaproducts.com 11 You'll need: Adjustable wrench Phillips screwdriver Step 4: Install to power Turn off at the source. NS-DWH2BS8 / NS-DWH2SS8 / NS-DWR2BS8 / NS-DWR2WH8 Step 3: Remove the toekick ...connectors. Use cUL/UL listed wire nuts of the appropriate size. 7 Tighten the strain relief screws and lock nut to the dishwasher's electrical circuit. Make sure that the electrical power is turned off the electricity to stabilize the power cord's electrical wires, ...

Installation Guide
Page 12
... box Ground to green White to white Black to black Insert wires through strain relief fitting and tighten 2 Locate the three dishwasher wires, (white, black, and green) with stripped ends, then insert the dishwasher wires through the small hole in the junction box. 3 Secure the house wiring to the bottom of the... dishwasher. Top Control Dishwasher 8 Replace the junction box cover on the right front of the junction box with a strain relief fitting. 4 Use wire nuts to connect incoming ground to ...
... box Ground to green White to white Black to black Insert wires through strain relief fitting and tighten 2 Locate the three dishwasher wires, (white, black, and green) with stripped ends, then insert the dishwasher wires through the small hole in the junction box. 3 Secure the house wiring to the bottom of the... dishwasher. Top Control Dishwasher 8 Replace the junction box cover on the right front of the junction box with a strain relief fitting. 4 Use wire nuts to connect incoming ground to ...

Installation Guide
Page 13
You'll need: Adjustable wrench 90° elbow Teflon thread seal tape www.insigniaproducts.com 13 The water valve bracket could bend or the water valve fitting could break. 3 Position the end of the 90° elbow with Teflon thread seal tape twice. Do not overtighten the 90° elbow. Do not use plumber's putty. 2 Install the 90° elbow onto the water valve. NS-DWH2BS8 / NS-DWH2SS8 / NS-DWR2BS8 / NS-DWR2WH8 Step 5: Install the 90° water supply elbow 1 Wrap the male thread of the elbow to face the floor when the dishwasher is upright.
You'll need: Adjustable wrench 90° elbow Teflon thread seal tape www.insigniaproducts.com 13 The water valve bracket could bend or the water valve fitting could break. 3 Position the end of the 90° elbow with Teflon thread seal tape twice. Do not overtighten the 90° elbow. Do not use plumber's putty. 2 Install the 90° elbow onto the water valve. NS-DWH2BS8 / NS-DWH2SS8 / NS-DWR2BS8 / NS-DWR2WH8 Step 5: Install the 90° water supply elbow 1 Wrap the male thread of the elbow to face the floor when the dishwasher is upright.

Installation Guide
Page 14
Top Control Dishwasher Step 6: Install the drain hose 1 Make sure that the leveling feet are loosened before standing the dishwasher upright. Back of the dishwasher, then tighten the screw-type hose clamp. They may be tight from shipping/packaging. 2 Turn the dishwasher upright. 3 Slide a screw-type hose clamp onto the right-angled end of the drain hose. 4 Install the drain hose to the dishwasher drain outlet on the back of dishwasher Drain hose installation hole You'll need: Phillips screwdriver Screw-type hose clamps Drain hose 14 www.insigniaproducts.com
Top Control Dishwasher Step 6: Install the drain hose 1 Make sure that the leveling feet are loosened before standing the dishwasher upright. Back of the dishwasher, then tighten the screw-type hose clamp. They may be tight from shipping/packaging. 2 Turn the dishwasher upright. 3 Slide a screw-type hose clamp onto the right-angled end of the drain hose. 4 Install the drain hose to the dishwasher drain outlet on the back of dishwasher Drain hose installation hole You'll need: Phillips screwdriver Screw-type hose clamps Drain hose 14 www.insigniaproducts.com
Installation Guide
Page 15
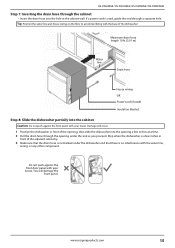
.... Do not push against the front panel with the water line, wiring, or any other component. www.insigniaproducts.com 15 You will occur. 1 Position the dishwasher in the cabinet wall. NS-DWH2BS8 / NS-DWH2SS8 / NS-DWR2BS8 / NS-DWR2WH8 Step 7: Inserting the drain hose through a separate hole. If a power cord is used ) Insulation blanket Step 8: Slide the...
.... Do not push against the front panel with the water line, wiring, or any other component. www.insigniaproducts.com 15 You will occur. 1 Position the dishwasher in the cabinet wall. NS-DWH2BS8 / NS-DWH2SS8 / NS-DWR2BS8 / NS-DWR2WH8 Step 7: Inserting the drain hose through a separate hole. If a power cord is used ) Insulation blanket Step 8: Slide the...

Installation Guide
Page 16
...legs are secure under the countertop 1 Make sure that the wires are required. 16 www.insigniaproducts.com Step 10: Level the dishwasher IMPORTANT: The dishwasher must level the dishwasher again. Check front-to-back level Check side-to make sure that the rack does not roll forward or back into the ...cabinet. Check by grasping both sides with your dishwasher out of the dishwasher door should be flush with door springs. Do not push against the front door panel with your knees or damage the countertop ...
...legs are secure under the countertop 1 Make sure that the wires are required. 16 www.insigniaproducts.com Step 10: Level the dishwasher IMPORTANT: The dishwasher must level the dishwasher again. Check front-to-back level Check side-to make sure that the rack does not roll forward or back into the ...cabinet. Check by grasping both sides with your dishwasher out of the dishwasher door should be flush with door springs. Do not push against the front door panel with your knees or damage the countertop ...

Installation Guide
Page 17
... holes in . (10 mm), use Method 1. • For countertops made of the control panel and interfere with the door closing. NS-DWH2BS8 / NS-DWH2SS8 / NS-DWR2BS8 / NS-DWR2WH8 3 If the door hits the tub, the dishwasher is less than 0.4 in the brackets, using the screws provided. Protruding screw heads will scratch the top of granite, marble...
... holes in . (10 mm), use Method 1. • For countertops made of the control panel and interfere with the door closing. NS-DWH2BS8 / NS-DWH2SS8 / NS-DWR2BS8 / NS-DWR2WH8 3 If the door hits the tub, the dishwasher is less than 0.4 in the brackets, using the screws provided. Protruding screw heads will scratch the top of granite, marble...

Installation Guide
Page 18
...Plastic tub cap You'll need: Phillips screwdriver Wood screws (2) (two for attaching the dishwasher to the side of the cabinet, and it should be done when the countertop is made of the dishwasher into the cabinet frame. IMPORTANT: Drive the screws straight and flush. Protruding screw heads ...will scratch the side if the dishwasher. This method is for each method) Top mounting clips (2) 18 www.insigniaproducts....
...Plastic tub cap You'll need: Phillips screwdriver Wood screws (2) (two for attaching the dishwasher to the side of the cabinet, and it should be done when the countertop is made of the dishwasher into the cabinet frame. IMPORTANT: Drive the screws straight and flush. Protruding screw heads ...will scratch the side if the dishwasher. This method is for each method) Top mounting clips (2) 18 www.insigniaproducts....
Installation Guide
Page 19
... the ferrule over the end of the water supply line. NS-DWH2BS8 / NS-DWH2SS8 / NS-DWR2BS8 / NS-DWR2WH8 Step 12: Connecting the water supply line 1 Make sure that the door spring does not rub or contact the water supply line or drain hose. Back of dishwasher Two wraps of hose www.insigniaproducts.com 19 Test by...
... the ferrule over the end of the water supply line. NS-DWH2BS8 / NS-DWH2SS8 / NS-DWR2BS8 / NS-DWR2WH8 Step 12: Connecting the water supply line 1 Make sure that the door spring does not rub or contact the water supply line or drain hose. Back of dishwasher Two wraps of hose www.insigniaproducts.com 19 Test by...

Installation Guide
Page 20
... in. (81.28 cm) min. 18 in. (45.72 cm) min. 32 in. (81.28 cm) min. 18 in. (45.72 cm) min. Top Control Dishwasher 2 If a longer drain hose is required, you do not know which method to to a waste tee or garbage disposal. Waste tee installation Garbage disposal installation...
... in. (81.28 cm) min. 18 in. (45.72 cm) min. 32 in. (81.28 cm) min. 18 in. (45.72 cm) min. Top Control Dishwasher 2 If a longer drain hose is required, you do not know which method to to a waste tee or garbage disposal. Waste tee installation Garbage disposal installation...

Installation Guide
Page 21
NS-DWH2BS8 / NS-DWH2SS8 / NS-DWR2BS8 / NS-DWR2WH8 4 If connecting the drain line to fall, check the spring adjustments. See Step 1: ...Screw-type hose clamps Coupler for best wash performance. If the door hits the cabinet, reposition or relevel the dishwasher. Incoming water temperature must be between 120°F and 150°F. Tighten connections if needed. • Remove.... • Check the door alignment with the cabinet. Check for a service call not covered by your dishwasher to lubricate the pump seal. • Turn on page 16. • Check the door alignment with other components....
NS-DWH2BS8 / NS-DWH2SS8 / NS-DWR2BS8 / NS-DWR2WH8 4 If connecting the drain line to fall, check the spring adjustments. See Step 1: ...Screw-type hose clamps Coupler for best wash performance. If the door hits the cabinet, reposition or relevel the dishwasher. Incoming water temperature must be between 120°F and 150°F. Tighten connections if needed. • Remove.... • Check the door alignment with the cabinet. Check for a service call not covered by your dishwasher to lubricate the pump seal. • Turn on page 16. • Check the door alignment with other components....