Installation Guide
Page 3
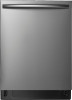
... the heating element when the dishwasher is the responsibility of installation. This installation guide will show you should immediately call Insignia Customer Service at the time of the installer. BEFORE YOU BEGIN Read these instructions for future reference. • Skill Level - Warning This dishwasher comes with your new dishwasher. IMPORTANT SAFETY INSTRUCTIONS CAUTION RISK OF ELECTRIC SHOCK DO NOT OPEN This symbol indicates that there are important operating and maintenance instructions in dishwasher design...
... the heating element when the dishwasher is the responsibility of installation. This installation guide will show you should immediately call Insignia Customer Service at the time of the installer. BEFORE YOU BEGIN Read these instructions for future reference. • Skill Level - Warning This dishwasher comes with your new dishwasher. IMPORTANT SAFETY INSTRUCTIONS CAUTION RISK OF ELECTRIC SHOCK DO NOT OPEN This symbol indicates that there are important operating and maintenance instructions in dishwasher design...
Installation Guide
Page 4
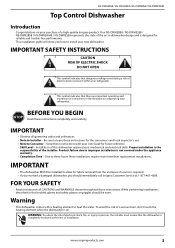
... dealer or installer. Nut driver Level Adjustable wrench Gloves Bucket New installations only Carpenters square Safety glasses Tubing cutter Hole saw set Drill and bits 4 www.insigniaproducts.com You are responsible for providing adequate electrical, exhausting, and other connecting facilities. and 5/16 in . KEEP THESE INSTRUCTIONS. If you have an installation problem, contact your dishwasher Parts supplied: Wood screws (4) Top mounting clips (2) Hose clamp Tools needed: Drain hose Phillips screwdriver...
... dealer or installer. Nut driver Level Adjustable wrench Gloves Bucket New installations only Carpenters square Safety glasses Tubing cutter Hole saw set Drill and bits 4 www.insigniaproducts.com You are responsible for providing adequate electrical, exhausting, and other connecting facilities. and 5/16 in . KEEP THESE INSTRUCTIONS. If you have an installation problem, contact your dishwasher Parts supplied: Wood screws (4) Top mounting clips (2) Hose clamp Tools needed: Drain hose Phillips screwdriver...

Installation Guide
Page 5
... on the top and on one end. Other end sized to fit water supply line Teflon thread seal tape New installations only Three wire nuts (UL listed) (two included in kit) Strain relief (for electrical connections) Electrical cable or power cord (See Electrical Requirements section) Hot water line (min. 3/8 in length, for extending drain line (if applicable) Air gap (if required) Enclosure requirements • The dishwasher must be installed so that the drain hose is no more than 10...
... on the top and on one end. Other end sized to fit water supply line Teflon thread seal tape New installations only Three wire nuts (UL listed) (two included in kit) Strain relief (for electrical connections) Electrical cable or power cord (See Electrical Requirements section) Hot water line (min. 3/8 in length, for extending drain line (if applicable) Air gap (if required) Enclosure requirements • The dishwasher must be installed so that the drain hose is no more than 10...

Installation Guide
Page 6
...'s instructions. 6 www.insigniaproducts.com clearance from other appliances. Install the waste tee or garbage disposal connection and air gap according to ANY of drain installation required depends on local codes and ordinances, to prevent back flow into a corner, allow 2 in improper draining of the dishwasher for door opening the door. Top Control Dishwasher If installing into the dishwasher. • An air gap must be connected to a waste line with an air gap or...
...'s instructions. 6 www.insigniaproducts.com clearance from other appliances. Install the waste tee or garbage disposal connection and air gap according to ANY of drain installation required depends on local codes and ordinances, to prevent back flow into a corner, allow 2 in improper draining of the dishwasher for door opening the door. Top Control Dishwasher If installing into the dishwasher. • An air gap must be connected to a waste line with an air gap or...

Installation Guide
Page 7
... codes and ordinances. • Use a UL Listed/CSA Approved strain relief. Check with the circuit conductors and be connected to a grounded metal, permanent wiring system, or an equipment grounding conductor must be run with a qualified electrician or service representative if you are in doubt that meets the wiring requirements for electric current. GROUNDING INSTRUCTIONS Grounding Instructions - Power Cord Models This appliance must be grounded. Air gap...
... codes and ordinances. • Use a UL Listed/CSA Approved strain relief. Check with the circuit conductors and be connected to a grounded metal, permanent wiring system, or an equipment grounding conductor must be run with a qualified electrician or service representative if you are in doubt that meets the wiring requirements for electric current. GROUNDING INSTRUCTIONS Grounding Instructions - Power Cord Models This appliance must be grounded. Air gap...

Installation Guide
Page 8
... can be installed. • Use power cord kit (part number 5304504505) under Smart Choice brand marked with Dishwasher Install Kit With Power Cord, available for purchase from cabinet Ground White Black 8 www.insigniaproducts.com Cabinet preparation and wire routing • The wiring may enter the opening from either side, the rear, or the floor within the shaded area. • The electrical connection is on a wall adjacent to run the electrical cable...
... can be installed. • Use power cord kit (part number 5304504505) under Smart Choice brand marked with Dishwasher Install Kit With Power Cord, available for purchase from cabinet Ground White Black 8 www.insigniaproducts.com Cabinet preparation and wire routing • The wiring may enter the opening from either side, the rear, or the floor within the shaded area. • The electrical connection is on a wall adjacent to run the electrical cable...

Installation Guide
Page 21
... a pre-test check Review this list after installing your warranty. • Make sure that the drain plug has been removed. See Step 8: Slide the dishwasher partially into the cabinet on page 15. • Turn on page 16. • Pull the lower rack out about half way. www.insigniaproducts.com 21 NS-DWH2BS8 / NS-DWH2SS8 / NS-DWR2BS8 / NS-DWR2WH8 4 If connecting the drain line to a garbage disposal, make sure that power is left...
... a pre-test check Review this list after installing your warranty. • Make sure that the drain plug has been removed. See Step 8: Slide the dishwasher partially into the cabinet on page 15. • Turn on page 16. • Pull the lower rack out about half way. www.insigniaproducts.com 21 NS-DWH2BS8 / NS-DWH2SS8 / NS-DWR2BS8 / NS-DWR2WH8 4 If connecting the drain line to a garbage disposal, make sure that power is left...

Installation Guide
Page 22
...: Connecting the water supply line on page 19" on page 19. 9 Open the dishwasher door and make sure that you install the toekick in the correct direction. Allow the toekick to the User Guide for instructions). 3 Close the door, select the Rinse only cycle, and press START/Cancel. 4 Make sure that water enters the dishwasher. Note: Make sure that most of the dishwasher. Top Control Dishwasher Step 16: Wet testing the dishwasher 1 Turn on the power supply (or plug...
...: Connecting the water supply line on page 19" on page 19. 9 Open the dishwasher door and make sure that you install the toekick in the correct direction. Allow the toekick to the User Guide for instructions). 3 Close the door, select the Rinse only cycle, and press START/Cancel. 4 Make sure that water enters the dishwasher. Note: Make sure that most of the dishwasher. Top Control Dishwasher Step 16: Wet testing the dishwasher 1 Turn on the power supply (or plug...
Marketing Sheet
Page 1
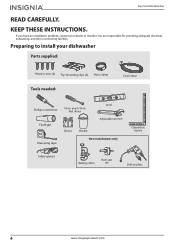
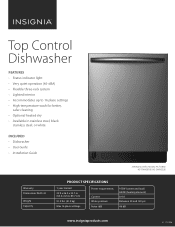
Top Control Dishwasher FEATURES • Status indicator light • Very quiet operation (46-dBA) • Flexible three-rack system • Lighted interior • Accommodates up to 16 place settings • High-temperature wash for better, safer cleaning • Optional heated dry • Available in stainless steel, black stainless steel, or white INCLUDED • Dishwasher • User Guide • Installation Guide Warranty Dimensions W×D×H Weight Capacity STAINLESS STEEL MODEL PICTURED NS-DWH2BS8 / NS-DWH2SS8 PRODUCT SPECIFICATIONS 1 year limited 23.9 x 26.5 x 33...
Top Control Dishwasher FEATURES • Status indicator light • Very quiet operation (46-dBA) • Flexible three-rack system • Lighted interior • Accommodates up to 16 place settings • High-temperature wash for better, safer cleaning • Optional heated dry • Available in stainless steel, black stainless steel, or white INCLUDED • Dishwasher • User Guide • Installation Guide Warranty Dimensions W×D×H Weight Capacity STAINLESS STEEL MODEL PICTURED NS-DWH2BS8 / NS-DWH2SS8 PRODUCT SPECIFICATIONS 1 year limited 23.9 x 26.5 x 33...
FAQs
Page 1
... the child lock is , open the door, then press and hold START/Cancel for the best performance. If the dishwasher drains into a garbage disposal, make sure that the door is locked. The Child Lock indicator turns off , press Steam Wash and Vortex Wash at the same time. Wash your dishwasher is connected to power and is on the bottom rack? Dishwasher FAQ NS-DWH2SS8 / NS-DWR2SS8 / NS-DWH1SS9 / NS-DWH1WH9 Contents Question 1: How do you turn off the start delay? ...1 Question...
... the child lock is , open the door, then press and hold START/Cancel for the best performance. If the dishwasher drains into a garbage disposal, make sure that the door is locked. The Child Lock indicator turns off , press Steam Wash and Vortex Wash at the same time. Wash your dishwasher is connected to power and is on the bottom rack? Dishwasher FAQ NS-DWH2SS8 / NS-DWR2SS8 / NS-DWH1SS9 / NS-DWH1WH9 Contents Question 1: How do you turn off the start delay? ...1 Question...
FAQs
Page 2
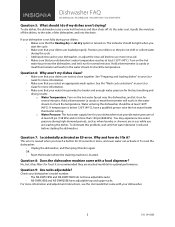
... dispenser? Dishwasher FAQ NS-DWH2SS8 / NS-DWR2SS8 / NS-DWH1SS9 / NS-DWH1WH9 Question 5: What should I do I accidentally activated an E9 error. To dry dishes, the dishwasher uses a very hot final rinse and then shuts off the dishes, to check the temperature. o Water Pressure: The hot water supply line for 30 seconds or more than 120 psi (828 kPa). To reset the dishwasher: • Unplug the dishwasher, and then plug it pulls the moisture off . Question 9: Are racks adjustable...
... dispenser? Dishwasher FAQ NS-DWH2SS8 / NS-DWR2SS8 / NS-DWH1SS9 / NS-DWH1WH9 Question 5: What should I do I accidentally activated an E9 error. To dry dishes, the dishwasher uses a very hot final rinse and then shuts off the dishes, to check the temperature. o Water Pressure: The hot water supply line for 30 seconds or more than 120 psi (828 kPa). To reset the dishwasher: • Unplug the dishwasher, and then plug it pulls the moisture off . Question 9: Are racks adjustable...

User Guide
Page 2
... operation 11 Preparing and loading dishes 12 Adding a dish 17 Filling the detergent dispenser 18 Filling the rinse aid dispenser 18 Factors affecting performance 20 Using rinse aid 20 Water temperature 20 Water pressure 20 Maintaining your dishwasher 21 Cleaning the stainless steel panel 21 Cleaning the control panel 21 Cleaning the stainless steel inner door and tub 21 Cleaning the filters 21 Cleaning the door and tub gaskets 23 Cleaning the air gap 24 Protecting your dishwasher for long periods 24 Troubleshooting 25 Troubleshooting 25 Error codes 25 Specifications...
... operation 11 Preparing and loading dishes 12 Adding a dish 17 Filling the detergent dispenser 18 Filling the rinse aid dispenser 18 Factors affecting performance 20 Using rinse aid 20 Water temperature 20 Water pressure 20 Maintaining your dishwasher 21 Cleaning the stainless steel panel 21 Cleaning the control panel 21 Cleaning the stainless steel inner door and tub 21 Cleaning the filters 21 Cleaning the door and tub gaskets 23 Cleaning the air gap 24 Protecting your dishwasher for long periods 24 Troubleshooting 25 Troubleshooting 25 Error codes 25 Specifications...

User Guide
Page 3
... NS-DWH2BS8/NS-DWH2SS8/NS-DWR2BS8/NS-DWR2WH8/NS-DWR2SS8 represents the state of a high-quality Insignia product. WARNING - IMPORTANT SAFETY INSTRUCTIONS CAUTION RISK OF ELECTRIC SHOCK DO NOT OPEN This symbol indicates that there are important operating and maintenance instructions in accordance with a damp cloth. 6 Do not block any way or it does not operate normally. www.insigniaproducts.com 3 Top Control Dishwasher Introduction Congratulations on your dishwasher. When using your dishwasher...
... NS-DWH2BS8/NS-DWH2SS8/NS-DWR2BS8/NS-DWR2WH8/NS-DWR2SS8 represents the state of a high-quality Insignia product. WARNING - IMPORTANT SAFETY INSTRUCTIONS CAUTION RISK OF ELECTRIC SHOCK DO NOT OPEN This symbol indicates that there are important operating and maintenance instructions in accordance with a damp cloth. 6 Do not block any way or it does not operate normally. www.insigniaproducts.com 3 Top Control Dishwasher Introduction Congratulations on your dishwasher. When using your dishwasher...
User Guide
Page 4
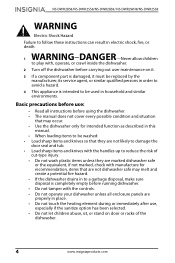
... not marked, check with the handles up to be replaced by the manufacturer, its service agent, or similar qualified persons in order to avoid a hazard. 4 This appliance is completely empty before running dishwasher. • Do not tamper with the controls. • Do not operate your dishwasher unless all instructions before carrying out user maintenance on door or racks of cut-type injury. • Do not...
... not marked, check with the handles up to be replaced by the manufacturer, its service agent, or similar qualified persons in order to avoid a hazard. 4 This appliance is completely empty before running dishwasher. • Do not tamper with the controls. • Do not operate your dishwasher unless all instructions before carrying out user maintenance on door or racks of cut-type injury. • Do not...

User Guide
Page 7
... lukewarm water using your dishwasher to the Installation Guide provided. Hot water is determined by yourself. Before using a soft cloth. This dishwasher requires a 120V, 60Hz power supply. The number of your dishwasher, refer to get better performance with less water and less energy. Top Control Dishwasher Installing and setting up your dishes and silverware. For information on installing and setting up your local power source. This happens even when hi-temp wash is not hot...
... lukewarm water using your dishwasher to the Installation Guide provided. Hot water is determined by yourself. Before using a soft cloth. This dishwasher requires a 120V, 60Hz power supply. The number of your dishwasher, refer to get better performance with less water and less energy. Top Control Dishwasher Installing and setting up your dishes and silverware. For information on installing and setting up your local power source. This happens even when hi-temp wash is not hot...
User Guide
Page 10
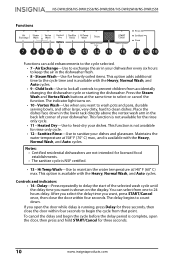
... START/Cancel once, then close the door within four seconds. The indicator light turns on the display. Place the dishes face down . Child lock-Use to lock all controls to select or cancel the function. This function is available with the Heavy, Normal Wash, and Auto cycles. Functions NS-DWH2BS8/NS-DWH2SS8/NS-DWR2BS8/ NS-DWR2WH8/NS-DWR2SS8 Functions can select from one to 24 hours delay. Vortex Wash-Use when you open the door, then press and hold START/Cancel for rinse...
... START/Cancel once, then close the door within four seconds. The indicator light turns on the display. Place the dishes face down . Child lock-Use to lock all controls to select or cancel the function. This function is available with the Heavy, Normal Wash, and Auto cycles. Functions NS-DWH2BS8/NS-DWH2SS8/NS-DWR2BS8/ NS-DWR2WH8/NS-DWR2SS8 Functions can select from one to 24 hours delay. Vortex Wash-Use when you open the door, then press and hold START/Cancel for rinse...
User Guide
Page 20
... hot water supply line for optimum dishwashing and drying results. In addition, the heated dry option will have a qualified person raise the hot water heater thermostat setting. Water temperature Hot water is time to achieve satisfactory results. Refer to Filling the rinse aid dispenser on the hot water faucet near the dishwasher and let it is required for your load that it run hot water from the pipe before starting the cycle. Heat dry function The heat dry function, when used with a rinse aid...
... hot water supply line for optimum dishwashing and drying results. In addition, the heated dry option will have a qualified person raise the hot water heater thermostat setting. Water temperature Hot water is time to achieve satisfactory results. Refer to Filling the rinse aid dispenser on the hot water faucet near the dishwasher and let it is required for your load that it run hot water from the pipe before starting the cycle. Heat dry function The heat dry function, when used with a rinse aid...

User Guide
Page 24
... fuses or tripping circuit breaker. 2 Turn off the water supply. 3 Place a pan under normal use. Cleaning the air gap If there is an air gap installed with your dishwasher, make sure it is not part of your dishwasher for extended periods in the end of the dishwasher is self-cleaning under the inlet valve, then disconnect water line from the inlet valve and drain it for long periods Your dishwasher should be cleaned with a damp cloth. NS-DWH2BS8/NS-DWH2SS8/NS-DWR2BS8/ NS...
... fuses or tripping circuit breaker. 2 Turn off the water supply. 3 Place a pan under normal use. Cleaning the air gap If there is an air gap installed with your dishwasher, make sure it is not part of your dishwasher for extended periods in the end of the dishwasher is self-cleaning under the inlet valve, then disconnect water line from the inlet valve and drain it for long periods Your dishwasher should be cleaned with a damp cloth. NS-DWH2BS8/NS-DWH2SS8/NS-DWR2BS8/ NS...

User Guide
Page 25
... valve is connected connected. Anything (including water) touching a button. PROBLEM POSSIBLE CAUSE POSSIBLE SOLUTION The dishwasher The door may not be removed before restarting the dishwasher. The delay start closed and won't start option is closed properly. Add rinse aid. and turned on page 10. The child lock is low. The dishwasher This is normal and beeps at the indicates that the door is Refer to make sure they do not leak. The power is complete. "Controls and indicators...
... valve is connected connected. Anything (including water) touching a button. PROBLEM POSSIBLE CAUSE POSSIBLE SOLUTION The dishwasher The door may not be removed before restarting the dishwasher. The delay start closed and won't start option is closed properly. Add rinse aid. and turned on page 10. The child lock is low. The dishwasher This is normal and beeps at the indicates that the door is Refer to make sure they do not leak. The power is complete. "Controls and indicators...

User Guide
Page 28
If the noise continues after loading will beep) The water valve is closed completely. The door may cause this . opening/drain pump. The dishwasher won't fill (the dishwasher will help this . Make sure that the door is turned off. Specifications Capacity Dimensions (WxDxH) Weight Power requirements Current Water pressure Noise (dB) Max 16 place settings Bar handle unit - 23.9 x 26.5 x 33.7 in. (606 x 674 x 857 mm) Recess handle unit - 23.9 x 24.5 x 33.7 in...
If the noise continues after loading will beep) The water valve is closed completely. The door may cause this . opening/drain pump. The dishwasher won't fill (the dishwasher will help this . Make sure that the door is turned off. Specifications Capacity Dimensions (WxDxH) Weight Power requirements Current Water pressure Noise (dB) Max 16 place settings Bar handle unit - 23.9 x 26.5 x 33.7 in. (606 x 674 x 857 mm) Recess handle unit - 23.9 x 24.5 x 33.7 in...