
Marketing Sheet
Page 1
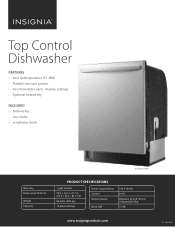
Top Control Dishwasher FEATURES • Very quiet operation (51-dBA) • Flexible two-rack system • Accommodates up to 14 place settings • Optional heated dry INCLUDED • Dishwasher • User Guide • Installation Guide NS-DWH1WH9 Warranty Dimensions W×D×H Weight Capacity PRODUCT SPECIFICATIONS 1 year limited 23.9 × 26.5 × 33.7 in. (60.6 × 67.4 × 85.7 cm) 86.6 lbs. (39.3 kg) 14 place settings Power requirements Current Water pressure Noise (dB) 120...
Top Control Dishwasher FEATURES • Very quiet operation (51-dBA) • Flexible two-rack system • Accommodates up to 14 place settings • Optional heated dry INCLUDED • Dishwasher • User Guide • Installation Guide NS-DWH1WH9 Warranty Dimensions W×D×H Weight Capacity PRODUCT SPECIFICATIONS 1 year limited 23.9 × 26.5 × 33.7 in. (60.6 × 67.4 × 85.7 cm) 86.6 lbs. (39.3 kg) 14 place settings Power requirements Current Water pressure Noise (dB) 120...

Installation Guide
Page 2
... 3 Preparing to install your dishwasher 4 Enclosure requirements 5 Drain requirements 6 Drain preparation 6 Electrical requirements 7 GROUNDING INSTRUCTIONS 7 Cabinet preparation and wire routing 8 Preparing the hot water line 9 Connecting the water line to the water supply 9 Installation instructions 10 Step 1: Check the door balance 10 Step 2: Adjust the leveling legs 10 Step 3: Remove the toekick 11 Step 4: Install to power 11 Step 5: Install the 90° water supply elbow 13 Step 6: Install the drain hose 14 Step 7: Inserting the drain hose through the cabinet 15 Step...
... 3 Preparing to install your dishwasher 4 Enclosure requirements 5 Drain requirements 6 Drain preparation 6 Electrical requirements 7 GROUNDING INSTRUCTIONS 7 Cabinet preparation and wire routing 8 Preparing the hot water line 9 Connecting the water line to the water supply 9 Installation instructions 10 Step 1: Check the door balance 10 Step 2: Adjust the leveling legs 10 Step 3: Remove the toekick 11 Step 4: Install to power 11 Step 5: Install the 90° water supply elbow 13 Step 6: Install the drain hose 14 Step 7: Inserting the drain hose through the cabinet 15 Step...
Installation Guide
Page 3
... DO NOT OPEN This symbol indicates that the dishwasher is not covered under the appliance warranty. • Completion Time - One to install your purchase of electric shock is on your new dishwasher. Keep these instructions completely and carefully. Proper installation is the responsibility of a serious burn, don't touch the heating element when the dishwasher is present within your User Guide for reliable and trouble-free performance. This installation guide will show...
... DO NOT OPEN This symbol indicates that the dishwasher is not covered under the appliance warranty. • Completion Time - One to install your purchase of electric shock is on your new dishwasher. Keep these instructions completely and carefully. Proper installation is the responsibility of a serious burn, don't touch the heating element when the dishwasher is present within your User Guide for reliable and trouble-free performance. This installation guide will show...
Installation Guide
Page 4
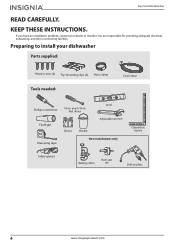
... electrical, exhausting, and other connecting facilities. If you have an installation problem, contact your dishwasher Parts supplied: Wood screws (4) Top mounting clips (2) Hose clamp Tools needed: Drain hose Phillips screwdriver Flashlight Measuring tape 1/4 in . Top Control Dishwasher READ CAREFULLY. Nut driver Level Adjustable wrench Gloves Bucket New installations only Carpenters square Safety glasses Tubing cutter Hole saw set Drill and bits 4 www.insigniaproducts.com Preparing to install your dealer or installer. KEEP THESE INSTRUCTIONS...
... electrical, exhausting, and other connecting facilities. If you have an installation problem, contact your dishwasher Parts supplied: Wood screws (4) Top mounting clips (2) Hose clamp Tools needed: Drain hose Phillips screwdriver Flashlight Measuring tape 1/4 in . Top Control Dishwasher READ CAREFULLY. Nut driver Level Adjustable wrench Gloves Bucket New installations only Carpenters square Safety glasses Tubing cutter Hole saw set Drill and bits 4 www.insigniaproducts.com Preparing to install your dealer or installer. KEEP THESE INSTRUCTIONS...

Installation Guide
Page 5
...) min. 34" (86.4cm) min. Other end sized to fit water supply line Teflon thread seal tape New installations only Three wire nuts (UL listed) (two included in kit) Strain relief (for electrical connections) Electrical cable or power cord (See Electrical Requirements section) Hot water line (min. 3/8 in length, for extending drain line (if applicable) Air gap (if required) Enclosure requirements • The dishwasher must be installed so that the drain hose is designed to be enclosed on...
...) min. 34" (86.4cm) min. Other end sized to fit water supply line Teflon thread seal tape New installations only Three wire nuts (UL listed) (two included in kit) Strain relief (for electrical connections) Electrical cable or power cord (See Electrical Requirements section) Hot water line (min. 3/8 in length, for extending drain line (if applicable) Air gap (if required) Enclosure requirements • The dishwasher must be installed so that the drain hose is designed to be enclosed on...

Installation Guide
Page 6
... dishwasher and adjacent cabinet, wall, or other devices to manufacturer's instructions. 6 www.insigniaproducts.com Install the waste tee or garbage disposal connection and air gap according to the dishwasher drain hose. • The dishwasher must be used . Allow 25.63 in . (5.08 cm) min. Drain requirements • Follow all local codes and ordinances. • Do not exceed 10 ft. (3.01 m) of the dishwasher for door opening the door...
... dishwasher and adjacent cabinet, wall, or other devices to manufacturer's instructions. 6 www.insigniaproducts.com Install the waste tee or garbage disposal connection and air gap according to the dishwasher drain hose. • The dishwasher must be used . Allow 25.63 in . (5.08 cm) min. Drain requirements • Follow all local codes and ordinances. • Do not exceed 10 ft. (3.01 m) of the dishwasher for door opening the door...

Installation Guide
Page 7
... in Cabinet preparation and wire routing on the appliance. GROUNDING INSTRUCTIONS Grounding Instructions - www.insigniaproducts.com 7 Air gap with this appliance. Direct Wire Method • The cable must be plugged into an appropriate outlet that meets the wiring requirements for electric current. NS-DWH2BS8 / NS-DWH2SS8 / NS-DWR2BS8 / NS-DWR2WH8 Method 1 - WARNING The improper connection of electrical shock by a 15 or 20 ampere circuit breaker or time delay fuse. • Wiring...
... in Cabinet preparation and wire routing on the appliance. GROUNDING INSTRUCTIONS Grounding Instructions - www.insigniaproducts.com 7 Air gap with this appliance. Direct Wire Method • The cable must be plugged into an appropriate outlet that meets the wiring requirements for electric current. NS-DWH2BS8 / NS-DWH2SS8 / NS-DWR2BS8 / NS-DWR2WH8 Method 1 - WARNING The improper connection of electrical shock by a 15 or 20 ampere circuit breaker or time delay fuse. • Wiring...

Installation Guide
Page 8
... drain hose and hot water line, but power cords with Dishwasher Install Kit With Power Cord, available for purchase from wall 2.5-3.5 in . (1.4 m) min. Top Control Dishwasher Power Cord Method • Install a 3-prong grounding type receptacle. The power cord and connections must comply with local codes and ordinances. • The recommended power cord length is metal, the hole edge must be free of the dishwasher. • Drill a 1.5 in. (3.81 cm) maximum diameter hole to be installed. • Use power cord kit (part number...
... drain hose and hot water line, but power cords with Dishwasher Install Kit With Power Cord, available for purchase from wall 2.5-3.5 in . (1.4 m) min. Top Control Dishwasher Power Cord Method • Install a 3-prong grounding type receptacle. The power cord and connections must comply with local codes and ordinances. • The recommended power cord length is metal, the hole edge must be free of the dishwasher. • Drill a 1.5 in. (3.81 cm) maximum diameter hole to be installed. • Use power cord kit (part number...
Installation Guide
Page 9
.... 4 Adjust the water heater to a temperature of 120° F to 150° F (49° C to 65° C). 5 Flush the water line to the water supply 1 Turn off the water supply. 2 Install a hand shut-off valve in . (3.81 cm) maximum diameter hole for the hot water line. • If a power cord with a plug is on the left side of dishwasher. • The hot water line may enter the opening from cabinet Power cable Water supply line Connecting the water line to clean out...
.... 4 Adjust the water heater to a temperature of 120° F to 150° F (49° C to 65° C). 5 Flush the water line to the water supply 1 Turn off the water supply. 2 Install a hand shut-off valve in . (3.81 cm) maximum diameter hole for the hot water line. • If a power cord with a plug is on the left side of dishwasher. • The hot water line may enter the opening from cabinet Power cable Water supply line Connecting the water line to clean out...

Installation Guide
Page 10
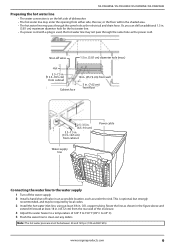
... the top of your dishwasher. • If it is installed will cause it on its back. Adjust both springs to .25 in . (6.35 mm) less than the installation height www.insigniaproducts.com Top Control Dishwasher Installation instructions Step 1: Check the door balance Caution: • Opening the door of the dishwasher firmly. 2 Open the door slowly, then release it. If the door closes, decrease the spring tension...
... the top of your dishwasher. • If it is installed will cause it on its back. Adjust both springs to .25 in . (6.35 mm) less than the installation height www.insigniaproducts.com Top Control Dishwasher Installation instructions Step 1: Check the door balance Caution: • Opening the door of the dishwasher firmly. 2 Open the door slowly, then release it. If the door closes, decrease the spring tension...

Installation Guide
Page 16
..., if equipped. It should be level for proper dish rack operation and wash performance. 1 Open the door, then place a level on the door and on the rack track inside the tub to dent the front panel with your hands. Tip: Pull the lower rack out about halfway. If the rack rolls in place. Be careful not to make sure that the dishwasher is level. Note: You will damage...
..., if equipped. It should be level for proper dish rack operation and wash performance. 1 Open the door, then place a level on the door and on the rack track inside the tub to dent the front panel with your hands. Tip: Pull the lower rack out about halfway. If the rack rolls in place. Be careful not to make sure that the dishwasher is level. Note: You will damage...

Installation Guide
Page 17
Method 1 1 Insert the long top mounting clips into the slot. 2 Bend the brackets to secure them to the dishwasher tub. 3 Secure the dishwasher to the countertop through the holes in . (10 mm), use Method 2. • If the gap between the control panel and the cabinet is not installed correctly. Note: Keep the dishwasher level. Protruding screw heads will scratch the top of granite, marble...
Method 1 1 Insert the long top mounting clips into the slot. 2 Bend the brackets to secure them to the dishwasher tub. 3 Secure the dishwasher to the countertop through the holes in . (10 mm), use Method 2. • If the gap between the control panel and the cabinet is not installed correctly. Note: Keep the dishwasher level. Protruding screw heads will scratch the top of granite, marble...
Installation Guide
Page 19
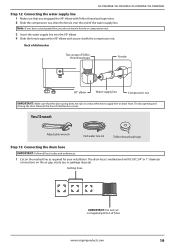
... it with Teflon thread seal tape twice. 2 Slide the compression nut, then the ferrule over the end of Teflon thread seal tape Ferrule 90° elbow Water supply line Compression nut IMPORTANT: Make sure that you do not need : Adjustable wrench Hot water line kit Teflon thread seal tape Step 13: Connecting the drain hose IMPORTANT: Follow all local codes and ordinances. 1 Cut on the air gap, waste tee, or...
... it with Teflon thread seal tape twice. 2 Slide the compression nut, then the ferrule over the end of Teflon thread seal tape Ferrule 90° elbow Water supply line Compression nut IMPORTANT: Make sure that you do not need : Adjustable wrench Hot water line kit Teflon thread seal tape Step 13: Connecting the drain hose IMPORTANT: Follow all local codes and ordinances. 1 Cut on the air gap, waste tee, or...

Installation Guide
Page 20
.... (3.01 m) to connect the two hose ends. Screw-type hose clamp Coupler Screw-type hose clamp 3 Secure the drain hose to use. Top Control Dishwasher 2 If a longer drain hose is required, you do not know which method to to the air gap, waste tee, or garbage disposal with screw-type hose clamps. Method 1 - Use 5/8" or 7/8" inside diameter hose and a coupler to the factory installed hose. Secure the connection with a screw-type...
.... (3.01 m) to connect the two hose ends. Screw-type hose clamp Coupler Screw-type hose clamp 3 Secure the drain hose to use. Top Control Dishwasher 2 If a longer drain hose is required, you do not know which method to to the air gap, waste tee, or garbage disposal with screw-type hose clamps. Method 1 - Use 5/8" or 7/8" inside diameter hose and a coupler to the factory installed hose. Secure the connection with a screw-type...

Installation Guide
Page 21
... connecting the drain line to lubricate the pump seal. • Turn on the sink hot water faucet and verify the water temperature. Your dishwasher will not drain if the plug is turned OFF. • Open the door and remove all foam and paper packaging. • Locate the User Guide in contact with the cabinet. See Step 10: Level the dishwasher on page 16. • Make sure that the wiring is required for leaks. See...
... connecting the drain line to lubricate the pump seal. • Turn on the sink hot water faucet and verify the water temperature. Your dishwasher will not drain if the plug is turned OFF. • Open the door and remove all foam and paper packaging. • Locate the User Guide in contact with the cabinet. See Step 10: Level the dishwasher on page 16. • Make sure that the wiring is required for leaks. See...

Installation Guide
Page 22
... 13: Connecting the drain hose on page 19" on page 19. 9 Open the dishwasher door and make sure that most of the dishwasher. See "Step 12: Connecting the water supply line on page 19" on page 19. Allow the toekick to the User Guide for leaks around the door could be sure that water enters the dishwasher. Top Control Dishwasher Step 16: Wet testing the dishwasher 1 Turn on the power supply (or plug the power cord into...
... 13: Connecting the drain hose on page 19" on page 19. 9 Open the dishwasher door and make sure that most of the dishwasher. See "Step 12: Connecting the water supply line on page 19" on page 19. Allow the toekick to the User Guide for leaks around the door could be sure that water enters the dishwasher. Top Control Dishwasher Step 16: Wet testing the dishwasher 1 Turn on the power supply (or plug the power cord into...
Installation Guide
Page 23
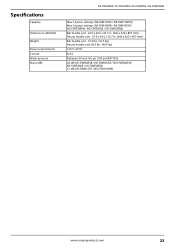
Specifications Capacity Dimensions (WxDxH) Weight Power requirements Current Water pressure Noise (dB) NS-DWH2BS8 / NS-DWH2SS8 / NS-DWR2BS8 / NS-DWR2WH8 Max 14 place settings (NS-DWH1SS9 / NS-DWH1WH9) Max 16 place settings (NS-DWH2BS8 / NS-DWH2SS8 / NS-DWR2WH8 / NS-DWR2SS8 / NS-DWR2BS8) Bar handle unit - 23.9 x 26.5 x 33.7 in. (606 x 674 x 857 mm) Recess handle unit - 23.9 x 24.5 x 33.7 in. (606 x 623 x 857 mm) Bar handle unit - 91.5 lbs. (41.5 kg) Recess handle unit...
Specifications Capacity Dimensions (WxDxH) Weight Power requirements Current Water pressure Noise (dB) NS-DWH2BS8 / NS-DWH2SS8 / NS-DWR2BS8 / NS-DWR2WH8 Max 14 place settings (NS-DWH1SS9 / NS-DWH1WH9) Max 16 place settings (NS-DWH2BS8 / NS-DWH2SS8 / NS-DWR2WH8 / NS-DWR2SS8 / NS-DWR2BS8) Bar handle unit - 23.9 x 26.5 x 33.7 in. (606 x 674 x 857 mm) Recess handle unit - 23.9 x 24.5 x 33.7 in. (606 x 623 x 857 mm) Bar handle unit - 91.5 lbs. (41.5 kg) Recess handle unit...
FAQs
Page 1
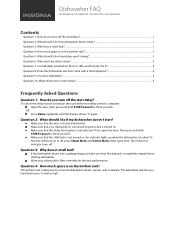
... the door is not selected. Wash your dishwasher is connected to accommodate plates, bowls, saucers, and cookware. Make sure that the child lock is not turned on the bottom rack? ...1 Question 5: What should I do if my dishes aren't drying?...2 Question 6: Why aren't my dishes clean? ...2 Question 7: I accidentally activated an E9 error. Dishwasher FAQ NS-DWH2SS8 / NS-DWR2SS8 / NS-DWH1SS9 / NS-DWH1WH9 Contents Question 1: How do you turn off the start delay? ...1 Question...
... the door is not selected. Wash your dishwasher is connected to accommodate plates, bowls, saucers, and cookware. Make sure that the child lock is not turned on the bottom rack? ...1 Question 5: What should I do if my dishes aren't drying?...2 Question 6: Why aren't my dishes clean? ...2 Question 7: I accidentally activated an E9 error. Dishwasher FAQ NS-DWH2SS8 / NS-DWR2SS8 / NS-DWH1SS9 / NS-DWH1WH9 Contents Question 1: How do you turn off the start delay? ...1 Question...
FAQs
Page 2
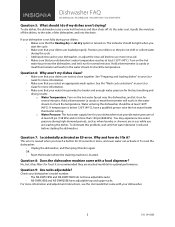
... have adjustable racks. • NS-DWH2SS8 and NS-DWR2SS8 have a qualified person raise the hot water heater thermostat setting. To reset the dishwasher: • Unplug the dishwasher, and then plug it run for your dishwasher's model number: • The NS-DWH1SS9 and NS-DWH1WH9 do if my dishes aren't drying? OR • Reset the breaker where the washing machine is recommended they do I fix it has filters for more information and adjustment instructions, see the User Guide...
... have adjustable racks. • NS-DWH2SS8 and NS-DWR2SS8 have a qualified person raise the hot water heater thermostat setting. To reset the dishwasher: • Unplug the dishwasher, and then plug it run for your dishwasher's model number: • The NS-DWH1SS9 and NS-DWH1WH9 do if my dishes aren't drying? OR • Reset the breaker where the washing machine is recommended they do I fix it has filters for more information and adjustment instructions, see the User Guide...
FAQs
Page 3
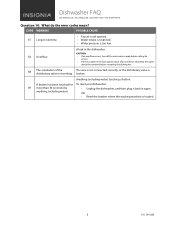
... / NS-DWH1WH9 Question 10: What do the error codes mean? A button has been touched for service. • If there is distributary valve not working. Anything (including water) touching a button. E8 The orientation of the The wire is not connected correctly, or the distributary valve is water in the base pan because of an overfill or small leak, the water should be removed before calling for To reset your dishwasher...
... / NS-DWH1WH9 Question 10: What do the error codes mean? A button has been touched for service. • If there is distributary valve not working. Anything (including water) touching a button. E8 The orientation of the The wire is not connected correctly, or the distributary valve is water in the base pan because of an overfill or small leak, the water should be removed before calling for To reset your dishwasher...