
Quick Setup Guide (English)
Page 2
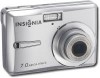
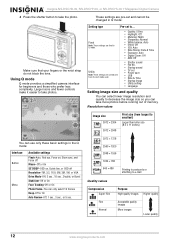
Getting to know your camera 1 Shutter button 2 Flash 3 Power button 4 Self-timer lamp 5 Speaker 6 USB/AV terminal 7 Microphone 8 Lens 9 Strap ring 10 Zoom button 11 Playback button 12 Menu button 13 Four-way control Flash button Macro button SET/DISP button 14 LCD screen 15 Power Indicator 16 ASM/Delete button 17 Mode button 18 Tripod socket 19 Battery and memory card cover Note: The memory card slot is located behind the battery cover, next to the battery compartment. 2
Getting to know your camera 1 Shutter button 2 Flash 3 Power button 4 Self-timer lamp 5 Speaker 6 USB/AV terminal 7 Microphone 8 Lens 9 Strap ring 10 Zoom button 11 Playback button 12 Menu button 13 Four-way control Flash button Macro button SET/DISP button 14 LCD screen 15 Power Indicator 16 ASM/Delete button 17 Mode button 18 Tripod socket 19 Battery and memory card cover Note: The memory card slot is located behind the battery cover, next to the battery compartment. 2

Quick Setup Guide (English)
Page 3
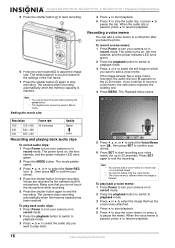
OR Press PLAYBACK to turn the camera on in PLAYBACK mode. 2 Press POWER again to turn the camera off. 3 Inserting the memory card 1 Open the battery cover. 2 Insert the card with the label facing up and with the arrow pointing in the direction indicated by sliding it . ...
OR Press PLAYBACK to turn the camera on in PLAYBACK mode. 2 Press POWER again to turn the camera off. 3 Inserting the memory card 1 Open the battery cover. 2 Insert the card with the label facing up and with the arrow pointing in the direction indicated by sliding it . ...
Quick Setup Guide (English)
Page 7
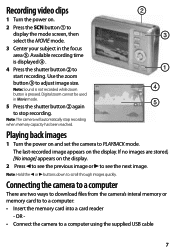
... area . Note: The camera will automatically stop recording. If no images are two ways to download files from the camera's interal memory or memory card to to a computer: • Insert the memory card into a card reader - Connecting the camera to a computer There are stored, [No image] appears on . 2 Press...the mode screen, then select the MOVIE mode. 3 Center your subject in Movie mode. 5 Press the shutter button again to stop recording when memory capacity has been reached. Recording video clips 1 Turn the power on the display. 2 Press to see the previous image or to see the ...
... area . Note: The camera will automatically stop recording. If no images are two ways to download files from the camera's interal memory or memory card to to a computer: • Insert the memory card into a card reader - Connecting the camera to a computer There are stored, [No image] appears on . 2 Press...the mode screen, then select the MOVIE mode. 3 Center your subject in Movie mode. 5 Press the shutter button again to stop recording when memory capacity has been reached. Recording video clips 1 Turn the power on the display. 2 Press to see the previous image or to see the ...
Quick Setup Guide (English)
Page 8
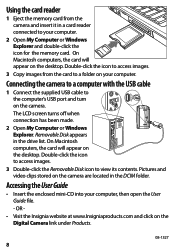
.... Accessing the User Guide • Insert the enclosed mini-CD into your computer. B B Using the card reader 1 Eject the memory card from the card to view its contents. On Macintosh computers, the card will appear on the desktop. Double-click the icon to access images. 3 ... images from the camera and insert it in a card reader connected to the computer's USB port and turn on the camera. OR - • Visit the Insignia website at www.Insigniaproducts.com and click on the desktop. The LCD screen turns off when connection has been made. 2 Open My Computer or Windows...
.... Accessing the User Guide • Insert the enclosed mini-CD into your computer. B B Using the card reader 1 Eject the memory card from the card to view its contents. On Macintosh computers, the card will appear on the desktop. Double-click the icon to access images. 3 ... images from the camera and insert it in a card reader connected to the computer's USB port and turn on the camera. OR - • Visit the Insignia website at www.Insigniaproducts.com and click on the desktop. The LCD screen turns off when connection has been made. 2 Open My Computer or Windows...

User Manual (English)
Page 4
... Use to mount the camera to take a photo. Press to a tripod. 4 www.insignia-products.com Open to this ring. Attach the carrying strap (included) to install batteries and an optional memory card. Lets you change camera settings. 4 Power indicator LED Lights green when the camera ... to confirm your settings. 7 Macro button Press to enable shooting close-up photos. 8 LCD Use to compose your camera. Back Insignia NS-DSC7B-09, NS-DSC7P-09, or NS-DSC7S-09 7 Megapixel Digital Camera Top, bottom and side 8 9 10 # Component Description 1 Zoom button Press T to zoom in...
... Use to mount the camera to take a photo. Press to a tripod. 4 www.insignia-products.com Open to this ring. Attach the carrying strap (included) to install batteries and an optional memory card. Lets you change camera settings. 4 Power indicator LED Lights green when the camera ... to confirm your settings. 7 Macro button Press to enable shooting close-up photos. 8 LCD Use to compose your camera. Back Insignia NS-DSC7B-09, NS-DSC7P-09, or NS-DSC7S-09 7 Megapixel Digital Camera Top, bottom and side 8 9 10 # Component Description 1 Zoom button Press T to zoom in...

User Manual (English)
Page 5
... charge is inside the battery cover, adjacent to release it . 4 Close the battery cover. www.insignia-products.com 5 Insignia NS-DSC7B-09, NS-DSC7P-09, or NS-DSC7S-09 7 Megapixel Digital Camera Setting up and the arrow pointing in. If a memory card is not inserted in the illustration. 4 If you match the + and - Make sure that...
... charge is inside the battery cover, adjacent to release it . 4 Close the battery cover. www.insignia-products.com 5 Insignia NS-DSC7B-09, NS-DSC7P-09, or NS-DSC7S-09 7 Megapixel Digital Camera Setting up and the arrow pointing in. If a memory card is not inserted in the illustration. 4 If you match the + and - Make sure that...
User Manual (English)
Page 7
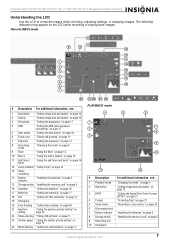
...indicator "Using Zoom" on page 13 13 Shots remaining 14 Battery indicator "Installing the batteries" on page 5 15 Storage media "Installing the memory card" on page 5 16 Stabilizer "Setting the stabilizer" on page 18 17 Metering "Setting the metering" on page 17 18 ISO ... number/total 7 Battery indicator "Installing the batteries" on page 5 8 Storage media "Installing the memory card" on the LCD while recording or playing back images. Insignia NS-DSC7B-09, NS-DSC7P-09, or NS-DSC7S-09 7 Megapixel Digital Camera Understanding the LCD Use the LCD to compose images while recording, ...
...indicator "Using Zoom" on page 13 13 Shots remaining 14 Battery indicator "Installing the batteries" on page 5 15 Storage media "Installing the memory card" on page 5 16 Stabilizer "Setting the stabilizer" on page 18 17 Metering "Setting the metering" on page 17 18 ISO ... number/total 7 Battery indicator "Installing the batteries" on page 5 8 Storage media "Installing the memory card" on the LCD while recording or playing back images. Insignia NS-DSC7B-09, NS-DSC7P-09, or NS-DSC7S-09 7 Megapixel Digital Camera Understanding the LCD Use the LCD to compose images while recording, ...

User Manual (English)
Page 11
Insignia NS-DSC7B-09, NS-DSC7P-09, or NS-DSC7S-09 7 Megapixel Digital Camera Setup menu Menu item Sounds Auto Review...Power turns on, the lens extends, and the power indicator LED turns green. 2 Compose the photo on a memory card, if you erase all data stored in some situations. In that you see "File naming" on the LCD... settings to save power. • 1 min. • 3 min. • 5 min. (Does not activate in the internal memory, if there is completed. A "COMPLETED" message displays when the formatting is no card inserted. A "BUSY...PLEASE WAIT" message displays when...
Insignia NS-DSC7B-09, NS-DSC7P-09, or NS-DSC7S-09 7 Megapixel Digital Camera Setup menu Menu item Sounds Auto Review...Power turns on, the lens extends, and the power indicator LED turns green. 2 Compose the photo on a memory card, if you erase all data stored in some situations. In that you see "File naming" on the LCD... settings to save power. • 1 min. • 3 min. • 5 min. (Does not activate in the internal memory, if there is completed. A "COMPLETED" message displays when the formatting is no card inserted. A "BUSY...PLEASE WAIT" message displays when...
User Manual (English)
Page 12
... Quality values Compression Super Fine Fine Normal Purpose High-quality images Higher quality Acceptable quality images More images Lower quality 12 www.insignia-products.com Insignia NS-DSC7B-09, NS-DSC7P-09, or NS-DSC7S-09 7 Megapixel Digital Camera 4 Press the shutter button to take photos. Resolution values Image size 3072 × 2304 3072 ×...., 10 sec., Double, or Burst Stabilizer-Off or On Face Tracking-Off or On Photo Frame-You can take more photos before running out of memory.
... Quality values Compression Super Fine Fine Normal Purpose High-quality images Higher quality Acceptable quality images More images Lower quality 12 www.insignia-products.com Insignia NS-DSC7B-09, NS-DSC7P-09, or NS-DSC7S-09 7 Megapixel Digital Camera 4 Press the shutter button to take photos. Resolution values Image size 3072 × 2304 3072 ×...., 10 sec., Double, or Burst Stabilizer-Off or On Face Tracking-Off or On Photo Frame-You can take more photos before running out of memory.
User Manual (English)
Page 16
...not touch the microphone while recording. 5 Press the shutter button again to end the recording. You cannot delete only the voice memo. Insignia NS-DSC7B-09, NS-DSC7P-09, or NS-DSC7S-09 7 Megapixel Digital Camera 5 Press the shutter button to start recording your voice memo (for up to 30 seconds). To...to turn your camera on in record mode. The voice memo is deleted when the image is reached. The camera stops recording automatically when the memory capacity is deleted. If the image already has a voice memo recorded, the audio clip icon appears on , the lens extends, and the ...
...not touch the microphone while recording. 5 Press the shutter button again to end the recording. You cannot delete only the voice memo. Insignia NS-DSC7B-09, NS-DSC7P-09, or NS-DSC7S-09 7 Megapixel Digital Camera 5 Press the shutter button to start recording your voice memo (for up to 30 seconds). To...to turn your camera on in record mode. The voice memo is deleted when the image is reached. The camera stops recording automatically when the memory capacity is deleted. If the image already has a voice memo recorded, the audio clip icon appears on , the lens extends, and the ...

User Manual (English)
Page 19
... again to finishing resizing. Press the SET button to begin trimming, then press the SET button again to finishing rotating. www.insignia-products.com 19 Insignia NS-DSC7B-09, NS-DSC7P-09, or NS-DSC7S-09 7 Megapixel Digital Camera 4 Press , , , or to select the photo you want, then press T or ... photo: 1 Press Power button to rotate the photo. The edited photo is saved as a new file. See "Editing your camera (see "Installing the memory card" on page 5). OR - Copying, deleting, and protecting files Copying files You can decrease (not increase) the size of the photo, then press ...
... again to finishing resizing. Press the SET button to begin trimming, then press the SET button again to finishing rotating. www.insignia-products.com 19 Insignia NS-DSC7B-09, NS-DSC7P-09, or NS-DSC7S-09 7 Megapixel Digital Camera 4 Press , , , or to select the photo you want, then press T or ... photo: 1 Press Power button to rotate the photo. The edited photo is saved as a new file. See "Editing your camera (see "Installing the memory card" on page 5). OR - Copying, deleting, and protecting files Copying files You can decrease (not increase) the size of the photo, then press ...
User Manual (English)
Page 20
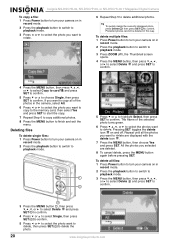
... press SET to confirm. 4 Press or to select Single, then press SET to confirm. 5 Press or to select the photo want to copy to the memory card, then select Yes and press SET to start the copy. 7 Repeat Step 6 to copy additional photos. 8 Press the MENU button to finish and exit... or to select the photo you selected are displayed with the delete icon . 7 Press the MENU button, then choose Yes and press SET. Insignia NS-DSC7B-09, NS-DSC7P-09, or NS-DSC7S-09 7 Megapixel Digital Camera To copy a file: 1 Press Power button to turn your camera on in record mode. 2 Press the playback...
... press SET to confirm. 4 Press or to select Single, then press SET to confirm. 5 Press or to select the photo want to copy to the memory card, then select Yes and press SET to start the copy. 7 Repeat Step 6 to copy additional photos. 8 Press the MENU button to finish and exit... or to select the photo you selected are displayed with the delete icon . 7 Press the MENU button, then choose Yes and press SET. Insignia NS-DSC7B-09, NS-DSC7P-09, or NS-DSC7S-09 7 Megapixel Digital Camera To copy a file: 1 Press Power button to turn your camera on in record mode. 2 Press the playback...
User Manual (English)
Page 21
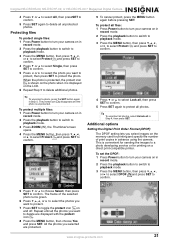
... SET to confirm. 4 Press or to select Lock all, then press SET to confirm. 5 Press SET again to protect all unprotected photos. Insignia NS-DSC7B-09, NS-DSC7P-09, or NS-DSC7S-09 7 Megapixel Digital Camera 4 Press or to select All, then pressSET to confirm. 5 Press SET again to delete all photos. Tip... photo turns green. 6 Press , , , or to select the photos you want to protect, then press SET to select the photo you select images on the memory card for printing on in record mode. 2 Press the playback button to switch to playback mode. 3 Press the MENU button, then press , , , or to...
... SET to confirm. 4 Press or to select Lock all, then press SET to confirm. 5 Press SET again to protect all unprotected photos. Insignia NS-DSC7B-09, NS-DSC7P-09, or NS-DSC7S-09 7 Megapixel Digital Camera 4 Press or to select All, then pressSET to confirm. 5 Press SET again to delete all photos. Tip... photo turns green. 6 Press , , , or to select the photos you want to protect, then press SET to select the photo you select images on the memory card for printing on in record mode. 2 Press the playback button to switch to playback mode. 3 Press the MENU button, then press , , , or to...

User Manual (English)
Page 22
... TV. Note The startup image is stored in this photo, select 0. 7 Press the SCN button to turn off when the connection is deleted or the memory formatted. 4 Set the TV input signal to set using the supplied AV cable. 3 Press the MENU button, then press , , , or to select S.Image and... Setup menu icon . 6 Press or to select S.Image , then press or SET. 7 Press or to select the option you want (0~30). Insignia NS-DSC7B-09, NS-DSC7P-09, or NS-DSC7S-09 7 Megapixel Digital Camera 4 Press or to select Single, then press SET to the computer using the supplied USB cable. Connecting the...
... TV. Note The startup image is stored in this photo, select 0. 7 Press the SCN button to turn off when the connection is deleted or the memory formatted. 4 Set the TV input signal to set using the supplied AV cable. 3 Press the MENU button, then press , , , or to select S.Image and... Setup menu icon . 6 Press or to select S.Image , then press or SET. 7 Press or to select the option you want (0~30). Insignia NS-DSC7B-09, NS-DSC7P-09, or NS-DSC7S-09 7 Megapixel Digital Camera 4 Press or to select Single, then press SET to the computer using the supplied USB cable. Connecting the...
User Manual (English)
Page 23
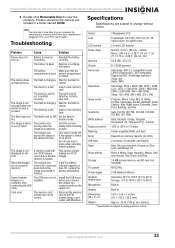
...inch LCD monitor Focus range Normal: 31.5 in. (80 cm) ~ infinity Macro: (W) 5.9 in.~3.28 ft. (15 cm ~1 m) (T) 15.75 in memory. www.insignia-products.com 23 Folders stored on . Reinstall the battery correctly. The battery Make sure that the compartment is full. charge. The...is loaded. The camera does The flash is charging. a photo. Cannot transfer images to fire. Card error The memory card format may be correct. Insignia NS-DSC7B-09, NS-DSC7P-09, or NS-DSC7S-09 7 Megapixel Digital Camera 3 Double-click Removable Disc to 40 cm. new card. another camera) is...
...inch LCD monitor Focus range Normal: 31.5 in. (80 cm) ~ infinity Macro: (W) 5.9 in.~3.28 ft. (15 cm ~1 m) (T) 15.75 in memory. www.insignia-products.com 23 Folders stored on . Reinstall the battery correctly. The battery Make sure that the compartment is full. charge. The...is loaded. The camera does The flash is charging. a photo. Cannot transfer images to fire. Card error The memory card format may be correct. Insignia NS-DSC7B-09, NS-DSC7P-09, or NS-DSC7S-09 7 Megapixel Digital Camera 3 Double-click Removable Disc to 40 cm. new card. another camera) is...

User Manual (English)
Page 24
... in sequence will be created." When it appears, try one of folders in a new memory card. • The folder number and file numbers are initialized and renumbered from 100 and 0001 respectively. Insignia NS-DSC7B-09, NS-DSC7P-09, or NS-DSC7S-09 7 Megapixel Digital Camera Appendix Understanding folder and file names Your digital camera...
... in sequence will be created." When it appears, try one of folders in a new memory card. • The folder number and file numbers are initialized and renumbered from 100 and 0001 respectively. Insignia NS-DSC7B-09, NS-DSC7P-09, or NS-DSC7S-09 7 Megapixel Digital Camera Appendix Understanding folder and file names Your digital camera...