
User Manual English
Page 35
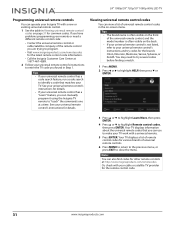
... cable or satellite TV provider for the remote control code. 31 www.insigniaproducts.com Viewing universal remote control codes You can manually program it using the Insignia TV remote to make your universal remote control's instructions for details. Tips • The brand name is not listed, ... If your universal remote control has a "Learn" feature, you can also find codes for the latest remote control code information. • Call the Insignia Customer Care Center at 1-877-467-4289. 2 Follow your TV. Your TV displays a list of remote control codes for details. • If your...
... cable or satellite TV provider for the remote control code. 31 www.insigniaproducts.com Viewing universal remote control codes You can manually program it using the Insignia TV remote to make your universal remote control's instructions for details. Tips • The brand name is not listed, ... If your universal remote control has a "Learn" feature, you can also find codes for the latest remote control code information. • Call the Insignia Customer Care Center at 1-877-467-4289. 2 Follow your TV. Your TV displays a list of remote control codes for details. • If your...
User Manual English
Page 46
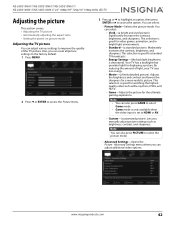
... and contrast and lowers the sharpness for video games, animation, and in bright light environments. • Standard-(a standard picture). NS-24D510NA17/NS-39D310NA17/NS-50D510NA17/ NS-24D510MX17/NS-50D510MX17 24" 1080p/39" 720p/50" 1080p 60Hz LED TV Adjusting the picture This section covers: • Adjusting the TV... press ENTER or X to select the picture mode. • Advanced Settings-Opens the Picture · Advanced Settings menu where you manually adjust picture settings such as Blu-ray Discs, DVDs, and HDTV. • Game-Adjusts the picture for watching the highest quality ...
... and contrast and lowers the sharpness for video games, animation, and in bright light environments. • Standard-(a standard picture). NS-24D510NA17/NS-39D310NA17/NS-50D510NA17/ NS-24D510MX17/NS-50D510MX17 24" 1080p/39" 720p/50" 1080p 60Hz LED TV Adjusting the picture This section covers: • Adjusting the TV... press ENTER or X to select the picture mode. • Advanced Settings-Opens the Picture · Advanced Settings menu where you manually adjust picture settings such as Blu-ray Discs, DVDs, and HDTV. • Game-Adjusts the picture for watching the highest quality ...
User Manual English
Page 48
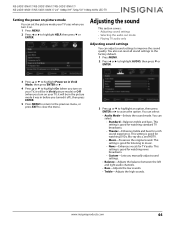
NS-24D510NA17/NS-39D310NA17/NS-50D510NA17/ NS-24D510MX17/NS-50D510MX17 24" 1080p/39" 720p/50" 1080p 60Hz LED TV Setting the power on picture mode You can set the picture mode your TV, it ... your TV, it will be in before you turned it on in Vivid Mode, then press ENTER or X. 4 Press S or T to highlight On (when you manually adjust sound settings. • Balance-Adjusts the balance between the left and right audio channels. • Bass-Adjusts the low sounds. • Treble-Adjusts the...
NS-24D510NA17/NS-39D310NA17/NS-50D510NA17/ NS-24D510MX17/NS-50D510MX17 24" 1080p/39" 720p/50" 1080p 60Hz LED TV Setting the power on picture mode You can set the picture mode your TV, it ... your TV, it will be in before you turned it on in Vivid Mode, then press ENTER or X. 4 Press S or T to highlight On (when you manually adjust sound settings. • Balance-Adjusts the balance between the left and right audio channels. • Bass-Adjusts the low sounds. • Treble-Adjusts the...

User Manual English
Page 61
When you selected Manual for setting the date and time or if you move your TV to a different time zone, you can select Eastern, Central, Mountain, Pacific, Alaska, Hawaii, ... TV 4 Press S or T to highlight Date / Time, then press ENTER. 5 Press S or T to highlight Mode, then press ENTER or X. 6 Press S or T to highlight Manual (to set the options manually) or Auto (the options are finished, press MENU. 12 Press MENU to return to the previous menu, or press EXIT to select your...
When you selected Manual for setting the date and time or if you move your TV to a different time zone, you can select Eastern, Central, Mountain, Pacific, Alaska, Hawaii, ... TV 4 Press S or T to highlight Date / Time, then press ENTER. 5 Press S or T to highlight Mode, then press ENTER or X. 6 Press S or T to highlight Manual (to set the options manually) or Auto (the options are finished, press MENU. 12 Press MENU to return to the previous menu, or press EXIT to select your...
User Manual English
Page 65
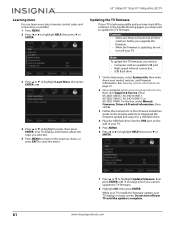
..., select System Info, then write down your TV until the update is updating, do not turn off your TV. Enter NS-24D510NA17, NS-39D310NA17, NS-50D510NA17, NS-24D510MX17, or NS-50D510MX17 in the box under Manual, Firmware, Drivers & Product Information, then click X. 3 Follow the instructions in the troubleshooting pages, you have tried all ...to highlight HELP, then press T or ENTER. 7 Press S or T to a USB flash drive. 4 Plug the USB flash drive into the USB port on the Insignia website to download the firmware update and copy it to highlight Update Firmware, then press ENTER or X.
..., select System Info, then write down your TV until the update is updating, do not turn off your TV. Enter NS-24D510NA17, NS-39D310NA17, NS-50D510NA17, NS-24D510MX17, or NS-50D510MX17 in the box under Manual, Firmware, Drivers & Product Information, then click X. 3 Follow the instructions in the troubleshooting pages, you have tried all ...to highlight HELP, then press T or ENTER. 7 Press S or T to a USB flash drive. 4 Plug the USB flash drive into the USB port on the Insignia website to download the firmware update and copy it to highlight Update Firmware, then press ENTER or X.

Quick Setup Guide English
Page 1
... the holes on the bottom of your TV, the bracket must be securely attached, using your adapter or cord in the box under Manual, Firmware, Drivers & Product Information, then click ►. ! Power/INPUT button Remote control sensor Power indicator 24" 24" shown Note... HDMI 3 jack. 39" /50" Msc4rexw8s mm B Your TV has four VESA mounting holes on a cushioned, clean surface. Enter NS-24D510NA17, NS-39D310NA17, NS-50D510NA17, NS-24D510MX17or NS-50D510MX17 in until all four holes. STOP Do not plug your new product, please read these instructions to correctly mount your TV. A...
... the holes on the bottom of your TV, the bracket must be securely attached, using your adapter or cord in the box under Manual, Firmware, Drivers & Product Information, then click ►. ! Power/INPUT button Remote control sensor Power indicator 24" 24" shown Note... HDMI 3 jack. 39" /50" Msc4rexw8s mm B Your TV has four VESA mounting holes on a cushioned, clean surface. Enter NS-24D510NA17, NS-39D310NA17, NS-50D510NA17, NS-24D510MX17or NS-50D510MX17 in until all four holes. STOP Do not plug your new product, please read these instructions to correctly mount your TV. A...
Quick Setup Guide English
Page 2
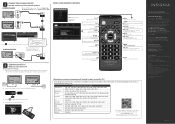
...basic how-to steps to use the included Insignia remote control, see the table below for more advanced features. MUTE Mutes the sound. / VOL+ Increases the volume or navigates right in TV menus. Enter NS-24D510NA17, NS-39D31NA17, NS-50D510NA17 or NS-24D510MX17, NS-50D510MX17 in TV menus. Distributed by Best...on the back of your TV and don't want to more information. Decreases the volume or navigates left in the box under Manual, Firmware, Drivers & Product Information, then click ►. Selects the next lower TV channel or navigates down in China English V2 16...
...basic how-to steps to use the included Insignia remote control, see the table below for more advanced features. MUTE Mutes the sound. / VOL+ Increases the volume or navigates right in TV menus. Enter NS-24D510NA17, NS-39D31NA17, NS-50D510NA17 or NS-24D510MX17, NS-50D510MX17 in TV menus. Distributed by Best...on the back of your TV and don't want to more information. Decreases the volume or navigates left in the box under Manual, Firmware, Drivers & Product Information, then click ►. Selects the next lower TV channel or navigates down in China English V2 16...


