
Firmware Installation Guide (English)
Page 1
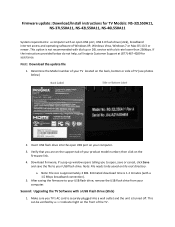
... your USB flash drive; After saving the firmware to your product model number; Determine the Model number of TV (see photos below do not help, call Insignia Customer Support at (877) 467‐4289 for TV Models: NS‐32L550A11, NS‐37L550A11, NS‐42L550A11, NS‐46L550A11 System requirements: a computer with a bit rate lower than 256kbps. Note: File needs to be verified by a red indicator light on the support...
... your USB flash drive; After saving the firmware to your product model number; Determine the Model number of TV (see photos below do not help, call Insignia Customer Support at (877) 467‐4289 for TV Models: NS‐32L550A11, NS‐37L550A11, NS‐42L550A11, NS‐46L550A11 System requirements: a computer with a bit rate lower than 256kbps. Note: File needs to be verified by a red indicator light on the support...

User Manual (English)
Page 2
... remote control 10 Using the remote control holder 10 Programming your universal Insignia remote control 10 Programming a different universal remote control 13 Making connections 14 Connecting the power 14 Connecting an antenna or cable TV (no box 14 Connecting a cable or satellite box 14 Connecting an HDMI device 15 Connecting a component video device 15 Connecting an S-Video device 16 Connecting a camcorder or game console 16 Connecting a VCR 17 Connecting a computer 17 Connecting headphones 18 Connecting a digital sound system 18 Connecting an analog sound system 18 Turning...
... remote control 10 Using the remote control holder 10 Programming your universal Insignia remote control 10 Programming a different universal remote control 13 Making connections 14 Connecting the power 14 Connecting an antenna or cable TV (no box 14 Connecting a cable or satellite box 14 Connecting an HDMI device 15 Connecting a component video device 15 Connecting an S-Video device 16 Connecting a camcorder or game console 16 Connecting a VCR 17 Connecting a computer 17 Connecting headphones 18 Connecting a digital sound system 18 Connecting an analog sound system 18 Turning...
User Manual (English)
Page 3
... 29 Locking control buttons 30 Blocking unrated TV 30 Setting parental control levels 31 Downloading rating information 32 Using closed captioning 33 Turning closed captioning on or off 33 Selecting the closed captioning mode 33 Customizing digital closed captioning styles 34 Adjusting time settings 35 Setting the time 35 Setting the sleep timer 36 Adjusting menu settings 36 Selecting the menu language 36 Adjusting the menu transparency 37 Turning Auto Input Sensing on or off 37 Labeling an input source 38 Using INlink 38 Restoring settings to the defaults 39 Using USB 40...
... 29 Locking control buttons 30 Blocking unrated TV 30 Setting parental control levels 31 Downloading rating information 32 Using closed captioning 33 Turning closed captioning on or off 33 Selecting the closed captioning mode 33 Customizing digital closed captioning styles 34 Adjusting time settings 35 Setting the time 35 Setting the sleep timer 36 Adjusting menu settings 36 Selecting the menu language 36 Adjusting the menu transparency 37 Turning Auto Input Sensing on or off 37 Labeling an input source 38 Using INlink 38 Restoring settings to the defaults 39 Using USB 40...

User Manual (English)
Page 5
... by this TV manufacturer, listed in mind The issue The home theater entertainment experience is appropriate. www.insigniaproducts.com 1 Wall mounting If you decide to be heavy. We and the consumer electronics industry are popular purchases. Tune into safety • One size of wall mount does not fit all enclosed instructions for proper use your flat panel display As you enjoy your...
... by this TV manufacturer, listed in mind The issue The home theater entertainment experience is appropriate. www.insigniaproducts.com 1 Wall mounting If you decide to be heavy. We and the consumer electronics industry are popular purchases. Tune into safety • One size of wall mount does not fit all enclosed instructions for proper use your flat panel display As you enjoy your...
User Manual (English)
Page 8
... scenes. (See page 22 for instructions on how to use INlink) 4 www.insigniaproducts.com Audyssey Dynamic Volume is a feature that lets you put the remote control down and enjoy your TV speakers sound more lifelike. NS-32L_37L_42L550A11_09-1120_MAN_V2_English.book Page 4 Thursday, January 21, 2010 10:20 AM NS-32L550A11/NS-37L550A11/NS-42L550A11 32"/37"/42" LCD, 120 Hz 1080p 32"/37"/42...
... scenes. (See page 22 for instructions on how to use INlink) 4 www.insigniaproducts.com Audyssey Dynamic Volume is a feature that lets you put the remote control down and enjoy your TV speakers sound more lifelike. NS-32L_37L_42L550A11_09-1120_MAN_V2_English.book Page 4 Thursday, January 21, 2010 10:20 AM NS-32L550A11/NS-37L550A11/NS-42L550A11 32"/37"/42" LCD, 120 Hz 1080p 32"/37"/42...
User Manual (English)
Page 12
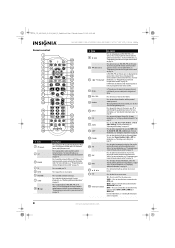
... EXIT 25 Video input selection Press to close the on -screen menu. Press to control a connected Blu-ray or DVD player. Press to the AV IN jacks. Press to open the on -screen menu. You can select Heavy, Medium, Light, or Off. Press to select the device connected to enter channel numbers and the parental control password. COMP-Press to select the device connected to display the program guide. Press to control your universal Insignia remote control" on page 10. # Item 9 (play) 10...
... EXIT 25 Video input selection Press to close the on -screen menu. Press to control a connected Blu-ray or DVD player. Press to the AV IN jacks. Press to open the on -screen menu. You can select Heavy, Medium, Light, or Off. Press to select the device connected to enter channel numbers and the parental control password. COMP-Press to select the device connected to display the program guide. Press to control your universal Insignia remote control" on page 10. # Item 9 (play) 10...
User Manual (English)
Page 13
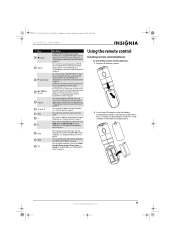
... program the remote control to select the aspect ratio. Press to control connected devices. For more information, see "Programming your remote control. Press to pause playback on page 10. In DVR mode, the behavior of this button again to turn Game mode On or Off. Press to display the Game mode status. For more information, see "Adjusting the TV picture" on page 33. Press to control connected devices. Using the remote control Installing remote control batteries To install the remote control batteries: 1 Remove...
... program the remote control to select the aspect ratio. Press to control connected devices. For more information, see "Programming your remote control. Press to pause playback on page 10. In DVR mode, the behavior of this button again to turn Game mode On or Off. Press to display the Game mode status. For more information, see "Adjusting the TV picture" on page 33. Press to control connected devices. Using the remote control Installing remote control batteries To install the remote control batteries: 1 Remove...
User Manual (English)
Page 14
... down each digit is not going to the remote control after trying all types of screws. The LED blinks twice. 5 Press the number that you want to program in an area with all codes listed for wall mounting. NS-32L_37L_42L550A11_09-1120_MAN_V2_English.book Page 10 Thursday, January 21, 2010 10:20 AM NS-32L550A11/NS-37L550A11/NS-42L550A11 32"/37"/42" LCD, 120 Hz 1080p 3 Replace the battery cover. Using the remote control holder...
... down each digit is not going to the remote control after trying all types of screws. The LED blinks twice. 5 Press the number that you want to program in an area with all codes listed for wall mounting. NS-32L_37L_42L550A11_09-1120_MAN_V2_English.book Page 10 Thursday, January 21, 2010 10:20 AM NS-32L550A11/NS-37L550A11/NS-42L550A11 32"/37"/42" LCD, 120 Hz 1080p 3 Replace the battery cover. Using the remote control holder...
User Manual (English)
Page 17
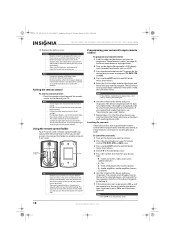
..., you selected in Step 1. You may need a different remote control code, visit www.insigniaproducts.com for additional buttons you would like to remove all buttonmoved data in a specific mode: 1 Press and hold SET until the LED blinks twice, then release. 3 Enter 9 9 4. To restore all buttonmoved data from twice. A macro can operate your TV and cable box and select a particular channel. Programming a different universal remote control You can be set of a single button. www...
..., you selected in Step 1. You may need a different remote control code, visit www.insigniaproducts.com for additional buttons you would like to remove all buttonmoved data in a specific mode: 1 Press and hold SET until the LED blinks twice, then release. 3 Enter 9 9 4. To restore all buttonmoved data from twice. A macro can operate your TV and cable box and select a particular channel. Programming a different universal remote control You can be set of a single button. www...
User Manual (English)
Page 18
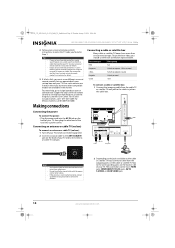
... cable with the power cord or other compatible models are listed on the back or side of your universal remote control has a code search feature, run a code search to an HDMI jack, COMPONENT Y/PB/PR jacks, AV IN S-VIDEO, or AV IN VIDEO jack. 14 www.insigniaproducts.com The connection can manually program it using the Insignia TV remote to the ANT/CABLE IN jack on the cable box. Connecting an antenna or cable TV (no box) To connect an antenna or cable TV (no box): 1 Turn...
... cable with the power cord or other compatible models are listed on the back or side of your universal remote control has a code search feature, run a code search to an HDMI jack, COMPONENT Y/PB/PR jacks, AV IN S-VIDEO, or AV IN VIDEO jack. 14 www.insigniaproducts.com The connection can manually program it using the Insignia TV remote to the ANT/CABLE IN jack on the cable box. Connecting an antenna or cable TV (no box) To connect an antenna or cable TV (no box): 1 Turn...
User Manual (English)
Page 21
..." your TV and the VIDEO OUT jack on the computer. 5 Press INPUT to open the Source List. 6 Press or to highlight AV, then press OK/ENTER. 7 Insert a videotape into the VCR, then press the play button. 3 Connect an audio cable to the PC/DVI AUDIO IN jack on the back of your TV and to the VGA jack on your TV's power cord is unplugged and the...
..." your TV and the VIDEO OUT jack on the computer. 5 Press INPUT to open the Source List. 6 Press or to highlight AV, then press OK/ENTER. 7 Insert a videotape into the VCR, then press the play button. 3 Connect an audio cable to the PC/DVI AUDIO IN jack on the back of your TV and to the VGA jack on your TV's power cord is unplugged and the...
User Manual (English)
Page 24
... mode and the power indicator LED turns red. Selecting the video input source To select the video input source: 1 Turn on your TV. When the scan is still receiving power. Note If your TV does not receive an input signal for digital channels first. Source List TV AV Component VGA HDMI 1 HDMI 2 HDMI 3 HDMI 4 USB 2 Press or to search for channels. The other inputs are based on or off: 1 Make sure that have connected devices are active. If you chose Antenna...
... mode and the power indicator LED turns red. Selecting the video input source To select the video input source: 1 Turn on your TV. When the scan is still receiving power. Note If your TV does not receive an input signal for digital channels first. Source List TV AV Component VGA HDMI 1 HDMI 2 HDMI 3 HDMI 4 USB 2 Press or to search for channels. The other inputs are based on or off: 1 Make sure that have connected devices are active. If you chose Antenna...
User Manual (English)
Page 26
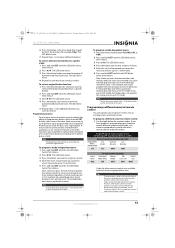
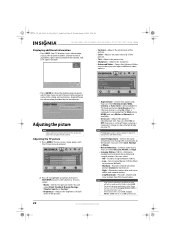
... the channel number, channel name (if available), signal source, program description, and DTV signal strength. The on-screen menu opens with clear detail and smooth motion. • 24p film mode-Provides smooth and clear motion from film-based video. Picture Advanced Video Aspect Ratio Overscan Color Temperature Noise Reduction Insignia Motion 120 Hz Backlight PICTURE AUDIO CHANNELS SETTINGS USB Auto On Cool Middle Low 20 MOVE OK ENTER SELECT Adjust how the picture fills the screen MENU PREVIOUS...
... the channel number, channel name (if available), signal source, program description, and DTV signal strength. The on-screen menu opens with clear detail and smooth motion. • 24p film mode-Provides smooth and clear motion from film-based video. Picture Advanced Video Aspect Ratio Overscan Color Temperature Noise Reduction Insignia Motion 120 Hz Backlight PICTURE AUDIO CHANNELS SETTINGS USB Auto On Cool Middle Low 20 MOVE OK ENTER SELECT Adjust how the picture fills the screen MENU PREVIOUS...
User Manual (English)
Page 36
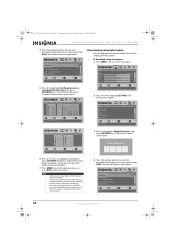
...www.insigniaproducts.com Settings Parental Controls Closed Caption Time Menu Settings Auto Input Sensing Input Labels PICTURE AUDIO CHANNELS SETTINGS USB On MOVE OK ENTER SELECT Set various TV options MENU PREVIOUS EXIT EXIT PICTURE AUDIO CHANNELS SETTINGS USB Settings Parental Controls Canadian Parental Locks English Rating French Rating E E C G C8+ 8 ans+ G 13 ans+ PG 16 ans+ 14+ 18 ans+ 18+ MOVE OK ENTER SELECT MENU PREVIOUS Restrict movie and TV programs by US Ratings MENU PREVIOUS EXIT EXIT Downloading rating information You can download rating information...
...www.insigniaproducts.com Settings Parental Controls Closed Caption Time Menu Settings Auto Input Sensing Input Labels PICTURE AUDIO CHANNELS SETTINGS USB On MOVE OK ENTER SELECT Set various TV options MENU PREVIOUS EXIT EXIT PICTURE AUDIO CHANNELS SETTINGS USB Settings Parental Controls Canadian Parental Locks English Rating French Rating E E C G C8+ 8 ans+ G 13 ans+ PG 16 ans+ 14+ 18 ans+ 18+ MOVE OK ENTER SELECT MENU PREVIOUS Restrict movie and TV programs by US Ratings MENU PREVIOUS EXIT EXIT Downloading rating information You can download rating information...

User Manual (English)
Page 43
...-Lets your TV remote control. Picture Mode Brightness Contrast Color Tint Sharpness PICTURE AUDIO CHANNELS SETTINGS USB Energy Savings 50 48 70 0 0 MOVE OK ENTER SELECT Adjust settings to affect picture quality MENU PREVIOUS EXIT EXIT 2 Press or to the defaults: 1 Press MENU. Settings Parental Controls Closed Caption Time Menu Settings Auto Input Sensing Input Labels PICTURE AUDIO CHANNELS SETTINGS USB On MOVE OK ENTER SELECT Set various TV options MENU PREVIOUS EXIT EXIT 3 Press to highlight Reset to Default, select Yes, then press OK/ENTER to access the submenu. NS...
...-Lets your TV remote control. Picture Mode Brightness Contrast Color Tint Sharpness PICTURE AUDIO CHANNELS SETTINGS USB Energy Savings 50 48 70 0 0 MOVE OK ENTER SELECT Adjust settings to affect picture quality MENU PREVIOUS EXIT EXIT 2 Press or to the defaults: 1 Press MENU. Settings Parental Controls Closed Caption Time Menu Settings Auto Input Sensing Input Labels PICTURE AUDIO CHANNELS SETTINGS USB On MOVE OK ENTER SELECT Set various TV options MENU PREVIOUS EXIT EXIT 3 Press to highlight Reset to Default, select Yes, then press OK/ENTER to access the submenu. NS...

User Manual (English)
Page 48
.../NS-42L550A11 32"/37"/42" LCD, 120 Hz 1080p 3 Press to a qualified service technician. Turn off the light or move your device and is especially dirty, moisten a soft, lint-free cloth in the battery compartment. The Settings menu opens. You can select On or Off. • Speed-Sets the amount of remote control codes. Refer all service to highlight Settings. You can select None, Fade to Black...
.../NS-42L550A11 32"/37"/42" LCD, 120 Hz 1080p 3 Press to a qualified service technician. Turn off the light or move your device and is especially dirty, moisten a soft, lint-free cloth in the battery compartment. The Settings menu opens. You can select On or Off. • Speed-Sets the amount of remote control codes. Refer all service to highlight Settings. You can select None, Fade to Black...
User Manual (English)
Page 49
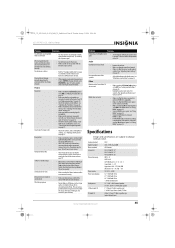
... selected. Turn off the screen can make sure the volume is turned on, the picture may be preventing your TV. Analog standard Digital standard Photo standard Screen size Channel coverage Power source Power consumption Audio power S-Video input (1) AV input (1) NTSC ATSC, 8-VSB, Clear-QAM JPEG format NS-32L550A11: 32" NS-37L550A11: 37" NS-42L550A11: 42" VHF: 2-13 UHF: 14-69 CATV: Mid band - Turn off scan for INlink devices again. See "Adjusting sound settings" on page 14. • Adjust...
... selected. Turn off the screen can make sure the volume is turned on, the picture may be preventing your TV. Analog standard Digital standard Photo standard Screen size Channel coverage Power source Power consumption Audio power S-Video input (1) AV input (1) NTSC ATSC, 8-VSB, Clear-QAM JPEG format NS-32L550A11: 32" NS-37L550A11: 37" NS-42L550A11: 42" VHF: 2-13 UHF: 14-69 CATV: Mid band - Turn off scan for INlink devices again. See "Adjusting sound settings" on page 14. • Adjust...
What is Firmware? (English)
Page 1
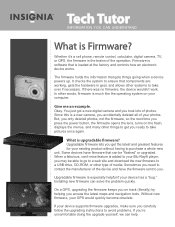
... you can solve the problem quickly. In other type of your device has a "bug." Give me an example. Installing new firmware can understand What is software that can help. Without new firmware, your device supports firmware upgrades, make sure you carefully follow the upgrading instructions to take pictures once again. If your GPS would quickly become obsolete. Firmware is Firmware? You just got a new digital camera and you...
... you can solve the problem quickly. In other type of your device has a "bug." Give me an example. Installing new firmware can understand What is software that can help. Without new firmware, your device supports firmware upgrades, make sure you carefully follow the upgrading instructions to take pictures once again. If your GPS would quickly become obsolete. Firmware is Firmware? You just got a new digital camera and you...
Quick Setup Guide (English)
Page 1
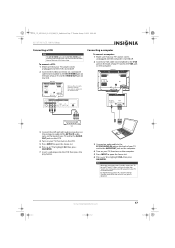
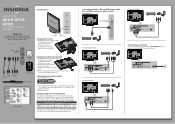
... universal Insignia remote control to work with other devices in the battery compartment. 3 Replace the cover. TV stand and screws Quick Setup Guide 2 Insert two AA batteries into the battery compartment. Connecting a DVD or Blu-ray DVD player, cable box, satellite receiver, or game console Using HDMI (best) Using component (better) Using S-Video (good) Using composite (fair) Connecting an antenna Connect a 75 ohm cable (not included) to the ANT/CABLE IN jack on the back of your TV screen face-down on the antenna. Installing a wall-mount bracket...
... universal Insignia remote control to work with other devices in the battery compartment. 3 Replace the cover. TV stand and screws Quick Setup Guide 2 Insert two AA batteries into the battery compartment. Connecting a DVD or Blu-ray DVD player, cable box, satellite receiver, or game console Using HDMI (best) Using component (better) Using S-Video (good) Using composite (fair) Connecting an antenna Connect a 75 ohm cable (not included) to the ANT/CABLE IN jack on the back of your TV screen face-down on the antenna. Installing a wall-mount bracket...
Quick Setup Guide (English)
Page 2
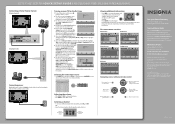
... Digital Audio/SPDIF PICTURE AUDIO CHANNELS SETTINGS USB Medium Off 32 32 0 PCM MOVE OK ENTER SELECT Adjust settings to affect sound quality MENU PREVIOUS EXIT EXIT Settings menu Settings Parental Controls Closed Caption Time Menu Settings Auto Input Sensing Input Labels PICTURE AUDIO CHANNELS SETTINGS USB On MOVE OK ENTER SELECT Set various TV options MENU PREVIOUS EXIT EXIT USB menu USB Photos Browse Photos Favorite Photos View Slideshow Settings PICTURE AUDIO CHANNELS SETTINGS USB MOVE OK ENTER SELECT Find photos that are trademarks of their respective owners. Need...
... Digital Audio/SPDIF PICTURE AUDIO CHANNELS SETTINGS USB Medium Off 32 32 0 PCM MOVE OK ENTER SELECT Adjust settings to affect sound quality MENU PREVIOUS EXIT EXIT Settings menu Settings Parental Controls Closed Caption Time Menu Settings Auto Input Sensing Input Labels PICTURE AUDIO CHANNELS SETTINGS USB On MOVE OK ENTER SELECT Set various TV options MENU PREVIOUS EXIT EXIT USB menu USB Photos Browse Photos Favorite Photos View Slideshow Settings PICTURE AUDIO CHANNELS SETTINGS USB MOVE OK ENTER SELECT Find photos that are trademarks of their respective owners. Need...


