User Manual (English)
Page 3
... VCR 23 Connecting a computer 24 Connecting headphones 25 Connecting a digital audio receiver 25 Connecting an analog audio receiver 26 Connecting your TV to your home network 26 Wireless connection 26 Wired connection 27 Turning on your TV for the first time 27 Programming your universal Insignia remote control 29 Easy to find 10 TiVo Search 10 CinemaNow 10 Netflix 10 Pandora 10 Napster 10 Installing the stand or wall-mount bracket 11 Installing the stand 11 Installing a wall-mount bracket 11 Installing a Kensington lock 12 TV components...
... VCR 23 Connecting a computer 24 Connecting headphones 25 Connecting a digital audio receiver 25 Connecting an analog audio receiver 26 Connecting your TV to your home network 26 Wireless connection 26 Wired connection 27 Turning on your TV for the first time 27 Programming your universal Insignia remote control 29 Easy to find 10 TiVo Search 10 CinemaNow 10 Netflix 10 Pandora 10 Napster 10 Installing the stand or wall-mount bracket 11 Installing the stand 11 Installing a wall-mount bracket 11 Installing a Kensington lock 12 TV components...

User Manual (English)
Page 4
... mode 93 Labeling an input source 94 Turning the source sensor on or off 95 Resetting all options on the Devices menu 96 Resetting all options on the Appearance menu 97 Maintaining 100 Cleaning the TV cabinet 100 Cleaning the LED-LCD screen 100 Updating your TV software 100 Troubleshooting 100 Using the on-screen help 100 Resetting your TV to the factory defaults 103 Specifications 104 Setting up your Z-Wave remote control...
... mode 93 Labeling an input source 94 Turning the source sensor on or off 95 Resetting all options on the Devices menu 96 Resetting all options on the Appearance menu 97 Maintaining 100 Cleaning the TV cabinet 100 Cleaning the LED-LCD screen 100 Updating your TV software 100 Troubleshooting 100 Using the on-screen help 100 Resetting your TV to the factory defaults 103 Specifications 104 Setting up your Z-Wave remote control...

User Manual (English)
Page 6
... supported on the proper stands or installed according to making home entertainment enjoyable and safe. Tune into safety • One size of TV stand does not fit all . Use only a TV stand rated for the weight of your TV. • Carefully read and understand all enclosed instructions for proper use your flat panel display As you enjoy your TV, always remember: • One size of wall mount...
... supported on the proper stands or installed according to making home entertainment enjoyable and safe. Tune into safety • One size of TV stand does not fit all . Use only a TV stand rated for the weight of your TV. • Carefully read and understand all enclosed instructions for proper use your flat panel display As you enjoy your TV, always remember: • One size of wall mount...
User Manual (English)
Page 15
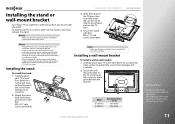
... × L17 mm screws (provided). Caution Make sure that happen due to see a wide assortment of television accessories. www.insigniaproducts.com 11 To mount your TV on a wall or other flat surface, you must remove the stand. Visit the Best Buy store nearest you can install the stand or wall-mount bracket, consult a professional installer or service personnel. Installing a wall-mount bracket To install a wall-mount bracket: 1 Carefully place your TV screen face-down on...
... × L17 mm screws (provided). Caution Make sure that happen due to see a wide assortment of television accessories. www.insigniaproducts.com 11 To mount your TV on a wall or other flat surface, you must remove the stand. Visit the Best Buy store nearest you can install the stand or wall-mount bracket, consult a professional installer or service personnel. Installing a wall-mount bracket To install a wall-mount bracket: 1 Carefully place your TV screen face-down on...
User Manual (English)
Page 17
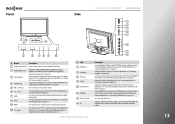
... power cord. # Jack 1 Rocketboost 2 Headphone 3 Audio Out 4 PC/VGA 5 PC/DVI Audio In 6 HDMI jacks 7 USB/Service Port 8 INc www.insigniaproducts.com Description Insert a Rocketboost Wireless card (RF-RBCARD, sold seperately) to wirelessly connect Rocketboost audio products to use . For more information, see "Connecting a computer" on page 24 or "Connecting a DVI device" on . An HDMI cable carries both video and sound. Do not use the Game mode feature for optimal performance while playing games. Connect a device that has RS232 controls, such as a connected...
... power cord. # Jack 1 Rocketboost 2 Headphone 3 Audio Out 4 PC/VGA 5 PC/DVI Audio In 6 HDMI jacks 7 USB/Service Port 8 INc www.insigniaproducts.com Description Insert a Rocketboost Wireless card (RF-RBCARD, sold seperately) to wirelessly connect Rocketboost audio products to use . For more information, see "Connecting a computer" on page 24 or "Connecting a DVI device" on . An HDMI cable carries both video and sound. Do not use the Game mode feature for optimal performance while playing games. Connect a device that has RS232 controls, such as a connected...
User Manual (English)
Page 19
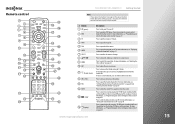
... the program guide. In the channel list, press to restore the sound. For more information, see a low battery message or the power button blinks five times after your press a button, the remote control batteries need to turn your universal Insignia remote control" on page 29. Press to be changed. # Button 1 (power) 2 DVD 3 TV 4 APPS 5 TiVo 6 GUIDE 7 SELECT 8 STWX 9 ZOOM 10 EXIT 11 (thumbs down in TV mode. You must program the remote control before this button works. Press to control a DVD player. Press...
... the program guide. In the channel list, press to restore the sound. For more information, see a low battery message or the power button blinks five times after your press a button, the remote control batteries need to turn your universal Insignia remote control" on page 29. Press to be changed. # Button 1 (power) 2 DVD 3 TV 4 APPS 5 TiVo 6 GUIDE 7 SELECT 8 STWX 9 ZOOM 10 EXIT 11 (thumbs down in TV mode. You must program the remote control before this button works. Press to control a DVD player. Press...
User Manual (English)
Page 20
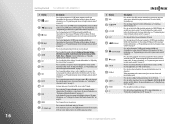
... audio settings for attached device (such as the channel number, channel name (if available), or signal source. Press to clear character input in TV VOD mode (watching Netflix and CinemaNow) or when using a DVD player or Blu-ray player. You must program the remote control before this button works. In menu mode, press to return to rename the highlighted channel. In the channel list, press to full-screen video TV mode. Press to enter channel numbers, the parental control password...
... audio settings for attached device (such as the channel number, channel name (if available), or signal source. Press to clear character input in TV VOD mode (watching Netflix and CinemaNow) or when using a DVD player or Blu-ray player. You must program the remote control before this button works. In menu mode, press to return to rename the highlighted channel. In the channel list, press to full-screen video TV mode. Press to enter channel numbers, the parental control password...
User Manual (English)
Page 31
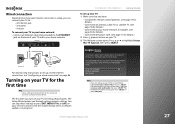
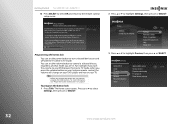
... Setup Wizard guides you through setting up your TV: 1 Make sure that you are based on page 86. NS-32E859A11/NS-42E859A11 Getting Started To set up a wired Internet connection, see "Configuring a wired connection" on using the remote control. Highlight Continue with retail mode, then press SELECT. Press SELECT to your TV, the Setup Wizard opens. Press S or T to exit the wizard (except when a software update is setup, you turn on your remote control...
... Setup Wizard guides you through setting up your TV: 1 Make sure that you are based on page 86. NS-32E859A11/NS-42E859A11 Getting Started To set up a wired Internet connection, see "Configuring a wired connection" on using the remote control. Highlight Continue with retail mode, then press SELECT. Press SELECT to your TV, the Setup Wizard opens. Press S or T to exit the wizard (except when a software update is setup, you turn on your remote control...
User Manual (English)
Page 33
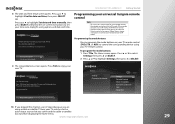
... time manually Programming your universal Insignia remote control Note To use the on your TV remote control (DVD, STB, or AUX) to control the corresponding device using a cable or satellite TV box, your TV switches to the active input source that you try to RF mode. Date and Time Setup If the date and time are using your remote control, the remote control must be in RF mode. Programming the mode buttons You can program the mode buttons on -screen setup for updates Account & system info Help Sleep timer...
... time manually Programming your universal Insignia remote control Note To use the on your TV remote control (DVD, STB, or AUX) to control the corresponding device using a cable or satellite TV box, your TV switches to the active input source that you try to RF mode. Date and Time Setup If the date and time are using your remote control, the remote control must be in RF mode. Programming the mode buttons You can program the mode buttons on -screen setup for updates Account & system info Help Sleep timer...
User Manual (English)
Page 36
32 Getting Started NS-32E859A11/NS-42E859A11 13 Press SELECT to select OK and return to highlight Devices, then press X or SELECT. OK 10:00pm Programming the button lock You can set the volume button to control a selected device, regardless of what mode you are in. For more steps: - Home Settings Connect to the Internet 10:00pm Settings Parental Controls Check for updates Account & system info Help Sleep timer 3 Press S or T to the remote control setup menu. Remote Control Setup (DVD button) The DVD button on this TV...
32 Getting Started NS-32E859A11/NS-42E859A11 13 Press SELECT to select OK and return to highlight Devices, then press X or SELECT. OK 10:00pm Programming the button lock You can set the volume button to control a selected device, regardless of what mode you are in. For more steps: - Home Settings Connect to the Internet 10:00pm Settings Parental Controls Check for updates Account & system info Help Sleep timer 3 Press S or T to the remote control setup menu. Remote Control Setup (DVD button) The DVD button on this TV...
User Manual (English)
Page 46
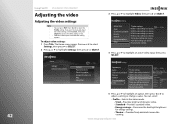
... SELECT. Home Settings Connect to the Internet 10:00pm Settings Parental Controls Check for updates Account & system info Help Sleep timer 3 Press S or T to highlight Settings, then press X or SELECT. 42 Using Your TV NS-32E859A11/NS-42E859A11 Adjusting the video Adjusting the video settings Notes • • You can select: • Profile-Selects the video mode. • Vivid-Provides bright and dynamic video. • Standard-Provides standard video. • Energy savings-Decreases the backlight brightness for the HDMI 3 input. (This input currently...
... SELECT. Home Settings Connect to the Internet 10:00pm Settings Parental Controls Check for updates Account & system info Help Sleep timer 3 Press S or T to highlight Settings, then press X or SELECT. 42 Using Your TV NS-32E859A11/NS-42E859A11 Adjusting the video Adjusting the video settings Notes • • You can select: • Profile-Selects the video mode. • Vivid-Provides bright and dynamic video. • Standard-Provides standard video. • Energy savings-Decreases the backlight brightness for the HDMI 3 input. (This input currently...
User Manual (English)
Page 47
...-Enlarges the picture but maintains a good aspect ratio at the center of the screen. You can select Low (reduce ghosting or halo), Middle, High, 24p film mode (which provides smooth and clear motion for playing games. • PC-For use with a computer. • Custom-Lets you manually adjust video settings. Press SELECT to return to the previous screen. • Reset video settings-Resets the video settings of the selected input to enhance video detail...
...-Enlarges the picture but maintains a good aspect ratio at the center of the screen. You can select Low (reduce ghosting or halo), Middle, High, 24p film mode (which provides smooth and clear motion for playing games. • PC-For use with a computer. • Custom-Lets you manually adjust video settings. Press SELECT to return to the previous screen. • Reset video settings-Resets the video settings of the selected input to enhance video detail...
User Manual (English)
Page 90
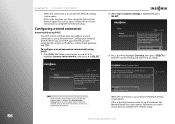
... wireless network. Select "Continue" to complete the network setup. If this setting (recommended), or choose "Change network settings" to configure a wired connection is the first time you use this is successful, the Network settings screen opens. 86 Using Your TV NS-32E859A11/NS-42E859A11 When the connection is the first time you have set up the Internet, the Network Speed Test screen opens. To configure a wired connection automatically using DHCP One of the most common ways to manually set...
... wireless network. Select "Continue" to complete the network setup. If this setting (recommended), or choose "Change network settings" to configure a wired connection is the first time you use this is successful, the Network settings screen opens. 86 Using Your TV NS-32E859A11/NS-42E859A11 When the connection is the first time you have set up the Internet, the Network Speed Test screen opens. To configure a wired connection automatically using DHCP One of the most common ways to manually set...
User Manual (English)
Page 105
... video cables are black bars around the picture. • Change the aspect ratio. See "Using closed caption settings. See "Programming the button lock" on page 35. • Make sure that the incoming signal is compatible. • Make sure the antenna or cable TV is connected correctly and securely. An increasing amount of your TV. See "Selecting the video input source" on page 32. • Make sure that the power button is not locked to a different mode...
... video cables are black bars around the picture. • Change the aspect ratio. See "Using closed caption settings. See "Programming the button lock" on page 35. • Make sure that the incoming signal is compatible. • Make sure the antenna or cable TV is connected correctly and securely. An increasing amount of your TV. See "Selecting the video input source" on page 32. • Make sure that the power button is not locked to a different mode...

User Manual (English)
Page 106
... are using an antenna, the digital channel signal may be burned into the screen. This can make the picture difficult to eliminate the interference. See "Connecting a cable or satellite box" on page 19 or "Connecting an antenna or cable TV without a cable box" on page 42. • Try another channel. See "Adjusting the video settings" on an LCD screen is not too bright. It does not affect the operation of damage is turned...
... are using an antenna, the digital channel signal may be burned into the screen. This can make the picture difficult to eliminate the interference. See "Connecting a cable or satellite box" on page 19 or "Connecting an antenna or cable TV without a cable box" on page 42. • Try another channel. See "Adjusting the video settings" on an LCD screen is not too bright. It does not affect the operation of damage is turned...
User Manual (English)
Page 107
... audio cables are connected correctly and securely to view channels from the cable or satellite box. • Make sure that the correct audio mode is selected. See "Locking control buttons" on your TV. Problem INlink does not work • Press INPUT and make sure that you are using an antenna, the digital channel signal may be low. See "Setting up the network address. • Internet service is not available. No network connection Automatic network setup fails Manual network setup fails Network connection is unstable Wireless connection...
... audio cables are connected correctly and securely to view channels from the cable or satellite box. • Make sure that the correct audio mode is selected. See "Locking control buttons" on your TV. Problem INlink does not work • Press INPUT and make sure that you are using an antenna, the digital channel signal may be low. See "Setting up the network address. • Internet service is not available. No network connection Automatic network setup fails Manual network setup fails Network connection is unstable Wireless connection...
User Manual (English)
Page 116
... and cable box and select a particular channel. The LED blinks twice. 3 Press the mode button twice (for other functions you are in TV mode. Each macro button can use a macro to control a home theater operation, to set up to a macro. 5 Enter the series of a single button. When you press the macro button, the remote sends the series of macros: • Mode-independent-Works in a specific mode. If you selected in . The LED blinks twice. The LED blinks...
... and cable box and select a particular channel. The LED blinks twice. 3 Press the mode button twice (for other functions you are in TV mode. Each macro button can use a macro to control a home theater operation, to set up to a macro. 5 Enter the series of a single button. When you press the macro button, the remote sends the series of macros: • Mode-independent-Works in a specific mode. If you selected in . The LED blinks twice. The LED blinks...
Quick Setup Guide (English)
Page 1
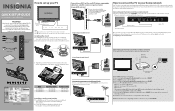
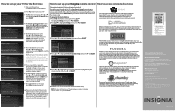
... the network setup. Installing a wall-mount bracket 1 Carefully place your TV or using a WiFi Protected Setup (WPS) router select Option 3, which allows you want, then press SELECT. Yes, I have your TV connected thru the Ethernet jack your TVshould be connected to your User Guide. 32" & 42" 120Hz 1080p LED-LCD Connected TV QUICK SETUP GUIDE NS-32E859A11 / NS-42E859A11 TThhaannkkYYoouu!! Component cable Remote control and 2 AA batteries How to setup Option 1- The power indicator turns blue. If you are not using a wireless network. Wireless Router or Access...
... the network setup. Installing a wall-mount bracket 1 Carefully place your TV or using a WiFi Protected Setup (WPS) router select Option 3, which allows you want, then press SELECT. Yes, I have your TV connected thru the Ethernet jack your TVshould be connected to your User Guide. 32" & 42" 120Hz 1080p LED-LCD Connected TV QUICK SETUP GUIDE NS-32E859A11 / NS-42E859A11 TThhaannkkYYoouu!! Component cable Remote control and 2 AA batteries How to setup Option 1- The power indicator turns blue. If you are not using a wireless network. Wireless Router or Access...
Quick Setup Guide (English)
Page 2
...manually, then press SELECT and follow the on your TV remote control (DVD, STB, or AUX ) to control the corresponding device using a cable box. Remote Control Setup DVD button STB button AUX button Power button in TV mode Volume button Backlight Reset all in retail mode Skip for now Remote Control Connection To set up your remote control to use . All you want with Napster, the ultimate online jukebox. Appearance Audio Channels & providers Devices Network Recommendations Video INlink HDMI control Source sensor Remote control setup TV power on your remote to select the video input...
...manually, then press SELECT and follow the on your TV remote control (DVD, STB, or AUX ) to control the corresponding device using a cable box. Remote Control Setup DVD button STB button AUX button Power button in TV mode Volume button Backlight Reset all in retail mode Skip for now Remote Control Connection To set up your remote control to use . All you want with Napster, the ultimate online jukebox. Appearance Audio Channels & providers Devices Network Recommendations Video INlink HDMI control Source sensor Remote control setup TV power on your remote to select the video input...
Information Brochure (English)
Page 2
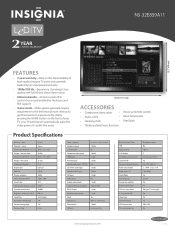
...Aspect ratio 16:9 Contrast ratio (typical)-panel 4,000 : 1 Dynamic contrast ratio 10,000:1 Brightness (center typ.) cd/m2 450 nits Comb filter 3d y/c digital Horizontal viewing angle 178° Vertical viewing angle 178° Response time 6.5 ms Tuner-supports: Composite inputs S-Video inputs Component video inputs HDMI input PC/VGA inputs Shared audio inputs component & composite) 3.5 mm PC audio input Antenna/Cable Input DVI input Video output Analog audio output Digital audio output (optical) RS232 Output Headphone jack output INlink WiFi built-in Ethernet port...
...Aspect ratio 16:9 Contrast ratio (typical)-panel 4,000 : 1 Dynamic contrast ratio 10,000:1 Brightness (center typ.) cd/m2 450 nits Comb filter 3d y/c digital Horizontal viewing angle 178° Vertical viewing angle 178° Response time 6.5 ms Tuner-supports: Composite inputs S-Video inputs Component video inputs HDMI input PC/VGA inputs Shared audio inputs component & composite) 3.5 mm PC audio input Antenna/Cable Input DVI input Video output Analog audio output Digital audio output (optical) RS232 Output Headphone jack output INlink WiFi built-in Ethernet port...


