
User Manual (English)
Page 3
... minutes. • V-Chip-The V-Chip function can view digital broadcasts without using the remote control-The on-screen display provides precise remote control adjustment of brightness, contrast, color, tint, and sharpness. • Programmable TV sleep timer-Available from the wall outlet before operating your TV. • Retain Instructions-Retain the safety and operating instructions for cleaning or any other audio/video component to turn off automatically after as many as they may...
... minutes. • V-Chip-The V-Chip function can view digital broadcasts without using the remote control-The on-screen display provides precise remote control adjustment of brightness, contrast, color, tint, and sharpness. • Programmable TV sleep timer-Available from the wall outlet before operating your TV. • Retain Instructions-Retain the safety and operating instructions for cleaning or any other audio/video component to turn off automatically after as many as they may...
User Manual (English)
Page 4
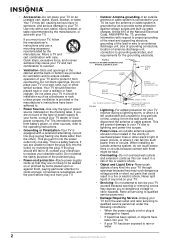
.... Use only with a cart, stand, tripod, bracket, or table recommended by the manufacturer. This plug will prevent damage to your TV, be located in the vicinity of overhead power lines or other electric light of power circuits, or where it can result in wire to an antenna discharge unit, size of grounding conductors, location of antenna-discharge unit, connection to the operating instructions...
.... Use only with a cart, stand, tripod, bracket, or table recommended by the manufacturer. This plug will prevent damage to your TV, be located in the vicinity of overhead power lines or other electric light of power circuits, or where it can result in wire to an antenna discharge unit, size of grounding conductors, location of antenna-discharge unit, connection to the operating instructions...
User Manual (English)
Page 6
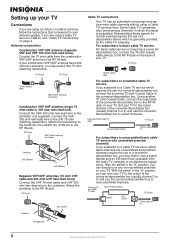
... to scrambled cable TV service. Descrambling these signals for normal viewing requires the use the converter/ descrambler box to select channels. RF IN jack 75 ohm coaxial cable For subscribers to the combiner. Incoming 75 ohm cable TV cable RF IN jack Converter/descrambler 75 ohm cable to TV For subscribers to TV UHF 300 ohm 4 www.insignia-products.com Set your TV to the output channel of...
... to scrambled cable TV service. Descrambling these signals for normal viewing requires the use the converter/ descrambler box to select channels. RF IN jack 75 ohm coaxial cable For subscribers to the combiner. Incoming 75 ohm cable TV cable RF IN jack Converter/descrambler 75 ohm cable to TV For subscribers to TV UHF 300 ohm 4 www.insignia-products.com Set your TV to the output channel of...
User Manual (English)
Page 7
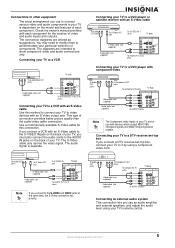
... selection of components. This type of connection provides better picture quality than the audio/video cable connection. To Audio OUT jacks To S-Video OUT jack To S-VIDEO IN jack TV back S-Video cable (not supplied) Audio cable (not supplied) To AUDIO IN 1 (or 2) jacks Note If you use an audio amplifier and external speakers, and adjust the audio level using a component video cord. The connection diagrams are for this method to connect your TV's remote control. Connecting your TV to a VCR To Audio/Video OUT jacks TV back Audio/video cable (not supplied) To AUDIO/VIDEO...
... selection of components. This type of connection provides better picture quality than the audio/video cable connection. To Audio OUT jacks To S-Video OUT jack To S-VIDEO IN jack TV back S-Video cable (not supplied) Audio cable (not supplied) To AUDIO IN 1 (or 2) jacks Note If you use an audio amplifier and external speakers, and adjust the audio level using a component video cord. The connection diagrams are for this method to connect your TV's remote control. Connecting your TV to a VCR To Audio/Video OUT jacks TV back Audio/video cable (not supplied) To AUDIO/VIDEO...

User Manual (English)
Page 8
... variety of signals generated by these devices and subsequent hook-up variations required, they have DTS audio out. For example, if the volume of your TV is at its highest level. Amplifier TV back To Audio (L) input jack To Audio (R) input jack To Audio (L) output jack To Audio (R) output jack Audio cable (not supplied) Note To hear sound when using an amplifier with built-in speakers" on page 22). To control the audio, turn on...
... variety of signals generated by these devices and subsequent hook-up variations required, they have DTS audio out. For example, if the volume of your TV is at its highest level. Amplifier TV back To Audio (L) input jack To Audio (R) input jack To Audio (L) output jack To Audio (R) output jack Audio cable (not supplied) Note To hear sound when using an amplifier with built-in speakers" on page 22). To control the audio, turn on...
User Manual (English)
Page 9
... volume up or down, or to change the channels up or down through menu selections. Caution • Use only the size and type of batteries specified. • Make sure that you follow the correct polarity as a DVD player. Connect a video cable from an external source, such as a VCR, to move to be recharged. Receives the remote control signal from an external source, such as indicated in the battery compartment. 3 Close...
... volume up or down, or to change the channels up or down through menu selections. Caution • Use only the size and type of batteries specified. • Make sure that you follow the correct polarity as a DVD player. Connect a video cable from an external source, such as a VCR, to move to be recharged. Receives the remote control signal from an external source, such as indicated in the battery compartment. 3 Close...

User Manual (English)
Page 10
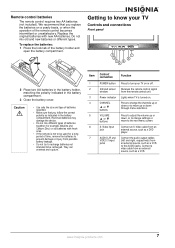
....com Press to access the on page 10. Back panel Remote control 9 8 Item 1 2 3 4 5 6 7 8 9 Control/ connection Function RF antenna in Adjustment mode, press to reset the menu screen, picture, and sound adjustments to their factory preset positions. Sets the sleep timer to this jack. While in jack COMPONENT IN jacks AUDIO(L/R) VIDEO 1 input jacks AUDIO(L/R) VIDEO 2 input jacks Audio right input jack Coaxial digital audio output jack S-VIDEO 1 input jack S-VIDEO 2 input jack AC power cord Connect the antenna cable to automatically turn your TV at a preset time. Press to the...
....com Press to access the on page 10. Back panel Remote control 9 8 Item 1 2 3 4 5 6 7 8 9 Control/ connection Function RF antenna in Adjustment mode, press to reset the menu screen, picture, and sound adjustments to their factory preset positions. Sets the sleep timer to this jack. While in jack COMPONENT IN jacks AUDIO(L/R) VIDEO 1 input jacks AUDIO(L/R) VIDEO 2 input jacks Audio right input jack Coaxial digital audio output jack S-VIDEO 1 input jack S-VIDEO 2 input jack AC power cord Connect the antenna cable to automatically turn your TV at a preset time. Press to the...

User Manual (English)
Page 11
... page 9. CLOSED Press to select the channel. COMPONENT /0-4 : SELECT Pressing INPUT SELECT on the remote control displays the current signal source (press INPUT SELECT again or 0-4 to change the channels up or down or to switch off and on the remote control. Item 9 10 11 12 13 14 15 16 Button Function MUTE button DISPLAY button Toggles the sound off the sound. Your TV stops at the next channel programmed into memory. Press the channel number buttons to display the CLOSED CAPTION button CAPTION menu.
... page 9. CLOSED Press to select the channel. COMPONENT /0-4 : SELECT Pressing INPUT SELECT on the remote control displays the current signal source (press INPUT SELECT again or 0-4 to change the channels up or down or to switch off and on the remote control. Item 9 10 11 12 13 14 15 16 Button Function MUTE button DISPLAY button Toggles the sound off the sound. Your TV stops at the next channel programmed into memory. Press the channel number buttons to display the CLOSED CAPTION button CAPTION menu.
User Manual (English)
Page 12
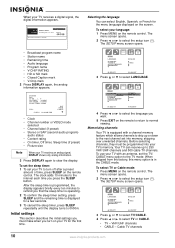
... analog information appears. P G L V ON TIMER 8:30AM OFF TIMER 11:30PM SLEEP TIMER 2h00m FULL CLOCK 12:00AM SUN ANT ABCD CABLE 7 • Clock • Channel number or VIDEO mode selected • Channel label (if preset) • Stereo or SAP (second audio program) audio status • Content rating • On timer, Off timer, Sleep time (if preset) • Picture size Note When your language: 1 Press MENU on the remote control. To set the sleep timer: 1 To set the TV/ CABLE menu option...
... analog information appears. P G L V ON TIMER 8:30AM OFF TIMER 11:30PM SLEEP TIMER 2h00m FULL CLOCK 12:00AM SUN ANT ABCD CABLE 7 • Clock • Channel number or VIDEO mode selected • Channel label (if preset) • Stereo or SAP (second audio program) audio status • Content rating • On timer, Off timer, Sleep time (if preset) • Picture size Note When your language: 1 Press MENU on the remote control. To set the sleep timer: 1 To set the TV/ CABLE menu option...
User Manual (English)
Page 14
... the password entering mode. LOCKS N E W PAS S WOR D [0-9] : SELECT ENTER : SET EXIT : END 4 Enter a 4-digit password with the number keys on the remote control and press ENTER. If you must first register a password. The LOCKS menu opens. To use the V-Chip function, you forget the password: 1. LOCKS V-CHIP SET F RO N T PA N E L L O C K N E W PA S S WO R D :SELECT :ADJUST 3 Press or to select NEW PASSWORD. The LOCKS setup menu opens. 5 Press or to minimum. 2. FAV or does not work until...
... the password entering mode. LOCKS N E W PAS S WOR D [0-9] : SELECT ENTER : SET EXIT : END 4 Enter a 4-digit password with the number keys on the remote control and press ENTER. If you must first register a password. The LOCKS menu opens. To use the V-Chip function, you forget the password: 1. LOCKS V-CHIP SET F RO N T PA N E L L O C K N E W PA S S WO R D :SELECT :ADJUST 3 Press or to select NEW PASSWORD. The LOCKS setup menu opens. 5 Press or to minimum. 2. FAV or does not work until...
User Manual (English)
Page 15
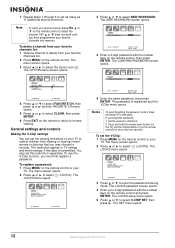
... press . To change the password: 1 Press MENU on the remote control or your TV. www.insignia-products.com 13 The LOCKS menu opens. To lock or unlock the front panel: 1 Press MENU on the remote control or your TV. LOCKS N E W PAS S WOR D [0-9] : SELECT ENTER : SET EXIT : END 6 Enter a new 4-digit password with the number keys on the remote to return to normal viewing. Press or to prevent your TV is turned off, or...
... press . To change the password: 1 Press MENU on the remote control or your TV. www.insignia-products.com 13 The LOCKS menu opens. To lock or unlock the front panel: 1 Press MENU on the remote control or your TV. LOCKS N E W PAS S WOR D [0-9] : SELECT ENTER : SET EXIT : END 6 Enter a new 4-digit password with the number keys on the remote to return to normal viewing. Press or to prevent your TV is turned off, or...

User Manual (English)
Page 16
... change the setting to SET. 6 Press ENTER to label. 2 Press MENU on the remote control and press ENTER. The LOCKS password screen opens. The LOCKS setup menu opens. 5 Press or to select FRONT PANEL LOCK, then press or to select CH LABEL, then press or and the CH LABEL menu opens. OPTION ON/OFF TIMER FAVORITE CH CH LABEL VIDEO LABEL :SELECT OFF :ADJUST 4 Press or to select ON or OFF. The menu screen...
... change the setting to SET. 6 Press ENTER to label. 2 Press MENU on the remote control and press ENTER. The LOCKS password screen opens. The LOCKS setup menu opens. 5 Press or to select FRONT PANEL LOCK, then press or to select CH LABEL, then press or and the CH LABEL menu opens. OPTION ON/OFF TIMER FAVORITE CH CH LABEL VIDEO LABEL :SELECT OFF :ADJUST 4 Press or to select ON or OFF. The menu screen...

User Manual (English)
Page 17
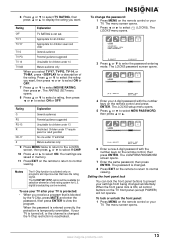
... 4. SETUP LANGUAGE CLOCK SET TV/CABLE AUTO CH MEMORY ADD/DELETE ENGLISH CABLE :SELECT :ADJUST 3 Press or to normal viewing. Note • After setting the clock, the date and time start working automatically. • After a power outage or disconnection, the clock settings are lost and need to be reset. 6 Press EXIT on the remote to return to select CLOCK SET, then press . If you want to label. VIDEO1 2. COMPONENT OPTION MENU - / VCR / DVD...
... 4. SETUP LANGUAGE CLOCK SET TV/CABLE AUTO CH MEMORY ADD/DELETE ENGLISH CABLE :SELECT :ADJUST 3 Press or to normal viewing. Note • After setting the clock, the date and time start working automatically. • After a power outage or disconnection, the clock settings are lost and need to be reset. 6 Press EXIT on the remote to return to select CLOCK SET, then press . If you want to label. VIDEO1 2. COMPONENT OPTION MENU - / VCR / DVD...

User Manual (English)
Page 19
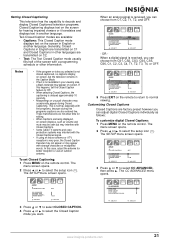
... letter box programs with gray side bars. PICTURE SIZE 0. CINEMA WIDE3 4. OPTION ON/OFF TIMER FAVORITE CH CH LABEL VIDEO LABEL ON / OFF / SET :SELECT :ADJUST 3 Press or to select ON/OFF TIMER. 4 Press or to select ON or OFF to normal viewing. NATURAL picture size - A B C D E F G CINEMA WIDE3 picture size (for some program formats (such as subtitles or captions), you can scroll the picture (see "Setting the picture scroll" on page 18). This setting displays the picture...
... letter box programs with gray side bars. PICTURE SIZE 0. CINEMA WIDE3 4. OPTION ON/OFF TIMER FAVORITE CH CH LABEL VIDEO LABEL ON / OFF / SET :SELECT :ADJUST 3 Press or to select ON/OFF TIMER. 4 Press or to select ON or OFF to normal viewing. NATURAL picture size - A B C D E F G CINEMA WIDE3 picture size (for some program formats (such as subtitles or captions), you can scroll the picture (see "Setting the picture scroll" on page 18). This setting displays the picture...

User Manual (English)
Page 20
... you view a DVD from the DVD player connected with the component input, you may get a smoother motion by setting the CINEMA MODE to select the setup icon . The menu screen opens. 2 Press or to FILM. The SETUP menu screen opens. SCROLL ADJUSTMENT 0 TO ADJUST 5 To adjust the vertical position of the picture, press or . To set the picture scroll: 1 Press MENU on the remote to return to select VIDEO. 5 Press EXIT on the remote control. SETUP CLOSED CAPTION OFF CC ADVANCED PICTURE SIZE PICTURE...
... you view a DVD from the DVD player connected with the component input, you may get a smoother motion by setting the CINEMA MODE to select the setup icon . The menu screen opens. 2 Press or to FILM. The SETUP menu screen opens. SCROLL ADJUSTMENT 0 TO ADJUST 5 To adjust the vertical position of the picture, press or . To set the picture scroll: 1 Press MENU on the remote to return to select VIDEO. 5 Press EXIT on the remote control. SETUP CLOSED CAPTION OFF CC ADVANCED PICTURE SIZE PICTURE...

User Manual (English)
Page 22
... modes: HIGH, LOW, and OFF. Setting the display format This setting converts a 480p input signal to select DISPLAY FORMAT. PICTURE PICTURE PREFERENCE BRIGHTNESS CONTRAST COLOR TINT SHARPNESS SPORTS 25 50 25 0 25 : SELECT : ADJUST 3 Press or to normal viewing. PICTURE COLOR T E M P E R AT U R E DISPLAY FORMAT SVM RESET COOL 540p / 1080i HIGH : SELECT : ADJUST 4 Press or to select 540p or 1080i. 5 Press EXIT on the remote to return to normal viewing. The menu screen opens. 2 Press or to set the display format: 1 Press MENU...
... modes: HIGH, LOW, and OFF. Setting the display format This setting converts a 480p input signal to select DISPLAY FORMAT. PICTURE PICTURE PREFERENCE BRIGHTNESS CONTRAST COLOR TINT SHARPNESS SPORTS 25 50 25 0 25 : SELECT : ADJUST 3 Press or to normal viewing. PICTURE COLOR T E M P E R AT U R E DISPLAY FORMAT SVM RESET COOL 540p / 1080i HIGH : SELECT : ADJUST 4 Press or to select 540p or 1080i. 5 Press EXIT on the remote to return to normal viewing. The menu screen opens. 2 Press or to set the display format: 1 Press MENU...
User Manual (English)
Page 23
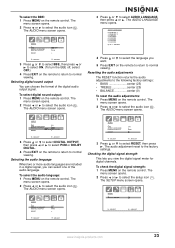
... PICTURE SIZE PICTURE SCROLL CINEMA MODE OFF C1/C2/T1/T2/OFF FILM : SELECT : ADJUST - The menu screen opens. 2 Press or to normal viewing. If this case, adjust the antenna for hearing impaired viewers or it translates and displays text in English or another language. In this happens, set Closed Captioning: 1 Press MENU on the remote control. The CC ADVANCED menu opens. When an analog signal is received, you can adjust digital Closed Captions individually as volume...
... PICTURE SIZE PICTURE SCROLL CINEMA MODE OFF C1/C2/T1/T2/OFF FILM : SELECT : ADJUST - The menu screen opens. 2 Press or to normal viewing. If this case, adjust the antenna for hearing impaired viewers or it translates and displays text in English or another language. In this happens, set Closed Captioning: 1 Press MENU on the remote control. The CC ADVANCED menu opens. When an analog signal is received, you can adjust digital Closed Captions individually as volume...
User Manual (English)
Page 25
... a digital signal, you can choose the format of the audio language. The menu screen opens. 2 Press or to normal viewing. To select digital sound output: 1 Press MENU on the remote control. The menu screen opens. 2 Press or to the following factory settings: • BASS center (25) • TREBLE center (25) • BALANCE center (0) To reset the audio adjustments: 1 Press MENU on the remote to return to select the audio icon . The AUDIO LANGUAGE menu opens. Resetting the audio adjustments The RESET...
... a digital signal, you can choose the format of the audio language. The menu screen opens. 2 Press or to normal viewing. To select digital sound output: 1 Press MENU on the remote control. The menu screen opens. 2 Press or to the following factory settings: • BASS center (25) • TREBLE center (25) • BALANCE center (0) To reset the audio adjustments: 1 Press MENU on the remote to return to select the audio icon . The AUDIO LANGUAGE menu opens. Resetting the audio adjustments The RESET...

User Manual (English)
Page 26
.... • Station or cable experiencing problems, tune to another channel. • Check the cable connection or the VHF/ UHF antenna. Troubleshooting Use the following check list for analog channels. • After 240 seconds, the SIGNAL METER screen returns to select SIGNAL METER, then press or . 3 Press or to normal TV operation automatically. Notes • The signal meter feature is off Closed Caption is not activated The display is not shown...
.... • Station or cable experiencing problems, tune to another channel. • Check the cable connection or the VHF/ UHF antenna. Troubleshooting Use the following check list for analog channels. • After 240 seconds, the SIGNAL METER screen returns to select SIGNAL METER, then press or . 3 Press or to normal TV operation automatically. Notes • The signal meter feature is off Closed Caption is not activated The display is not shown...
User Manual (English)
Page 27
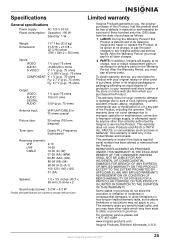
... Antenna input: VHF/UHF/CABLE In 75 ohms coaxial Picture tube: 30 inches (760 mm diagonal) Tuner type: Quartz PLL Frequency Synthesized Receiving channels: VHF 2-13 UHF 14-69 CABLE 14-36 (A)-(W) 37-59 (AA)-(WW) 60-85 (AAA)-(ZZZ) 86-94 (86)-(94) 95-99 (A-5)-(A-1) 100-125 (100)-(125) 01 (5A) Speaker: 1.8 × 3.9 inches (45.7 x 99 mm), 8 ohms x 2 Sound output power: 5.0 W + 5.0 W Design and specifications...
... Antenna input: VHF/UHF/CABLE In 75 ohms coaxial Picture tube: 30 inches (760 mm diagonal) Tuner type: Quartz PLL Frequency Synthesized Receiving channels: VHF 2-13 UHF 14-69 CABLE 14-36 (A)-(W) 37-59 (AA)-(WW) 60-85 (AAA)-(ZZZ) 86-94 (86)-(94) 95-99 (A-5)-(A-1) 100-125 (100)-(125) 01 (5A) Speaker: 1.8 × 3.9 inches (45.7 x 99 mm), 8 ohms x 2 Sound output power: 5.0 W + 5.0 W Design and specifications...


