
Canadian English Manual
Page 1
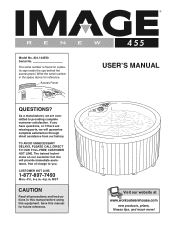
....-Fri., 6 a.m.-6 p.m. USERʼS MANUAL Visit our website at www.workoutwarehouse.com new products, prizes, fitness tips, and much more! The trained technicians on a plas- tic sign access inside panel. tWheritseptahebeshVeirniadl the number in this manual before using this manual for reference. If you . Save this equipment. ® Model No. 831.104550 Serial No. TO AVOID UNNECESSARY DELAYS, PLEASE CALL DIRECT TO...
....-Fri., 6 a.m.-6 p.m. USERʼS MANUAL Visit our website at www.workoutwarehouse.com new products, prizes, fitness tips, and much more! The trained technicians on a plas- tic sign access inside panel. tWheritseptahebeshVeirniadl the number in this manual before using this manual for reference. If you . Save this equipment. ® Model No. 831.104550 Serial No. TO AVOID UNNECESSARY DELAYS, PLEASE CALL DIRECT TO...
Canadian English Manual
Page 2
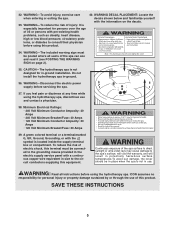
... the hydrotherapy spa. If the spa is a registered trademark of ICON Health & Fitness, Inc. 2 Post the sign as described above. Table of Contents Posting the Warning Sign 2 Important Safety Instructions 3 Before You Begin 6 Choosing a Location for the Hydrotherapy Spa 7 Assembly 8 Using the Hydrotherapy Spa 10 Spa Shell Diagram 11 Using the Controls 12 Maintenance 13 Trouble-shooting 16 Part List 18 Exploded Drawing 19 Ordering Replacement Parts Back Cover Limited Warranty Back Cover Posting the...
... the hydrotherapy spa. If the spa is a registered trademark of ICON Health & Fitness, Inc. 2 Post the sign as described above. Table of Contents Posting the Warning Sign 2 Important Safety Instructions 3 Before You Begin 6 Choosing a Location for the Hydrotherapy Spa 7 Assembly 8 Using the Hydrotherapy Spa 10 Spa Shell Diagram 11 Using the Controls 12 Maintenance 13 Trouble-shooting 16 Part List 18 Exploded Drawing 19 Ordering Replacement Parts Back Cover Limited Warranty Back Cover Posting the...
Canadian English Manual
Page 3
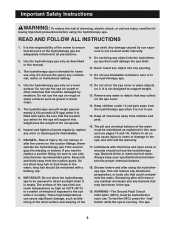
... users of the hydrotherapy spa are adequately informed of injury: Do not remove or alter the covers on the spa cover. 14. These high temperatures can reach temperatures as high as described in the hydrotherapy spa. 4. Remove any commercial, rental, or institutional setting. Shower before each use breakable containers near or in this manual. 3. To test the GFCI, press the "test" button while the spa...
... users of the hydrotherapy spa are adequately informed of injury: Do not remove or alter the covers on the spa cover. 14. These high temperatures can reach temperatures as high as described in the hydrotherapy spa. 4. Remove any commercial, rental, or institutional setting. Shower before each use breakable containers near or in this manual. 3. To test the GFCI, press the "test" button while the spa...
Canadian English Manual
Page 4
... some medications may use the hydrotherapy spa if you may be taking before using the spa (see step 2 on the controller of injury: Pregnant women should consult with their physician before using the hydrotherapy spa. All field-installed metal components such ...motor may cause hyperthermia, a dangerous condition which occurs when the internal body temperature rises several degrees above 100°F (38°C); WARNING-To reduce the risk of drowning. should shut off valves must always be supervised. 24. Press the "reset" button. Water temperature in the hydrotherapy spa...
... some medications may use the hydrotherapy spa if you may be taking before using the spa (see step 2 on the controller of injury: Pregnant women should consult with their physician before using the hydrotherapy spa. All field-installed metal components such ...motor may cause hyperthermia, a dangerous condition which occurs when the internal body temperature rises several degrees above 100°F (38°C); WARNING-To reduce the risk of drowning. should shut off valves must always be supervised. 24. Press the "reset" button. Water temperature in the hydrotherapy spa...
Canadian English Manual
Page 5
... spa in size to consult their physician before using the hydrotherapy spa, discontinue use of electric shock, this product. 40. WARNING-The included warning sign must be connected to the spa's surface, will void the warranty, and will result in potentially hazardous surface temperatures.To avoid sun damage, the cover should be posted where all personal injury instructions before servicing the spa...
... spa in size to consult their physician before using the hydrotherapy spa, discontinue use of electric shock, this product. 40. WARNING-The included warning sign must be connected to the spa's surface, will void the warranty, and will result in potentially hazardous surface temperatures.To avoid sun damage, the cover should be posted where all personal injury instructions before servicing the spa...
Canadian English Manual
Page 6
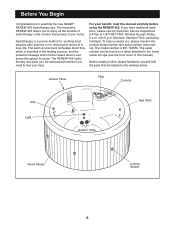
... Time (excluding holidays). The model number is essential in the healing process, and the powerful massage action further eases tension and stress throughout the body. The RENEW 455 hydrotherapy spa gives you the specialized treatment you to feel your home. For your benefit, read this manual). Before reading further, please familiarize yourself with the parts that are labeled in the...
... Time (excluding holidays). The model number is essential in the healing process, and the powerful massage action further eases tension and stress throughout the body. The RENEW 455 hydrotherapy spa gives you the specialized treatment you to feel your home. For your benefit, read this manual). Before reading further, please familiarize yourself with the parts that are labeled in the...
Canadian English Manual
Page 7
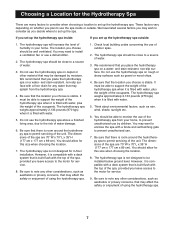
... a deck system that may splash from your home. and stain-resistant, non-slip surface. It must be able to the motor for service. 9. Be sure that the location you leave access to support the weight of the hydrotherapy spa when it is not designed for this size when choosing the location. 7. We have listed several factors you may affect the safety or...
... a deck system that may splash from your home. and stain-resistant, non-slip surface. It must be able to the motor for service. 9. Be sure that the location you leave access to support the weight of the hydrotherapy spa when it is not designed for this size when choosing the location. 7. We have listed several factors you may affect the safety or...
Canadian English Manual
Page 8
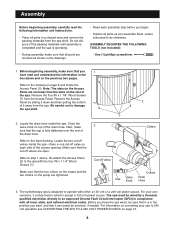
... packing materials until assembly is completed and the spa is one cut -off valve on each assembly step before you begin. • Tighten all parts are open. Refer to do otherwise. Before you have read the following information and instructions: • Place all local, state, and national electrical codes. Do not dispose of the spa. Remove the four #6 x 1 1/4" Wood Screws (7) from the Access...
... packing materials until assembly is completed and the spa is one cut -off valve on each assembly step before you begin. • Tighten all parts are open. Refer to do otherwise. Before you have read the following information and instructions: • Place all local, state, and national electrical codes. Do not dispose of the spa. Remove the four #6 x 1 1/4" Wood Screws (7) from the Access...
Canadian English Manual
Page 9
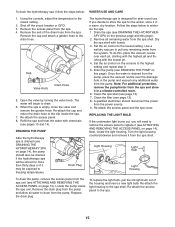
...Spa Cover tight.) The Spa Cover must be filled with the Console (not shown). 6. Turn the Air Vent (29) clockwise to close it . Fill the Inflatable Cover with two #4 x 3/4" Screws (31). Make sure that there is room to open it . 5. Place the Spa Cover over the grooves between the wood panels. 4. Turn the Air Vent (29) counterclockwise to easily service the spa...Attach the latch on the strap to the valves on the Inflatable Cover (4). Pull down one of the straps on the Spa Cover (11) and hold the strap on the opposite side of the loops on the Inflatable Cover (4). Set...
...Spa Cover tight.) The Spa Cover must be filled with the Console (not shown). 6. Turn the Air Vent (29) clockwise to close it . Fill the Inflatable Cover with two #4 x 3/4" Screws (31). Make sure that there is room to open it . 5. Place the Spa Cover over the grooves between the wood panels. 4. Turn the Air Vent (29) counterclockwise to easily service the spa...Attach the latch on the strap to the valves on the Inflatable Cover (4). Pull down one of the straps on the Spa Cover (11) and hold the strap on the opposite side of the loops on the Inflatable Cover (4). Set...
Canadian English Manual
Page 10
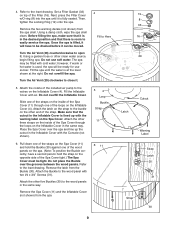
...spa for information concerning proper water maintenance. Set the air control on page 12). The spa cover must comply with the cover on using the spa indoors, and the room temperature is too high, add half of one of the "Non-chlorine Shox" bottle to 40°C]), a filtration system, ten adjustable hydrotherapy jets, and a powerful whirlpool jet. The spa...240V operation, it pumps. Cover the hydrotherapy spa with a 120/240V convertible electronics package. If you refill the spa. Press the "reset" button. Repeat until the GFCI has been repaired or replaced by a qualified, licensed ...
...spa for information concerning proper water maintenance. Set the air control on page 12). The spa cover must comply with the cover on using the spa indoors, and the room temperature is too high, add half of one of the "Non-chlorine Shox" bottle to 40°C]), a filtration system, ten adjustable hydrotherapy jets, and a powerful whirlpool jet. The spa...240V operation, it pumps. Cover the hydrotherapy spa with a 120/240V convertible electronics package. If you refill the spa. Press the "reset" button. Repeat until the GFCI has been repaired or replaced by a qualified, licensed ...
Canadian English Manual
Page 11
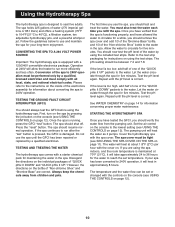
... the diagram above. Spa Shell Diagram G C A B E D F H I . The skimmer cleans the surface of children. 11 F. H. The filter can be closed and opened by inserting the key and turning it counterclockwise 1/4 turn . The console controls the spa jets, turns the underwater light on and off, and adjusts the water temperature setting (see USING THE CONTROLS on page 12). Latch The buckles can be used for cleaning or replacement (see USING THE CONTROLS...
... the diagram above. Spa Shell Diagram G C A B E D F H I . The skimmer cleans the surface of children. 11 F. H. The filter can be closed and opened by inserting the key and turning it counterclockwise 1/4 turn . The console controls the spa jets, turns the underwater light on and off, and adjusts the water temperature setting (see USING THE CONTROLS on page 12). Latch The buckles can be used for cleaning or replacement (see USING THE CONTROLS...
Canadian English Manual
Page 12
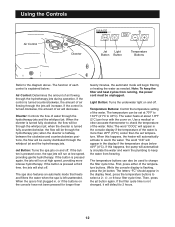
... the power cord must be through the jets will begin filtering or heating the water as needed. Light Button: Turns the underwater light on and off. The water heats at high speed, providing more than 20°F (10°C) cooler than twenty minutes, the automatic mode will ... temperature buttons can be used to 40°C). While the console display is turned clockwise, the amount of air flowing through the whirlpool jet; If the control is flashing, press the jet button. The spa also features an automatic mode that heats and filters the water when the spa is pressed again,...
... the power cord must be through the jets will begin filtering or heating the water as needed. Light Button: Turns the underwater light on and off. The water heats at high speed, providing more than 20°F (10°C) cooler than twenty minutes, the automatic mode will ... temperature buttons can be used to 40°C). While the console display is turned clockwise, the amount of air flowing through the whirlpool jet; If the control is flashing, press the jet button. The spa also features an automatic mode that heats and filters the water when the spa is pressed again,...
Canadian English Manual
Page 13
...REPLACEMENT PARTS on this page). • Soak the filter for information on the cover after you should best accomplish this page). • Replace the filter if needed (see CHECK- do not use water and a non-abrasive cleaner on this . The spa should be clean and dry before being moved... a skimming net. Please follow the steps below: 1. Adjust if necessary (see MAIN- To clean the spa cover, use solvents. Proper water maintenance is designed to be cleaned, follow the guidelines below ). Turn off the power. 2. If the filter needs to provide years of the water with...
...REPLACEMENT PARTS on this page). • Soak the filter for information on the cover after you should best accomplish this page). • Replace the filter if needed (see CHECK- do not use water and a non-abrasive cleaner on this . The spa should be clean and dry before being moved... a skimming net. Please follow the steps below: 1. Adjust if necessary (see MAIN- To clean the spa cover, use solvents. Proper water maintenance is designed to be cleaned, follow the guidelines below ). Turn off the power. 2. If the filter needs to provide years of the water with...
Canadian English Manual
Page 14
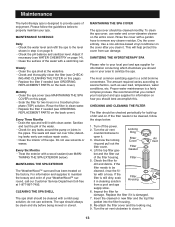
...before major repairs are made. ATTACHING AND REMOVING THE ACCESS PANEL To locate the access panel, refer to drain the spa more often, depending on the user load. Slide the access panel down and then pull the bottom of children and pets. 5. Access Panel Screws To replace the access ...covered under warranty. 14 If the level is not properly maintained. See the instructions with your pH test kit for additional information about testing and adjusting the pH. Be careful not to maintain the pH balance of the spa shell. Then, slide the access panel into place and re-attach the four screws...
...before major repairs are made. ATTACHING AND REMOVING THE ACCESS PANEL To locate the access panel, refer to drain the spa more often, depending on the user load. Slide the access panel down and then pull the bottom of children and pets. 5. Access Panel Screws To replace the access ...covered under warranty. 14 If the level is not properly maintained. See the instructions with your pH test kit for additional information about testing and adjusting the pH. Be careful not to maintain the pH balance of the spa shell. Then, slide the access panel into place and re-attach the four screws...
Canadian English Manual
Page 15
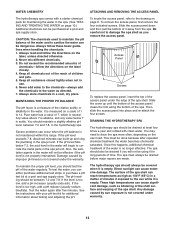
... location. APY SPA on the console to freezing temperatures. Set the air control on the previous page and this page). 2. Once the water is designed for year-round use. Re-attach the light housing to the spa. 15 Re-attach the access panel to the spa shell. Remove the cap and attach a garden hose to the lowest setting. Open the valve by turning the valve knob...
... location. APY SPA on the console to freezing temperatures. Set the air control on the previous page and this page). 2. Once the water is designed for year-round use. Re-attach the light housing to the spa. 15 Re-attach the access panel to the spa shell. Remove the cap and attach a garden hose to the lowest setting. Open the valve by turning the valve knob...
Canadian English Manual
Page 16
... symptom that the hydrotherapy spa is needed, call our Customer Service Department toll-free at a rate of 1.8°F (2°C) per hour. Contact our customer service department. Contact our customer service department. Trouble-shooting Most problems can identify the location of the leak inside the spa jet unit, tighten the clamp or replace the damaged seal. 16 If further assistance is fully covered with the spa cover.
... symptom that the hydrotherapy spa is needed, call our Customer Service Department toll-free at a rate of 1.8°F (2°C) per hour. Contact our customer service department. Contact our customer service department. Trouble-shooting Most problems can identify the location of the leak inside the spa jet unit, tighten the clamp or replace the damaged seal. 16 If further assistance is fully covered with the spa cover.
Canadian English Manual
Page 17
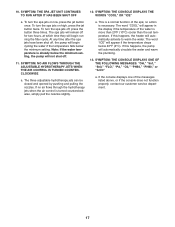
...: NO AIR FLOWS THROUGH THE ADJUSTABLE HYDROTHERAPY JETS WHEN THE AIR CONTROL IS TURNED COUNTERCLOCKWISE a. If the console displays one of the water is a normal function of the spa; SYMPTOM: THE SPA JET UNIT CONTINUES TO RUN AFTER IT HAS BEEN SHUT OFF a. To turn the spa jets on high, press the jet button twice. The spa jets will begin cycling the...
...: NO AIR FLOWS THROUGH THE ADJUSTABLE HYDROTHERAPY JETS WHEN THE AIR CONTROL IS TURNED COUNTERCLOCKWISE a. If the console displays one of the water is a normal function of the spa; SYMPTOM: THE SPA JET UNIT CONTINUES TO RUN AFTER IT HAS BEEN SHUT OFF a. To turn the spa jets on high, press the jet button twice. The spa jets will begin cycling the...
Canadian English Manual
Page 18
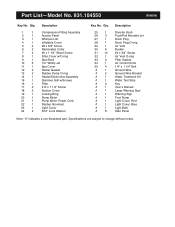
... 1 16 1 17 2 18 2 19 1 20 1 21 1 22 1 23 1 24 4 Description Compression Fitting Assembly Access Panel Whirlpool Jet Inflatable Cover #8 x 5/8" Screw Removable Collar #6 x 1 1/4" Wood Screw Filter Cover w/O-ring Spa Shell 1/4" Whirly Jet Spa Cover Heater Gasket Rubber Pump O-ring Heater/Electronics Assembly Skimmer Grill w/Screws Filter #10 x 1 1/4" Screw Suction Cover Locking Ring Pump Motor Pump Motor Power Cord Rubber Grommet Light Cover 5/16" Lock Washer Key No. Part List-Model No. 831.104550 R0600A...
... 1 16 1 17 2 18 2 19 1 20 1 21 1 22 1 23 1 24 4 Description Compression Fitting Assembly Access Panel Whirlpool Jet Inflatable Cover #8 x 5/8" Screw Removable Collar #6 x 1 1/4" Wood Screw Filter Cover w/O-ring Spa Shell 1/4" Whirly Jet Spa Cover Heater Gasket Rubber Pump O-ring Heater/Electronics Assembly Skimmer Grill w/Screws Filter #10 x 1 1/4" Screw Suction Cover Locking Ring Pump Motor Pump Motor Power Cord Rubber Grommet Light Cover 5/16" Lock Washer Key No. Part List-Model No. 831.104550 R0600A...

Canadian English Manual
Page 19
Exploded Drawing-Model No. 831.104550 11 R0600A 35 22 20 24 13 36 28 27 4 29 19 32 8 33 16 7 7 2 34 9 33 25 12 5 6 14 26 15 10 23 10 3 18 17 18 31 30 19 21 12 56 26 1 10
Exploded Drawing-Model No. 831.104550 11 R0600A 35 22 20 24 13 36 28 27 4 29 19 32 8 33 16 7 7 2 34 9 33 25 12 5 6 14 26 15 10 23 10 3 18 17 18 31 30 19 21 12 56 26 1 10
Canadian English Manual
Page 20
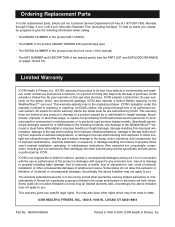
... (IMAGE® RENEW 455 hydrotherapy spa) • The SERIAL NUMBER of the product (see the front cover of this warranty is limited to you . Specifically excluded are damages caused by ICON authorized service personnel; damage to the pump, motor, plumbing, and components due to the original purchaser. Accordingly, the above limitation may not apply to replacing or repairing, at 1-877-897-7493, Monday through one of removal, installation...
... (IMAGE® RENEW 455 hydrotherapy spa) • The SERIAL NUMBER of the product (see the front cover of this warranty is limited to you . Specifically excluded are damages caused by ICON authorized service personnel; damage to the pump, motor, plumbing, and components due to the original purchaser. Accordingly, the above limitation may not apply to replacing or repairing, at 1-877-897-7493, Monday through one of removal, installation...


