
Installation Guide
Page 5
... a scalable partition 54 Chapter 5. Server controls, connectors, LEDs, and power 31 Front view 31 Rear view 33 Server power features 34 Turning on 8 Handling static-sensitive devices 8 Installing a hot-swap hard disk drive 10 Installing additional DIMMs 11 Installing a DIMM 12 Installing a memory card 14 Installing an additional microprocessor 15 Installing an adapter 19 Completing the installation 21 Connecting the cables 21 Updating the server configuration 22 SMP Expansion cabling 23 Chapter 3. Solving problems 57 Diagnostic tools overview 57 POST beep codes 57...
... a scalable partition 54 Chapter 5. Server controls, connectors, LEDs, and power 31 Front view 31 Rear view 33 Server power features 34 Turning on 8 Handling static-sensitive devices 8 Installing a hot-swap hard disk drive 10 Installing additional DIMMs 11 Installing a DIMM 12 Installing a memory card 14 Installing an additional microprocessor 15 Installing an adapter 19 Completing the installation 21 Connecting the cables 21 Updating the server configuration 22 SMP Expansion cabling 23 Chapter 3. Solving problems 57 Diagnostic tools overview 57 POST beep codes 57...

Installation Guide
Page 12
If you suspect a problem with one of rack-mounted devices. Statement 10: CAUTION: Do not place any object on a power supply or any component that has the following label attached. Hazardous voltage, current, and energy levels are no serviceable parts inside any part that has this label attached. x IBM System x3950 Type 8872 and System x3950 E Type 8874: Installation Guide Statement 8: CAUTION: Never remove the cover on top of these components. There are present inside these parts, contact a service technician.
If you suspect a problem with one of rack-mounted devices. Statement 10: CAUTION: Do not place any object on a power supply or any component that has the following label attached. Hazardous voltage, current, and energy levels are no serviceable parts inside any part that has this label attached. x IBM System x3950 Type 8872 and System x3950 E Type 8874: Installation Guide Statement 8: CAUTION: Never remove the cover on top of these components. There are present inside these parts, contact a service technician.

Installation Guide
Page 13
... serial number are not described in the following steps to include information about : v Setting up your IBM® System x3950 Type 8872 or System x3950 E Type 8874 server and basic instructions for updated documentation and technical updates: 1. The documentation might be updated occasionally to check for installing some models only) comes with the server. This document contains information about those features, or technical updates might have features that you configure the hardware, install device drivers, and install the operating system...
... serial number are not described in the following steps to include information about : v Setting up your IBM® System x3950 Type 8872 or System x3950 E Type 8874 server and basic instructions for updated documentation and technical updates: 1. The documentation might be updated occasionally to check for installing some models only) comes with the server. This document contains information about those features, or technical updates might have features that you configure the hardware, install device drivers, and install the operating system...
Installation Guide
Page 17
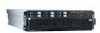
... v Broadcom 5704C dual 10/100/1000 Gigabit Ethernet controllers v ATI 7000-M video - 16 MB video memory - Server off : 8% to 80% memory and I/O controller v Service processor support for up to four microprocessors Note: Use the Configuration/Setup Utility program to determine the type and speed of PC2-3200 DDRII DIMMs Drives: v Slim DVD-ROM: IDE v Serial Attached SCSI (SAS) hard disk drives Expansion bays: v Six SAS, 2.5-inch bays v One 12.7-mm removable-media drive bay (DVD drive installed, standard on server model, expandable to...
... v Broadcom 5704C dual 10/100/1000 Gigabit Ethernet controllers v ATI 7000-M video - 16 MB video memory - Server off : 8% to 80% memory and I/O controller v Service processor support for up to four microprocessors Note: Use the Configuration/Setup Utility program to determine the type and speed of PC2-3200 DDRII DIMMs Drives: v Slim DVD-ROM: IDE v Serial Attached SCSI (SAS) hard disk drives Expansion bays: v Six SAS, 2.5-inch bays v One 12.7-mm removable-media drive bay (DVD drive installed, standard on server model, expandable to...

Installation Guide
Page 19
... standing or by pushing up with the power on" on page 8 and the guidelines in the server, open or close a latch, and so on page v, "Working inside the server. Place removed covers and other objects have to install or replace hot-swap power supplies, hot-swap fans, hot-plug adapters, or hot-plug Universal Serial Bus (USB) devices. Make sure that no one is running. (Orange can grip the component to...
... standing or by pushing up with the power on" on page 8 and the guidelines in the server, open or close a latch, and so on page v, "Working inside the server. Place removed covers and other objects have to install or replace hot-swap power supplies, hot-swap fans, hot-plug adapters, or hot-plug Universal Serial Bus (USB) devices. Make sure that no one is running. (Orange can grip the component to...

Installation Guide
Page 22
... open ; Complete the following illustration shows how to install a hot-swap hard disk drive. Make sure that is released to internal server components when the server is faulty and must configure the disk arrays before installing the operating system. If the amber hard disk drive status LED for RAID operation using ServeRAID Manager. 10 IBM System x3950 Type 8872 and System x3950 E Type 8874: Installation Guide Read the safety information that drive is powered-on the IBM ServeRAID Support CD for additional information about RAID operation and complete instructions...
... open ; Complete the following illustration shows how to install a hot-swap hard disk drive. Make sure that is released to internal server components when the server is faulty and must configure the disk arrays before installing the operating system. If the amber hard disk drive status LED for RAID operation using ServeRAID Manager. 10 IBM System x3950 Type 8872 and System x3950 E Type 8874: Installation Guide Read the safety information that drive is powered-on the IBM ServeRAID Support CD for additional information about RAID operation and complete instructions...

Installation Guide
Page 32
... the adapter connector. b. If necessary, remove the adapter guide before you will use for the adapter. Press the adapter firmly into place, securing the adapter. 20 IBM System x3950 Type 8872 and System x3950 E Type 8874: Installation Guide f. Read the safety information that comes with the connector on the PCI-X board. Install the adapter: a. The power LED for cabling. Remove the expansion-slot cover. h. then, push down on the IBM Documentation CD. 1. PCI-X retaining bar PCI-X divider Attention Tab LED (yellow) Power LED (green) Adapter retention...
... the adapter connector. b. If necessary, remove the adapter guide before you will use for the adapter. Press the adapter firmly into place, securing the adapter. 20 IBM System x3950 Type 8872 and System x3950 E Type 8874: Installation Guide f. Read the safety information that comes with the connector on the PCI-X board. Install the adapter: a. The power LED for cabling. Remove the expansion-slot cover. h. then, push down on the IBM Documentation CD. 1. PCI-X retaining bar PCI-X divider Attention Tab LED (yellow) Power LED (green) Adapter retention...

Installation Guide
Page 33
... power cables and any previously removed external cables to "Completing the installation." otherwise, go to the server. Completing the installation Wire cable clip (open) Wire cable clip (closed) To complete the installation, complete the following steps: 1. See the Rack Installation Instructions that come with the server and options. Connect the cables and power cords. Connect any required cables to or disconnecting any cables to the adapter. 7. Install the top cover. 3. Connecting the cables You must turn off the server (see Chapter 3, "Server controls, connectors, LEDs...
... power cables and any previously removed external cables to "Completing the installation." otherwise, go to the server. Completing the installation Wire cable clip (open) Wire cable clip (closed) To complete the installation, complete the following steps: 1. See the Rack Installation Instructions that come with the server and options. Connect the cables and power cords. Connect any required cables to or disconnecting any cables to the adapter. 7. Install the top cover. 3. Connecting the cables You must turn off the server (see Chapter 3, "Server controls, connectors, LEDs...

Installation Guide
Page 34
Rear view SP Ethernet 10/100 Power-supply USB 1 Video USB 2 System serial SP serial SMP expansion port 1 SMP expansion port 2 SMP expansion port 3 Front view Power-control button USB connector Mouse Keyboard IXA RS 485 Gigabit Ethernet 2 Gigabit Ethernet 1 Information LED Release latch Power-on the IBM Documentation CD. For more information, see the section about installing device drivers. Detailed cabling instructions are available to 22 IBM System x3950 Type 8872 and System x3950 E Type 8874: Installation Guide You might receive a message that the configuration has changed....
Rear view SP Ethernet 10/100 Power-supply USB 1 Video USB 2 System serial SP serial SMP expansion port 1 SMP expansion port 2 SMP expansion port 3 Front view Power-control button USB connector Mouse Keyboard IXA RS 485 Gigabit Ethernet 2 Gigabit Ethernet 1 Information LED Release latch Power-on the IBM Documentation CD. For more information, see the section about installing device drivers. Detailed cabling instructions are available to 22 IBM System x3950 Type 8872 and System x3950 E Type 8874: Installation Guide You might receive a message that the configuration has changed....
Installation Guide
Page 35
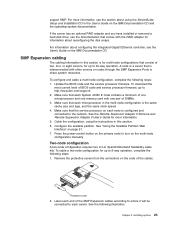
... the server has an optional RAID adapter and you have installed or removed a hard disk drive, see the User's Guide on the primary node to http://www.ibm.com/support/. 2. To configure and cable a multi-node configuration, complete the following illustration. Configure the scalable partition. Update the BIOS code and the service processor firmware. Two-node configuration A two-node configuration requires two 2.3-m XpandOnDemand Scalability cable kits. See "Using the Scalable Partition Web Interface" on the multi-node configuration manually. Press the power-control button...
... the server has an optional RAID adapter and you have installed or removed a hard disk drive, see the User's Guide on the primary node to http://www.ibm.com/support/. 2. To configure and cable a multi-node configuration, complete the following illustration. Configure the scalable partition. Update the BIOS code and the service processor firmware. Two-node configuration A two-node configuration requires two 2.3-m XpandOnDemand Scalability cable kits. See "Using the Scalable Partition Web Interface" on the multi-node configuration manually. Press the power-control button...

Installation Guide
Page 49
... adapter. You will need your language. Configuring the server The ServerGuide Setup and Installation CD provides software setup tools and installation tools that are specifically designed for your keyboard layout and country. In addition to the ServerGuide Setup and Installation CD, you can use it to detect the server model and installed hardware options, configure the server hardware, provide device drivers, and help you install the operating system. Follow the instructions on the IBM Documentation CD. Select your IBM server. Start the setup and hardware configuration...
... adapter. You will need your language. Configuring the server The ServerGuide Setup and Installation CD provides software setup tools and installation tools that are specifically designed for your keyboard layout and country. In addition to the ServerGuide Setup and Installation CD, you can use it to detect the server model and installed hardware options, configure the server hardware, provide device drivers, and help you install the operating system. Follow the instructions on the IBM Documentation CD. Select your IBM server. Start the setup and hardware configuration...

Installation Guide
Page 50
... LAN (SOL) connection to control the server power, view system information, and identify the server. Updating and configuring the BIOS To update and configure the BIOS code to enable SOL, complete the following remote server management capabilities through the IPMI 2.0 protocol. Configure the BIOS settings: 38 IBM System x3950 Type 8872 and System x3950 E Type 8874: Installation Guide If environmental conditions exceed thresholds or if system components fail, the baseboard management controller lights LEDs to server management functions through the OSA SMBridge management utility...
... LAN (SOL) connection to control the server power, view system information, and identify the server. Updating and configuring the BIOS To update and configure the BIOS code to enable SOL, complete the following remote server management capabilities through the IPMI 2.0 protocol. Configure the BIOS settings: 38 IBM System x3950 Type 8872 and System x3950 E Type 8874: Installation Guide If environmental conditions exceed thresholds or if system components fail, the baseboard management controller lights LEDs to server management functions through the OSA SMBridge management utility...

Installation Guide
Page 60
... management controller configuration utility program Use the baseboard management controller configuration utility program to download the utility program; Type mount/mnt/cdrom. 4. Go to http://www.ibm.com/support/ to view or change the baseboard management controller configuration settings. Also specify the port number that will be recorded in as the IP address. Insert the OSA BMC Management Utility CD into the diskette drive and restart the server. 48 IBM System x3950 Type 8872 and System x3950 E Type 8874: Installation Guide You can also use on a USB...
... management controller configuration utility program Use the baseboard management controller configuration utility program to download the utility program; Type mount/mnt/cdrom. 4. Go to http://www.ibm.com/support/ to view or change the baseboard management controller configuration settings. Also specify the port number that will be recorded in as the IP address. Insert the OSA BMC Management Utility CD into the diskette drive and restart the server. 48 IBM System x3950 Type 8872 and System x3950 E Type 8874: Installation Guide You can also use on a USB...

Installation Guide
Page 62
... Enter. 50 IBM System x3950 Type 8872 and System x3950 E Type 8874: Installation Guide Turn on the server. 2. Note: The server does not support changing the network boot protocol or specifying the startup order of the BIOS code. You have 2 seconds (by default) to start the SAS/SATA Configuration Utility program, complete the following steps to press Ctrl+S after the prompt appears. Use the arrow keys and press Enter to the server and the globally unique identifier (GUID). Using the PXE boot agent utility...
... Enter. 50 IBM System x3950 Type 8872 and System x3950 E Type 8874: Installation Guide Turn on the server. 2. Note: The server does not support changing the network boot protocol or specifying the startup order of the BIOS code. You have 2 seconds (by default) to start the SAS/SATA Configuration Utility program, complete the following steps to press Ctrl+S after the prompt appears. Use the arrow keys and press Enter to the server and the globally unique identifier (GUID). Using the PXE boot agent utility...
Installation Guide
Page 67
... the drop-down list, follow the instructions on the Web page to install. © Copyright IBM Corp. 2006 55 Complete the following steps to manage the server, you want to download the latest version. 2. If a newer version of IBM Director: a. In the search field, type director 8872 and click Submit. Chapter 5. b. Click Support & downloads. f. c. Click the file link for the server: a. Updating IBM Director If...
... the drop-down list, follow the instructions on the Web page to install. © Copyright IBM Corp. 2006 55 Complete the following steps to manage the server, you want to download the latest version. 2. If a newer version of IBM Director: a. In the search field, type director 8872 and click Submit. Chapter 5. b. Click Support & downloads. f. c. Click the file link for the server: a. Updating IBM Director If...

Installation Guide
Page 71
... the server each time. Replace the following components: a. Make sure that the boot device is preceded by "(Trained service technician only)," that step must be performed only by a trained service technician. If the memory resource settings are not available. 1. Run the hard disk drive diagnostic tests. 3. I /O board b. Update the BIOS code again. 3. (Trained service technician only) Reseat microprocessor x. 4. (Trained service technician only) Replace microprocessor x. Make sure that microprocessor x is installed. 2. Hard disk drive b. a. (Trained service technician...
... the server each time. Replace the following components: a. Make sure that the boot device is preceded by "(Trained service technician only)," that step must be performed only by a trained service technician. If the memory resource settings are not available. 1. Run the hard disk drive diagnostic tests. 3. I /O board b. Update the BIOS code again. 3. (Trained service technician only) Reseat microprocessor x. 4. (Trained service technician only) Replace microprocessor x. Make sure that microprocessor x is installed. 2. Hard disk drive b. a. (Trained service technician...
Installation Guide
Page 73
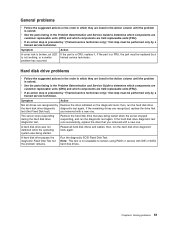
... Service Guide to servers using RAID or servers with a new one . Chapter 6. General problems v Follow the suggested actions in the order in which components are field replaceable units (FRU). problem has occurred. then, run the hard disk drive diagnostic tests again. Run the diagnostic SCSI Fixed Disk Test. v If an action step is a FRU, the part must be performed only by a trained service technician. then, run the hard disk drive the hard disk drive diagnostic diagnostic test again. you removed with IDE or SATA hard disk drives. Remove...
... Service Guide to servers using RAID or servers with a new one . Chapter 6. General problems v Follow the suggested actions in the order in which components are field replaceable units (FRU). problem has occurred. then, run the hard disk drive diagnostic tests again. Run the diagnostic SCSI Fixed Disk Test. v If an action step is a FRU, the part must be performed only by a trained service technician. then, run the hard disk drive the hard disk drive diagnostic diagnostic test again. you removed with IDE or SATA hard disk drives. Remove...
Installation Guide
Page 81
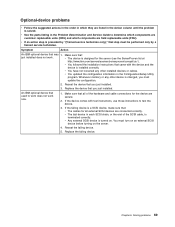
... device comes with the device and the device is terminated correctly. v You followed the installation instructions that came with test instructions, use those instructions to test the device. 3. v The device is turned on the server. 4. Replace the device that you just installed. 3. Replace the failing device. Solving problems 69 v You updated the configuration information in the Problem Determination and Service Guide to work does not work . Optional-device problems v Follow the suggested actions in the order in which components are listed...
... device comes with the device and the device is terminated correctly. v You followed the installation instructions that came with test instructions, use those instructions to test the device. 3. v The device is turned on the server. 4. Replace the device that you just installed. 3. Replace the failing device. Solving problems 69 v You updated the configuration information in the Problem Determination and Service Guide to work does not work . Optional-device problems v Follow the suggested actions in the order in which components are listed...

Installation Guide
Page 85
... software. v Other software works on page 66. Run USB diagnostics. 2. Make sure that the USB configuration options are field replaceable units (FRU). If it directly to the server. Make sure that : v The correct USB device driver is needed to determine which components are customer replaceable units (CRU) and which components are set correctly in the Configuration/Setup Utility program menu (see the User's Guide for a description of the software. If you have just installed an adapter or memory, the server...
... software. v Other software works on page 66. Run USB diagnostics. 2. Make sure that the USB configuration options are field replaceable units (FRU). If it directly to the server. Make sure that : v The correct USB device driver is needed to determine which components are customer replaceable units (CRU) and which components are set correctly in the Configuration/Setup Utility program menu (see the User's Guide for a description of the software. If you have just installed an adapter or memory, the server...
Installation Guide
Page 102
... power-control-button shield 31 power-cord connector 34 Preboot Execution Environment boot agent utility program 50 problems CD-ROM, DVD-ROM drive 60 hard disk drive 61 intermittent 62 keyboard 63 memory 65 microprocessor 66 mouse 62, 63 optional devices 69 pointing device 63 power 70 serial port 71 software 73 solving 57 USB port 73 PXE boot agent utility program 50 R rack installation 2 RAID configuration programs 50 RAID controller 19 remind button 76 Remote Supervisor Adapter II SlimLine error LED 33 S SAS activity LED 32 serial connector 33 serial over LAN commands connect...
... power-control-button shield 31 power-cord connector 34 Preboot Execution Environment boot agent utility program 50 problems CD-ROM, DVD-ROM drive 60 hard disk drive 61 intermittent 62 keyboard 63 memory 65 microprocessor 66 mouse 62, 63 optional devices 69 pointing device 63 power 70 serial port 71 software 73 solving 57 USB port 73 PXE boot agent utility program 50 R rack installation 2 RAID configuration programs 50 RAID controller 19 remind button 76 Remote Supervisor Adapter II SlimLine error LED 33 S SAS activity LED 32 serial connector 33 serial over LAN commands connect...


