Hardware Maintenance Manual
Page 5
...and 8315 . . 17 Available options 18 Types 8301 and 8302 18 Types 8303, 8304 and 8312 19 Types 8305, 8306, 8309, and 8313 20 Types 8307, 8308, 8310, 8311, 8314, and 8315 . . 21...39 Installing internal options 39 Removing the cover 40 Locating components 42 Identifying parts on LAN 265 BIOS levels 265 Flash update procedures 265 Flash from Operating System (WinPhlash). . . 266 Flash from CD-ROM ISO ... 8302 . . . . 71 Removing the CD-ROM drive Types 8301 and 8302 71 © Copyright IBM Corp. 2001 Front bezel Types 8307, 8308, 8310, 8311, 8314, and 8315 72 Replacing a microprocessor ...
...and 8315 . . 17 Available options 18 Types 8301 and 8302 18 Types 8303, 8304 and 8312 19 Types 8305, 8306, 8309, and 8313 20 Types 8307, 8308, 8310, 8311, 8314, and 8315 . . 21...39 Installing internal options 39 Removing the cover 40 Locating components 42 Identifying parts on LAN 265 BIOS levels 265 Flash update procedures 265 Flash from Operating System (WinPhlash). . . 266 Flash from CD-ROM ISO ... 8302 . . . . 71 Removing the CD-ROM drive Types 8301 and 8302 71 © Copyright IBM Corp. 2001 Front bezel Types 8307, 8308, 8310, 8311, 8314, and 8315 72 Replacing a microprocessor ...
Hardware Maintenance Manual
Page 88
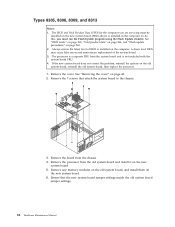
...that attach the system board to the chassis. 3. To do this, you are servicing must run the Flash Update program using the Flash Update diskette. Remove the processor from the chassis. 4. The BIOS and Vital Product Data (VPD) for the computer you must be installed on the new system board (FRU)...system board jumper settings. 82 Hardware Maintenance Manual If the new system board does not correct the problem, reinstall the options on page 40. 2. Types 8305, 8306, 8309, and 8313 Notes: 1. Always ensure the latest level of the system board. 3. See "Removing the cover" on the old system...
...that attach the system board to the chassis. 3. To do this, you are servicing must run the Flash Update program using the Flash Update diskette. Remove the processor from the chassis. 4. The BIOS and Vital Product Data (VPD) for the computer you must be installed on the new system board (FRU)...system board jumper settings. 82 Hardware Maintenance Manual If the new system board does not correct the problem, reinstall the options on page 40. 2. Types 8305, 8306, 8309, and 8313 Notes: 1. Always ensure the latest level of the system board. 3. See "Removing the cover" on the old system...

Hardware Maintenance Manual
Page 99
System board 1. Video card, if installed 3. Run Setup 2. Video drivers update 3. System board 1. System board 1. Press F3 to -FRU Index 93...XXX Video Device Controller failure 005-036-XXX Video Register error 005-038-XXX System BIOS extension failure 005-040-XXX Video IRQ failure 005-195-XXX Video Test aborted by ... test, if necessary 1. Video card, if installed 2. System board 1. System board 1. Symptom-to review the log file 2. Video Ram 2. Video card, if installed 2. System board 1. Flash the system 2. Video card, if installed 2. Monitor 3. System board 1. ...
System board 1. Video card, if installed 3. Run Setup 2. Video drivers update 3. System board 1. System board 1. Press F3 to -FRU Index 93...XXX Video Device Controller failure 005-036-XXX Video Register error 005-038-XXX System BIOS extension failure 005-040-XXX Video IRQ failure 005-195-XXX Video Test aborted by ... test, if necessary 1. Video card, if installed 2. System board 1. System board 1. Symptom-to review the log file 2. Video Ram 2. Video card, if installed 2. System board 1. Flash the system 2. Video card, if installed 2. Monitor 3. System board 1. ...
Hardware Maintenance Manual
Page 117
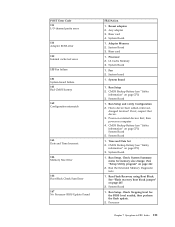
... Backup Battery (see "Safety information" on page 24.) 2. Run Setup. Run Setup. Check System Summary menu for the BIOS level needed, then perform the flash update. 2. System Board 1. System Board 1. POST Error Code 111 I/O channel parity error 114 Adapter ROM error 129 Internal cache...161 Bad CMOS battery 162 Configuration mismatch 163 Date and Time Incorrect 164 Memory Size Error 166 Boot Block Check Sum Error 167 No Processor BIOS Update Found FRU/Action 1. Adapter Memory 2. Reseat adapters 2. Any adapter 3. Processor 2. L2 Cache Memory 3. System Board 1. Had a device ...
... Backup Battery (see "Safety information" on page 24.) 2. Run Setup. Run Setup. Check System Summary menu for the BIOS level needed, then perform the flash update. 2. System Board 1. System Board 1. POST Error Code 111 I/O channel parity error 114 Adapter ROM error 129 Internal cache...161 Bad CMOS battery 162 Configuration mismatch 163 Date and Time Incorrect 164 Memory Size Error 166 Boot Block Check Sum Error 167 No Processor BIOS Update Found FRU/Action 1. Adapter Memory 2. Reseat adapters 2. Any adapter 3. Processor 2. L2 Cache Memory 3. System Board 1. Had a device ...

Hardware Maintenance Manual
Page 271
... level of BIOS installed. Flash update procedures This section details how to obtain the latest level of the computer. Alert on LAN Alert on LAN events are configured to manage and monitor the hardware and software features of BIOS. Additional Service Information 265 PC PartnerInfo-Technical Database (CTSTIPS.NSF) 3. ® HelpCenter 4. IBM Home Page...
... level of BIOS installed. Flash update procedures This section details how to obtain the latest level of the computer. Alert on LAN Alert on LAN events are configured to manage and monitor the hardware and software features of BIOS. Additional Service Information 265 PC PartnerInfo-Technical Database (CTSTIPS.NSF) 3. ® HelpCenter 4. IBM Home Page...

Hardware Maintenance Manual
Page 273
You will be some variations on the Flash/BIOS update process done after a boot block recovery process to the help provided with a... recover the BIOS. 8. Click Yes. Create a CD from an ISO image; The filename of a diskette on your C:\IBMTOOLS\FLASH\24JZnnUS folder. Close all open applications. 14. Shutdown the computer. 16. When you wish to update the machine... boots back to a 1962 POST error or displays a picture of the ISO image is lost, so a normal flash update has to include the hard disk drive. For example, press 1 for further assistance. 12. Press Enter. You will...
You will be some variations on the Flash/BIOS update process done after a boot block recovery process to the help provided with a... recover the BIOS. 8. Click Yes. Create a CD from an ISO image; The filename of a diskette on your C:\IBMTOOLS\FLASH\24JZnnUS folder. Close all open applications. 14. Shutdown the computer. 16. When you wish to update the machine... boots back to a 1962 POST error or displays a picture of the ISO image is lost, so a normal flash update has to include the hard disk drive. For example, press 1 for further assistance. 12. Press Enter. You will...
Hardware Maintenance Manual
Page 274
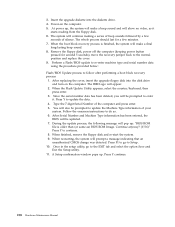
... machine type and serial number data using the procedure provided below: Flash/BIOS Update process to continue. 8. Since the serial number data has been deleted, you will show no video, as ) BIOS ROM Image. During the update process, the following message will continue making a series of beep sounds ... in the setup utility, go to update the Machine Type information of your system. Remove the floppy disk, power off the computer (keeping power button pressed for a few seconds of the computer and press enter. 5. The IBM Logo will prompt a message indicating that an unauthorized CMOS ...
... machine type and serial number data using the procedure provided below: Flash/BIOS Update process to continue. 8. Since the serial number data has been deleted, you will show no video, as ) BIOS ROM Image. During the update process, the following message will continue making a series of beep sounds ... in the setup utility, go to update the Machine Type information of your system. Remove the floppy disk, power off the computer (keeping power button pressed for a few seconds of the computer and press enter. 5. The IBM Logo will prompt a message indicating that an unauthorized CMOS ...


