

User Guide
Page 23
... checks used to repair it. xxiv Service Manual Parts Catalog contains illustrations and part numbers for making printer adjustments and removing and installing FRUs. 5. Preventive Maintenance contains the lubrication specifications and recommendations to identify the connector locations and test points on the printer. 6. Special tools and test equipment are listed in this chapter, as well as general environmental and safety instructions. 2. Repair Information provides instructions for individual FRUs. Connector Locations uses illustrations to prevent problems. 7. IBM Infoprint...
... checks used to repair it. xxiv Service Manual Parts Catalog contains illustrations and part numbers for making printer adjustments and removing and installing FRUs. 5. Preventive Maintenance contains the lubrication specifications and recommendations to identify the connector locations and test points on the printer. 6. Special tools and test equipment are listed in this chapter, as well as general environmental and safety instructions. 2. Repair Information provides instructions for individual FRUs. Connector Locations uses illustrations to prevent problems. 7. IBM Infoprint...

User Guide
Page 28
... first line of the printer. Use the service error code, user status message, user error message, symptom table, service checks, and diagnostic aids in this chapter to determine the corrective action necessary to the printer. If a user status message is displayed on the current status of the display unless Power Saver is invoked, and then Power Saver is displayed. User status messages provide the user with a print cartridge, paper jam, option, port, and so on page 2-42. Ready is displayed, go to the "User Status Screens" on the side...
... first line of the printer. Use the service error code, user status message, user error message, symptom table, service checks, and diagnostic aids in this chapter to determine the corrective action necessary to the printer. If a user status message is displayed on the current status of the display unless Power Saver is invoked, and then Power Saver is displayed. User status messages provide the user with a print cartridge, paper jam, option, port, and so on page 2-42. Ready is displayed, go to the "User Status Screens" on the side...
User Guide
Page 29
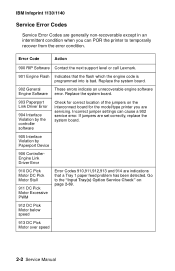
... the "Input Tray(s) Option Service Check" on the interconnect board for correct location of the jumpers on page 2-69. 912 DC Pick Motor below speed 913 DC Pick Motor over speed 2-2 Service Manual Go to temporarily recover from the error condition. If jumpers are set correctly, replace the system board. 905 Interface Violation by the controller software Check for the model/type printer you are servicing. IBM Infoprint 1130/1140 Service Error Codes Service Error Codes are generally...
... the "Input Tray(s) Option Service Check" on the interconnect board for correct location of the jumpers on page 2-69. 912 DC Pick Motor below speed 913 DC Pick Motor over speed 2-2 Service Manual Go to temporarily recover from the error condition. If jumpers are set correctly, replace the system board. 905 Interface Violation by the controller software Check for the model/type printer you are servicing. IBM Infoprint 1130/1140 Service Error Codes Service Error Codes are generally...

User Guide
Page 53
... data, or printing data. The printer is processing or printing a list of Ready. IBM Infoprint 1130/1140 User Status Screens Busy Flushing Buffer Printing Menu Settings Status Action The printer is processing data. No more data is on the second line of Busy. Press Go to return to reset the printer. 2-26 Service Manual Press Stop to take the printer out of the display. Press Select to Ready after the page prints. No button actions are possible while this message...
... data, or printing data. The printer is processing or printing a list of Ready. IBM Infoprint 1130/1140 User Status Screens Busy Flushing Buffer Printing Menu Settings Status Action The printer is processing data. No more data is on the second line of Busy. Press Go to return to reset the printer. 2-26 Service Manual Press Stop to take the printer out of the display. Press Select to Ready after the page prints. No button actions are possible while this message...

User Guide
Page 73
... diagnose problems before changing any service checks. • Paper feed problems (especially paper jams): Go to "Viewing the Error Log" on page 3-13 and check the printer error log for indications of repetitive entries that help to isolate a problem to a particular area of the printer or option. • Paper feed problems with error message: Use the "Sub Error Codes for 9XX and 2XX Error Codes" on page 2-8 to help diagnose the problem. • Print quality problems: Go to "Print Quality Test Pages" on page 3-34 and print a test page to "Setting Configuration...
... diagnose problems before changing any service checks. • Paper feed problems (especially paper jams): Go to "Viewing the Error Log" on page 3-13 and check the printer error log for indications of repetitive entries that help to isolate a problem to a particular area of the printer or option. • Paper feed problems with error message: Use the "Sub Error Codes for 9XX and 2XX Error Codes" on page 2-8 to help diagnose the problem. • Print quality problems: Go to "Print Quality Test Pages" on page 3-34 and print a test page to "Setting Configuration...

User Guide
Page 116
... the disk using the Format Disk Menu operation. Error Code 977 - WARNING: This can be performed on network model printers. Run the "Quick Disk Test" on page 3-6 from the Device Test on the disk size. Network Card X (X=Network card 1, 2, or 3) A 976 error code indicates an unrecoverable software error in slot x on page 3-6 is used to help restore the disk if the disk contains bad data and is a non-destructive test and indicates Pass or Fail. IBM Infoprint 1130/1140 Hard Disk Option Service Tip: The Lexmark T printers support one hard disk option is installed...
... the disk using the Format Disk Menu operation. Error Code 977 - WARNING: This can be performed on network model printers. Run the "Quick Disk Test" on page 3-6 from the Device Test on the disk size. Network Card X (X=Network card 1, 2, or 3) A 976 error code indicates an unrecoverable software error in slot x on page 3-6 is used to help restore the disk if the disk contains bad data and is a non-destructive test and indicates Pass or Fail. IBM Infoprint 1130/1140 Hard Disk Option Service Tip: The Lexmark T printers support one hard disk option is installed...

User Guide
Page 117
... improper operating sensor flag causes a Remove Paper Standard Bin message to make sure the correct flag is installed. Check the sensor and flag for damage or improper operation. If this does not fix the problem, replace the system board. If incorrect, replace the flag. FRU 1 System Board Printer fails to post the message "Remove Paper Standard Bin," enter the Diagnostic Mode, select Output Bin Tests, select Sensor Tests and select Standard Bin. IBM Infoprint 1130/1140 Output Bin Sensor Standard Tray Service Check Service Tip: If the output bin standard tray fills up...
... improper operating sensor flag causes a Remove Paper Standard Bin message to make sure the correct flag is installed. Check the sensor and flag for damage or improper operation. If this does not fix the problem, replace the system board. If incorrect, replace the flag. FRU 1 System Board Printer fails to post the message "Remove Paper Standard Bin," enter the Diagnostic Mode, select Output Bin Tests, select Sensor Tests and select Standard Bin. IBM Infoprint 1130/1140 Output Bin Sensor Standard Tray Service Check Service Tip: If the output bin standard tray fills up...

User Guide
Page 121
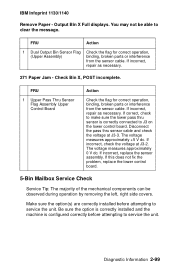
... incorrect, replace the sensor assembly. Output Bin X is correctly connected to clear the message. If correct, check the voltage at J3-3. Check Bin X, POST complete, first sheet of sensor assembly) P = Pass Thru Sensor 2-94 Service Manual The voltage measures approximately +5 V dc. Sensor Test: NF = Near Full (Upper part of sensor assembly) F = Full (Lower part of paper feeds into Output Bin X. IBM Infoprint 1130/1140 Remove Paper - FRU Action 1 Dual Output Bin Sensor Flag Check the flag for proper operation. If correct, check to make sure...
... incorrect, replace the sensor assembly. Output Bin X is correctly connected to clear the message. If correct, check the voltage at J3-3. Check Bin X, POST complete, first sheet of sensor assembly) P = Pass Thru Sensor 2-94 Service Manual The voltage measures approximately +5 V dc. Sensor Test: NF = Near Full (Upper part of sensor assembly) F = Full (Lower part of paper feeds into Output Bin X. IBM Infoprint 1130/1140 Remove Paper - FRU Action 1 Dual Output Bin Sensor Flag Check the flag for proper operation. If correct, check to make sure...

User Guide
Page 125
... and belt idler pulley. IBM Infoprint 1130/1140 202 Paper Jam Open Rear Door Message displays and a sheet of paper is jammed prior to the pass through sensors. Service Tip: For this does not fix the problem, replace the lower control board. 2 High-Capacity Output Check to ensure the output stacker Stacker Drive belt(s), Drive drive belt or the failing assembly is Pulleys, Belt Idlers, and Belt correctly installed on the lower control board. Repair as necessary.
... and belt idler pulley. IBM Infoprint 1130/1140 202 Paper Jam Open Rear Door Message displays and a sheet of paper is jammed prior to the pass through sensors. Service Tip: For this does not fix the problem, replace the lower control board. 2 High-Capacity Output Check to ensure the output stacker Stacker Drive belt(s), Drive drive belt or the failing assembly is Pulleys, Belt Idlers, and Belt correctly installed on the lower control board. Repair as necessary.
User Guide
Page 126
... side covers. If incorrect, repair as necessary. 271 Paper Jam - IBM Infoprint 1130/1140 Remove Paper - If correct, check to make sure the lower pass thru sensor is configured correctly before attempting to clear the message. If incorrect, check the voltage at J3-3. The voltage measures approximately +5 V dc. If incorrect, replace the sensor assembly. Output Bin X Full displays. If incorrect, repair as necessary. Check Bin X, POST incomplete. If this does not fix the problem, replace the lower control board. 5-Bin...
... side covers. If incorrect, repair as necessary. 271 Paper Jam - IBM Infoprint 1130/1140 Remove Paper - If correct, check to make sure the lower pass thru sensor is configured correctly before attempting to clear the message. If incorrect, check the voltage at J3-3. The voltage measures approximately +5 V dc. If incorrect, replace the sensor assembly. Output Bin X Full displays. If incorrect, repair as necessary. Check Bin X, POST incomplete. If this does not fix the problem, replace the lower control board. 5-Bin...

User Guide
Page 128
... necessary. If incorrect, repair as necessary. The voltage measures approximately +5 V dc. If incorrect, replace the sensor assembly. If incorrect, check the voltage at J11-2. Check Bin 4 displays Service Tip: When a 274 Paper Jam Check Bin 4 message displays, a problem exists with the top pass thru sensor assembly or the control board. If correct check to make sure the bottom pass thru sensor is correctly connected to J5 on the control board. If incorrect...
... necessary. If incorrect, repair as necessary. The voltage measures approximately +5 V dc. If incorrect, replace the sensor assembly. If incorrect, check the voltage at J11-2. Check Bin 4 displays Service Tip: When a 274 Paper Jam Check Bin 4 message displays, a problem exists with the top pass thru sensor assembly or the control board. If correct check to make sure the bottom pass thru sensor is correctly connected to J5 on the control board. If incorrect...

User Guide
Page 135
..., replace the defective cable. These error codes indicate a problem with the mirror motor circuit in the HSYNC signal to the system board cable or system board assembly. If incorrect, replace the system board. If correct, replace the FRUs in the printer. IBM Infoprint 1130/1140 Printhead Service Check The printhead assembly does not contain any service replaceable parts or components. If service error code 930 displays, the wrong printhead is installed in...
..., replace the defective cable. These error codes indicate a problem with the mirror motor circuit in the HSYNC signal to the system board cable or system board assembly. If incorrect, replace the system board. If correct, replace the FRUs in the printer. IBM Infoprint 1130/1140 Printhead Service Check The printhead assembly does not contain any service replaceable parts or components. If service error code 930 displays, the wrong printhead is installed in...

User Guide
Page 136
...; Test the printer using plain paper (20 lb) An incorrect printer driver for print quality of graphics, check the printhead fan to see if it is damaged or contaminated. • Make sure the fuser assembly is operating correctly. Select the following : • Install another print cartridge if available before proceeding with the service checks. • Use Tray 1 to test for the installed software can return the printer to the original customer printer setup. • Print Resolution: Set...
...; Test the printer using plain paper (20 lb) An incorrect printer driver for print quality of graphics, check the printhead fan to see if it is damaged or contaminated. • Make sure the fuser assembly is operating correctly. Select the following : • Install another print cartridge if available before proceeding with the service checks. • Use Tray 1 to test for the installed software can return the printer to the original customer printer setup. • Print Resolution: Set...

User Guide
Page 170
IBM Infoprint 1130/1140 Tests EP Setup If selected, the following menu selections are available: 1.EP Defaults 2.Fuser Temperature 3.Warm Up Time 4.Transfer 5.Print Contrast 6.Charge Roll 7.Gap Adjustment (envelope solenoid) Error Log If selected, the following menu selections are available: 1.Display Log 2.Clear Log Exit Diagnostics Configuration Menu Maintenance Count Value (Viewable only) Reset Maintenance Count Print Quality Test Pages Download Emuls (only displayed if at least one downloaded emulator is installed) Factory Defaults Exit Configuration Menu Refer to Test Page "Restore EP ...
IBM Infoprint 1130/1140 Tests EP Setup If selected, the following menu selections are available: 1.EP Defaults 2.Fuser Temperature 3.Warm Up Time 4.Transfer 5.Print Contrast 6.Charge Roll 7.Gap Adjustment (envelope solenoid) Error Log If selected, the following menu selections are available: 1.Display Log 2.Clear Log Exit Diagnostics Configuration Menu Maintenance Count Value (Viewable only) Reset Maintenance Count Print Quality Test Pages Download Emuls (only displayed if at least one downloaded emulator is installed) Factory Defaults Exit Configuration Menu Refer to Test Page "Restore EP ...

User Guide
Page 184
... access the envelope or multipurpose feeder. To run the Input Tray Feed Test: 1. Select either Single (feeds one sheet of paper can be used to cover the pass thru sensor. Once this test. All installed sources are working correctly. Press Return/Stop to exit the test. Select the Sensor Test from the selected source until Return/Stop is used to determine if the input tray sensors are listed. 3. LO = Input Tray Paper Low Sensor - P = Input Tray Pass Thru Sensor 2. Input Tray Sensor Test...
... access the envelope or multipurpose feeder. To run the Input Tray Feed Test: 1. Select either Single (feeds one sheet of paper can be used to cover the pass thru sensor. Once this test. All installed sources are working correctly. Press Return/Stop to exit the test. Select the Sensor Test from the selected source until Return/Stop is used to determine if the input tray sensors are listed. 3. LO = Input Tray Paper Low Sensor - P = Input Tray Pass Thru Sensor 2. Input Tray Sensor Test...

User Guide
Page 191
... operator panel displays OP for closed . Eight sheets of the paper sizes supported by hand to verify that each sensor switches from the selected source and then outputted to closed . 2. Note: This test can be checked: Toner Optical Sensor Input Sensor Output Sensor (Fuser Exit) Narrow Media Sensor Front Door Sensor (Upper Front Cover) To run using any of paper feed and then the pages staple. To test the Bin Full Sensor and Near Full Sensor, first actuate the Bin Empty Sensor...
... operator panel displays OP for closed . Eight sheets of the paper sizes supported by hand to verify that each sensor switches from the selected source and then outputted to closed . 2. Note: This test can be checked: Toner Optical Sensor Input Sensor Output Sensor (Fuser Exit) Narrow Media Sensor Front Door Sensor (Upper Front Cover) To run using any of paper feed and then the pages staple. To test the Bin Full Sensor and Near Full Sensor, first actuate the Bin Empty Sensor...

User Guide
Page 192
... the menu. Eight sheets of paper feed into the finisher and then staple. Bin Level Sensor Select the test for the sensors you want to complete). 4. Note: This test cannot be used to exit the test. Cover and Door Sensor - IBM Infoprint 1130/1140 To run the Finisher Sensor Test: 1. To run the StapleSmart Finisher Feed Test: 1. Cover and Door Sensors Cover and Door TC=CL SD=CL TC=Finisher Top Cover Sensor Diagnostic Aids 3-27 Select Return/Stop...
... the menu. Eight sheets of paper feed into the finisher and then staple. Bin Level Sensor Select the test for the sensors you want to complete). 4. Note: This test cannot be used to exit the test. Cover and Door Sensor - IBM Infoprint 1130/1140 To run the Finisher Sensor Test: 1. To run the StapleSmart Finisher Feed Test: 1. Cover and Door Sensors Cover and Door TC=CL SD=CL TC=Finisher Top Cover Sensor Diagnostic Aids 3-27 Select Return/Stop...
User Guide
Page 196
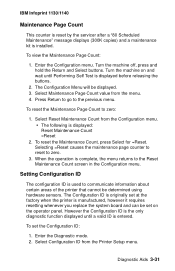
... originally set at the factory when the printer is displayed before releasing the buttons. 2. Enter the Diagnostic mode. 2. Select Configuration ID from the menu. 4. Turn the machine on and wait until a valid ID is entered. Select Maintenance Page Count value from the Printer Setup menu. When the operation is installed. IBM Infoprint 1130/1140 Maintenance Page Count This counter is reset by the servicer after a "80 Scheduled Maintenance" message displays (300K copies) and a maintenance kit is complete, the menu returns to the Reset Maintenance Count...
... originally set at the factory when the printer is displayed before releasing the buttons. 2. Enter the Diagnostic mode. 2. Select Configuration ID from the menu. 4. Turn the machine on and wait until a valid ID is entered. Select Maintenance Page Count value from the Printer Setup menu. When the operation is installed. IBM Infoprint 1130/1140 Maintenance Page Count This counter is reset by the servicer after a "80 Scheduled Maintenance" message displays (300K copies) and a maintenance kit is complete, the menu returns to the Reset Maintenance Count...

User Guide
Page 197
... is open. - If the ID is valid then the ID is attached to their factory default value select Restore from 0 to help correct print quality problems. Fuser Temperature This adjustment can be changed , press Select to activate the new setting. To exit the menu without restoring the settings to skip a digit. This time period 3-32 Service Manual The current ID displays on Line 2 before allowing pages to print by changing this...
... is open. - If the ID is valid then the ID is attached to their factory default value select Restore from 0 to help correct print quality problems. Fuser Temperature This adjustment can be changed , press Select to activate the new setting. To exit the menu without restoring the settings to skip a digit. This time period 3-32 Service Manual The current ID displays on Line 2 before allowing pages to print by changing this...

User Guide
Page 424
... Paper Feed Tests Base Sensor Test 3-26 Input Tray Sensor Test 3-19 Output Bin Feed Test 3-21 Output Bin Sensor Test 3-21 Print Registration 3-28 Print Tests 3-33 Printer Setup 3-30 Maintenance Page Count 3-31 Restore EP Factory Defaults 3-32 Setting Configuration ID 3-31 Setting the Page Count 3-30 Viewing the Permanent Page Count 3-30 Diagnostic Mode 3-6 Disabling Download Emulations 3-8 Disk Test/Clean 3-6 Duplex Option Board Connectors 5-9 Duplex Tests 3-8 E Envelope Option Board Connectors 5-7 Error Codes Service Error Codes 2-2 User Error Messages 2-29 Error Log 3-13 ESD-Sensitive Parts...
... Paper Feed Tests Base Sensor Test 3-26 Input Tray Sensor Test 3-19 Output Bin Feed Test 3-21 Output Bin Sensor Test 3-21 Print Registration 3-28 Print Tests 3-33 Printer Setup 3-30 Maintenance Page Count 3-31 Restore EP Factory Defaults 3-32 Setting Configuration ID 3-31 Setting the Page Count 3-30 Viewing the Permanent Page Count 3-30 Diagnostic Mode 3-6 Disabling Download Emulations 3-8 Disk Test/Clean 3-6 Duplex Option Board Connectors 5-9 Duplex Tests 3-8 E Envelope Option Board Connectors 5-7 Error Codes Service Error Codes 2-2 User Error Messages 2-29 Error Log 3-13 ESD-Sensitive Parts...


