Hardware Maintenance Manual
Page 3
... 30 Power management 32 Checkout guide 36 Testing the computer 36 Detecting system information with PC-Doctor. . . 38 Power system checkout 39 ThinkPad A30, A30p, A31, A31p 43 Product overview 45 Specifications 45 Status indicators 48 FRU Tests 50 Fn key combinations 51 Symptom-to-FRU index 53 Numeric error... Intermittent problems 59 Undetermined problems 59 FRU replacement notices 60 Screw notices 60 Retaining serial numbers 61 Removing and replacing a FRU 63 1010 Battery pack 64 1020 Mini PCI adapter 65 1030 Communication daughter card (CDC) . . . 68 © Copyright...
... 30 Power management 32 Checkout guide 36 Testing the computer 36 Detecting system information with PC-Doctor. . . 38 Power system checkout 39 ThinkPad A30, A30p, A31, A31p 43 Product overview 45 Specifications 45 Status indicators 48 FRU Tests 50 Fn key combinations 51 Symptom-to-FRU index 53 Numeric error... Intermittent problems 59 Undetermined problems 59 FRU replacement notices 60 Screw notices 60 Retaining serial numbers 61 Removing and replacing a FRU 63 1010 Battery pack 64 1020 Mini PCI adapter 65 1030 Communication daughter card (CDC) . . . 68 © Copyright...
Hardware Maintenance Manual
Page 4
1040 Backup battery 75 1050 DIMM 76 1060 Hard-disk drive 77 1070 Ultrabay Plus device 79 1080... PCI cover 137 3020 ThinkPad Dock top cover 139 Locations 144 Front view 144 Rear view 146 Bottom view 147 Parts list 148 A30 and A30p series model matrix . . . . . 148 A31 and A31p series model matrix . . . . . 149 Overall 155 LCD ...FRUs 169 Keyboard 172 Recovery CDs 173 Optional FRUs 179 Miscellaneous parts 180 AC adapters 183 Common parts list 184 Notices 186 Trademarks 186 iv MT 2652/2653/2654
1040 Backup battery 75 1050 DIMM 76 1060 Hard-disk drive 77 1070 Ultrabay Plus device 79 1080... PCI cover 137 3020 ThinkPad Dock top cover 139 Locations 144 Front view 144 Rear view 146 Bottom view 147 Parts list 148 A30 and A30p series model matrix . . . . . 148 A31 and A31p series model matrix . . . . . 149 Overall 155 LCD ...FRUs 169 Keyboard 172 Recovery CDs 173 Optional FRUs 179 Miscellaneous parts 180 AC adapters 183 Common parts list 184 Notices 186 Trademarks 186 iv MT 2652/2653/2654
Hardware Maintenance Manual
Page 24
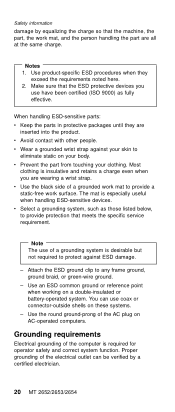
... and the person handling the part are all at the same charge. v Use the black side of the AC plug on a double-insulated or battery-operated system. v Select a grounding system, such as fully effective. Attach the ESD ground clip to provide protection that the ESD protective devices you ... body. Use an ESD common ground or reference point when working on AC-operated computers. Safety information damage by a certified electrician. 20 MT 2652/2653/2654 Note The use coax or connector-outside shells on your clothing. Use the round ground-prong of a grounded work mat to eliminate...
... and the person handling the part are all at the same charge. v Use the black side of the AC plug on a double-insulated or battery-operated system. v Select a grounding system, such as fully effective. Attach the ESD ground clip to provide protection that the ESD protective devices you ... body. Use an ESD common ground or reference point when working on AC-operated computers. Safety information damage by a certified electrician. 20 MT 2652/2653/2654 Note The use coax or connector-outside shells on your clothing. Use the round ground-prong of a grounded work mat to eliminate...

Hardware Maintenance Manual
Page 35
... by the servicer: 1. For how to reset the password. Reinstall the backup battery and the battery pack. (B) If an SVP has been set and is no SVP has been set . If it has, it blank and press Enter twice. 7. The IBM BIOS Setup Utility menu appears. 3. General descriptions 31 Remove the... battery pack. The POP has been removed. 5. Enter the SVP. Related service information Attention: If the user HDP has been ...
... by the servicer: 1. For how to reset the password. Reinstall the backup battery and the battery pack. (B) If an SVP has been set and is no SVP has been set . If it has, it blank and press Enter twice. 7. The IBM BIOS Setup Utility menu appears. 3. General descriptions 31 Remove the... battery pack. The POP has been removed. 5. Enter the SVP. Related service information Attention: If the user HDP has been ...
Hardware Maintenance Manual
Page 37
...has been selected in the "Power Management Properties" window, the computer goes into standby mode automatically: v If a "suspend time" has been set the low-battery alarm, the computer may not do what occurs in screen blank mode: v The LCD is powered off. Standby mode When the computer enters standby mode..., the following : v Press the Fn key. so if you are using the ACPI operating system, only the low-battery alarm is low, and then the computer enters the power-saving mode automatically. If you have set on the "Turn off monitor" timer in addition...
...has been selected in the "Power Management Properties" window, the computer goes into standby mode automatically: v If a "suspend time" has been set the low-battery alarm, the computer may not do what occurs in screen blank mode: v The LCD is powered off. Standby mode When the computer enters standby mode..., the following : v Press the Fn key. so if you are using the ACPI operating system, only the low-battery alarm is low, and then the computer enters the power-saving mode automatically. If you have set on the "Turn off monitor" timer in addition...
Hardware Maintenance Manual
Page 39
... within that time. The hibernation file in either of the following conditions: v If a "hibernation time" has been set the mode to Hibernate when battery becomes low, and the battery charge becomes critically low. General descriptions 35 When the power is turned on the hard-disk drive is read, and system status is...
... within that time. The hibernation file in either of the following conditions: v If a "hibernation time" has been set the mode to Hibernate when battery becomes low, and the battery charge becomes critically low. General descriptions 35 When the power is turned on the hard-disk drive is read, and system status is...
Hardware Maintenance Manual
Page 42
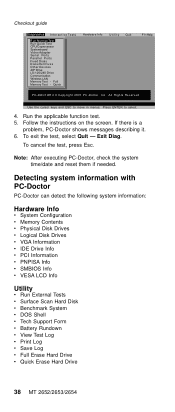
... Info Utility v Run External Tests v Surface Scan Hard Disk v Benchmark System v DOS Shell v Tech Support Form v Battery Rundown v View Test Log v Print Log v Save Log v Full Erase Hard Drive v Quick Erase Hard Drive 38 MT 2652/2653/2654 Run the applicable function test. 5. Exit Diag. If there is a problem, PC-Doctor shows...
... Info Utility v Run External Tests v Surface Scan Hard Disk v Benchmark System v DOS Shell v Tech Support Form v Battery Rundown v View Test Log v Print Log v Save Log v Full Erase Hard Drive v Quick Erase Hard Drive 38 MT 2652/2653/2654 Run the applicable function test. 5. Exit Diag. If there is a problem, PC-Doctor shows...
Hardware Maintenance Manual
Page 43
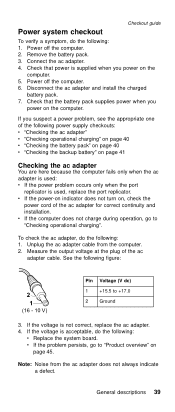
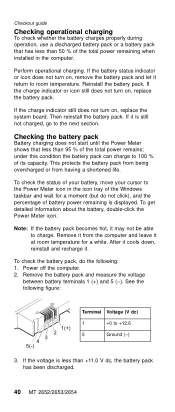
...If the voltage is supplied when you power on the computer. 5. Power system checkout Checkout guide To verify a symptom, do the following: 1. Check that the battery pack supplies power when you suspect a power problem, see the appropriate one of the following figure: 2 1 (16 - 10 V) Pin Voltage (V dc)...the port replicator is not correct, replace the ac adapter. 4. General descriptions 39 Disconnect the ac adapter and install the charged battery pack. 7. Remove the battery pack. 3. v If the problem persists, go to "Product overview" on , check the power cord of the ac adapter ...
...If the voltage is supplied when you power on the computer. 5. Power system checkout Checkout guide To verify a symptom, do the following: 1. Check that the battery pack supplies power when you suspect a power problem, see the appropriate one of the following figure: 2 1 (16 - 10 V) Pin Voltage (V dc)...the port replicator is not correct, replace the ac adapter. 4. General descriptions 39 Disconnect the ac adapter and install the charged battery pack. 7. Remove the battery pack. 3. v If the problem persists, go to "Product overview" on , check the power cord of the ac adapter ...
Hardware Maintenance Manual
Page 44
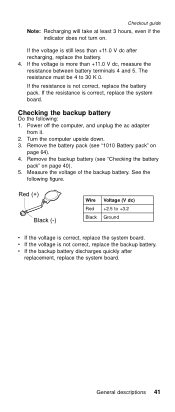
...charged, go to room temperature. See the following : 1. Remove it may not be able to 100 % of its capacity. Checking the battery pack Battery charging does not start until the Power Meter shows that has less than 50 % of the total power remaining when installed in the icon ...turn on , replace the battery pack. To check the status of your battery, move your cursor to +12.6 5 Ground (−) 3. To get detailed information about the battery, double-click the Power Meter icon. If the voltage is less than +11.0 V dc, the battery pack has been discharged. 40 MT 2652/2653/2654
...charged, go to room temperature. See the following : 1. Remove it may not be able to 100 % of its capacity. Checking the battery pack Battery charging does not start until the Power Meter shows that has less than 50 % of the total power remaining when installed in the icon ...turn on , replace the battery pack. To check the status of your battery, move your cursor to +12.6 5 Ground (−) 3. To get detailed information about the battery, double-click the Power Meter icon. If the voltage is less than +11.0 V dc, the battery pack has been discharged. 40 MT 2652/2653/2654
Hardware Maintenance Manual
Page 45
....0 V dc after replacement, replace the system board. See the following : 1. Measure the voltage of the backup battery. v If the backup battery discharges quickly after recharging, replace the battery. 4. Checkout guide Note: Recharging will take at least 3 hours, even if the indicator does not turn on...the resistance is still less than +11.0 V dc, measure the resistance between battery terminals 4 and 5. Power off the computer, and unplug the ac adapter from it. 2. Remove the backup battery (see "1010 Battery pack" on . If the voltage is correct, replace the system board. General...
....0 V dc after replacement, replace the system board. See the following : 1. Measure the voltage of the backup battery. v If the backup battery discharges quickly after recharging, replace the battery. 4. Checkout guide Note: Recharging will take at least 3 hours, even if the indicator does not turn on...the resistance is still less than +11.0 V dc, measure the resistance between battery terminals 4 and 5. Power off the computer, and unplug the ac adapter from it. 2. Remove the backup battery (see "1010 Battery pack" on . If the voltage is correct, replace the system board. General...
Hardware Maintenance Manual
Page 47
ThinkPad A30, A30p, A31, A31p Product overview 45 Specifications 45 Status indicators 48 FRU Tests 50 Fn key combinations 51 Symptom-to-FRU index 53 ... 60 Retaining serial numbers 61 Restoring the serial number of the system unit 61 Retaining the UUID 61 Removing and replacing a FRU 63 1010 Battery pack 64 1020 Mini PCI adapter 65 1030 Communication daughter card (CDC) . . . 68 Ethernet daughter card 69 Modem daughter card 71 ...bezel 125 Installation of clear plate 126 2020 Inverter card 127 2030 LCD panel 129 2040 Antenna assembly 133 © Copyright IBM Corp. 2003 43
ThinkPad A30, A30p, A31, A31p Product overview 45 Specifications 45 Status indicators 48 FRU Tests 50 Fn key combinations 51 Symptom-to-FRU index 53 ... 60 Retaining serial numbers 61 Restoring the serial number of the system unit 61 Retaining the UUID 61 Removing and replacing a FRU 63 1010 Battery pack 64 1020 Mini PCI adapter 65 1030 Communication daughter card (CDC) . . . 68 Ethernet daughter card 69 Modem daughter card 71 ...bezel 125 Installation of clear plate 126 2020 Inverter card 127 2030 LCD panel 129 2040 Antenna assembly 133 © Copyright IBM Corp. 2003 43
Hardware Maintenance Manual
Page 52
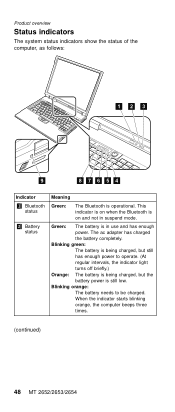
... when the Bluetooth is in suspend mode. Blinking green: The battery is being charged, but the battery power is operational. The ac adapter has charged the battery completely. When the indicator starts blinking orange, the computer beeps three times. (continued) 48 MT 2652/2653/2654 Product overview Status indicators The system status indicators show...
... when the Bluetooth is in suspend mode. Blinking green: The battery is being charged, but the battery power is operational. The ac adapter has charged the battery completely. When the indicator starts blinking orange, the computer beeps three times. (continued) 48 MT 2652/2653/2654 Product overview Status indicators The system status indicators show...
Hardware Maintenance Manual
Page 54
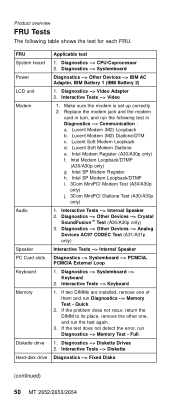
...turn, and run the test again. 3. Diagnostics --> Other Devices --> Analog Devices AC97 CODEC Test (A31/A31p only) Interactive Tests --> Internal Speaker Diagnostics --> Systemboard --> PCMCIA, PCMCIA External Loop 1. Quick. ...; Test (A30/A30p only) 3. Interactive Tests --> Diskette Diagnostics --> Fixed Disks (continued) 50 MT 2652/2653/2654 Lucent Modem (M2) Dialtone/DTM c. Intel SP Modem Loopback/DTMF i. 3Com MiniPCI Modem Test... d. Diagnostics --> Systemboard Diagnostics --> Other Devices --> IBM AC Adapter, IBM Battery 1 (IBM Battery 2) 1. Intel Modem Register (A30/A30p only) f.
...turn, and run the test again. 3. Diagnostics --> Other Devices --> Analog Devices AC97 CODEC Test (A31/A31p only) Interactive Tests --> Internal Speaker Diagnostics --> Systemboard --> PCMCIA, PCMCIA External Loop 1. Quick. ...; Test (A30/A30p only) 3. Interactive Tests --> Diskette Diagnostics --> Fixed Disks (continued) 50 MT 2652/2653/2654 Lucent Modem (M2) Dialtone/DTM c. Intel SP Modem Loopback/DTMF i. 3Com MiniPCI Modem Test... d. Diagnostics --> Systemboard Diagnostics --> Other Devices --> IBM AC Adapter, IBM Battery 1 (IBM Battery 2) 1. Intel Modem Register (A30/A30p only) f.
Hardware Maintenance Manual
Page 58
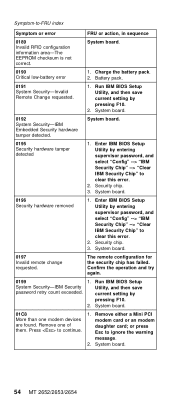
... save current setting by entering supervisor password, and select "Config" --> "IBM Security Chip" --> "Clear IBM Security Chip" to clear this error. 2. System board. 01C8 More than one of them. System board. 54 MT 2652/2653/2654 System board. 0190 Critical low-battery error 1. Charge the battery pack. 2. System board. 0195 Security hardware tamper detected 1. Confirm...
... save current setting by entering supervisor password, and select "Config" --> "IBM Security Chip" --> "Clear IBM Security Chip" to clear this error. 2. System board. 01C8 More than one of them. System board. 54 MT 2652/2653/2654 System board. 0190 Critical low-battery error 1. Charge the battery pack. 2. System board. 0195 Security hardware tamper detected 1. Confirm...
Hardware Maintenance Manual
Page 59
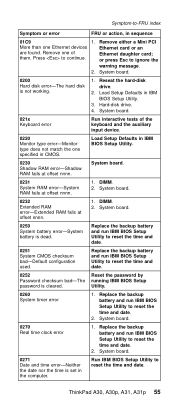
... Setup Utility to reset the time and date. 0252 Reset the password by Password checksum bad-The running IBM BIOS Setup password is dead. ThinkPad A30, A30p, A31, A31p 55 Replace the backup battery and run IBM BIOS Setup Utility to reset the time and date. 2. Symptom-to ignore the warning message. 2. Remove either a Mini...
... Setup Utility to reset the time and date. 0252 Reset the password by Password checksum bad-The running IBM BIOS Setup password is dead. ThinkPad A30, A30p, A31, A31p 55 Replace the backup battery and run IBM BIOS Setup Utility to reset the time and date. 2. Symptom-to ignore the warning message. 2. Remove either a Mini...
Hardware Maintenance Manual
Page 60
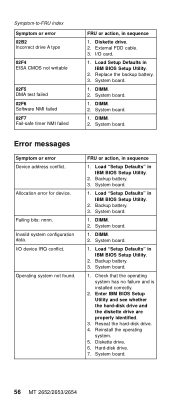
...Backup battery. 3. System board. 1. System board. 1. Invalid system configuration data. Check that the operating system has no failure and is installed correctly. 2. I /O device IRQ conflict. Load "Setup Defaults" in IBM BIOS... Setup Utility. 2. Load "Setup Defaults" in sequence 1. System board. 1. Enter IBM BIOS Setup Utility and see whether the... Fail-safe timer NMI failed FRU or action, in IBM BIOS Setup Utility. 2. Load "Setup Defaults" in sequence 1. Backup battery. 3. Diskette drive. 6. DIMM. 2. System board...
...Backup battery. 3. System board. 1. System board. 1. Invalid system configuration data. Check that the operating system has no failure and is installed correctly. 2. I /O device IRQ conflict. Load "Setup Defaults" in IBM BIOS... Setup Utility. 2. Load "Setup Defaults" in sequence 1. System board. 1. Enter IBM BIOS Setup Utility and see whether the... Fail-safe timer NMI failed FRU or action, in IBM BIOS Setup Utility. 2. Load "Setup Defaults" in sequence 1. Backup battery. 3. Diskette drive. 6. DIMM. 2. System board...
Hardware Maintenance Manual
Page 63
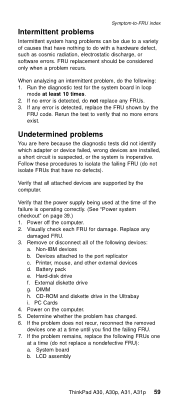
...by the computer. External diskette drive g. DIMM h. PC Cards 4. LCD assembly ThinkPad A30, A30p, A31, A31p 59 Follow these procedures to isolate the failing FRU (do not replace a nondefective FRU): a. Non-IBM devices b. Power on page 39.) 1. If no more errors exist. Visually ...supply being used at least 10 times. 2. Verify that have no defects). If any error is detected, do the following: 1. Battery pack e. If the problem remains, replace the following devices: a. Intermittent problems Symptom-to-FRU index Intermittent system hang problems can be...
...by the computer. External diskette drive g. DIMM h. PC Cards 4. LCD assembly ThinkPad A30, A30p, A31, A31p 59 Follow these procedures to isolate the failing FRU (do not replace a nondefective FRU): a. Non-IBM devices b. Power on page 39.) 1. If no more errors exist. Visually ...supply being used at least 10 times. 2. Verify that have no defects). If any error is detected, do the following: 1. Battery pack e. If the problem remains, replace the following devices: a. Intermittent problems Symptom-to-FRU index Intermittent system hang problems can be...
Hardware Maintenance Manual
Page 67
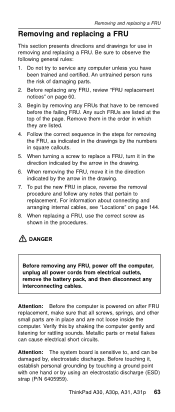
...arrow in which they are not loose inside the computer. Metallic parts or metal flakes can be removed before the failing FRU. ThinkPad A30, A30p, A31, A31p 63 Begin by the numbers in place and are listed. 4. Remove them in the order in the drawing. 7. ...: 1. When replacing a FRU, use in the drawing. 6. DANGER Before removing any notes that all power cords from electrical outlets, remove the battery pack, and then disconnect any interconnecting cables. For information about connecting and arranging internal cables, see "Locations" on page 144. 8. When turning ...
...arrow in which they are not loose inside the computer. Metallic parts or metal flakes can be removed before the failing FRU. ThinkPad A30, A30p, A31, A31p 63 Begin by the numbers in place and are listed. 4. Remove them in the order in the drawing. 7. ...: 1. When replacing a FRU, use in the drawing. 6. DANGER Before removing any notes that all power cords from electrical outlets, remove the battery pack, and then disconnect any interconnecting cables. For information about connecting and arranging internal cables, see "Locations" on page 144. 8. When turning ...

Hardware Maintenance Manual
Page 68
Use of an incorrect battery can result in the parts listing for your computer. Removing and replacing a FRU 1010 Battery pack DANGER The use only the battery in ignition or explosion of the battery. 1 2 64 MT 2652/2653/2654
Use of an incorrect battery can result in the parts listing for your computer. Removing and replacing a FRU 1010 Battery pack DANGER The use only the battery in ignition or explosion of the battery. 1 2 64 MT 2652/2653/2654
Hardware Maintenance Manual
Page 69
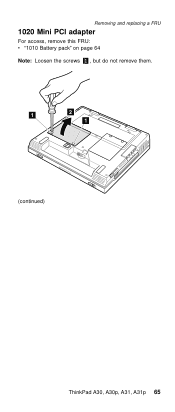
Removing and replacing a FRU 1020 Mini PCI adapter For access, remove this FRU: v "1010 Battery pack" on page 64 Note: Loosen the screws 1 , but do not remove them. 1 2 1 (continued) ThinkPad A30, A30p, A31, A31p 65
Removing and replacing a FRU 1020 Mini PCI adapter For access, remove this FRU: v "1010 Battery pack" on page 64 Note: Loosen the screws 1 , but do not remove them. 1 2 1 (continued) ThinkPad A30, A30p, A31, A31p 65
