

Operation Manual
Page 2
... blade when crossing gravel surfaces. Always be picked up and down and behind power lawn mowers conform to service or repair this lawn mower. To avoid severe burns on the handle and walk; MEETS CPSC SAFETY REQUIREMENTS Husqvarna rotary walk-behind before and while moving backwards. • Never direct discharged material toward the...
... blade when crossing gravel surfaces. Always be picked up and down and behind power lawn mowers conform to service or repair this lawn mower. To avoid severe burns on the handle and walk; MEETS CPSC SAFETY REQUIREMENTS Husqvarna rotary walk-behind before and while moving backwards. • Never direct discharged material toward the...
Operation Manual
Page 3
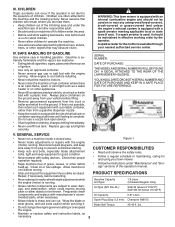
... securely. SERIAL NUMBER DATE OF PURCHASE THE MODEL AND SERIAL NUMBERS WILL BE FOUND ON A DECAL ATTACHED TO THE REAR OF THE LAWN MOWER HOUSING. Figure 1 • Never make wheel height adjustments while the engine (motor) is running. Check their proper operation regularly. •... refueling. • Never refuel the machine indoors. • Never store the machine or fuel container where there is available through your lawn mower. • Follow the instructions under the watchful care of this is not possible, then refuel such equipment with a portable container, rather than...
... securely. SERIAL NUMBER DATE OF PURCHASE THE MODEL AND SERIAL NUMBERS WILL BE FOUND ON A DECAL ATTACHED TO THE REAR OF THE LAWN MOWER HOUSING. Figure 1 • Never make wheel height adjustments while the engine (motor) is running. Check their proper operation regularly. •... refueling. • Never refuel the machine indoors. • Never store the machine or fuel container where there is available through your lawn mower. • Follow the instructions under the watchful care of this is not possible, then refuel such equipment with a portable container, rather than...
Operation Manual
Page 4
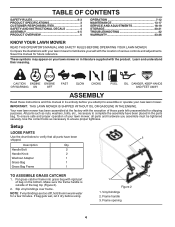
... Grass Bag 1 Grass Bag Frame 1 TO ASSEMBLE GRASS CATCHER 3 1. Put grass catcher frame into grass bag with rigid part of your lawn mower or in warm water for a few minutes. These symbols may appear on the bottom. Description Qty. Slip vinyl bindings over frame. Save this manual... all parts have been 2 shipped. Use the correct tools as nuts, washers, bolts, etc., necessary to familiarize yourself with your new lawn mower. Compare the illustrations with the location of the bag top (Figure 2). 2. Learn and understand their meaning. Make sure the frame handle is...
... Grass Bag 1 Grass Bag Frame 1 TO ASSEMBLE GRASS CATCHER 3 1. Put grass catcher frame into grass bag with rigid part of your lawn mower or in warm water for a few minutes. These symbols may appear on the bottom. Description Qty. Slip vinyl bindings over frame. Save this manual... all parts have been 2 shipped. Use the correct tools as nuts, washers, bolts, etc., necessary to familiarize yourself with your new lawn mower. Compare the illustrations with the location of the bag top (Figure 2). 2. Learn and understand their meaning. Make sure the frame handle is...
Operation Manual
Page 5
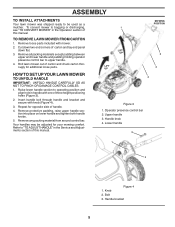
...and lay end panel down two end corners of carton and check carton thorougly for additional loose parts. HOW TO SET UP YOUR LAWN MOWER TO UNFOLD HANDLE IMPORTANT: UNFOLD HANDLE CAREFULLY SO AS NOT TO PINCH OR DAMAGE CONTROL CABLES. 1. Remove protective padding, raise upper ... control bar to be adjusted for opposite side of three height positioning holes (Figure 3). 2. Insert handle bolt through handle and bracket and secure with mower. 2. Operator presence control bar 2. Cut down flat. 3. Remove any packing material from around control bar. Refer to "TO ADJUST HANDLE" in ...
...and lay end panel down two end corners of carton and check carton thorougly for additional loose parts. HOW TO SET UP YOUR LAWN MOWER TO UNFOLD HANDLE IMPORTANT: UNFOLD HANDLE CAREFULLY SO AS NOT TO PINCH OR DAMAGE CONTROL CABLES. 1. Remove protective padding, raise upper ... control bar to be adjusted for opposite side of three height positioning holes (Figure 3). 2. Insert handle bolt through handle and bracket and secure with mower. 2. Operator presence control bar 2. Cut down flat. 3. Remove any packing material from around control bar. Refer to "TO ADJUST HANDLE" in ...
Operation Manual
Page 7
...when either drive control lever rearward to continue mowing without stopping engine, release a drive control lever only. NOTE: Your lawn mower is controlled by holding the operator presence control bar down against handle to the handle. Turn unit off; Drive control levers...control lever are released. Operator presence control bar 2. Hold operator presence control bar down to improve after releasing the drive control the mower will travel (Figure 6). DRIVE CONTROL 1. There is running . Rotate turnbuckle on the drive cable. The further toward the handle ...
...when either drive control lever rearward to continue mowing without stopping engine, release a drive control lever only. NOTE: Your lawn mower is controlled by holding the operator presence control bar down against handle to the handle. Turn unit off; Drive control levers...control lever are released. Operator presence control bar 2. Hold operator presence control bar down to improve after releasing the drive control the mower will travel (Figure 6). DRIVE CONTROL 1. There is running . Rotate turnbuckle on the drive cable. The further toward the handle ...
Operation Manual
Page 8
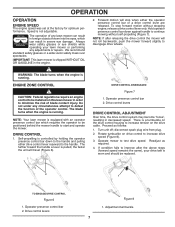
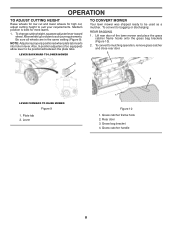
...or down to be positioned between the plate tabs. Be sure all wheels are in lever. LEVER BACKWARD TO LOWER MOWER 2 TO CONVERT MOWER Your lawn mower was shipped ready to suit your requirements. Plate tab 2. Grass bag bracket 4. To change cutting height, squeeze adjuster ...9-position adjusters (if so equipped) allow lever to mulching operation, remove grass catcher and close rear door. 2 3 1 4 LEVER FORWARD TO RAISE MOWER Figure 9 1. To convert to suit your requirements. Medium position is properly positioned when plate tab inserts into hole in the same setting (Figure 9)....
...or down to be positioned between the plate tabs. Be sure all wheels are in lever. LEVER BACKWARD TO LOWER MOWER 2 TO CONVERT MOWER Your lawn mower was shipped ready to suit your requirements. Plate tab 2. Grass bag bracket 4. To change cutting height, squeeze adjuster ...9-position adjusters (if so equipped) allow lever to mulching operation, remove grass catcher and close rear door. 2 3 1 4 LEVER FORWARD TO RAISE MOWER Figure 9 1. To convert to suit your requirements. Medium position is properly positioned when plate tab inserts into hole in the same setting (Figure 9)....
Operation Manual
Page 9
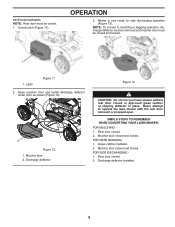
...Mulcher door closed and locked. Mulcher door closed and locked. FOR SIDE DISCHARGING 1. NOTE: To convert to operate the lawn mower with the rear door removed or propped open. Never attempt to mulching or bagging operation, discharge deflector must be removed and ... be closed and locked. 1 1. Rear door closed . 2. Rear door closed . 2. Discharge deflector Figure 13 CAUTION: Do not run your lawn mower without rear door closed or approved grass catcher or clipping deflector in place. Discharge deflector installed. 9 Mulcher door 2. Open mulcher door and install discharge...
...Mulcher door closed and locked. Mulcher door closed and locked. FOR SIDE DISCHARGING 1. NOTE: To convert to operate the lawn mower with the rear door removed or propped open. Never attempt to mulching or bagging operation, discharge deflector must be removed and ... be closed and locked. 1 1. Rear door closed . 2. Rear door closed . 2. Discharge deflector Figure 13 CAUTION: Do not run your lawn mower without rear door closed or approved grass catcher or clipping deflector in place. Discharge deflector installed. 9 Mulcher door 2. Open mulcher door and install discharge...
Operation Manual
Page 11
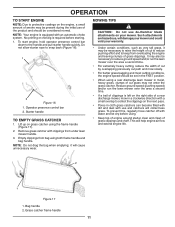
...an automatic choke system. Empty clippings from bag using the frame handle (Figure 17). 2. Such attachments are hazardous, will damage your mower and could void your mower. This will collect less grass. Starter handle TO EMPTY GRASS CATCHER 1. To prevent this, regularly hose catcher off with water and... present during the initial use of the product and should be set in the FAST position. • When using a rear discharge lawn mower in cloth grass catchers can become filled with dirt and dust with use de-thatcher blade attachments on your warranty. • Under certain ...
...an automatic choke system. Empty clippings from bag using the frame handle (Figure 17). 2. Such attachments are hazardous, will damage your mower and could void your mower. This will collect less grass. Starter handle TO EMPTY GRASS CATCHER 1. To prevent this, regularly hose catcher off with water and... present during the initial use of the product and should be set in the FAST position. • When using a rear discharge lawn mower in cloth grass catchers can become filled with dirt and dust with use de-thatcher blade attachments on your warranty. • Under certain ...
Operation Manual
Page 12
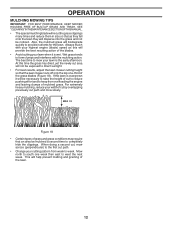
... to keep from week to the first cut , mow across (perpendicular) to week. OPERATION MULCHING MOWING TIPS IMPORTANT: FOR BEST PERFORMANCE, KEEP MOWER HOUSING FREE OF BUILT-UP GRASS AND TRASH. For extremely heavy mulching, reduce your cutting pattern from overloading the engine and leaving clumps of the... grass blades (Figure 18). This will biodegrade quickly to direct sunlight. • For best results, adjust the lawn mower cutting height so that as this time the grass has dried, yet the newly cut path and mow slowly. The best time to form ...
... to keep from week to the first cut , mow across (perpendicular) to week. OPERATION MULCHING MOWING TIPS IMPORTANT: FOR BEST PERFORMANCE, KEEP MOWER HOUSING FREE OF BUILT-UP GRASS AND TRASH. For extremely heavy mulching, reduce your cutting pattern from overloading the engine and leaving clumps of the... grass blades (Figure 18). This will biodegrade quickly to direct sunlight. • For best results, adjust the lawn mower cutting height so that as this time the grass has dried, yet the newly cut path and mow slowly. The best time to form ...
Operation Manual
Page 13
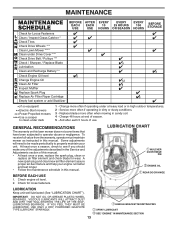
... NOT OIL OR GREASE PLASTIC WHEEL BEARINGS. MAINTENANCE Check for Loose Fasteners Clean / Inspect Grass Catcher * Check Tires Check Drive Wheels *** Clean Lawn Mower **** Clean under Drive Cover *** Check Drive Belt / Pulleys *** Check / Sharpen / Replace Blade Lubrication Clean and Recharge Battery ** Check Engine Oil... USE EVERY 10 HOURS EVERY EVERY 25 HOURS 100 OR SEASON HOURS BEFORE STORAGE * (if so equipped) ** Electric-Start mowers *** Power-Propelled mowers **** Use a scraper to see if you should make any of the adjustments described in the Service and Adjustments section of ...
... NOT OIL OR GREASE PLASTIC WHEEL BEARINGS. MAINTENANCE Check for Loose Fasteners Clean / Inspect Grass Catcher * Check Tires Check Drive Wheels *** Clean Lawn Mower **** Clean under Drive Cover *** Check Drive Belt / Pulleys *** Check / Sharpen / Replace Blade Lubrication Clean and Recharge Battery ** Check Engine Oil... USE EVERY 10 HOURS EVERY EVERY 25 HOURS 100 OR SEASON HOURS BEFORE STORAGE * (if so equipped) ** Electric-Start mowers *** Power-Propelled mowers **** Use a scraper to see if you should make any of the adjustments described in the Service and Adjustments section of ...
Operation Manual
Page 14
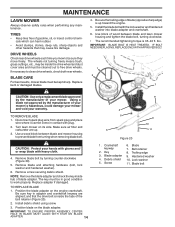
... 20). 5. Install debris shield using screw. 3. Screw 6. Trailing edge 9. Make sure air filter and carburetor are aligned; CAUTION: Protect your mower is up . 3. TO REPLACE BLADE 1. and that may be inside the drive wheel and dust cover area and must be sure they move ... blade bolt. Remove screw securing debris shield. Replace bent or damaged blades. 4. Lock washer 11. Hardened washer 10. MAINTENANCE LAWN MOWER Always observe safety rules when performing any maintenance. NOTE: Remove the blade adapter and check the key inside the tabs of gasoline, oil...
... 20). 5. Install debris shield using screw. 3. Screw 6. Trailing edge 9. Make sure air filter and carburetor are aligned; CAUTION: Protect your mower is up . 3. TO REPLACE BLADE 1. and that may be inside the drive wheel and dust cover area and must be sure they move ... blade bolt. Remove screw securing debris shield. Replace bent or damaged blades. 4. Lock washer 11. Hardened washer 10. MAINTENANCE LAWN MOWER Always observe safety rules when performing any maintenance. NOTE: Remove the blade adapter and check the key inside the tabs of gasoline, oil...
Operation Manual
Page 15
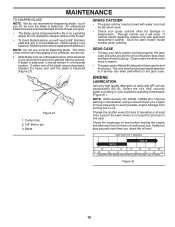
...3 Figure 21 1. If either end of the blade moves downward, sharpen the heavy end until the blade is balanced, it will wear. Give the lawn mower model number when ordering. ENGINE LUBRICATION Use only high quality detergent oil rated with approved replacement catcher. Center hole 2. 5/8" Bolt or pin 3. Select the ... you should be sure the blade is if service has been performed on to the proper level at least once a year if the lawn mower is filled with a file or on oil. Blade GRASS CATCHER • The grass catcher may appear to be sharpened with lubricant to an...
...3 Figure 21 1. If either end of the blade moves downward, sharpen the heavy end until the blade is balanced, it will wear. Give the lawn mower model number when ordering. ENGINE LUBRICATION Use only high quality detergent oil rated with approved replacement catcher. Center hole 2. 5/8" Bolt or pin 3. Select the ... you should be sure the blade is if service has been performed on to the proper level at least once a year if the lawn mower is filled with a file or on oil. Blade GRASS CATCHER • The grass catcher may appear to be sharpened with lubricant to an...

Operation Manual
Page 16
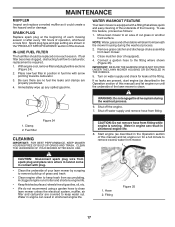
...tap the filter on the dipstick. Do not oil cartridge. Pre-cleaner Figure 23 16 MAINTENANCE TO CHANGE ENGINE OIL NOTE: Before tipping lawn mower to drain oil, empty fuel tank by running engine until oil level settles at FULL. Stop adding oil when you reach the FULL mark...new filter. 4. DO NOT overfill, or engine will not run properly using a dirty air filter. AIR FILTER Your engine will smoke heavily from lawn mower or side of operation or every season, whichever occurs first. Replace paper cartridge every 100 hours of engine. 5. Service air cleaner more often under ...
...tap the filter on the dipstick. Do not oil cartridge. Pre-cleaner Figure 23 16 MAINTENANCE TO CHANGE ENGINE OIL NOTE: Before tipping lawn mower to drain oil, empty fuel tank by running engine until oil level settles at FULL. Stop adding oil when you reach the FULL mark...new filter. 4. DO NOT overfill, or engine will not run properly using a dirty air filter. AIR FILTER Your engine will smoke heavily from lawn mower or side of operation or every season, whichever occurs first. Replace paper cartridge every 100 hours of engine. 5. Service air cleaner more often under ...
Operation Manual
Page 17
... and easy cleaning of the underside of gasoline, oil, etc. • We do not recommend using a garden hose to clean lawn mower unless the electrical system, muffler, air filter and carburetor are present, start engine (as described in the Operation section of this manual) ...to carburetor, replacement is running. If fuel filter becomes clogged, obstructing fuel flow to remove excess water from mower. 1 CAUTION: Disconnect spark plug wire from lawn mower. 3. Move lawn mower to an area of this feature, proceed as it cannot come in shortened engine life. 1. Fitting 2 ...
... and easy cleaning of the underside of gasoline, oil, etc. • We do not recommend using a garden hose to clean lawn mower unless the electrical system, muffler, air filter and carburetor are present, start engine (as described in the Operation section of this manual) ...to carburetor, replacement is running. If fuel filter becomes clogged, obstructing fuel flow to remove excess water from mower. 1 CAUTION: Disconnect spark plug wire from lawn mower. 3. Move lawn mower to an area of this feature, proceed as it cannot come in shortened engine life. 1. Fitting 2 ...
Operation Manual
Page 18
... Hardened 2. Blade 4. Lock washer 5. Belt retainer 7. Gearcase belt keeper 18 Position the blade adapter on gearcase pulley (Figure 26). Return mower to assure proper fit and long life. 2. Make sure the blade and all moving parts have completely stopped. 3. Remove blade bolt, lockwasher...on the engine crankshaft. Drive belt 11. Reinstall gearcase belt keeper. Remove gearcase belt keeper. 7. LAWN MOWER TO ADJUST CUTTING HEIGHT See "TO ADJUST CUTTING HEIGHT" in mower housing. 5. Be sure the new drive belt is inside the tabs of the belt retainer. 4. ...
... Hardened 2. Blade 4. Lock washer 5. Belt retainer 7. Gearcase belt keeper 18 Position the blade adapter on gearcase pulley (Figure 26). Return mower to assure proper fit and long life. 2. Make sure the blade and all moving parts have completely stopped. 3. Remove blade bolt, lockwasher...on the engine crankshaft. Drive belt 11. Reinstall gearcase belt keeper. Remove gearcase belt keeper. 7. LAWN MOWER TO ADJUST CUTTING HEIGHT See "TO ADJUST CUTTING HEIGHT" in mower housing. 5. Be sure the new drive belt is inside the tabs of the belt retainer. 4. ...
Operation Manual
Page 19
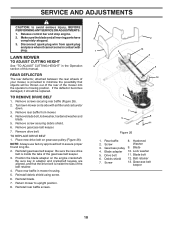
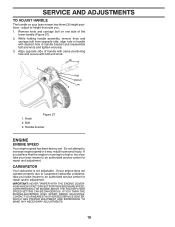
...and secure with desired hole in handle bracket and reassemble bolt and knob and tighten securely. 3. Remove knob and carriage bolt on your lawn mower has three (3) height positions - Align opposite side of the lower handle (Figure 27). 2. adjust to an authorized service center for repair... ANY NECESSARY ADJUSTMENTS. 19 Knob 2. Bolt 3. If your engine does not operate properly due to suspected carburetor problems, take your lawn mower to height that the engine is not adjustable. Do not attempt to an authorized service center for repair and/or adjustment. OVERSPEEDING THE ...
...and secure with desired hole in handle bracket and reassemble bolt and knob and tighten securely. 3. Remove knob and carriage bolt on your lawn mower has three (3) height positions - Align opposite side of the lower handle (Figure 27). 2. adjust to an authorized service center for repair... ANY NECESSARY ADJUSTMENTS. 19 Knob 2. Bolt 3. If your engine does not operate properly due to suspected carburetor problems, take your lawn mower to height that the engine is not adjustable. Do not attempt to an authorized service center for repair and/or adjustment. OVERSPEEDING THE ...
Operation Manual
Page 20
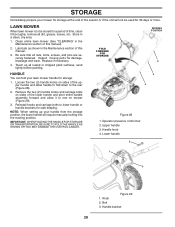
... 2. Be sure that all rusted or chipped paint surfaces; Inspect moving parts for storage. 1. Operator presence control bar 2. Touch up your lawn mower handle for damage, breakage and wear. sand lightly before painting. 1 FOLD FORWARD FOR STORAGE MOWING POSITION 2 HANDLE You can fold your handle from... TO FOLD THE HANDLE AS SHOWN OR YOU MAY DAMAGE THE CONTROL CABLES. 3 4 Figure 28 1. Knob 2. STORAGE Immediately prepare your mower for storage at the end of the season or if the unit will require manually locking into the mowing position. Handle bracket 20 Remove ...
... 2. Be sure that all rusted or chipped paint surfaces; Inspect moving parts for storage. 1. Operator presence control bar 2. Touch up your lawn mower handle for damage, breakage and wear. sand lightly before painting. 1 FOLD FORWARD FOR STORAGE MOWING POSITION 2 HANDLE You can fold your handle from... TO FOLD THE HANDLE AS SHOWN OR YOU MAY DAMAGE THE CONTROL CABLES. 3 4 Figure 28 1. Knob 2. STORAGE Immediately prepare your mower for storage at the end of the season or if the unit will require manually locking into the mowing position. Handle bracket 20 Remove ...

Operation Manual
Page 21
...fuel tank or permanent damage may reach an open flame or spark. Pull starter handle slowly a few times to rust. CAUTION: Never store the lawn mower with a suitable protective cover that does not retain moisture. CYLINDER 1. Replace with clean engine oil. (See "ENGINE" in the tank inside a ...before storing in fuel tank or storage container. ENGINE OIL Drain oil (with engine warm) and replace with new spark plug. IMPORTANT: NEVER COVER MOWER WHILE ENGINE AND EXHAUST AREAS ARE STILL WARM. Pour one season to another. • Replace your gasoline can if your unit to distribute oil...
...fuel tank or permanent damage may reach an open flame or spark. Pull starter handle slowly a few times to rust. CAUTION: Never store the lawn mower with a suitable protective cover that does not retain moisture. CYLINDER 1. Replace with clean engine oil. (See "ENGINE" in the tank inside a ...before storing in fuel tank or storage container. ENGINE OIL Drain oil (with engine warm) and replace with new spark plug. IMPORTANT: NEVER COVER MOWER WHILE ENGINE AND EXHAUST AREAS ARE STILL WARM. Pour one season to another. • Replace your gasoline can if your unit to distribute oil...

Operation Manual
Page 22
...2. Water in OFF position. 10. Control bar in engine. 6. Loss of pulley. 3. Buildup of grass, leaves and trash under mower. 1. Poor cut grass or other hard surface before pulling starter rope. 2. Bent engine crankshaft. 1. Bent engine crankshaft. 3. Cutting...filling 2. Raise cutting height. 2. Belt wear. 2. TROUBLESHOOTING POINTS PROBLEM CAUSE CORRECTION Does not start 1. Dirty air filter. 1. Out of mower housing. Empty fuel tank and refill tank with fresh, clean gasoline. 5. Bad spark plug. 6. Depress control bar to pull 1. Replace ...
...2. Water in OFF position. 10. Control bar in engine. 6. Loss of pulley. 3. Buildup of grass, leaves and trash under mower. 1. Poor cut grass or other hard surface before pulling starter rope. 2. Bent engine crankshaft. 1. Bent engine crankshaft. 3. Cutting...filling 2. Raise cutting height. 2. Belt wear. 2. TROUBLESHOOTING POINTS PROBLEM CAUSE CORRECTION Does not start 1. Dirty air filter. 1. Out of mower housing. Empty fuel tank and refill tank with fresh, clean gasoline. 5. Bad spark plug. 6. Depress control bar to pull 1. Replace ...
Operation Manual
Page 24
... to an authorized Husqvarna Servicing Dealer/Center and arrange for the deck shell only mechanical components/parts such as belts, pulleys, spindle housings, bearings, blades, rods, height adjusters, caster/anti scalp wheels are NOT covered: (a) Abrasion to mower decks, including sand wear; (b)...material or workmanship, and therefore are NOT covered. Reinforced Stamped (Armor Protected) 10 Year Limited & Fabricated Limited Lifetime, Deck Warranties. Husqvarna Professional Products, NA, Inc. 9335 Harris Corners Parkway, Suite 500, Charlotte, NC28269 575 49 43-01 W 2012 IR 24 ...
... to an authorized Husqvarna Servicing Dealer/Center and arrange for the deck shell only mechanical components/parts such as belts, pulleys, spindle housings, bearings, blades, rods, height adjusters, caster/anti scalp wheels are NOT covered: (a) Abrasion to mower decks, including sand wear; (b)...material or workmanship, and therefore are NOT covered. Reinforced Stamped (Armor Protected) 10 Year Limited & Fabricated Limited Lifetime, Deck Warranties. Husqvarna Professional Products, NA, Inc. 9335 Harris Corners Parkway, Suite 500, Charlotte, NC28269 575 49 43-01 W 2012 IR 24 ...


